HP Samsung MultiXpress SCX-6545 Laser Multifunction Printer series Owner's manual

Category
Laser/LED printers
Type
Owner's manual

This manual is also suitable for

SCX-6545N Series
Multi Functional Printer
User’s Guide
imagine the possibilities
Thank you for purchasing a Samsung product.
Samsung Printer
Software section
1
Software section
Contents
1. Installing Printer Software in Windows
Installing Printer Software ................................................................................................................................................ 5
Installing Software for Local Printing .................................................................................................................... 5
Installing Software for Network Printing ................................................................................................................ 8
Reinstalling Printer Software .......................................................................................................................................... 11
Removing Printer Software ............................................................................................................................................ 12
2. Basic Printing
Printing a Document ....................................................................................................................................................... 13
Printing to a file (PRN) ................................................................................................................................................... 14
Printer Settings ............................................................................................................................................................... 14
Basic Tab ............................................................................................................................................................ 15
Paper Tab ........................................................................................................................................................... 15
Graphics Tab ...................................................................................................................................................... 16
Advanced Tab .................................................................................................................................................... 17
Samsung Tab ..................................................................................................................................................... 17
Using a Favorite Setting ..................................................................................................................................... 17
Using Help .......................................................................................................................................................... 18
3. Advanced Printing
Printing Multiple Pages on One Sheet of Paper (N-Up Printing) .................................................................................... 19
Printing Posters .............................................................................................................................................................. 20
Printing Booklets ........................................................................................................................................................... 20
Printing on Both Sides of Paper ..................................................................................................................................... 21
Change percentage of your document ........................................................................................................................... 21
Fitting Your Document to a Selected Paper Size ........................................................................................................... 21
2
Using Watermarks .......................................................................................................................................................... 22
Using an Existing Watermark ............................................................................................................................. 22
Creating a Watermark ........................................................................................................................................ 22
Editing a Watermark ........................................................................................................................................... 22
Deleting a Watermark ......................................................................................................................................... 22
Using Overlays ............................................................................................................................................................... 23
What is an Overlay? ........................................................................................................................................... 23
Creating a New Page Overlay ............................................................................................................................ 23
Using a Page Overlay ......................................................................................................................................... 23
Deleting a Page Overlay ..................................................................................................................................... 23
4. Using Windows PostScript Driver
Printer Settings ............................................................................................................................................................... 24
Layout tab ........................................................................................................................................................... 24
Paper/Quality tab ................................................................................................................................................ 25
Using Help .......................................................................................................................................................... 25
5. Using Direct Printing Utility
Overview Direct Printing Utility ....................................................................................................................................... 26
Printing ........................................................................................................................................................................... 26
From the Direct Printing Utility window ............................................................................................................... 26
Using the shortcut icon ....................................................................................................................................... 26
Using the right-click menu .................................................................................................................................. 26
6. Sharing the Printer Locally
Setting Up a Host Computer .......................................................................................................................................... 27
Setting Up a Client Computer ......................................................................................................................................... 27
7. Scanning
Using Samsung Easy Document Creator ....................................................................................................................... 28
Understanding Samsung Easy Document Creator ............................................................................................. 28
Using features .................................................................................................................................................... 30
Plug-ins ............................................................................................................................................................... 31
Scanning Process with TWAIN-enabled Software ......................................................................................................... 31
3
Scanning Using the WIA Driver ...................................................................................................................................... 31
Windows XP/Server 2003 ................................................................................................................................... 31
Windows Vista .................................................................................................................................................... 32
Windows 7 .......................................................................................................................................................... 32
8. Using Smart Panel
Understanding Smart Panel ........................................................................................................................................... 33
Opening the Troubleshooting Guide .............................................................................................................................. 34
Changing the Smart Panel Program Settings ................................................................................................................ 34
9. Using Your Printer in Linux
Getting Started ............................................................................................................................................................... 35
Installing the Unified Linux Driver ................................................................................................................................... 35
Installing the Unified Linux Driver ....................................................................................................................... 35
Uninstalling the Unified Linux Driver ................................................................................................................... 36
Using the Unified Driver Configurator ............................................................................................................................. 37
Opening the Unified Driver Configurator ............................................................................................................ 37
Printers Configuration ......................................................................................................................................... 37
Scanners Configuration ...................................................................................................................................... 38
Ports Configuration ............................................................................................................................................. 38
Configuring Printer Properties ........................................................................................................................................ 39
Printing a Document ....................................................................................................................................................... 39
Printing from Applications ................................................................................................................................... 39
Printing Files ....................................................................................................................................................... 40
Scanning a Document .................................................................................................................................................... 40
Using the Image Manager .................................................................................................................................. 41
10. Using Your Printer with a Macintosh
Installing Software .......................................................................................................................................................... 43
Installing the printer software .............................................................................................................................. 43
Uninstalling the printer software ......................................................................................................................... 43
Setting Up the Printer ..................................................................................................................................................... 44
For a Network-connected ................................................................................................................................... 44
For a USB-connected ......................................................................................................................................... 45
4
Printing ........................................................................................................................................................................... 46
Printing a Document ........................................................................................................................................... 46
Changing Printer Settings ................................................................................................................................... 46
Printer Features .................................................................................................................................................. 48
Printing Multiple Pages on One Sheet of Paper ................................................................................................. 49
Printing on both sides of paper ........................................................................................................................... 49
Scanning ........................................................................................................................................................................ 50
Scanning with USB ............................................................................................................................................. 50
Scanning with network ........................................................................................................................................ 50
Installing Printer Software in Windows
5
1 Installing Printer Software in
Windows
This chapter includes:
Installing Printer Software
Reinstalling Printer Software
Removing Printer Software
N
OTE
:
The following procedure is based on Windows XP, for other
operating systems, refer to the corresponding Windows user's guide or
online help.
Installing Printer Software
You can install the printer software for local printing or network printing.
To install the printer software on the computer, perform the appropriate
installation procedure depending on the printer in use.
A printer driver is software that lets your computer communicate with
your printer. The procedure to install drivers may differ depending on the
operating system you are using.
All applications should be closed on your PC before beginning
installation.
Installing Software for Local Printing
A local printer is a printer directly attached to your computer using the
printer cable supplied with your printer, such as a USB or parallel cable.
If your printer is attached to a network, skip this step and go to “Installing
Software for Network Printing” on page 8.
You can install the printer software using the typical or custom method.
NOTE
: If the “New Hardware Wizard” window appears during the
installation procedure, click in the upper right corner of the box to
close the window, or click
Cancel
.
Typical Installation
This is recommended for most users. All components necessary for
printer operations will be installed.
1
Make sure that the printer is connected to your computer and
powered on.
2
Insert the supplied CD-ROM into your CD-ROM drive.
The CD-ROM should automatically run, and an installation window
appears.
If the installation window does not appear, click
Start
and then
Run
. Type
X:\
Setup.exe
, replacing “
X
” with the letter which
represents your drive and click
OK
.
If you use Windows vista, Windows 7 and Windows Server 2008
R2, click
Start
All programs
Accessories
Run
, and type
X:\
Setup.exe
.
If the
AutoPlay
window appears in Windows vista, Windows 7 and
Windows Server 2008 R2, click
Run
Setup.exe
in
Install or run
program
field, and click
Continue
in the
User Account Control
window.
3
Click
Next
.
If necessary, select a language from the drop-down list.
4
Select
Typical installation for a local printer
. Click
Next
.
Installing Printer Software in Windows
6
NOTE
: If your printer is not already connected to the computer, the
following window will appear.
After connecting the printer, click
Next
.
If you don’t want to connect the printer at this time, click
Next
, and
No
on the following screen. Then the installation will start and a test page
will not be printed at the end of the installation.
The installation window that appears in this Users Guide may
differ depending on the printer and interface in use.
5
After the installation is finished, a window asking you to print a test
page appears. If you choose to print a test page, select the
checkbox and click
Next
.
Otherwise, just click
Next
and skip to step 7.
6
If the test page prints out correctly, click
Yes
.
If not, click
No
to reprint it.
7
To register yourself as a user of Samsung Printers in order to
receive information from Samsung, select the checkbox and click
Finish
. You are now sent to the Samsung web site.
Otherwise, just click
Finish
.
NOTE
: After setup is complete, if your printer driver doesn’t work
properly, reinstall the printer driver. See “Reinstalling Printer Software”
on page 11.
Custom Installation
You can choose individual components to install.
1
Make sure that the printer is connected to your computer and
powered on.
2
Insert the supplied CD-ROM into your CD-ROM drive.
The CD-ROM should automatically run, and an installation window
appears.
If the installation window does not appear, click
Start
and then
Run
. Type
X:\
Setup.exe
, replacing “
X
” with the letter which
represents your drive and click
OK
.
If you use Windows vista, Windows 7 and Windows Server 2008
R2, click
Start
All programs
Accessories
Run
, and type
X:\
Setup.exe
.
If the
AutoPlay
window appears in Windows vista, Windows 7 and
Windows Server 2008 R2, click
Run
Setup.exe
in
Install or run
program
field, and click
Continue
in the
User Account Control
window.
3
Click
Next
.
If necessary, select a language from the drop-down list.
Installing Printer Software in Windows
7
4
Select
Custom installation
. Click
Next
.
5
Select your printer and click
Next
.
NOTE
: If your printer is not already connected to the computer, the
following window will appear.
After connecting the printer, click
Next
.
If you don’t want to connect the printer at this time, click
Next
, and
No
on the following screen. Then the installation will start and a test page
will not be printed at the end of the installation.
The installation window that appears in this User’s Guide may
differ depending on the printer and interface in use.
6
Select the components to be installed and click
Next
.
NOTE
: You can change the desired installation folder by clicking
[
Browse
].
7
After the installation is finished, a window asking you to print a test
page appears. If you choose to print a test page, select the
checkbox and click
Next
.
Otherwise, just click
Next
and skip to step 9.
8
If the test page prints out correctly, click
Yes
.
If not, click
No
to reprint it.
9
To register yourself as a user of Samsung Printers in order to
receive information from Samsung, select the checkbox and click
Finish
. You are now sent to the Samsung web site.
Otherwise, just click
Finish
.
Installing Printer Software in Windows
8
Installing Software for Network Printing
When you connect your printer to a network, you must first configure the
TCP/IP settings for the printer. After you have assigned and verified the
TCP/IP settings, you are ready to install the software on each computer
on the network.
You can install the printer software using the typical or custom method.
Typical Installation
This is recommended for most users. All components necessary for
printer operations will be installed.
1
Make sure that the printer is connected to your network and
powered on. For details about connecting to the network, see the
supplied printers Users Guide.
2
Insert the supplied CD-ROM into your CD-ROM drive.
The CD-ROM should automatically run, and an installation window
appears.
If the installation window does not appear, click
Start
and then
Run
. Type
X:\
Setup.exe
, replacing “
X
” with the letter which
represents your drive and click
OK
.
If you use Windows vista, Windows 7 and Windows Server 2008
R2, click
Start
All programs
Accessories
Run
, and type
X:\
Setup.exe
.
If the
AutoPlay
window appears in Windows vista, Windows 7 and
Windows Server 2008 R2, click
Run
Setup.exe
in
Install or run
program
field, and click
Continue
in the
User Account Control
window.
3
Click
Next
.
If necessary, select a language from the drop-down list.
4
Select
Typical installation for a network printer
. Click
Next
.
5
The list of printers available on the network appears. Select the
printer you want to install from the list and then click
Next
.
•If you do not see your printer on the list, click
Update
to refresh
the list, or select
Add TCP/IP Port
to add your printer to the
network. To add the printer to the network, enter the port name
and the IP address for the printer.
To verify your printers IP address or the MAC address, print a
Network Configuration page.
•To find a shared network printer (UNC Path), select
Shared
Printer [UNC]
and enter the shared name manually or find a
shared printer by clicking the
Browse
button.
NOTE
: If you cannot find your machine in network, please turn off the
firewall and click
Update
.
For Windows operating system, click
Start
Control Panel
and start
windows firewall, and set this option unactivated. For other operating
system, refer to its on-line guide.
Installing Printer Software in Windows
9
6
After the installation is finished, a window appears asking you to
print a test page and to register yourself as a user of Samsung
Printers in order to receive information from Samsung. If you so
desire, select the corresponding checkbox(es) and click
Finish
.
Otherwise, just click
Finish
.
NOTE
: After setup is complete, if your printer driver doesn’t work
properly, reinstall the printer driver. See “Reinstalling Printer Software”
on page 11.
Custom Installation
You can choose individual components to install and set a specific IP
address.
1
Make sure that the printer is connected to your network and
powered on. For details about connecting to the network, see the
supplied printers Users Guide.
2
Insert the supplied CD-ROM into your CD-ROM drive.
The CD-ROM should automatically run, and an installation window
appears.
If the installation window does not appear, click
Start
and then
Run
. Type
X:\
Setup.exe
, replacing “
X
” with the letter which
represents your drive and click
OK
.
If you use Windows vista, Windows 7 and Windows Server 2008
R2, click
Start
All programs
Accessories
Run
, and type
X:\
Setup.exe
.
If the
AutoPlay
window appears in Windows vista, Windows 7 and
Windows Server 2008 R2, click
Run
Setup.exe
in
Install or run
program
field, and click
Continue
in the
User Account Control
window.
3
Click
Next
.
If necessary, select a language from the drop-down list.
4
Select
Custom installation
. Click
Next
.
5
The list of printers available on the network appears. Select the
printer you want to install from the list and then click
Next
.
•If you do not see your printer on the list, click
Update
to refresh
the list, or select
Add TCP/IP Port
to add your printer to the
network. To add the printer to the network, enter the port name
and the IP address for the printer.
Installing Printer Software in Windows
10
To verify your printers IP address or the MAC address, print a
Network Configuration page.
•To find a shared network printer (UNC Path), select
Shared
Printer [UNC]
and enter the shared name manually or find a
shared printer by clicking the
Browse
button.
NOTE
: If you cannot find your machine in network, please turn off the
firewall and click
Update
.
For Windows operating system, click
Start
Control Panel
and start
windows firewall, and set this option unactivated. For other operating
system, refer to its on-line guide.
TIP
: If you want to set a specific IP address on a specific network
printer, click the
Set IP Address
button. The Set IP Address window
appears. Do as follows:
a. Select a printer to be set with a specific IP address from the list.
b. Configure an IP address, subnet mask, and gateway for the printer
manually and click
Configure
to set the specific IP address for the
network printer.
Click
Next
.
6
Select the components to be installed and click
Next
.
NOTE
: You can change the desired installation folder by clicking
[
Browse
].
7
Select the components to be installed. After selecting the
components, the following window appears. You can also change
the printer name, set the printer to be shared on the network, set
the printer as the default printer, and change the port name of each
printer. Click
Next
.
To install this software on a server, select the
Setting up this
printer on a server
checkbox.
8
After the installation is finished, a window appears asking you to
print a test page and to register yourself as a user of Samsung
Printers in order to receive information from Samsung. If you so
desire, select the corresponding checkbox(es) and click
Finish
.
Otherwise, just click
Finish
.
NOTE
: After setup is complete, if your printer driver doesn’t work
properly, reinstall the printer driver. See “Reinstalling Printer Software”
on page 11.
Installing Printer Software in Windows
11
Reinstalling Printer Software
You can reinstall the software if installation fails.
1
Start Windows.
2
From the
Start
menu select
Programs
or
All Programs
your
printer driver name
Maintenance
.
3
Select
Repair
and click
Next
.
4
The list of printers available on the network appears. Select the
printer you want to install from the list and then click
Next
.
•If you do not see your printer on the list, click
Update
to refresh
the list, or select
Add TCP/IP Port
to add your printer to the
network. To add the printer to the network, enter the port name
and the IP address for the printer.
•To find a shared network printer (UNC Path), select
Shared
Printer [UNC]
and enter the shared name manually or find a
shared printer by clicking the
Browse
button.
You will see a component list so that you can reinstall any item
individually.
NOTE
: If your printer is not already connected to the computer, the
following window will appear.
After connecting the printer, click
Next
.
If you don’t want to connect the printer at this time, click
Next
, and
No
on the following screen. Then the installation will start and a test page
will not be printed at the end of the installation.
The reinstallation window that appears in this User’s Guide may
differ depending on the printer and interface in use.
5
Select the components you want to reinstall and click
Next
.
If you installed the printer software for local printing and
you
select
your printer driver name
, the window asking you to print a
test page appears. Do as follows:
a. To print a test page, select the check box and click
Next
.
b. If the test page prints out correctly, click
Yes
.
If it doesn’t, click
No
to reprint it.
6
When the reinstallation is done, click
Finish
.
Installing Printer Software in Windows
12
Removing Printer Software
1
Start Windows.
2
From the
Start
menu select
Programs
or
All Programs
your
printer driver name
Maintenance
.
3
Select
Remove
and click
Next
.
You will see a component list so that you can remove any item
individually.
4
Select the components you want to remove and then click
Next
.
5
When your computer asks you to confirm your selection, click
Yes
.
The selected driver and all of its components are removed from
your computer.
6
After the software is removed, click
Finish
.
Basic Printing
13
2 Basic Printing
This chapter explains the printing options and common printing tasks in
Windows.
This chapter includes:
Printing a Document
Printing to a file (PRN)
Printer Settings
- Basic Tab
- Paper Tab
- Graphics Tab
- Advanced Tab
- Samsung Tab
- Using a Favorite Setting
- Using Help
Printing a Document
N
OTES
:
Your printer driver
Properties
window that appears in this Users
Guide may differ depending on the printer in use. However the
composition of the printer properties window is similar.
Check the Operating System(s) that are compatible with your
printer. Please refer to the OS Compatibility section of Printer
Specifications in your Printer User’s Guide.
If you need to know the exact name of your printer, you can check the
supplied CD-ROM.
When you select an option in printer properties, you may see an
exclamationmark or mark. An exclamation mark means you
can select that certain option but it is not recommended, and
mark means you cannot select that option due to the machine’s
setting or environment.
The following procedure describes the general steps required for printing
from various Windows applications. The exact steps for printing a
document may vary depending on the application program you are
using. Refer to the Users Guide of your software application for the
exact printing procedure.
1
Open the document you want to print.
2
Select
Print
from the
File
menu. The Print window is displayed. It
may look slightly different depending on your application.
The basic print settings are selected within the Print window. These
settings include the number of copies and print range.
3
Select your machine from the
Select Printer
list.
The basic print settings including the number of copies and print
range are selected within the
Print
window.
To take advantage of the printer features provided by your printer
driver, click
Properties
or
Preferences
in the application’s Print
window. For details, see “Printer Settings” on page 14.
4
To start the print job, click
OK
or
Print
in the Print window.
N
OTE
: If you are using Windows Internet Explorer, the
AnyWeb Print
too will save your time for screen-captured images or printing the
image. Click
Start
>
All programs
>
your printer driver name
>
AnyWeb Print
to link the website where the tool is available for the
download.
Make sure that your
printer is selected.
Basic Printing
14
Printing to a file (PRN)
You will sometimes need to save the print data as a file for your purpose.
To create a file:
1
Check the
Print to file
box at the
Print
window.
2
Select the folder and assign a name of the file and then click
OK
.
Printer Settings
You can use the printer properties window, which allows you to access
all of the printer options you need when using your printer. When the
printer properties are displayed, you can review and change the settings
needed for your print job.
Your printer properties window may differ, depending on your operating
system. This Software Users Guide shows the Properties window for
Windows XP.
Your printer driver
Properties
window that appears in this User’s Guide
may differ depending on the printer in use.
If you access printer properties through the Printers folder, you can view
additional Windows-based tabs (refer to your Windows User’s Guide).
N
OTES
:
Most Windows applications will override settings you specify in the
printer driver. Change all print settings available in the software
application first, and change any remaining settings using the printer
driver.
The settings you change remain in effect only while you are using the
current program.
To make your changes permanent
, make them in
the Printers folder.
The following procedure is for Windows XP. For other Windows OS,
refer to the corresponding Windows User's Guide or online help.
1. Click the Windows
Start
button.
2. Select Printers and Faxes.
3. Select your printer driver icon.
4. Right-click on the printer driver icon and select
Printing Preferences.
5. Change the settings on each tab, click OK.
Basic Printing
15
Basic Tab
Use
Basic
tab to adjust how the document appear on the printed page.
Click the
Basic
tab to display the options shown below.
Orientation
This option allows you to select the direction in which information is
printed on a page.
Portrait: This option prints across the width of the page, letter
style.
Landscape: This option prints across the length of the page,
spreadsheet style.
Rotate 180 Degrees: This option allows you to rotate the page,
180 degrees.
Quality
The available Quality options may vary depending on your
machine. The higher the setting, the sharper the clarity of printed
characters and graphics. The higher setting may also increase the
printing time of a document.
Layout Options
This option allows you to select various ways to layout your
document.
Single Page Per Side: This option is a basic layout option. This
option allows you to print a page on one side of a paper.
Multiple Pages Per Side: This option allows you to print several
pages on one side of a paper. (See “Printing Multiple Pages on
One Sheet of Paper (N-Up Printing)” on page 19.)
?
Landscape
?
Portrait
Poster Printing: This option allows you to print your document
into a poster-size document. This option prints your document into
several pages. Paste printed pages together to form one poster-
size document. (See “Printing Posters” on page 20)
Booklet Printing: This option allows you to print your document
on both sides of the paper to make into a booklet. (See “Printing
Booklets” on page 20.)
Double-Sided Printing
This option allows you to print on both sides of paper. (See “Printing
on Both Sides of Paper” on page 21.)
Paper Tab
Use the
Paper
tab options to set the basic paper handling specifications
.
Click the
Paper
tab to display the options shown below.
Copies
This option allows you to choose the number of copies to be printed.
You can select 1 to 999 copies.
Paper Options
This option allows you to choose paper tray you want to use.
N
OTE
: When printing on an envelope, select the
Envelope
tab to set
the options.
Size: This option allows you to set the size of paper to be loaded
in the tray. This setting appears in the list, so that you can select it.
Source: Make sure that Source is set to the corresponding paper
tray. Use MP Tray when printing on special materials, such as
envelopes and transparencies.
Type: This option allows you to set the type of paper to be loaded
in the tray. This setting appears in the list, so that you can select it.
This will let you get the best quality printout. If not, the desired
print quality may not be achieved.
Basic Printing
16
- Plain: Normal plain paper. Select this type if your machine is
monochrome and printing on the 60 g./m
2
(16 lb) cotton paper.
- Thick: 90 to 105 g/m
2
(24 to 28 lb) thick paper.
- Thin: 60 to 70 g/m
2
(16 to 19 lb) thin paper.
- Cotton: 75 to 90 g/m
2
(20 to 24 lb) cotton paper such as Gilbert
25 % and Gilbert 100 %.
- Color: 75 to 90 g/m
2
(20 to 24 lb) color-backgrounded paper.
- Preprinted: 75 to 90 g/m
2
(20 to 24 lb) preprinted paper.
- Recycled: 75 to 90 g/m
2
(20 to 24 lb) recycled paper.
- Envelope: 75 to 90 g/m
2
(20 to 24 lb) envelope.
- Transparency: 138 to 146 g/m
2
(37 to 39 lb) transparency
paper.
- Labels: 120 to 150 g/m
2
(32 to 40 lb) label.
- CardStock: 90 to 163 g/m
2
(24 to 43 lb) cardstock.
- Bond: 105 to 120 g/m
2
(28 to 32 lb) bond.
- Archive: 70 to 90 g/m
2
(19 to 24 lb) If you need to keep the
print-out for a long period time, such as archives, select this
option.
Advanced: This option allows you to print the first page using a
different paper type from the rest of the document by choosing the
tray to use for printing the first page. For example, if you want to
print the first page using color paper, load color paper into the MP
Tray, and plain paper into Tray 1. Then, select Tray 1. in the
Source option and MP Tray in this
Advanced
option.
N
OTE
:
If you click Reset, settings i
n the
Advanced
optio
n returns to
the default setting.
Scaling Options
This option allows you to automatically or manually scale your print
job on a page. This option can be grayed out according to the
Layout Options setting in the Basic tab.
Fit to Page: This option allows you to scale your print job to any
selected paper size regardless of the document size. (See “Fitting
Your Document to a Selected Paper Sizeon page 21.)
Percentage: This option allows you to change the size of a page’s
contents to appear larger or smaller on the printed page by typing
in a percentage you want. (See “Change percentage of your
document” on page 21.)
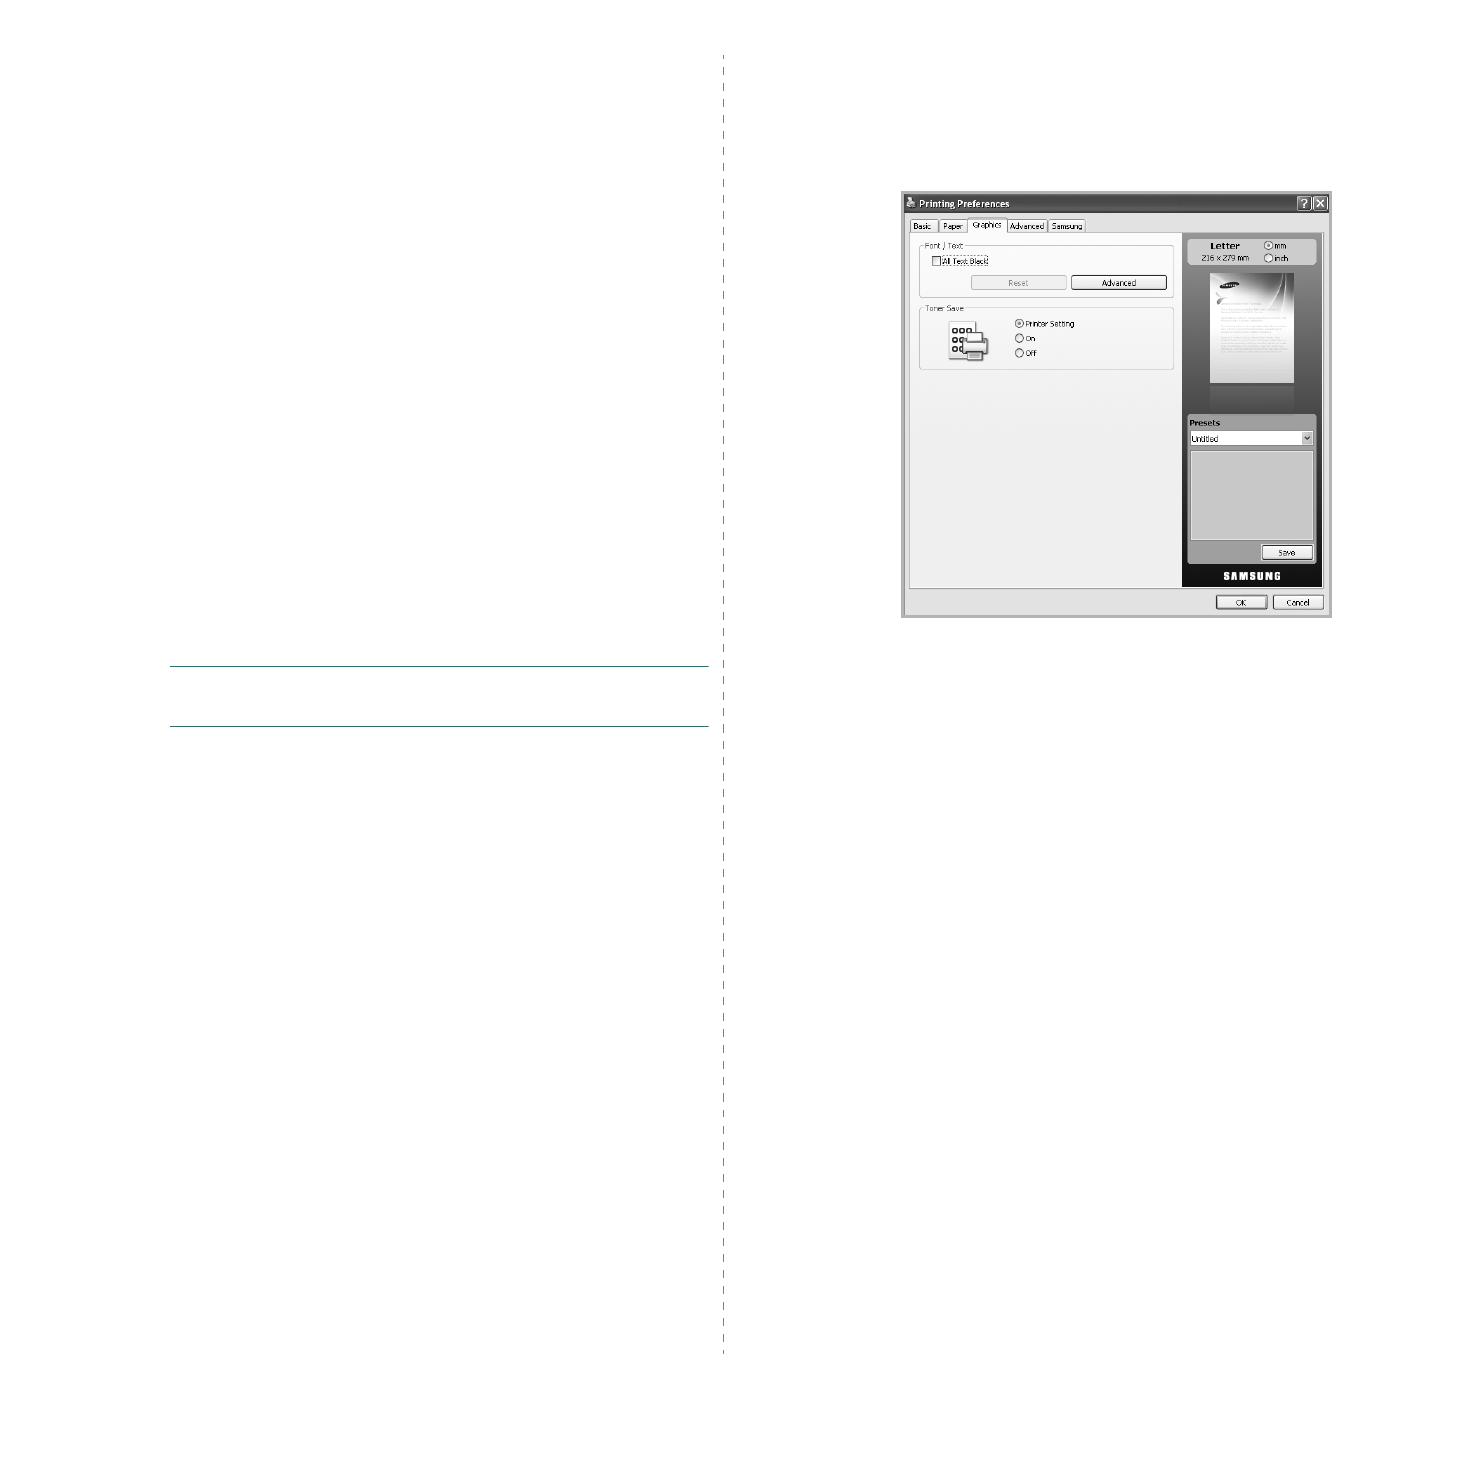
Graphics Tab
Use the
Graphics
tab options to adjust the print quality for your specific
printing needs.
Click the
Graphics
tab to display the options shown below.
Font/Text
Check All Text Black box to print all the texts in your document in
solid black, regardless of the color it appears on the screen.
Advanced
Download as Outline: This option allows the driver to download
any TrueType fonts that are used in your document not stored
(resident) on your machine. If, after printing a document, you find
that the fonts did not print correctly, choose Download as Bit
Image and resubmit your print job. This feature is available only
when you use the PCL printer driver.
Download as Bit Image: This option allows the driver to
download the font data as bitmap images. Documents with
complicated fonts, such as Korean or Chinese, or various other
fonts, will print faster in this setting. Download as Bit Image is
useful when printing from Adobe programs.
Print as Graphics: This option allows the driver to download any
fonts as graphics. When printing documents with high graphic
content and relatively few TrueType fonts, printing performance
(speed) may be enhanced in this setting.
Use Printer Fonts: When Use Printer Fonts is checked, the
printer uses the fonts that are stored in its memory (resident fonts)
to print your document, rather than downloading the fonts used in
your document. Because downloading fonts takes time, selecting
this option can speed up your printing time. When using Printer
fonts, the printer will try to match the fonts used in your document
to those stored in its memory. If, however, you use fonts in your
document that are very different from those resident in the printer,
your printed output will appear very different from what it looks like
on the screen.
Basic Printing
17
N
OTE
:
If you click Reset, settings i
n the
Advanced
optio
n returns to
the default setting.
Toner Save
This option allows you to extend the life of your toner cartridge and
reduces the cost per page without a significant reduction in print
quality.
On: This option to allows the printer to use less toner on each
page.
Off: If you do not need to save toner when printing a document,
select this option.
Advanced Tab
Use the
Advanced
tab to set various printing options.
Click the
Advanced
tab to display the options shown below.
Watermark
This option allows you to print text over an existing document. (See
“Using Watermarks” on page 22.)
Overlay
Overlays are often used to take the place of letterhead paper. (See
“Using Overlays” on page 23.)
Output options
This options allows you to set the sequence in which the pages will
print. Select the print order from the drop-down list.
Normal: This option allows you to print all pages from the first
page to the last page.
Reverse All Pages: This option allows you to print all pages from
the last page to the first page.
Print Odd Pages: This option allows you to print only the odd
numbered pages of the document.
Print Even Pages: This option allows you to print only the even
numbered pages of the document.
Advanced: This option allows you to set advanced output options
for printing, such as printing an information page, and saving as a
form to later use as an overlay.
Staple: Do the stapling on the printouts.
Request Offset: If you want the printouts to be sorted the same
way as the original, the machine places printout sets slightly offset
from one another.
N
OTE
: If you click
Reset
, settings in the
Advanced
option returns to
the default setting.
Job Settings
This option allows you to choose how to print or save the printing file
by using the HDD.
Print Mode: The default Print Mode is Normal which is for
printing without saving the printing file in the HDD.
User ID: This option is used when you need to find a saved file
using the control panel.
Job Name: This option is used when you need to find a saved file
using the control panel.
Samsung Tab
Use the
Samsung
tab to display the copyright and the version number
of the driver. If your computer is connected to the Internet, you can have
access to following services:
Click the
Samsung
tab to display the options.
Help
This option allows you to open the Help file by searching a keyword.
Service
Buy Supplies: This option allows you to order supplies on-line.
Samsung Website: This option directly connects you to
Samsung Website.
Registration: This option allows you to register your machine.
Check for updates: This option allows you to download updates
for your printer driver.
Using a Favorite Setting
The
Presets
option, which is visible on each preferences tab except for
Samsung
tab, allows you to save the current preferences settings for
future use.
To save a
Presets
item:
1
Change the settings as needed on each tab.
Basic Printing
18
2
Enter a name for the item in the
Presets
input box.
3
Click
Save
. When you save
Presets
, all current driver settings are
saved.
To use a saved setting, select it from the
Presets
drop down list. The
machine is now set to print according to the setting you selected.
To delete saved setting, select it from the
Presets
drop down list and
click
Delete
.
You can also restore the printer driver’s default settings by selecting
Printer Default
from the
Presets
drop down list.
Using Help
Click from the upper-right corner of the window, and then click on any
option. The help screen gives detailed information about the printing
features provided by the printer driver.
  • Page 1 1
  • Page 2 2
  • Page 3 3
  • Page 4 4
  • Page 5 5
  • Page 6 6
  • Page 7 7
  • Page 8 8
  • Page 9 9
  • Page 10 10
  • Page 11 11
  • Page 12 12
  • Page 13 13
  • Page 14 14
  • Page 15 15
  • Page 16 16
  • Page 17 17
  • Page 18 18
  • Page 19 19
  • Page 20 20
  • Page 21 21
  • Page 22 22
  • Page 23 23
  • Page 24 24
  • Page 25 25
  • Page 26 26
  • Page 27 27
  • Page 28 28
  • Page 29 29
  • Page 30 30
  • Page 31 31
  • Page 32 32
  • Page 33 33
  • Page 34 34
  • Page 35 35
  • Page 36 36
  • Page 37 37
  • Page 38 38
  • Page 39 39
  • Page 40 40
  • Page 41 41
  • Page 42 42
  • Page 43 43
  • Page 44 44
  • Page 45 45
  • Page 46 46
  • Page 47 47
  • Page 48 48
  • Page 49 49
  • Page 50 50
  • Page 51 51
  • Page 52 52
  • Page 53 53
  • Page 54 54
  • Page 55 55
  • Page 56 56
  • Page 57 57
  • Page 58 58
  • Page 59 59
  • Page 60 60
  • Page 61 61
  • Page 62 62
  • Page 63 63
  • Page 64 64
  • Page 65 65
  • Page 66 66
  • Page 67 67
  • Page 68 68
  • Page 69 69
  • Page 70 70
  • Page 71 71
  • Page 72 72
  • Page 73 73
  • Page 74 74
  • Page 75 75
  • Page 76 76
  • Page 77 77
  • Page 78 78
  • Page 79 79
  • Page 80 80
  • Page 81 81
  • Page 82 82
  • Page 83 83
  • Page 84 84
  • Page 85 85
  • Page 86 86
  • Page 87 87
  • Page 88 88
  • Page 89 89
  • Page 90 90
  • Page 91 91
  • Page 92 92
  • Page 93 93
  • Page 94 94
  • Page 95 95
  • Page 96 96
  • Page 97 97
  • Page 98 98
  • Page 99 99
  • Page 100 100
  • Page 101 101
  • Page 102 102
  • Page 103 103
  • Page 104 104
  • Page 105 105
  • Page 106 106
  • Page 107 107
  • Page 108 108
  • Page 109 109
  • Page 110 110
  • Page 111 111
  • Page 112 112
  • Page 113 113
  • Page 114 114
  • Page 115 115
  • Page 116 116
  • Page 117 117
  • Page 118 118
  • Page 119 119
  • Page 120 120
  • Page 121 121
  • Page 122 122
  • Page 123 123
  • Page 124 124
  • Page 125 125
  • Page 126 126
  • Page 127 127
  • Page 128 128
  • Page 129 129
  • Page 130 130
  • Page 131 131
  • Page 132 132
  • Page 133 133
  • Page 134 134
  • Page 135 135
  • Page 136 136
  • Page 137 137
  • Page 138 138
  • Page 139 139
  • Page 140 140
  • Page 141 141
  • Page 142 142
  • Page 143 143
  • Page 144 144
  • Page 145 145
  • Page 146 146
  • Page 147 147
  • Page 148 148
  • Page 149 149
  • Page 150 150
  • Page 151 151
  • Page 152 152
  • Page 153 153
  • Page 154 154
  • Page 155 155
  • Page 156 156
  • Page 157 157
  • Page 158 158
  • Page 159 159
  • Page 160 160
  • Page 161 161
  • Page 162 162
  • Page 163 163
  • Page 164 164
  • Page 165 165
  • Page 166 166
  • Page 167 167
  • Page 168 168
  • Page 169 169
  • Page 170 170
  • Page 171 171
  • Page 172 172
  • Page 173 173
  • Page 174 174
  • Page 175 175
  • Page 176 176
  • Page 177 177
  • Page 178 178
  • Page 179 179
  • Page 180 180
  • Page 181 181
  • Page 182 182
  • Page 183 183
  • Page 184 184
  • Page 185 185
  • Page 186 186
  • Page 187 187
  • Page 188 188
  • Page 189 189
  • Page 190 190

HP Samsung MultiXpress SCX-6545 Laser Multifunction Printer series Owner's manual

Category
Laser/LED printers
Type
Owner's manual
This manual is also suitable for

Ask a question and I''ll find the answer in the document

Finding information in a document is now easier with AI