Sony KDL-22PX300 User manual

Category
DVD players
Type
User manual

This manual is also suitable for

2
Table of contents
Preparation
Part names......................................................................................3
Connecting digital audio equipment .............................................. 5
Connecting the controller............................................................... 5
Turning the built-in PlayStation
TM2 on and off ............................. 6
Games
Playing a game ............................................................................... 7
Using Memory Cards................................................................... 10
Audio CDs
Playing an audio CD .................................................................... 12
DVDs
Watching a DVD.......................................................................... 14
Using the playback modes ...........................................................18
Adjusting DVD player settings.................................................... 20
Main menu
Displaying the main menu ........................................................... 27
Using the Browser screen ............................................................ 27
Using the System Configuration menu........................................ 28
Using the Version Information screen ......................................... 31
Networking
Connecting to a network...............................................................34
Creating network settings .............................................................36
Table of contents
3
Part names
Preparation
GB
Preparation
Part names
Built-in PlayStationTM2 front
Connect to Description
1 MEMORY CARD slot
1/2
Insert a memory card ( page 11).
2 Controller port 1/2
Insert the Analog Controller (DUALSHOCK®2)
into a controller port of the PlayStation
TM2
(page5).
OPEN
3 USB connector
You can connect various USB devices to the built-in
PlayStation
TM2, but not all are compatible. Refer to
the instructions supplied with the USB device for
more information.
Hint
You cannot play photo, music, video files using the
PlayStation's USB connector.
4 Disc cover
Press the OPEN button, and the cover slides open.
5 OPEN button
Press to open the disc cover.
6 "/1 (on/standby)/
RESET button
Press to turn on the built-in PlayStationTM2, to enter
standby mode, or to reset.
RESET: Press once.
Standby: Press for more than one second.
7 "/1 (on/standby)
indicator
Lights up in green when the built-in PlayStationTM2
is on.
Lights up in red when the built-in PlayStation
TM2 is
in standby mode.
Connect to Description
4
Part names
Built-in PlayStationTM2 rear
Connect to Description
1 LAN
You can enjoy online games by connecting the
PlayStation
TM2 to a broadband network
( page 34).
Hint
To enjoy "BRAVIA" home network features,
connect to LAN of the TV using an Ethernet cable
( page 34).
1 2
2 DIGITAL AUDIO OUT
(OPTICAL)
You can listen to the built-in PlayStationTM2 sound
on a Home theatre system connected via digital
input.
Connect to Description
5
Connecting digital audio equipment
Preparation
GB
By using a commercially available optical digital cable, you can enjoy
surround sound with the effect of being in a movie theatre or a concert hall.
When connecting the built-in PlayStationTM2 to audio equipment with
digital connectors, refer to the instructions supplied with the device to be
connected.
Hints
If you connect the built-in PlayStationTM2 to audio equipment using an optical
digital cable, it may affect the audio output of some PlayStation
TM2 format
software with the result that no sound is produced. If this happens, use a cable such
as the Audio cable (not supplied) and connect it to the TV's AUDIO OUT. Do not
use an optical digital cable.
After connecting digital audio equipment, set "Digital Out (Optical)" to "On" in the
System Configuration menu. For details, see "Digital Out (Optical)" ( page 29).
The DIGITAL AUDIO OUT (OPTICAL) connection outputs digital audio from
the built-in PlayStation
TM2.
1 Insert the Analog Controller (DUALSHOCK®2) into a controller
port of the built-in PlayStation
TM2.
Hint
Some software titles designate a specific controller port to be used. Refer to the
instructions supplied with the software for details.
Connecting digital audio
equipment
OPTICAL
DIGITAL IN
Built-in PlayStationTM2 rear
Connected device
Commercially available optical
digital cable
Connecting the controller
Built-in PlayStationTM2 front
Analog Controller
(DUALSHOCK
®2)
6
Turning the built-in PlayStationTM2 on and off
1 Press PlayStation 2 POWER ON on the TV's remote to turn on
the TV and the PlayStation
TM2. (The TV input mode is
automatically switched to PlayStationTM2.)
Hints
When you turn the TV off, the PlayStationTM2 is also turned off. In addition, when
functions below are activated, the PlayStation
TM2 will also be turned off in
conjunction with the TV.
Idle TV Standby
Sleep Timer
PC Power Management
Reminder
–On Timer
–Picture Frame
Do not access the memory card when a warning message (such as, "the TV will
soon turn off...") appears.
Turning the built-in
PlayStation
TM2 on and off
7
Playing a game
Games
GB
Check that the connections to the TV and audio equipment are correct and
that the precautions have been met.
"Connecting the controller" ( page 5)
Hint
To play online games, you first need to connect to and set up a network. See
"Connecting to a network" ( page 34) for details.
1 Press the OPEN button to release the disc cover lock.
2 Slide the disc cover to the left, then place the disc with the
label side facing up.
3 Close the disc cover by sliding it to the right until it is locked.
Hints
Be sure to lock the disc cover to play a disc.
You can also start a game from the Browser screen ( page 27).
If you turn on the built-in PlayStation
TM2 after inserting a disc, the game will start
automatically.
Games
Playing a game
OPEN
Before playing a game Starting a game
8
Playing a game
To reset a game
Press the \/1 (on/standby)/RESET button on the built-in PlayStationTM2
front. Do not accidentally press the @/1/RESET button while playing a
game, as doing so will cause the game to reset.
To end a game
Press the "/1 (on/standby)/RESET button on the built-in PlayStationTM2
front after saving game data, and then remove the disc ( page 3).
RESET: Press once.
Standby: Press for more than one second.
The Analog Controller (DUALSHOCK
®2) is equipped with a pressure-
sensitive button function. It also has a vibration function.
Part names
Using the Analog Controller (DUALSHOCK®2)
Button/Switch Description
1 L2 button
2 L1 button
3 SELECT button
4 Directional buttons
9
Playing a game
Games
GB
Hints
Depending on the software, the buttons for use in analogue mode may be limited.
Refer to the instructions supplied with the software for details.
The vibration function can be set to on or off in the software options menu.
Depending on the software, the vibration function may be set to on automatically.
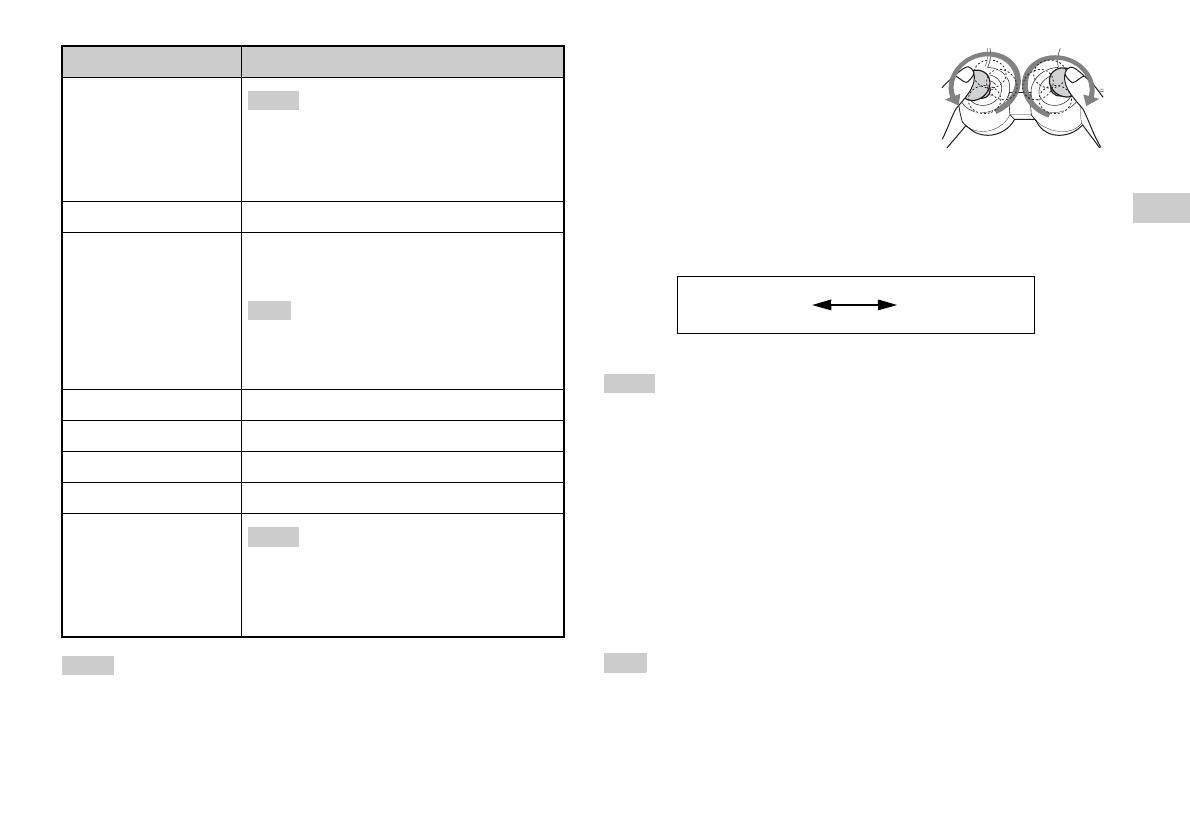
Before using the Analog Controller
(DUALSHOCK
®2), with the built-in
PlayStation
TM2 turned on, rotate the left and right
analog sticks once with your thumbs. Do not twist
the analog sticks, but rotate as if drawing a circle as
shown in the diagram.
About mode switching
The ANALOG mode button can be used to switch between two modes.
Switch to the appropriate mode for use. Note, however, that some software
titles make this adjustment automatically.
Hints
When using the Analog Controller in digital mode, the left and right analog sticks
do not function. Also, the pressure-sensitive button function is turned off.
Depending on the software, you may not be able to switch modes even if you press
the ANALOG mode button.
About analog controls
When playing a PlayStationTM2 format software title, you can use all
buttons in analog mode except for the START, SELECT, L3 and R3
buttons.
When playing a PlayStation
TM format software title, only the left and
right analog sticks can be used in analog mode.
Hint
Depending on the software, the buttons for use in analog mode may be limited. Refer
to the instructions supplied with the software for details.
5 Left analog stick/ L3
button
Hints
The left analog stick and L3 button, function only
in analogue mode (indicator: red).
The L3 button function when the analog stick is
pressed.
6 ANALOG mode button
Switch between digital mode and analogue mode.
7 Mode indicator
Digital mode: Lights off.
Analogue mode: Lights up in red.
Hint
Depending on the software, you may not be able to
switch modes even if you press the ANALOG mode
button.
8 R2 button
9 R1 button
q; START button
qa f/a/×/s buttons
qs Right analog stick/ R3
button
Hints
The right analog stick and R3 button, function
only in analogue mode (indicator: red).
The R3 button function when the analog stick is
pressed.
Button/Switch Description
Digital mode
(indicator: off)
Analog mode
(indicator: red)
10
Using Memory Cards
About the vibration function
The vibration function can be set to ON or OFF in the software options
menu.
Hint
Depending on the software, the vibration function may be set to "On" automatically.
You can use the Analog Controller (DUALSHOCK®) (SCPH-110 E) with
the built-in PlayStation
TM2, but the functions of the buttons in analog mode
may be different from those of the Analog Controller (DUALSHOCK
®2).
Only the left and right analog sticks can be used in analog mode.
Hint
Not all PlayStationTM2 format software titles support the use of the Analog Controller
(DUALSHOCK
®) (SCPH-110 E). The Analog Controller (DUALSHOCK®2)
should be used in such cases.
You can save and load game data using a Memory Card (sold separately).
You can also delete game data or copy game data from one Memory Card
to another.
There are two types of Memory Cards. Select a Memory Card suitable for
the software in use.
MagicGate™ is a term of copyright protection technology developed by Sony
Corporation
About using the Analog Controller (DUALSHOCK®)
(SCPH-110 E)
Using Memory Cards
About Memory Card types
Memory Card type Compatible software Amount of memory
Memory Card (8MB) (for
PlayStation
TM2)
(SCPH-10020 E)
PlayStation
TM2 format
software
Approx. 8 MB
Memory Card
(SCPH-1020 E)*
* This product is no
longer manufactured.
PlayStation
TM format
software
15 memory blocks
(approx. 120 KB)
11
Using Memory Cards
Games
GB
Insert the Memory Card into a MEMORY CARD slot on the built-in
PlayStation
TM2 front.
Hint
Some software titles designate a specific MEMORY CARD slot to use. Refer to the
instructions supplied with the software for details.
Depending on the software, the procedure for saving or loading may vary.
Refer to the instructions supplied with the software for details.
You can delete saved data or copy data to another memory card. Use
directional buttons and the button of the controller to select items.
1 Turn on the built-in PlayStationTM2 with no disc inserted, and
then insert a memory card.
2 Select "Browser", and then select the memory card you want
to copy or delete data from.
3 Select the icon for the data item, and select "Copy" or
"Delete".
4 Follow the instructions that appear on the set-up screen.
Inserting a Memory Card
Saving or loading game data
MEMORY CARDMEMORY CARD
Built-in PlayStationTM2 front
Copying or deleting game data
12
Playing an audio CD
1 Turn on the built-in PlayStationTM2 and insert the disc
(page7).
Follow steps 1 to 3 of "Starting a game".
The track numbers are displayed.
2 Using the directional buttons, select the track number you
want to play and then press the button.
Playback begins.
Hints
If you turn on the built-in PlayStationTM2 after inserting a disc, the track numbers
are displayed automatically.
You can also start playback from the Browser screen ( page 27).
Caution
To play an audio CD recorded in DTS format, you must turn the volume fully
down, and then connect a device with a DTS decoder to the DIGITAL OUT
(OPTICAL) connector ( page 5). Note that an extremely loud noise may be
emitted.
Using the directional buttons, select the icon for the desired track and then
press the button.
* You can operate directly by pressing the analog controller (DUALSHOCK®2)
buttons shown in parentheses.
Hint
You can also use the DVD Remote Control (for PlayStationTM2) (sold separately).
1 Using the directional buttons, select x and then press the
button.
Playback stops. Press the OPEN button on the built-in PlayStationTM2
front to remove the disc.
Audio CDs
Playing an audio CD
Playing a CD
Operating the CD player during playback
Icon (button*) Function
. (L1 button) Go to the beginning of the current or previous track
m (L2 button) Fast reverse
M (R2 button) Fast forward
> (R1 button) Go to the beginning of the next track
N (START button) Start playback
X (START button) Pause playback
x (SELECT button) Stop playback
Ending audio CD playback
13
Playing an audio CD
Audio CDs
GB
You can set for "Play Mode" and "Repeat".
1 At the Browser screen ( page 27), use the directional
buttons to select the audio CD icon and then press the
button.
The Play Options screen is displayed.
2 Select "Play Mode" or "Repeat", and then press the
button.
3 Select the desired setting, and then press the button.
If you select "Program", the screen for specifying track order will be
displayed. Select the tracks you want to play.
4 Press the button.
The Browser screen is displayed.
5 Select the audio CD icon, and then press the button.
The track numbers are displayed, and the setting option is shown in the
lower left of the screen.
6 Select the desired track, and then press the button.
Playback begins.
Hints
You can also access the Play Options screen from the screen displaying the tracks
by selecting the Audio CD icon in the upper left corner of the screen and pressing
the button.
You can set "Play Mode" and "Repeat" at the same time.
Playing in various modes
Play Mode Normal Plays tracks as recorded on the CD
Program Plays tracks in a specified order
Shuffle Plays tracks in a random order
Repeat Off Does not play the CD repeatedly
All Plays all tracks repeatedly
1 Plays a track repeatedly
14
Watching a DVD
You can operate the DVD player using the following methods.
Using the on-screen Control Panel
Operating directly using the Analog Controller (DUALSHOCK
®2)
Using the DVD Remote Control (for PlayStation
TM2) (sold separately)
The following instructions assume use of the Control Panel to operate the
DVD player. Some operations may be different depending on the method
used.
Hints
For details about playing a DVD, refer to the instructions supplied with the DVD.
The built-in PlayStation
TM2 plays disc content as recorded in the DVD software.
Note that not all features are available on all DVDs.
1 Start playback of the DVD ( page 16).
2 Press the SELECT button.
The Control Panel is displayed. If you press the SELECT button again,
the display will change its position on the screen.
3 Using the directional buttons, select an icon and then press
the button.
Hint
To turn off the Control Panel, press the SELECT button (once or twice), or press the
button.
Control Panel item list
You can access the following options in the Control Panel.
DVDs
Watching a DVD
Using the Control Panel
Icon Function
Menu Displays the DVD-Video menu
Top Menu Displays the DVD-Video menu
15
Watching a DVD
DVDs
GB
Hints
You can use " " to check the options that can be accessed directly using the
buttons of the Analog Controller. To access the options directly using the
controller, you must clear the Control Panel from the screen.
Depending on the playback mode, some options may not be available or cannot be
adjusted.
O
Return
Returns to the previously selected screen
within the DVD's menu
Audio Options
Displays and changes audio options on
DVDs with multiple audio tracks
Angle Options
Displays and changes viewing angles on
DVDs recorded with multi-angle options
Subtitle Options
Displays and changes subtitle options on
DVDs with subtitle options
Go To
Skips to the selected title, chapter or the
specified time, and starts playback
( page 16)
Setup
Displays and changes options for
language, picture quality, Parental Control
level, audio, etc. ( page 20)
Time Display
Displays the current title or chapter
number, the elapsed time, etc.
( page 17)
Help
Displays the direct button functions of the
Analog Controller (DUALSHOCK
®2)
0~9
Go to Chapter
Used to enter the number of a chapter you
want to play ( page 16)
./> Previous/Next
Returns/skips to the beginning of the
current, previous or next chapter
/Search
Fast reverses/forwards playback
( page 17)
/Slow
Changes to playback/reverse playback in
slow-motion
Icon Function
N
Play Starts playback
X
Pause Pauses playback
x
Stop Stops playback ( page 16)
A-B Repeat
Specifies a scene for playback, and starts
playback of the scene that has been set
( page 19)
Shuffle Play
Begins playback of titles or chapters in a
random order ( page 19)
Program Play
Begins playback of titles or chapters in a
programmed sequence ( page 18)
Repeat Play
Selects repeated playback of all the titles
on the disc, or one title or one chapter
( page 19)
Original/Play List
For DVD-RW discs (VR mode), selects
Original or Play List content to play
( page 18)
Clear
Clears selected numbers or playback
modes ( page 20)
Icon Function
16
Watching a DVD
1 Turn on the built-in PlayStationTM2 and insert a disc
(page7).
Follow steps 1 to 3 of "Starting a game". Playback begins.
Hints
If you turn on the built-in PlayStationTM2 after inserting a disc, playback will begin
automatically.
You can also start playback from the Browser screen ( page 27).
1 During playback, select x in the Control Panel ( page 14)
and then press the button.
Playback stops. Press the OPEN button on the built-in PlayStationTM2
front, and then remove the disc.
1 During playback, select x in the Control Panel ( page 14)
and then press the button.
2 Select N, and then press the button.
Playback begins from the point where you stopped the disc in step 1.
To clear Resume Play
After step 1, select x and then press the button.
Selecting a scene by chapter number
1 During playback, select the desired chapter number in the
Control Panel ( page 14) and then press the button.
Playback of the selected chapter begins. If you want to play a chapter
with a single digit number (i.e. 1-9), enter a leading zero. For example,
enter as "01".
Selecting a scene by title number, chapter number or by
specifying the time
1 During playback, select in the Control Panel
( page 14) and then press the button.
2 Select an item, and then press the button.
3 Select the numbers for the desired scene, and then press the
button.
Playback of the selected chapter begins.
Playing a DVD
Ending DVD playback x
Playing a DVD from the last stopping point
(Resume Play)
Selecting a specific scene for playback
Title Specifies the title number
Chapter Specifies the chapter number
C XX:XX:XX
(or T XX:XX:XX)
Specifies the elapsed time for the chapter (or title)
17
Watching a DVD
DVDs
GB
You can search either forwards or backwards to quickly locate a particular
point on a DVD.
1 During playback, select or in the Control Panel
( page 14) and then press and hold the button.
Search speed changes as shown below when you press either the up or
down directional button while holding down the button.
Search 3
Search 2
Search 1
•Slow
2 Release the button when you reach the point you are
searching for.
Playback returns to normal speed.
Hint
To use the Analog Controller to Search during playback, press and hold down the L2
or R2 button to begin searching. Use the directional buttons to change speeds.
Release the L2 or R2 button when you reach the point you are searching for.
You can display information such as the current title number or elapsed
time.
1 During playback, select in the Control Panel
( page 14) and then press the button.
The display changes as shown below each time you press the
button.
Finding a particular point on a DVD (Search) Displaying playback information
Title X Chapter X Title number and chapter number
Title X Chapter X C XX:XX:XX Elapsed time of current chapter
Title X Chapter X C - XX:XX:XX Remaining time of current chapter
Title X Chapter X T XX:XX:XX Elapsed time of current title
Title X Chapter X T - XX:XX:XX Remaining time of current title
(Off)
18
Using the playback modes
When using a DVD-RW disc (VR mode), you can select the type of titles
you want to play.
1 With playback stopped, select in the Control Panel
( page 14) and then press the button.
Original and Play List will be selected in turn each time you press the
button.
Hints
Slow-motion play in reverse is not available for DVD-RW discs (VR mode).
You cannot use this function with Resume Play. Clear Resume Play ( page 16)
before selecting this feature.
Using the various playback modes, you can play titles or chapters in the
order you want or repeat playback of a specific scene. There are four
playback modes:
Program Play ( page 18)
Shuffle Play ( page 19)
Repeat Play ( page 19)
A-B Repeat ( page 19)
The following instructions assume use of the Control Panel ( page 14)
to operate the DVD player.
Hints
You can play combinations of Program Play, Shuffle Play, and Repeat Play. Note,
however, that some Shuffle Play or Repeat Play options may not be available
depending on the combination.
The built-in PlayStation
TM2 plays disc content as recorded in the DVD software.
You can create programmes to play titles and chapters in any order.
1 During playback, select in the Control Panel
( page 14) and then press the button.
2 Select a programme number, and then press the button.
If no programmes have been set, the only option will be "1. Title".
3 Select the title number, and then press the button.
Selecting Original or Play List for DVD-RW
playback
Original Plays content in the originally recorded sequence
Play List Plays edited content. Play List is the default setting.
Using the playback modes
Program Play
19
Using the playback modes
DVDs
GB
4 Select the chapter number, and then press the button.
To play all the chapters, select "All". Repeat steps 2 to 4 to set other
titles or chapters.
5 Press the START button.
Program Play begins.
Hint
The setting will not be cleared after Program Play finishes.
You can set this option for random playback of all titles or chapters
recorded on a disc. Playback order will be different each time Shuffle Play
is used.
1 Select in the Control Panel ( page 14), and then
press the button.
The display changes as shown below each time you press the
button.
2 Select N, and then press the button.
You can set this option to play titles or chapters repeatedly.
1 Select in the Control Panel ( page 14), and then
press the button.
The display changes as shown below each time you press the
button.
2 Select N, and then press the button.
You can set a specific scene to be played repeatedly.
1 During playback, select in the Control Panel
( page 14) and then press the button at the point you
want to start repeated playback.
The starting point (point A) is set.
2 Press the button at the point you want to end repeated
playback.
The ending point (point B) is set, and repeated playback of the section
from A to B begins.
Shuffle Play
Title Shuffle Plays titles in random order
Chapter Shuffle Plays chapters in random order
Shuffle Off Clears Shuffle Play
Repeat Play
Disc Repeat Repeats playback of all titles
Title Repeat Repeats playback of one title
Chapter Repeat Repeats playback of one chapter
Repeat Off Clears Repeat Play
A-B Repeat
20
Adjusting DVD player settings
Clears playback modes to allow normal playback.
1 Select in the Control Panel ( page 14), and then
press the button.
A message stating, "Play mode contents cleared", is displayed and the
built-in PlayStation
TM2 returns to normal playback.
Hint
If multiple playback modes have been set in a combination, all playback modes are
cleared.
You can use the Control Panel to adjust DVD player settings, such as the
language for subtitles, audio language, and Parental Control level.
Hints
Some DVDs do not support all settings. The built-in PlayStationTM2 plays disc
content as recorded in the DVD software. If the DVD does not support the features
listed, you will not be able to change the settings.
The following options are not available during playback or Resume Play. Clear
Resume Play ( page 16) before changing these settings.
"Menu", "Audio" and "Subtitles" in Language Setup
"TV Type" and "Progressive" in Screen Setup
"Parental Control" in Custom Setup
"DTS" and "Audio Track Auto Select Mode" in Audio Setup
You can change DVD player settings using the following procedure:
1 Select in the Control Panel ( page 14), and then press
the button.
The Setup icon bar is displayed.
2 Select the icon for the setting you want to change, and then
press the button.
The current setting for each item is displayed.
3 Select the desired item, and then press the button.
The menu option becomes active and can be selected.
Clearing playback modes
Adjusting DVD player settings
21
Adjusting DVD player settings
DVDs
GB
4 Select the desired setting, and then press the button.
The setting of the item is completed. For details, see the instructions
for each item ( pages 21 to 26).
Hints
The default setting for each menu item is underlined in the explanations below.
To return to the Control Panel after making settings, press the SELECT button.
Settings are saved when you do any of the following:
Stop playback (including stopping Resume Play)
Open the disc cover
In "Language Setup" you can choose the language for the DVD's menu,
audio and subtitles. Note that if you select a language that is not recorded
on the DVD, one of the recorded languages is selected automatically.
Hint
If you select "Audio Follow" for subtitles, the subtitle language will automatically be
set to match the language selected for the DVD's audio track.
In the Screen Setup menu, you can set the screen size (aspect ratio) and
other options that affect picture quality.
TV Type
You can set the aspect ratio to match the screen format.
Hint
When you set "Progressive" to "On", "TV Type" is automatically set to "16:9".
Setting language options
Menu Selects the language for the DVD's menu
Audio Selects the language for the DVD's audio track
Subtitles Selects the language for the DVD's subtitles
Setting TV display options
16:9 Screen Format: Wide
4:3 Letter Box Screen Format: 4:3
This setting displays a wide picture with margins on the upper
and lower portions of the screen.
4:3 PAN SCAN Screen Format: 4:3
This setting displays a picture adjusted to the height of the
screen, cutting off portions at left and right that do not fit.
  • Page 1 1
  • Page 2 2
  • Page 3 3
  • Page 4 4
  • Page 5 5
  • Page 6 6
  • Page 7 7
  • Page 8 8
  • Page 9 9
  • Page 10 10
  • Page 11 11
  • Page 12 12
  • Page 13 13
  • Page 14 14
  • Page 15 15
  • Page 16 16
  • Page 17 17
  • Page 18 18
  • Page 19 19
  • Page 20 20
  • Page 21 21
  • Page 22 22
  • Page 23 23
  • Page 24 24
  • Page 25 25
  • Page 26 26
  • Page 27 27
  • Page 28 28
  • Page 29 29
  • Page 30 30
  • Page 31 31
  • Page 32 32
  • Page 33 33
  • Page 34 34
  • Page 35 35
  • Page 36 36
  • Page 37 37
  • Page 38 38
  • Page 39 39
  • Page 40 40
  • Page 41 41
  • Page 42 42
  • Page 43 43
  • Page 44 44
  • Page 45 45
  • Page 46 46
  • Page 47 47
  • Page 48 48
  • Page 49 49
  • Page 50 50
  • Page 51 51
  • Page 52 52
  • Page 53 53
  • Page 54 54
  • Page 55 55
  • Page 56 56
  • Page 57 57
  • Page 58 58
  • Page 59 59
  • Page 60 60
  • Page 61 61
  • Page 62 62
  • Page 63 63
  • Page 64 64
  • Page 65 65
  • Page 66 66
  • Page 67 67
  • Page 68 68
  • Page 69 69
  • Page 70 70
  • Page 71 71
  • Page 72 72
  • Page 73 73
  • Page 74 74
  • Page 75 75
  • Page 76 76
  • Page 77 77
  • Page 78 78
  • Page 79 79
  • Page 80 80
  • Page 81 81
  • Page 82 82
  • Page 83 83
  • Page 84 84
  • Page 85 85
  • Page 86 86
  • Page 87 87
  • Page 88 88
  • Page 89 89
  • Page 90 90
  • Page 91 91
  • Page 92 92
  • Page 93 93
  • Page 94 94
  • Page 95 95
  • Page 96 96
  • Page 97 97
  • Page 98 98
  • Page 99 99
  • Page 100 100
  • Page 101 101
  • Page 102 102
  • Page 103 103
  • Page 104 104
  • Page 105 105
  • Page 106 106
  • Page 107 107
  • Page 108 108
  • Page 109 109
  • Page 110 110
  • Page 111 111
  • Page 112 112
  • Page 113 113
  • Page 114 114
  • Page 115 115
  • Page 116 116
  • Page 117 117
  • Page 118 118
  • Page 119 119
  • Page 120 120
  • Page 121 121
  • Page 122 122
  • Page 123 123
  • Page 124 124
  • Page 125 125
  • Page 126 126
  • Page 127 127
  • Page 128 128
  • Page 129 129
  • Page 130 130
  • Page 131 131
  • Page 132 132
  • Page 133 133
  • Page 134 134
  • Page 135 135
  • Page 136 136
  • Page 137 137
  • Page 138 138
  • Page 139 139
  • Page 140 140
  • Page 141 141
  • Page 142 142
  • Page 143 143
  • Page 144 144
  • Page 145 145
  • Page 146 146
  • Page 147 147
  • Page 148 148
  • Page 149 149
  • Page 150 150
  • Page 151 151
  • Page 152 152
  • Page 153 153
  • Page 154 154
  • Page 155 155
  • Page 156 156
  • Page 157 157
  • Page 158 158
  • Page 159 159
  • Page 160 160
  • Page 161 161
  • Page 162 162
  • Page 163 163
  • Page 164 164
  • Page 165 165
  • Page 166 166
  • Page 167 167
  • Page 168 168
  • Page 169 169
  • Page 170 170
  • Page 171 171
  • Page 172 172
  • Page 173 173
  • Page 174 174
  • Page 175 175
  • Page 176 176
  • Page 177 177
  • Page 178 178
  • Page 179 179
  • Page 180 180
  • Page 181 181
  • Page 182 182
  • Page 183 183
  • Page 184 184
  • Page 185 185
  • Page 186 186
  • Page 187 187
  • Page 188 188
  • Page 189 189
  • Page 190 190
  • Page 191 191
  • Page 192 192
  • Page 193 193
  • Page 194 194
  • Page 195 195
  • Page 196 196
  • Page 197 197
  • Page 198 198
  • Page 199 199
  • Page 200 200
  • Page 201 201
  • Page 202 202
  • Page 203 203
  • Page 204 204
  • Page 205 205
  • Page 206 206
  • Page 207 207
  • Page 208 208
  • Page 209 209
  • Page 210 210
  • Page 211 211
  • Page 212 212
  • Page 213 213
  • Page 214 214
  • Page 215 215
  • Page 216 216
  • Page 217 217
  • Page 218 218
  • Page 219 219
  • Page 220 220
  • Page 221 221
  • Page 222 222
  • Page 223 223
  • Page 224 224
  • Page 225 225
  • Page 226 226
  • Page 227 227
  • Page 228 228
  • Page 229 229
  • Page 230 230
  • Page 231 231
  • Page 232 232
  • Page 233 233
  • Page 234 234
  • Page 235 235
  • Page 236 236
  • Page 237 237
  • Page 238 238
  • Page 239 239
  • Page 240 240
  • Page 241 241
  • Page 242 242
  • Page 243 243
  • Page 244 244
  • Page 245 245
  • Page 246 246
  • Page 247 247
  • Page 248 248
  • Page 249 249
  • Page 250 250
  • Page 251 251
  • Page 252 252
  • Page 253 253
  • Page 254 254
  • Page 255 255
  • Page 256 256
  • Page 257 257
  • Page 258 258
  • Page 259 259
  • Page 260 260
  • Page 261 261
  • Page 262 262
  • Page 263 263
  • Page 264 264
  • Page 265 265
  • Page 266 266
  • Page 267 267
  • Page 268 268
  • Page 269 269
  • Page 270 270
  • Page 271 271
  • Page 272 272
  • Page 273 273
  • Page 274 274
  • Page 275 275
  • Page 276 276
  • Page 277 277
  • Page 278 278
  • Page 279 279
  • Page 280 280
  • Page 281 281
  • Page 282 282
  • Page 283 283
  • Page 284 284
  • Page 285 285
  • Page 286 286
  • Page 287 287
  • Page 288 288
  • Page 289 289
  • Page 290 290
  • Page 291 291
  • Page 292 292
  • Page 293 293
  • Page 294 294
  • Page 295 295
  • Page 296 296
  • Page 297 297

Sony KDL-22PX300 User manual

Category
DVD players
Type
User manual
This manual is also suitable for

Ask a question and I''ll find the answer in the document

Finding information in a document is now easier with AI