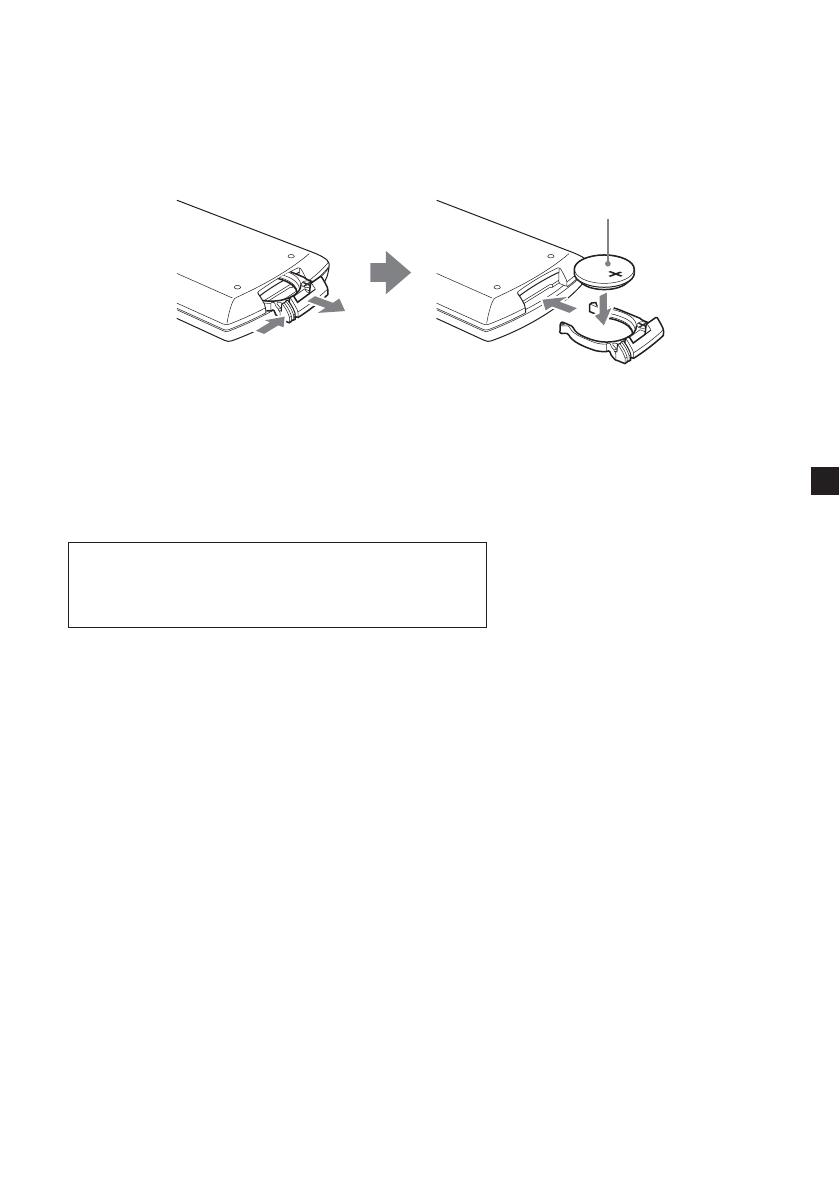
Sony XVM-F65 Operating instructions

Type
Operating instructions
3
Table of contents
Welcome! .............................................................................................................................. 4
Precautions........................................................................................................................... 5
Location of controls ............................................................................................................8
Operation
Selecting the input source ................................................................................................ 10
Setting the screen mode ................................................................................................... 11
Switching the DIMMER On/Off .................................................................................... 12
Changing the menu settings ........................................................................................... 13
Adjusting the volume ....................................................................................................... 15
Additional Information
Maintenance ...................................................................................................................... 16
Specifications ..................................................................................................................... 18
Troubleshooting ................................................................................................................ 19
4
Welcome!
Thank you for purchasing the Sony Mobile Monitor.
PAL or NTSC colour system compatible
Full, Wide and Zoom screen modes available, in addition to the normal screen
mode.
The low reflection liquid crystal panel reduces the glare from outside lighting
sources.
Adjustable brightness control, according to lighting conditions
Backlight dimmer control produces sharp contrast image, free from reversed or
blurred colours.
•2 Audio/Video inputs and 1 Audio/Video output are provided for connecting a
video player, video game, and an additional monitor.
Built-in infrared transmitter for cordless headphones.
5
Precautions
To avoid the risk of serious injury or accident, read the following precautions before
installing and operating the unit.
On safety
Comply with your local traffic rules and regulations.
While driving
- The driver must not watch or operate the monitor. It may lead to distraction and
cause an accident.
- The driver must not use the headphones. It may lead to distraction and cause an
accident.
Park the car in a safe place when the driver watch and operate the monitor, or use
headphones.
Watching video pictures
The video pictures appear only after you park the car and set
the parking brake.
When the car starts moving, the video pictures automatically
disappear after displaying the following caution.
Do not operate equipment connected to the monitor or watch
the monitor while driving.
The caution above appears only when the monitor is
connected to the installation cradle.
After installing
- Take care not to bump your head against the unit when getting up from the back
seat.
- Take extra care not to wind the wire of the headphones around your neck
avoiding injury or suffocation in the event of a sudden movement of the vehicle.
- Keep small articles out of the reach of children.
- Do not leave the monitor under direct sunlight for a long period of time.
DRIVE MODE
6
On installation
Installing this unit requires technical expertise.
This unit should be installed by a qualified
technician or service personnel.
• If you try to install this unit by yourself, do it
properly, referring to the installation and wiring
diagrams in this operating manual. Improper
installation may result in fire or electric shock.
• Before installation, be sure to turn the ignition
switch to the OFF position or take the key out.
Installing this unit with the ignition on may
cause battery drain or a short circuit.
• Do not damage any pipes, tubes, the fuel tank or
electric wiring when installing this unit. This can cause
a fire. If you drill a hole in car panels, make sure that
any hidden car parts will not be damaged.
• Do not use any nuts or bolts for safety devices such as
steering linkage, fuel supply or braking systems. This
can cause a fire or an accident.
• Take care to prevent cords and wires from getting
tangled or crimped in the moving portion of a seat rail.
7
Where to install
Before installing this unit, please check your local traffic rules and regulations.
Do not install this unit where:
- It will obstruct the driver’s view.
- It will obstruct the operation of the airbag system.
- It will obstruct the operation of the vehicle, especially
the steering wheel, shift lever, or brake pedal.
-A driver or passengers may injure themselves when
getting into or out of the car.
If you have any questions or problems concerning your unit that are not covered
in this manual, please consult your nearest Sony dealer.
8
7 8
15
643
2
Location of controls
Monitor
* If interference occurs while using several cordless headphones
If several monitors are installed and used simultaneously, interference may occur.
1 INPUT button
Press to select the input source.
2 Receptor for the card remote
commander/Transmitter for the
cordless headphones*
3 MENU button
Press to make various settings.
4 DIMMER button
Press to switch the dimmer on/off.
5 POWER (on/off) button
Press to turn on/off the monitor.
6 VOLUME +/– buttons
Press to turn up or down the volume
or to select the item during menu
operation.
7 RESET button
8 Monaural speaker
9
Tip
Refer to “Replacing the lithium battery” for details on how to replace the batteries (page
17).
Card remote commander RM-X709
1 ATT button
Press to quickly attenuate the
volume.
2 INPUT button
Press to select the input source.
3 MENU button
Press to select the menu settings.
4 |/1 (power) button
5 MODE button
Press to change the screen mode.
6 M/m buttons
Press to select the desired item.
7 VOL (volume) +/– buttons
Press to adjust the volume of the
monitor.
2
3
1
5
6
4
7
MODEMENU
INPUT
ATT
`/1
VOL
10
`/1
V/v
INPUT
MODEMENU
INPUT
ATT
`/1
VOL
VOLUME
ĸ-Ĺ
POWERINPUT
When NTSC Video is selected
VIDEO1
NTSC
When PAL Video is selected
VIDEO1
PAL
Operation
Selecting the input source
You can select the input source and colour system.
1 Press (POWER).
On the card remote commander, press
{/1
.
The power is turned on.
2 Press (INPUT) to select the desired input source.
Each time you press (INPUT), the indication changes in the following sequence:
3 Press M or m ((VOLUME) (+) or (–) on the monitor) to select PAL or NTSC
system.
Press either button while the source indication (such as “VIDEO 1”) is displayed.
VIDEO 1 VIDEO 2
11
Setting the screen mode
In addition to the full mode, wide, normal and zoom modes are also available.
Press (MODE) repeatedly.
The current mode is displayed on the screen first.
Each time the button is pressed, the screen mode swiches in the following
sequence:
You can also set the screen mode in the menu setting (page 13).
Tip
Images may appear coarse-grained when viewed in the zoom mode.
Zoom
Zoom
Zoom
Full
Full
Full
Wide
Wide
Wide
Normal
Normal
Normal
Normal
An image with an aspect ratio
of 4 to 3.
Zoom
An image with an aspect ratio of 4
to 3 enlarged to the left and right
edges of the screen, with the
overflowing parts (top and bottom)
cut off to fill the screen.
Full (regular image)
An image with an aspect ratio
of 4 to 3 enlarged to the left
and right edges of the screen.
Wide
An image with an aspect ratio of
4 to 3, with only the left and
right sides of the image being
enlarged to fill the screen.
MENU
MENU
MODE
MODEMENU
INPUT
ATT
`/1
VOL
12
Switching the DIMMER On/Off
Press the (DIMMER) button on the monitor.
The current setting of the dimmer is displayed.
Each time you press (DIMMER), the dimmer is switched to On/Off.
When it is set to On, the display darkens.
DIMMER
13
Changing the menu settings
You can adjust the display settings manually if the display is hard to see from the
position where you are seated.
1 Press (MENU).
The “Picture” screen appears.
Each time you press (MENU), the setting screen changes in the following
sequence:
* Appears only when the NTSC colour system is selected.
2 Press M or m ((VOLUME) (+) or (–) on the monitor) to adjust to the desired
setting.
See the next page for the setting options.
Picture 32
Press
+/-
or MENU.
The setting value of the
item selected appears in this
area.
VOLUME
ĸ-Ĺ
MENU
MENU
MODEMENU
INPUT
ATT
`/1
VOL
V/v
Picture Brightness Color Hue Video Adjust
Menu Off WireLess Headphone Speaker Blue Back
Mode
14
The default settings are underlined.
Settings Setting options
Picture Settable range: 0 to 63 (default setting is “36”)
Adjusting the contrast.
Brightness Settable range: 0 to 63 (default setting is “30”)
Adjusting the brightness.
Color Settable range: 0 to 63 (default setting is “36”)
Adjusting the color.
Hue Adjust this if the picture is reddish or greenish. The default setting is
“CTR (center)”.
”Hue” is displayed for NTSC system only.
Video Adjust Resetting the picture, brightness, color, hue, dimmer setting at single
operation.
Note
Input channel, color system for the input video signal (PAL/NTSC),
screen mode, and blue background setting will not be reset when you
reset the adjustments.
Mode Full, Wide, Normal, Zoom
Setting the screen mode.
Full: An image with an aspect ratio of 4 to 3 enlarged to the left and
right edges of the screen (regular image).
Wide: An image with an aspect ratio of 16 to 9.
Normal: An image with an aspect ratio of 4 to 3.
Zoom: An image with an aspect ratio of 4 to 3 enlarged to the left and
right edges of the screen, with the overflowing parts (top and
bottom) cut off to fill the screen.
Blue Back On, Off
Setting the blue background screen.
Speaker On, Off
Turning on and off the speaker on the backside of the monitor.
WireLess Headphone 1CH, 2CH, OFF
Turning on and off the cordless headphone (MV-02HP) (optional).
When using the headphone, select either “1CH” or “2CH” depending
on the headphone's channel setting.
15
ATT
VOLĸ-Ĺ
MODEMENU
INPUT
ATT
`/1
VOL
Adjusting the volume
You can adjust the volume of the unit with the supplied card remote commander.
Press (VOL) (+) or (VOL) (–) ((VOLUME) (+) or (–) on the monitor).
The default volume level is 25.
Quickly attenuating the sound
Press (ATT) on the card remote commander.
To restore the previous volume level
Press (ATT) again or (VOL) (+) or (–) ((VOLUME) (+) or (–) on the monitor).
Using cordless headphones
You can use infrared cordless headphones, MV-02HP (optional), with the unit. Please
refer to the operating instructions for MV-02HP.
Notes
The volume of the cordless headphones cannot be adjusted with the supplied card
remote commander. Use the volume control on the cordless headphones.
For your safety, do not use the headphones while driving a car.
Do not leave the headphones in a place subject to direct sunlight, or in a high
temperature.
If the cordless headphones are used while exposed to direct sunlight, sensitivity of the
infrared receptor may deteriorate, and inferior quality sound may result.
ATT On
VOLUME
ĸ-Ĺ
16
Additional Information
Maintenance
Fuse replacement
When replacing the fuse of the power cord or the cigar lighter socket, be sure to use
one matching the amperage rating stated on the original fuse. If the fuse blows, check
the power connection and replace the fuse. If the fuse blows again after replacement,
there may be an internal malfunction. In such a case, consult your nearest Sony
dealer.
Warning
Never use a fuse with an amperage rating exceeding the one supplied with the unit
as this could damage the unit.
1
2
c
c
Fuse
17
+ side facing up
While pushing the
lock lever (1), pull
out the battery
holder (2).
1
2
Replacing the lithium battery
Under normal conditions, batteries will last approximately 1 year. (The service life
may be shorter, depending on the conditions of use.)
When the battery becomes weak, the range of the card remote commander becomes
shorter. Replace the battery with a new CR2025 lithium battery. Use of any other
battery may present a risk of fire or explosion.
Notes on lithium battery
Keep the lithium battery out of the reach of children. Should the battery be
swallowed, immediately consult a doctor.
Wipe the battery with a dry cloth to assure a good contact.
Be sure to observe the correct polarity when installing the battery.
Do not hold the battery with metallic tweezers, otherwise a short-circuit may occur.
WARNING
Battery may explode if mistreated.
Do not recharge, disassemble, or dispose of in fire.
About the liquid crystal display (LCD) panel
Do not press on the LCD panel on the unit as doing so can distort the picture or
cause a malfunction. The picture may become unclear, or the LCD panel may be
damaged.
Notes on cleaning
Clean the LCD panel with a slightly damp soft cloth.
Do not use solvents such as benzine, thinner, commercially available cleaners or
antistatic spray.
Do not use the unit in temperatures under 0°C or over 45°C.
If your car was parked in a cold or hot place, the picture may not be clear. The
monitor is not damaged. The picture will become clear after the temperature in
your car becomes normal.
Some stationary blue or red dots may appear on the monitor.
These are called bright spots, and can happen with any LCD.
The LCD panel is highly sophisticated, and more than 99.99 % of the segments used
in the panel are flawless. However, there is a possibility that less than 0.01 % of the
segments are defective and may not light up properly.
18
Specifications
Monitor
System Liquid crystal colour display
Drive system TFT-LCD active matrix
system
Picture size 6.5 inches wide screen (16:9)
143.4 × 79.3 mm, 165.1 mm
(w/h, d)
Picture segment
280,800 (w 1,200 × h 234) dots
Power requirements
12 V DC car battery
(negative ground)
Current drain Approx. 1 A
Dimensions 194 × 101 × 27.1 mm
(w/h/d)
Operating temperature
0°C – 45°C
Mass Approx. 400 g
Connection box XA-124
A/V Output
Output Impedance: less than 470
less than 1,000 pF
Output Level: 0 dBs ±0.3 dB
(0.775 V rms)
Video: 75 1 Vp-p
A/V Input ×2
Input Impedance: more than 10 k
less than 1,000 pF
Input Level (max.): 1.3 dBs +0/–0.3 dB
(1 V rms)
Video: 75 1 Vp-p
Dimensions 147.5 × 40 × 80 mm
(w/h/d)
Mass Approx. 250 g
Card remote commander RM-X709
Power requirements
CR2025 lithium battery
Operable range
Approx. 2.5 m
Dimensions 55 × 125 × 15 mm
(w/h/d)
Mass Approx. 40 g
(including batteries)
Supplied accessories
Monitor stand (1)
(with supplied screws (5))
RCA cable (3 m) (1)
Connection box XA-124 (1)
Card remote commander RM-X709
(with supplied battery) (1)
Power supply cord (1)
Detach cradle (3 m) (1)
Cigar plug (0.3 m) (1)
Operating Instructions (1 set)
Optional accessories
DVD player DVX-11A
Cordless headphones MV-02HP
Multi Disc Player MEX-R1
Design and specifications are subject to
change without notice.
19
Troubleshooting
The following checklist will help you solve problems you may encounter with your
unit.
Before going through the checklist below, check the connection and operating
procedures.
General
No picture
Good picture, but no sound
Dotted lines or stripes
No picture when you connect
the optional equipment.
No response when pressing
the buttons on the card
remote commander
No picture even when playing
back the connected device
while driving.
The operation buttons on the
monitor do not function. / The
monitor does not turn off. /
Nothing but the white
background appears on the
display.
The power cord has been disconnected.
The fuse has blown.
Press (VOL)(+) ((VOLUME)(+) on the monitor) or (ATT) on
the card remote commander.
This may be caused by local interference such as a car
engine or motorcycle. Adjust the antennas for minimum
interference.
The cord has been disconnected. Connect the cord securely.
The battery may be exhausted.
When the blue cord is connected to the parking brake, you
cannot use the monitor while driving. Playback the
connected device when the car is stopped.
Remove the monitor from the cradle to stop the power
distribution, and press the (RESET) button on the rear side
of the monitor with a pointed object, such as a ballpoint pen
(page 8).
Sony Corporation Printed in Thailand
  • Page 1 1
  • Page 2 2
  • Page 3 3
  • Page 4 4
  • Page 5 5
  • Page 6 6
  • Page 7 7
  • Page 8 8
  • Page 9 9
  • Page 10 10
  • Page 11 11
  • Page 12 12
  • Page 13 13
  • Page 14 14
  • Page 15 15
  • Page 16 16
  • Page 17 17
  • Page 18 18
  • Page 19 19
  • Page 20 20
  • Page 21 21
  • Page 22 22
  • Page 23 23
  • Page 24 24
  • Page 25 25
  • Page 26 26
  • Page 27 27
  • Page 28 28
  • Page 29 29
  • Page 30 30
  • Page 31 31
  • Page 32 32
  • Page 33 33
  • Page 34 34
  • Page 35 35
  • Page 36 36
  • Page 37 37
  • Page 38 38
  • Page 39 39
  • Page 40 40
  • Page 41 41
  • Page 42 42
  • Page 43 43
  • Page 44 44
  • Page 45 45
  • Page 46 46
  • Page 47 47
  • Page 48 48
  • Page 49 49
  • Page 50 50
  • Page 51 51
  • Page 52 52
  • Page 53 53
  • Page 54 54
  • Page 55 55
  • Page 56 56
  • Page 57 57
  • Page 58 58
  • Page 59 59
  • Page 60 60
  • Page 61 61
  • Page 62 62
  • Page 63 63
  • Page 64 64
  • Page 65 65
  • Page 66 66
  • Page 67 67
  • Page 68 68
  • Page 69 69
  • Page 70 70
  • Page 71 71
  • Page 72 72
  • Page 73 73
  • Page 74 74
  • Page 75 75
  • Page 76 76

Sony XVM-F65 Operating instructions

Type
Operating instructions

Ask a question and I''ll find the answer in the document

Finding information in a document is now easier with AI

in other languages