Page is loading ...

Treadmill Desk/Bike Desk
Owner’s Manual
DT7

3
Welcome
Congratulations on choosing the LifeSpan Workplace™ line of products. These
products give you the opportunity to remain productive while taking care of
yourself as you integrate movement with normally sedentary tasks.
The average American now spends eleven hours, ve days a week, sitting, and
burns one-hundred fewer calories each day than they did a few decades ago.
Sitting for long periods slows your metabolism, reduces calories burned, and
increases your risk for heart disease and diabetes.
Whether you plan on placing this product in a TV room, replace your desk at
home or are adding another workspace in the oce, LifeSpan Workplace™
products are a great way to add movement to an otherwise sedentary activity.
Before you assemble or operate your product, please read this manual
thoroughly. Important information, including safety precautions, ongoing
product maintenance, assembly instructions, and information on proper
operation are included.
If you need to contact LifeSpan customer service, visit our website at
www.LifeSpanFitness.com and select customer service. Complete the
information requested and we will respond to your inquiry within one
business day. In the United States and Canada you can also call
(877) 654-3837 and choose option 4.
Neither LifeSpan nor its representatives can accept responsibility for any damages or
injury incurred as a result of information presented in this manual except under the terms
of the product warranty.

5
Table of Contents
Welcome
Getting Started
Warranty
Safety & Usage
Children and Pets
Safety Tips While in Use
Grounding
Desk Assembly
Assembly Instructions
Desk Console Assembly
Assembly Instructions
Treadmill to DT7 Desk Assembly
Bike to DT7 Desk Assembly
Moving Your Treadmill Desk
Treadmill Desk Operations
Specications
Setting the Clock
Starting the Treadmill Desk
Console Buttons Overview
Preset Button & Bluetooth
Innovative Features
Troubleshooting
Personal Settings
Display Details
Bike Desk Operations
Specications
Setting the Clock
Starting the Bike Desk
Console Buttons Overview
Bluetooth & Innovative Features
Troubleshooting
Personal Settings
Display Details
7
15
26
32
33
34
35
47

7
Getting Started

8
Warranty
Your LifeSpan treadmill/bike desk comes with the following limited warranty
valid in North America and the United Kingdom. If you are outside of these
areas contact your local distributor for warranty information or visit
www.LifeSpanFitness.com.
LifeSpan warrants the equipment it manufactures is free from defects in
materials and workmanship under normal use and services. The periods above
are based on the date of purchase. During these periods, LifeSpan will repair
or replace any defective part. Free labor is included on all parts that are not
normally assembled or replaced by the customer within the labor period.
If within the time frames specied above, any part fails to operate properly,
login to our website at www.LifeSpanFitness.com, click on “Customer Service”
and complete the form to request assistance or call 877.654.3837 option 4 for a
Customer Service Agent (please note that certain kinds of service should only
be performed by a qualied service technician).
LifeSpan reserves the right to make changes and improvements to our products
without incurring any obligations to similarly alter any product purchased.
In order to insure our product warranty and to ensure the safe and ecient
operation of your LifeSpan product, only authorized parts can be used. The
warranty is void if any parts other than those provided by LifeSpan are used.
Exclusions and Limitations:
• This warranty does not apply to any defects caused by negligence, misuse,
improper assembly, or maintenance, accident, or “act of God.”
• This warranty does not apply to discoloration of paints or plastics.
• LifeSpan shall not be responsible for incidental or consequential damages.
• This warranty is non-transferable from the original owner.
Registration
Should you need to process a warranty claim make sure you retain your
purchase receipt to verify the date of purchase and register your LifeSpan
product online. To complete the registration go to www.LifeSpanFitness.com
and select “Product Registration”.
Warranty
Frame & Parts
Labor
DT7
2 Years
1 Year
Getting Started

9
Safety & Usage
When using active workstations, basic precautions should always be followed,
including:
• Never drop or insert any object into any opening. If an object falls into an
opening, turn the power o and unplug the power cord from the outlet.
Remove the object or call customer service at 877.654.3837 option 4.
• Never operate this treadmill if it has been damaged or partially
submersed in water.
• To reduce the risk of electric shock, unplug the treadmill and desk from
the wall outlet when not in use, before performing any maintenance, or
before moving the treadmill and desk.
• Do not use outdoors or in areas of high humidity or extreme temperature
changes.
• Do not operate where aerosol spray products are being used or where
oxygen is being administered.
• Never place the power cords under carpeting or place any object on top
of the cord, this may pinch or damage the cord causing re damage or
personal injury.
• Use this product for its intended use as described in this Owner’s Manual.
Do not use attachments that are not recommended by LifeSpan.
• Do not leave your treadmill running while not in use.
• A complete visual inspection and test of the features and functions of the
assembled desk need to be made prior to use.
• Keep the area within the entire lift range of the desk clear of any
obstructions to prevent personal or property damage. A minimum
distance of 1 inch or 25 mm above, below and around the desk is
recommended.
• Do not use the product beyond its intended purpose as oce furniture.
• Do not use the product with defective or malfunctioning safety and
protection devices .
• Do not make unapproved changes to the product with regard to its
construction and implementation.
• Do not exceed product maximum loads specied in this manual.
Getting Started

10
Getting Started
Note: Read all instructions and save for future reference.
Min. 3 Ft.
(.9 m)
Min. 2 Ft.
(.6 m)
Safety Clearance
Safety Tips While in Use
• Always consult a physician before beginning an exercise program.
• If you experience chest pains, nausea, dizziness or shortness of
breath, stop exercising immediately and consult your physician before
continuing. Do not wear clothing or jewelry that might catch on any
part of the treadmill.
• Wear shoes with high traction rubber soles. Do not wear shoes with
heels, leather soles, cleats or spikes.
• Do not walk backwards on the treadmill, always face forward.
• Allow the walking belt to fully stop prior to getting o the treadmill.
• Make sure the area behind the treadmill remains completely clear
during use. A minimum of 3 feet (1m) of clearance is required for safety
reasons. There should be a minimum of 2 ft. (.6 m) on at least one side of
the treadmill.

11
Children and Pets
• Keep children from playing on your treadmill at all times.
• When in use children and pets should be kept at least 10 feet (3m) away.
• Cleaning and user maintenance shall not be made by children without
supervision.
Getting Started

12
Proper Grounding
LifeSpan equipment must be grounded. Improper connection of the
equipment’s grounding conductor can result in the risk of electric shock.
Check with a qualied electrician or service person if you are in doubt as to
whether the outlet is properly grounded. Do not modify the plug provided or
use a ground plug adapter to adapt to a non-grounded outlet. If the plug will
not t in the outlet, have the proper outlet installed by a qualied electrician.
Power Cord Options
This standing desk should only be used with the proper power cord and
power outlet. Several power cord options (shown below) are available from
LifeSpan. We do our best do include the correct power cord with the standing
desk for your area. In the event that the correct power cord is not included in
the packaging please contact your local distributor.
Do not use extension cords between the standing desk and power
outlet.
Power Cord Options
!
Getting Started

15
Desk
DT7

16
Desk Assembly
At LifeSpan we strive to make our equipment easy to assemble and use.
Prior to starting the assembly process, take all the parts out of the box,
remove plastic bags, and lay everything out on the oor to become familiar
with the components.
Since your desk is a heavy piece of equipment, it is recommended that you
use two people during assembly and follow these assembly instructions to
reduce any problems that may occur.
Desktop Ships Separately
3
4
10
11
2
1
9
8
7
6
5
5mm Allen
Wrench
4mm Allen
Wrench
w/Phillipsw/Phillips w/Phillips
2.5mm Allen
Wrench
Tool Bag - Contents

17
Table corresponds to the diagram on the left
Desk Assembly
Hardware Included
Item# Part Description Item# Part Description
1 Front Reinforcement Frame 8 Left Desk Support Bracket
2 Back Reinforcement Frame 9 Right Desk Support Bracket
3 Desktop 10 Electronics Control Box
4 Right Motorized Leg 11 Power Cord
5 Left Motorized Leg 12 Height Adjust Cable Adapter
6 Left Base Foot
7 Right Base Foot
STEP 2 BAG
M8x55L (x8)
Bag # Item # Qty. Part Description
1 13 6 M8x12L Screws/Washers
2 14 8 M8x55L Bolts/Washers
3 15 6 M6x15L Screws/Washers
4 16 8 M8x35L Screws/Washers
4 17 6 M6x15L Screws/Washers
4 20 4 M8x 12L Screws/Lock Washers
5 18 3 M4 x10L Screws/Washers
6 22 4 Cable Ties
STEP 5 BAG
M4x10L Screw
(x3)
STEP 4 BAG
M6x15L Screw
(x6)
M8x35L Screw
(x8)
STEP 3 BAG
M6x15L Screw
(x6)
STEP 1 BAG
M8x12L (x6)
STEP 6 BAG
Cable Ties
M8x12L Screw
(x4)

18
Desk Assembly
Step 1: Attach Right and Left Side Desk Support Brackets
LOCATE BAG LABELED STEP 1
Contents: 6 each M8x12L Screws with Washers
A. Attach the Left Desk Support Bracket(8) to the Left Motorized Leg(5). Each
will have an “LLL” sticker attached for easy identication.
B. Stand the leg on the motor side as shown in the illustration and align the
bracket.
C. Locate the screws for Step 1 and hand tighten the bracket to the leg.
Then securely tighten with the included tool.
D. Repeat for the Right Desk Support Bracket(9) and Right Motorized Leg(4).
NOTE: Make sure that the
power cable isn’t set hard
on the ground which could
damage the wire.
5mm Allen
Wrench w/
Phillips
5
8
M8x12L (x6)
NOTE: Do not tighten or
loosen set screws. They
have been pre-adjusted
prior to shipping.
Set Screws

19
L L L
L L L
Desk Assembly
Step 2: Attach Base Foot
A. Insert four M8x55L Bolts
and Washers through the
Left Base Foot (6).
B. Align Left Base Foot(6)
labelled "LLL" with the
Left Motorized Leg(5) and
connect the wires.
C. Push ALL extra wiring into
the Left Base Foot(6).
6
L L L
L L L
6
LOCATE BAG
LABELED STEP 2
Contents: 8 each M8x55L
Bolts with Washers

20
L L L
Desk Assembly
Step 2: Attach Base Foot (Continued)
D. Connect the Left Base Foot(6) to the Left Motorized Leg(5) with
the four installed M8x55L Bolts with Washers(14).
E. Fully tighten each of the four bolts.
F. Tip the left post on its side.
G. Repeat the same procedure on the right side.
5mm Allen
Wrench w/
Phillips
6
5
M8x55L (x8)
NOTE:
If using a 5 or
6 foot desktop
you can still
use the Desk
Position
Bumper on
one side of
your treadmill.

21
Desk Assembly
Step 3: Attach Desktop to Posts
RRR
LLL
RRR
NOTE:
Be careful not to let
the post tip.
A. Place the right post on
top of the Desktop(3)
as shown in the
illustration. Tighten
each of the three
M6x15L Screws and
Washers(15) as shown.
B. Repeat on the left side.
M6x15L Screw
(x6)
4mm
RRR
3
LOCATE BAG LABELED STEP 3
Contents: 6 each M6x15L Screws

22
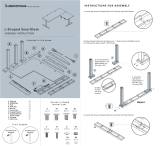
A. Locate the Front Reinforcement Frame labelled (1) and the Back
Reinforcement Frame labeled (2). Place these frames on Desktop with
screw tabs down and facing each other as shown in gure below.
B. Extend Front and Back Reinforcement Frames(1, 2) to align all
mounting holes with Desktop(3) and Motorized Legs(4, 5).
C. Loosely install the eight M8x35L(16) bolts through the
Reinforcement Frames (1,2) and into the Motorized Legs (4,5).
D. Tighten all eight M8x35L(16) bolts.
Step 4: Attach Reinforcement Frame
LOCATE BAG LABELED STEP 4
Contents: 8 each M8x35L Bolts/Washers, 6 each M6x15L Screws,
4 each M8x12L Screws/Lock Washers.
Center Positions
17
17
17
17
20
20
4
16
16
16
16
Desk Assembly

23
E. Using the six M6x15L Screws(17) attach both Reinforcement
Frames to the Desktop as shown in the illustration.
F. Insert four M8x12L Screws and Lock Washers(20) into the
bottom of the Reinforcement Frames and tighten. Do not
overt ighten as this can deform the frame tubes.
NOTE:
72" desktop shown for clarity of frame
components. When mounting the frame
to smaller desktop sizes, the front and
back reinforcement frame pieces slide and
compress into shorter lengths.
5mm Allen
Wrench w/
Phillips
M8x35L Screw
(x8)
M6x15L Screw
(x6)
4mm
M8x12L Screw
(x4)
Front
17
17
16
16
16
16
20
20
3
5
1
2
Desk Assembly

24
Desk Assembly
C
B
10
18
Step 5: Attach Electronics Controller Box
LOCATE BAG LABELED STEP 5
Contents: 3 each M4x10L Screws/Washers
A. Guide the cable with the square connector(B) to the middle of the desk as
shown.
B. Connect the 2 pin Power Cable(C) to the Electronics Controller Box(10).
C. Secure the Electronics Controller Box(10) in place with three M4 screws(18).
D. Attach square connector cables (B, D) to the left side of the Electronics
Controller Box(10).
Square
Connector
Cable
Right Side
Left Side
D
M4x10L Screw
(x3)
2.5mm
B

25
Step 6: Cable Preparation for Console
A. Connect the 7 pin Data Cable(F) coming from the Front Reinforcement
Frame(1) to the 7 pin Data Cable(G) coming from the Right Motorized
Leg(4).
B. Connect the 6 pin Height Adjustment Cable(E) coming from the Front
Reinforcement Frame(1) to the 6 pin Height Adjustment Cable Adapter(12)
included with the Electronics Control Box(10).
C. Plug the Height Adjustment Cable Adapter(12) into the Electronics
Controller Box(10).
F
1
E
4
Desk Assembly
G
12
10
/