
• Einbau dieses Laufwerks in den PC
Verwendung der Software mit diesem Laufwerk
• Comment installer cet appareil dans l’ordinateur ?
Comment utiliser les logiciels de cet appareil ?
• Come installare questa unità sul PC
Come usare il software con questa unità
• Hoe installeer ik dit station in mijn PC?
Hoe gebruik ik de programma's?
• ¿Cómo instalar esta unidad en su ordenador?
¿Cómo utilizar el software con esta unidad?
How to install this drive in your PC?
How to use the software with this drive?
For Internal ReWriters
using
Nero 6
Version 1.0
3104 125 2473.3
How_TO_Nero6_Pag1_64 20-02-2004 12:54 Pagina 1

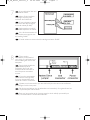
Contents - Inhalt - Table des matières - Indice - Inhoud - Índice
2
Installation How to install this drive in my computer? 5
Video How to capture video from a digital DV-camcorder? 19
How to make a video disc from video files which are
on the hard disk or a disc? 29
Copy How to copy a disc? 37
Data How to make a Data disc? 43
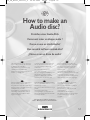
Music How to make an Audio disc? 51
Warranty How to find warranty information? 59
Installation Einbau dieses Laufwerks in den Computer 5
Video Videos von einem digitalen DV-Camcorder aufnehmen 19
Wie erstellt man eine Video Disk von Video-Dateien,
die sich auf der Festplatte oder einer Disk befinden? 29
Kopieren Eine Disk kopieren 37
Daten Eine Daten-Disk erstellen 43
Musik Erstellen einer Audio-Disk 51
Garantie Wie findet man Garantie-Informationen? 59
Installation Comment installer ce lecteur dans l’ordinateur? 5
Vidéo Comment acquérir les images vidéo d’une caméra
numérique DV ? 19
Comment créer un disque vidéo à partir de fichiers
vidéo enregistrés sur le disque dur ou sur un disque ? 29
Copie Comment copier un disque? 37
Données Comment créer un disque de données ? 43
Musique Comment créer un disque audio ? 51
Garantie Comment trouver les informations relatives à la garantie? 59
UK
D
F
How_TO_Nero6_Versie1_0 20-02-2004 08:05 Pagina 2
Page is loading ...
Page is loading ...

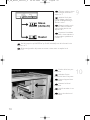
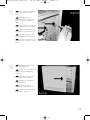
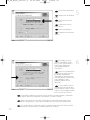
How to install this drive
in my computer?
Einbau dieses Laufwerks in den Computer
Comment installer ce lecteur dans l’ordinateur ?
Come installare questa unità sul computer
Hoe installeer ik dit station in mijn computer?
¿Cómo instalar esta unidad en el ordenador?
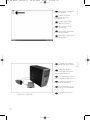
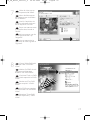
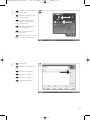
The next pages show how to install
your new DVD-ReWriter in the PC.
Since there are many brands and types
of PC's available, the next photographs
show only examples on how your drive
could be installed.
For specific information on your PC,
please refer to your PC manual or
contact your local dealer.
Auf den nächsten Seiten wird
beschrieben, wie Sie Ihren neuen DVD-
ReWriter in den PC einbauen können.
Da es viele verschiedene PC-Marken
und –Typen gibt, zeigen die folgenden
Fotos nur Beispiele dafür, wie Ihr
Laufwerk eingebaut werden kann.
Für spezielle Informationen zu Ihrem PC
beachten Sie bitte Ihr PC-Handbuch,
oder wenden Sie sich an Ihren Händler
vor Ort.
Les pages qui suivent illustrent la
procédure d’installation de votre nouveau
DVD-ReWriter dans l’ordinateur.
Il existe un grand nombre de marques
et de modèles d’ordinateurs. Les photos
suivantes ne sont présentées qu’à titre
d’illustration de la procédure à suivre
pour installer l’appareil.
Pour des informations spécifiques sur
votre ordinateur, reportez-vous à son
mode d’emploi ou contactez votre
revendeur.
Nelle prossime pagine verranno date
informazioni su come installare DVD-
ReWriter sul PC.
Poiché esistono molte marche e tipi di
PC, le prossime foto mostreranno solo
esempi di come l'unità possa essere
installata.
Per informazioni specifiche sul proprio
PC, fare riferimento al manuale PC o
rivolgersi al proprio rivenditore locale.
De volgende pagina's beschrijven het
installeren van de nieuwe DVD-
ReWriter in uw PC.
Omdat er vele soorten en merken
computers zijn, zullen de hierna volgende
afbeeldingen hoogstwaarschijnlijk niet
exact overeenkomen met uw eigen
situatie. Ze dienen slechts ter illustratie
van het installeren.
Raadpleeg voor specifieke informatie
over uw eigen computer de handleiding
van uw PC, of neem contact op met uw
leverancier.
Las páginas siguientes muestran cómo
instalar su nueva regrabadora en el
DVD-PC.
Puesto que hay muchas marcas y tipos
de ordenadores personales disponibles,
las fotografías siguientes muestran sólo
algunos ejemplos de cómo podría
instalarse la unidad.
Para obtener información específica
sobre su ordenador personal, por favor
consulte el manual de su PC o póngase
en contacto con su distribuidor local.
UK D F
I NL E
5
How_TO_Nero6_Versie1_0 20-02-2004 08:05 Pagina 5

6
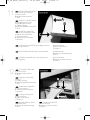
Tu rn your computer off.
Schalten Sie Ihren
Computer aus.
Éteignez l’ordinateur.
Spegnere il computer.
Schakel de computer uit.
Apague el ordenador.
Touch a unpainted
metal part (eg. your heating or
an unpainted part of your
computer case) to avoid any
damage to your computer by
electrostatic discharge.
Berühren Sie ein
unbemaltes Metallteil (z.B. Ihre
Heizung oder ein nicht
bemaltes Teil Ihres Computer-
gehäuses), um zu vermeiden,
dass Ihr Computer durch
elektrische Entladung
beschädigt wird.
Touchez une partie
métallique non peinte (p.ex.le
radiateur ou une partie nue
du capot de votre ordinateur)
pour éviter tout risque de décharge électrostatique qu endommagerait l’ordinateur.
Toccare una parte di metallo non verniciata (ad es. il riscaldamento o una parte
non verniciata del telaio del computer) per evitare di danneggiare il computer con
scariche elettrostatiche.
Om uw te computer beschermen tegen elektrostatische ontladingen, moet u altijd
eerst een ongeverfd metalen deel aanraken (bijv. een verwarmingsbuis of het
computerframe) om uzelf te ontladen.
Toque alguna parte metálica sin pintar (por ejemplo: su calefacción o alguna parte
sin pintar de la carcasa del ordenador) para evitar producir daños al ordenador por
descargas electrostáticas.
UK
D
F
I
NL
E
2
1
UK
D
F
I
NL
E
How_TO_Nero6_Versie1_0 20-02-2004 08:05 Pagina 6
Page is loading ...
Page is loading ...
Page is loading ...

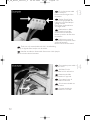
Put the drive into your
computer.
Schieben Sie das
Laufwerk in Ihren Computer.
Montez l’appareil dans
l’ordinateur.
Mettere l'unità nel
computer.
Schuif het station in uw
computer.
Ponga la unidad en el
ordenador.
Choose master or slave
for the jumper, as chosen in
steps 6 or 7.
Wählen Sie für den
Jumper Master oder Slave,
gemäß der Beschreibung in
Schritt 6 oder 7.
Placez le cavalier sur la
position maître ou esclave
selon l’option choisie aux
étapes 6 et 7.
Impostare il cavallotto
su master o slave, secondo la
configurazione specificata ai
passi 6 o 7.
Stel de jumper in op MASTER of op SLAVE, afhankelijk van de informatie in de
stappen 6 en 7.
Elija la configuración del puente en master o slave, como se explicó en el
paso 6 o 7.
10
10
9
UK
D
F
NL
E
UK
D
F
I
NL
E
I
How_TO_Nero6_Versie1_0 20-02-2004 08:05 Pagina 10

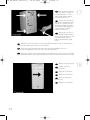
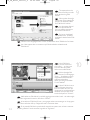
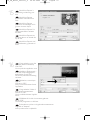
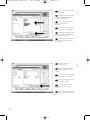
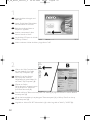
Find the IDE-cable which
may look like this example:
A: Coloured line.
B: Notch and closed hole.
C: Pin1.
Suchen Sie das IDE-Kabel,
das möglicherweise wie in
diesem Beispiel aussieht:
A: Farbige Leitung.
B: Kerbe und geschlossenes Loch.
C: Pin1.
Identifiez le câble IDE.
Celui-ci doit ressembler à celui
présenté dans l’illustration :
A : Ligne de couleur
B : Encoche et trou bouché
C : Broche 1
Individuare il cavo IDE, che potrebbe mostrare A: Linea colorata.
questi segni distintivi: B:Tacca e foro chiuso.
C: Piedino 1.
Zoek de IDE-kabel die lijkt op dit voorbeeld: A: Gekleurde lijn.
B: Nokje plus ontbrekend gat.
C: Pin 1.
Localice el cable IDE, cuya apariencia puede A: Línea de color.
ser la siguiente: B: Muesca y orificio cerrado.
C: Patilla 1.
UK
D
F
I
NL
E
Connect the IDE cable
A: Coloured line.
B: Notch and closed hole.
C: Pin1.
Schließen Sie das IDE-
Kabel an.
A: Farbige Leitung.
B: Kerbe und geschlossenes Loch.
C: Pin1.
Raccordez le câble IDE
A : Ligne de couleur
B : Encoche et trou bouché
C : Broche 1
Collegare il cavo IDE
A: Linea colorata.
B:Tacca e foro chiuso.
C: Piedino 1.
De IDE-kabel aansluiten
A: Gekleurde lijn.
B: Nokje plus ontbrekend gat.
C: Pin 1.
12
11
11
UK
D
F
I
NL
E
Conecte el cable IDE
A: Línea de color.
B: Muesca y orificio cerrado.
C: Patilla 1.
How_TO_Nero6_Versie1_0 20-02-2004 08:05 Pagina 11
Page is loading ...

Secure the drive with the
screws (if possible on both
sides).
Befestigen Sie das
Laufwerk mit den Schrauben
(wenn möglich an beiden
Seiten).
Fixez l’appareil à l’aide des
vis (si possible des deux côtés).
Fissare l'unità con le viti
(se possibile su entrambi i lati).
Schroef het station vast
(zo mogelijk aan beide zijden).
Asegure la unidad con los
tornillos (si es posible en ambos
lados).
Put the cover you took
off in step 5 back on.
Setzen Sie die in Schritt 5
abgenommene Abdeckung
wieder auf.
Replacez le capot que
vous avez retiré à l’étape 5.
Rimettere il coperchio
tolto al punto 5.
Plaats de in stap 5
verwijderde kast weer terug.
Vuelva a instalar la carcasa
que quitó en el paso 5.
16
15
13
UK
D
F
I
N
E
UK
D
F
I
NL
E
How_TO_Nero6_Versie1_0 20-02-2004 08:05 Pagina 13

Restart your computer.
Starten Sie Ihren
Computer neu.
Allumez l’ordinateur.
Riavviare il computer.
Start uw computer
opnieuw op.
Reinicie el ordenador.
14
Put the screws (if there
were any) back in. Plug the
power cable back in. If you
disconnected other cables,
put these back in too.
Drehen Sie die Schrau-
ben (wenn da welche waren)
wieder ein. Stecken Sie das
Netzkabel wieder ein.Wenn
Sie weitere Kabel abgezogen
haben, stecken Sie diese
ebenfalls wieder ein.
Resserrez la ou les vis,
le cas échéant. Rebranchez le
cordon d’alimentation. Si vous
avez débranché d’autres
câbles,rebranchez-les égale-
ment.
Riavvitare le viti (se c'erano) al loro posto.Riconnettere il cavo di alimentazione.
Se sono stati staccati anche altri cavi, riconnetterli.
Draai (zo nodig) de schroeven weer vast.Sluit de netstekker weer aan.
Sluit ook de overige kabels weer aan, als u die had losgemaakt.
Ponga los tornillos (si los tenía puestos) nuevamente en su lugar. Vuelva a conectar
el cable de alimentación.Si ha desconectado otros cables, vuélvalos a conectar en su lugar.
18
17
UK
D
F
I
NL
E
UK
D
F
I
NL
E
How_TO_Nero6_Versie1_0 20-02-2004 08:05 Pagina 14

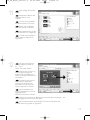
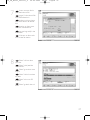
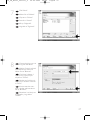
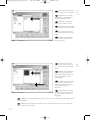
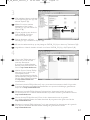
Choose "Install Suite".
Wählen Sie "Install Suite".
auf dem Bildschirm.
Choisissez "Install Suite".
Selezionare "Install Suite".
Selecteer "Install Suite".
Elija "Install Suite".
Insert the Nero disc
when Windows is loaded.
Legen Sie die Nero CD
ein, wenn Windows geladen ist.
Insérez le disque Nero
une fois que Windows a démar-
ré.
Inserire il disco Nero do-
po il caricamento di Windows.
Plaats de Nero-disc nadat
Windows is gestart.
Coloque el disco de Ne-
ro cuando se inicie Windows.
UK
D
I
NL
E
UK
D
F
I
NL
E
20
19
15
F
How_TO_Nero6_Versie1_0 20-02-2004 08:05 Pagina 15
Page is loading ...
Page is loading ...
Page is loading ...

19
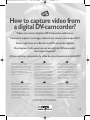
How to capture video from
a digital DV-camcorder?
Videos von einem digitalen DV-Camcorder aufnehmen
Comment acquérir les images vidéo d’une caméra numérique DV ?
Come registrare un video da una DV-camcorder digitale
Hoe kopieer ik de opnames van een digitale DV-camcorder
naar mijn computer?
¿Cómo capturar secuencias de vídeo de una videocámara digital DV?
This manual shows an example on how
to capture video from a digital
DV-camcorder which is connected via
FireWire (IEEE1394) to the computer.
This product is for personal use only.
Unauthorized duplication and
distribution of copyrighted materials is a
violation of copyright law.
In diesem Handbuch wird an einem
Beispiel gezeigt, wie ein Video von
einem digitalen DV-Camcorder
aufgenommen wird, der über FireWire
(IEEE1394) an den Computer
angeschlossen ist. Dieses Produkt ist
nur für den persönlichen Gebrauch.
Die ungenehmigte Vervielfältigung und
der Vertrieb von urheberrechtlich
geschützten Materialien stellt eine
Verletzung des Urheberrechts dar.
Ce manuel illustre la procédure
d’acquisition d’images vidéo à partir
d’une caméra numérique DV connectée
à l’ordinateur par le biais d’un port
FireWire (IEEE1394).Ce produit est à
usage personnel exclusivement. Toute
duplication et diffusion non autorisée de
matières soumises au droit d’auteur et
de copie (copyright) constituent une
violation de la loi sur les droits d’auteur
et de copie (copyright).
Questo manuale mostra un esempio di
come registrare un video da una
DV-camcorder digitale connessa al
computer via FireWire (IEEE1394).
Questo prodotto è destinato ad un uso
esclusivamente personale.
La duplicazione e la distribuzione di
materiali protetti dal diritto d'autore
rappresentano una violazione della
legge sul copyright.
Deze handleiding beschrijft het
kopiëren van opnames gemaakt met
een digitale DV-camcorder naar de
computer via een FireWire-aansluiting
(IEEE1394). Dit product is alleen
bedoeld voor eigen gebruik. Het zonder
toestemming vermenigvuldigen en
verspreiden van auteursrechtelijk be-
schermd materiaal is wettelijk verboden.
Este manual muestra un ejemplo que
explica cómo capturar una secuencia
de vídeo de una videocámara digital DV
conectada al ordenador mediante el
puerto FireWire (IEEE1394).
Este producto es para uso personal
exclusivamente. La duplicación y
distribución no autorizada de
materiales con copyright es una
violación de las leyes del copyright.
UK D F
I NL E
The application software used here is:
Nero Vision Express from Ahead Software
19
How_TO_Nero6_Versie1_0 20-02-2004 08:05 Pagina 19
Page is loading ...
Page is loading ...

22
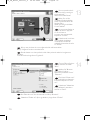
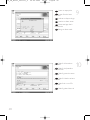
You can use these but-
tons to control your DV-ca-
mera. Press the "record" but-
ton to record video.
Diese Tasten können Sie
benutzen,um Ihre DV-Kamera
zu steuern. Drücken Sie die
Taste "Aufnehmen", um Video-
informationen aufzunehmen.
Ces boutons vous per-
mettent de commander votre
caméra DV. Appuyez sur le
bouton "Enregistrer" pour en-
registrer la vidéo.
E' possibile utilizzare
questi pulsanti per controllare
la camera-DV. Premere il pul-
sante "Registra" per registrare
il video.
U kunt deze knoppen gebruiken voor het bedienen van uw DV-camera.
Druk op de knop "Opnemen" om video op te nemen.
Estos botones permiten controlar la cámara DV.
Pulse el botón "Grabar" para grabar vídeo.
UK
D
F
I
NL
E
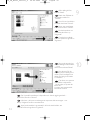
During capturing, you
will see the progress here.
Während der Auf-
nahme sehen Sie hier den
Fortschritt.
La progression de
l’acquisition est affichée ici.
Durante la cattura qui
viene visualizzata la sua
progressione.
Tijdens het opnemen
ziet u hier de voortgang.
Durante la captura, verá
el progreso de la misma aquí.
UK
D
F
I
NL
E
6
5
How_TO_Nero6_Versie1_0 20-02-2004 08:05 Pagina 22
Page is loading ...
Page is loading ...
Page is loading ...

26
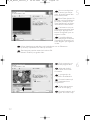
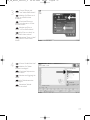
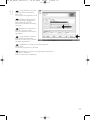
You can preview the fi-
nished movie by pressing on
the thumbnails.
When done, click "Next".
Wenn Sie auf die
Thumbnail-Symbole klicken,
sehen Sie eine Vorschau des
fertigen Films.
Wenn Sie fertig sind, klicken
Sie auf "Weiter".
Vous pouvez afficher un
aperçu du film en appuyant
sur les miniatures.
Lorsque vous avez terminé,
cliquez sur "Suivant".
Selezionando le miniatu-
re è possibile visualizzare
un'anteprima del filmato
realizzato.Al termine, fare clic
su "Avanti".
Klik op een miniatuur als u een afgeronde film wilt beoordelen.
Klik op "Volgende" zodra u tevreden bent.
Puede obtener una vista preliminar del vídeo pulsando sobre las imágenes en
miniatura.
Cuando termine, haga clic en "Siguiente".
UK
D
F
I
NL
E
Choose "Burn to", choo-
se your recorder and click
"Burn".
Wählen Sie "Brennen
auf", wählen Sie Ihren
Recorder und klicken Sie auf
"Brennen".
Choisissez "Graver vers"
puis le périphérique d’enregis-
trement et cliquez sur "Gra-
ver".
Selezionare "Masterizza
Su", specificare il recorder e
fare clic su "Scrivi".
Kies "Branden naar", kies de recorder en klik op "Branden".
Seleccione "Grabar en", elija su grabadora y haga clic en "Grabar".
UK
D
F
I
NL
E
14
13
How_TO_Nero6_Versie1_0 20-02-2004 08:05 Pagina 26

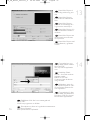
27
NeroVision Express is
transcoding and burning your
disc.
NeroVision Express
transcodiert und brennt Ihre
Disk.
NeroVision Express
procède au transcodage et à la
gravure de votre disque.
NeroVision Express è in
fase di trascodifica e scrittura
del disco.
NeroVision Express zet
de informatie om en brandt die
op de disc.
NeroVision Express está
transcodificando y grabando el
disco.
UK
D
F
I
NL
E
Congratulations, your disc
has been written successfully.
Click "OK".
You may exit the application now.
Herzlichen Glückwunsch –
Ihre Disk wurde erfolgreich er-
stellt. Klicken Sie auf "OK".
Sie können jetzt die Anwendung
verlassen.
Félicitations, votre disque
est prêt.
Cliquez sur "OK".
Vous pouvez maintenant fermer
l’application.
Congratulazioni, il disco è
stato scritto correttamente.
Fare clic su "OK".
Ora è possibile chiudere l'applica-
zione.
Gefeliciteerd! Uw disc is met succes gebrand.
Klik op "OK".
U kunt het programma nu afsluiten.
Enhorabuena, su disco se ha grabado correctamente.
Haga clic en "Aceptar".
Ahora puede cerrar la aplicación.
UK
D
F
I
NL
E
16
15
How_TO_Nero6_Versie1_0 20-02-2004 08:05 Pagina 27
Page is loading ...

How to make a video disc from video
files which are on the hard disk or a disc?
Wie erstellt man eine Video Disk von Video-Dateien,die sich auf der Festplatte
oder einer Disk befinden?
Comment créer un disque vidéo à partir de fichiers vidéo enregistrés
sur le disque dur ou sur un disque ?
Come si crea un video disc con file video memorizzati sull'hard disk o su un disco?
Hoe maak ik een videodisc met bestanden die nu op de harde schijf of een andere disc staan?
¿Cómo crear un disco de vídeo a partir de archivos de vídeo en el disco duro u otro disco?
This manual will show you how to make
a DVD-Video from source files which
are stored on your hard disc or on one
or more discs and that can be played in
most DVD-players.
A DVD Video is a DVD disc with video
files in a special format, which you can
play on a DVD Video Player or on a
DVD-ROM.
This product is for personal use only.
Unauthorized duplication and distribu-
tion of copyrighted materials is a viola-
tion of copyright law.
In dieser Anleitung wird beschrieben,
wie man eine DVD-Video Disk von
Quelldateien erstellen kann, die auf der
Festplatte oder auf einer oder mehre-
ren Disks gespeichert sind und die mit
den meisten DVD-Spielern wiedergege-
ben werden kann. Eine DVD Video ist
eine DVD Disk mit Video-Dateien in ei-
nem speziellen Format, die mit einem
DVD Video Player oder einem DVD-
ROM Laufwerk wiedergegeben werden
kann. Dieses Produkt ist nur für den pri-
vaten Gebrauch vorgesehen. Die unbe-
rechtigte Vervielfältigung und Verteilung
von urheberrechtlich geschütztem Ma-
terial stellt eine Verletzung des Urhe-
berrechts dar.
Ce manuel vous enseigne comment
créer un DVD vidéo lisible sur la plupart
des lecteurs de DVD à partir de fichiers
source présents sur votre disque dur ou
sur un ou plusieurs disques.
Un DVD vidéo est un DVD contenant
des fichiers vidéo dans un format spé-
cial que vous pouvez lire sur un lecteur
de DVD vidéo ou de DVD-ROM.
Ce produit est réservé à un usage pers-
onnel.
Toute duplication et distribution sans
autorisation des documents protégés
par copyright constitue une violation de
la législation sur les droits d’auteur.
Questa guida spiega come realizzare
un DVD-Video contenente file memo-
rizzati sul vostro disco rigido o su uno o
più dischi, riproducibile sulla maggioran-
za dei lettori DVD.
Un DVD Video è un disco DVD conte-
nente file video in un formato speciale,
riproducibile su un lettore DVD Video o
su un DVD-ROM.
Questo prodotto è rivolto esclusivamen-
te all'utilizzo personale.
La duplicazione e la distribuzione non
autorizzate di materiale protetto da co-
pyright e diritti d'autore costituiscono
violazione delle leggi sul copyright e sui
diritti d'autore.
Deze handleiding geeft aan hoe be-
standen die nu op uw harde schijf of op
een of meer andere discs staan op een
DVD-Video-disc brandt die u in de
meeste DVD-spelers kunt afspelen.
Een DVD-Video is een DVD-disc met vi-
deobestanden in een format dat u kunt
afspelen in een DVD-videospeler of een
DVD-ROM.
Dit product is alleen bestemd voor per-
soonlijk gebruik.
Onder het geldende copyright is het
verboden zonder voorafgaande toe-
stemming materiaal waarop copyright
rust te kopiëren of distribueren.
Este manual le muestra cómo crear un
DVD-Vídeo a partir de archivos de ori-
gen almacenados en el disco duro o en
uno o más discos que pueda ser repro-
ducido en la mayoría de los lectores de
DVD.
Un DVD-Vídeo es un disco DVD con ar-
chivos de vídeo en un formato especial,
que se puede reproducir en un lector de
DVD Vídeo o en un DVD-ROM.
Este producto es para uso personal ex-
clusivo.
La duplicación y distribución sin autori-
zación de materiales con derechos de
propiedad intelectual infringen las leyes
de propiedad intelectual.
UK D F
I NL E
The application software used here is:
Nero Vision Express from Ahead Software
29
How_TO_Nero6_Versie1_0 20-02-2004 08:05 Pagina 29
Page is loading ...
Page is loading ...

32
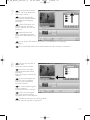
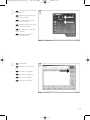
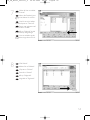
Choose the files you
want to add and click "Open".
Wählen Sie die hinzu-
zufügenden Dateien und klic-
ken Sie auf "Öffnen".
Sélectionnez les fichiers
à ajouter puis cliquez sur "Ou-
vrir".
Selezionare i file da aggi-
ungere e fare clic su "Apri"
Kies de bestanden die u
wilt toevoegen en klik op
"Openen".
Seleccione los archivos
que desea añadir y haga clic en
"Abrir"
UK
D
F
I
NL
E
The movies you loaded
are shown here.You can edit
them by choosing "Edit
Movie".
Hier werden die gelade-
nen Filme gezeigt. Sie können
sie editieren, indem Sie "Edit
Movie" wählen.
Les films que vous ve-
nez de charger sont réperto-
riés ici.Vous pouvez les mon-
ter en choisissant "Edit Movie".
Qui sono visualizzati i
filmati caricati. E' possibile
modificarli selezionando "Edit
Movie".
Hier ziet u welke bestanden u hebt toegevoegd. U kunt die bewerken door
"Edit Movie" te kiezen.
Los vídeos que ha cargado se muestran aquí. Puede editarlos seleccionando
"Edit Movie".
UK
D
F
I
NL
E
6
5
How_TO_Nero6_Versie1_0 20-02-2004 08:05 Pagina 32
Page is loading ...

34
After editing all files,
choose "Next".
Nach dem Editieren al-
ler Dateien wählen Sie
"Weiter".
Une fois tous les fichiers
modifiés, choisissez "Suivant".
Dopo aver modificato
tutti i file, fare clic su "Avanti".
Na het bewerken van
alle bestanden klikt u op
"Volgende".
Cuando haya editado
todos los archivos, haga clic en
"Siguiente".
UK
D
F
I
NL
E
You can change the lay-
out, the background, add titles,
… here.
When done, choose "Next".
Hier können Sie das
Layout und den Hintergrund
ändern,Titel hinzufügen, usw.
Wenn Sie fertig sind, wählen
Sie "Weiter".
Cet écran vous permet
de modifier la disposition,
_l'arrière-plan, d'ajouter des
titres, etc.
Lorsque vous avez terminé,
choisissez "Suivant".
Qui è possibile modificare la disposizione, lo sfondo, aggiungere titoli....
Al termine, fare clic su "Avanti".
Hier kunt u de layout en achtergrond aanpassen, titels toevoegen ... enz.
Klik op "Volgende" zodra u tevreden bent.
Aquí puede cambiar la presentación, el fondo, añadir títulos, etc.
Cuando termine, haga clic en "Siguiente".
UK
D
F
I
NL
E
10
9
How_TO_Nero6_Versie1_0 20-02-2004 08:05 Pagina 34
Page is loading ...
Page is loading ...

How to copy a disc?
Eine Disk kopieren
Comment copier un disque?
Come copiare un dischi?
Hoe kopieer ik een disc?
¿Cómo copiar un disco?
This manual shows an example of how
to copy a disc.
This product is for personal use only.
Unauthorized duplication and
distribution of copyrighted materials is a
violation of copyright law.
In diesem Handbuch wird an einem
Beispiel gezeigt, wie eine Disk kopiert
wird.
Dieses Produkt ist nur für den
persönlichen Gebrauch.
Die ungenehmigte Vervielfältigung und
der Vertrieb von urheberrechtlich
geschützten Materialien stellt eine
Verletzung des Urheberrechts dar.
Ce manuel illustre la procédure de co-
pie d’un disque.
Ce produit est à usage personnel
exclusivement.
Toute duplication et diffusion non
autorisée de matières soumises au droit
d’auteur et de copie (copyright)
constituent une violation de la loi sur les
droits d’auteur et de copie (copyright).
Questo manuale contiene informazioni
su come copiare un dischi.
Questo prodotto è destinato ad un uso
esclusivamente personale.
La duplicazione e la distribuzione di
materiali protetti dal diritto d'autore
rappresentano una violazione della
legge sul copyright.
Deze handleiding beschrijft het
kopiëren van een disc.
Dit product is alleen bedoeld voor eigen
gebruik.
Het zonder toestemming vermenig-
vuldigen en verspreiden van
auteursrechtelijk beschermd materiaal
is wettelijk verboden.
Este manual muestra un ejemplo de
cómo copiar un disco.
Este producto es para uso personal
exclusivamente.
La duplicación y distribución no
autorizada de materiales con copyright
es una violación de las leyes del
copyright.
UK D F
I NL E
The application software used here is:
Nero - Burning Rom from Ahead Software
37
How_TO_Nero6_Versie1_0 20-02-2004 08:05 Pagina 37

38
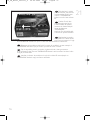
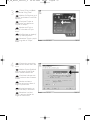
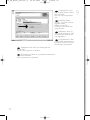
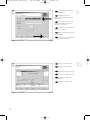
Start "Nero SmartStart"
from the desktop.
Starten Sie "Nero
SmartStart" von Ihrer
Oberfläche aus.
Lancez "Nero Smart-
Start" depuis le bureau.
Aprire "Nero Smart-
Start" dal desktop.
Start "Nero SmartStart"
vanaf het bureaublad.
Inicie "Nero SmartStart"
desde el escritorio.
UK
Choose "CD" or "DVD".
Wählen Sie "CD" oder
"DVD".
Choisissez "CD" ou
"DVD".
Selezionare "CD" o
"DVD".
Kies "CD" of "DVD".
Seleccione "CD" o
"DVD".
UK
D
F
I
NL
E
2
1
D
F
I
NL
E
How_TO_Nero6_Versie1_0 20-02-2004 08:05 Pagina 38
Page is loading ...
Page is loading ...

Insert an empty disc in
your destination drive.
Legen Sie eine leere Disk
in Ihr Ziellaufwerk ein.
Insérez un disque vierge
dans votre lecteur de destina-
tion.
Inserire un disco vuoto
nell'unità di destinazione.
Leg een lege schijf in het
doelstation.
Coloque un disco vacío
en la unidad de destino.
UK
D
F
I
NL
E
"Nero" will now burn
your disc.
"Nero" wird jetzt Ihre
Disk brennen.
"Nero" grave alors votre
disque.
"Nero" inizierà a scrivere
sul disco.
"Nero" zal nu uw CD
branden.
"Nero" grabará ahora el
disco.
UK
D
F
I
NL
E
8
7
41
How_TO_Nero6_Versie1_0 20-02-2004 08:05 Pagina 41

42
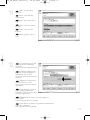
Congratulations, your
disc has been written success-
fully. Click "OK".
You may exit the application
now.
Herzlichen Glück-
wunsch – Ihre Disk wurde er-
folgreich erstellt.
Klicken Sie auf "OK".
Sie können jetzt die Anwen-
dung verlassen.
Félicitations, votre dis-
que est prêt. Cliquez sur "OK".
Vous pouvez maintenant fer-
mer l’application.
Congratulazioni, il disco
è stato scritto correttamente.
Fare clic su "OK". Ora è possi-
bile chiudere l'applicazione.
Gefeliciteerd! Uw disc is met succes gebrand.
Klik op "OK".
U kunt het programma nu afsluiten.
Enhorabuena, su disco se ha grabado correctamente.
Haga clic en "Aceptar".
Ahora puede cerrar la aplicación.
UK
D
F
I
NL
E
9
How_TO_Nero6_Versie1_0 20-02-2004 08:05 Pagina 42
Page is loading ...
Page is loading ...
Page is loading ...
Page is loading ...
Page is loading ...
Page is loading ...
Page is loading ...
Page is loading ...
Page is loading ...
Page is loading ...
Page is loading ...
Page is loading ...
Page is loading ...
Page is loading ...
Page is loading ...
Page is loading ...
Page is loading ...
Page is loading ...
Page is loading ...
Page is loading ...
Page is loading ...
Page is loading ...
-
 1
1
-
 2
2
-
 3
3
-
 4
4
-
 5
5
-
 6
6
-
 7
7
-
 8
8
-
 9
9
-
 10
10
-
 11
11
-
 12
12
-
 13
13
-
 14
14
-
 15
15
-
 16
16
-
 17
17
-
 18
18
-
 19
19
-
 20
20
-
 21
21
-
 22
22
-
 23
23
-
 24
24
-
 25
25
-
 26
26
-
 27
27
-
 28
28
-
 29
29
-
 30
30
-
 31
31
-
 32
32
-
 33
33
-
 34
34
-
 35
35
-
 36
36
-
 37
37
-
 38
38
-
 39
39
-
 40
40
-
 41
41
-
 42
42
-
 43
43
-
 44
44
-
 45
45
-
 46
46
-
 47
47
-
 48
48
-
 49
49
-
 50
50
-
 51
51
-
 52
52
-
 53
53
-
 54
54
-
 55
55
-
 56
56
-
 57
57
-
 58
58
-
 59
59
-
 60
60
-
 61
61
-
 62
62
-
 63
63
-
 64
64


Ask a question and I''ll find the answer in the document
Finding information in a document is now easier with AI
in other languages
- italiano: Philips PBDV1640G/35 Manuale utente
- français: Philips PBDV1640G/35 Manuel utilisateur
- español: Philips PBDV1640G/35 Manual de usuario
- Deutsch: Philips PBDV1640G/35 Benutzerhandbuch
- Nederlands: Philips PBDV1640G/35 Handleiding
Related papers
-
Philips DVDRW824K/40 User manual
-
-
Philips DVDRW228K Owner's manual
-
-
-
Philips DVDR1625K User manual
-
-
Philips DVDR16LSK User manual
-
Philips SPD7000BM User manual
-
Other documents
-
Gigabyte GO-D1600F Owner's manual
-
Nero Vision Express 3 Owner's manual
-
Sony DSC-M2 Quick start guide
-
LG GDR-H30N User manual
-
Ewent EW7016 User manual
-
-
-
-
-
LG GCR-8526B User manual