Page is loading ...

1
A FEW REMINDERS:
With modern plastics and advanced engineering, it is no
longer necessary to crank faucets off with great pressure - in
fact, overtightening the handle can shorten the life of your
faucets. Use average pressure and turn only until water stops.
Should a drip develop, turning the knob gently should stop the
leak.
The most common repair made by the consumer is the
replacement of the seat washer or cartridge. Should a leak
develop in your faucet, there are different but simple repair
procedures. The replacement of the washer in a stem &
bonnet assembly is a simple process. This manual and some
repair parts available from your dealer is all youll need.
If water flow seems low, some faucets are equipped with flow
restrictors for water conservation mandated by Public Law
102-486.
PHOENIX PRODUCTS
5 YEAR LIMITED WARRANTY
For a period of five years, Phoenix Products warrants its
faucets against defects in material or workmanship, ordinary
wear and tear excluded. Special finishes other than chrome
are warranted for one year. Should any faucet part or parts
thereof prove defective, return the material immediately to:
Phoenix Products, Inc., 583 Miller Road, Avon Lake, Ohio
44012. Repair or replacement will be made without charge.
LIABILITY FOR CONSEQUENTIAL DAMAGES UNDER ANY
AND ALL WARRANTIES ARE EXCLUDED TO THE EXTENT
SUCH EXCLUSION IS PERMITTED BY LAW. Some states
do not allow the exclusion or limitation of consequential
damages, so the above limitation and exclusion may not
apply to you. This warranty gives you specific legal rights, and
you may also have other rights which vary from state to state.
Phoenix Products, Inc.
1-440-933-8100
TOLL
FREE
1-800-222-6041
FAX
440-933-6252
WEB
Phoenixfaucets.com
Dear Customer:
Some or all of the faucets in your RV, Manufactured Home or Boat were produced by Phoenix Products,
Inc. Our company is a family owned business specializing in faucets for the Recreational Vehicle,
Manufactured Housing and Marine applications. This brochure explains your faucets operation and
simple maintenance items that may be required.
All of us work very hard to provide you with the best possible faucet value. If you have problems with your
faucet that you and/or your dealer cant solve, please contact us. If you are not satisfied with the
response of our Customer Service personnel, please feel free to contact me directly. Your satisfaction is
our primary goal.
Very truly yours,
Raymond M. Arth
President & Chief Executive Officer
FAUCET OWNERS MANUAL
4
For information regarding additional service or replacement parts contact: Phoenix Products, Inc. 583 Miller
Road Avon Lake, OH 44012, or call 800-222-6041, fax 440-933-6252., email [email protected]
Ledge Faucets - 8 Centers
Key Part No. Description
1 40-16 H or C Index Button, Clear
2 40-2H Handle Screw (brass stem)
60-4-2 Handle Screw (plastic stem)
3 6-40-9-16 H or C Handle, Clear w/Button & Screw
4 40-5-8 Bonnet Lock Washer
5 40-5-3 Bonnet Lock
6 41-5-0 Stem & Bonnet (brass)
45-5-0 Stem & Bonnet (plastic)
P82 Washerless Cartridge
7 40-2S Seat Screw(brass)
45-2S Seat Screw (plastic)
8 40-3-2 Seat Washer
9 40-12-1 Renu Seat
10 N50-12PLC 8 Shield
11 40-11 Locknut, 1/2 Plastic
12 50-78A-0 8 Tubular Spout, C.P.
13 50-11C Spout Nut C.P., Brass
14 40-13-3 End Trim Washer
15 6-40-13-0 End Trim Assembly
16 50-19C Aerator
17 52-78A-0 8 Decorative Spout, C.P.
18 P52-11C Spout Nut, Plastic C.P.
19 56-76-0 6 Bar Spout
20 56-79-0 9 Bar Spout (not shown)
Lavatory with Diverter - 4 Centers
Key Part No. Description
1 40-16 H or C Button, Index, Clear
2 40-2H Handle Screw (brass stem)
60-4-2 Handle Screw (plastic stem)
3 6-40-9-16 H or C Handle, Clear w/Button & Screw
4 40-5-8 Bonnet Lock Washer
5 40-5-3 Bonnet Lock
6 41-5-0 Stem & Bonnet (brass)
45-5-0 Stem & Bonnet (plastic)
P82 Washerless Cartridge
7 40-2S Seat Screw(brass)
45-2S Seat Screw (plastic)
8 40-3-2 Seat Washer
9 40-12-1 Renu Seat
10 40-11 Locknut, Plastic 1/2
11 P40-12-16 Black Domed Hole Plug
12 40-13-3 End Trim Washer
13 6-40-13-0 End Trim Assembly
14 50-19C Aerator
15 44-13 D Spud For lavatory diverter only
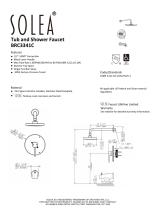
Exposed 2 Valve Diverter & Tub Filler - 8 Centers
Key Part No. Description
1 40-16 H or C Index Button, Clear
2 40-2H Handle Screw (brass stem)
60-4-2 Handle Screw (plastic stem)
3 6-40-9-16 H or C Handle, Clear w/Button & Screw
4 40-5-8 Bonnet Lock Washer
5 40-5-3 Bonnet Lock
6 41-5-0 Stem & Bonnet (brass)
45-5-0 Stem & Bonnet (plastic)
P82 Washerless Cartridge
7 40-2S Seat Screw(brass)
45-2S Seat Screw (plastic)
8 40-3-2 Seat Washer
9 40-12-1 Renu Seat
10 40-11 Locknut, Plastic 1/2
11 40-11-1 Locknut, Zinc 1/2
12 40-18 Crowfoot Washer 1/2
13 60-10-8C Flange Shower Arm, C.P.
14 60-10C Shower Arm, C.P.
15 34-1/2 Showerhead, 1/2
16 6-48-1-0 Clapper Assy
fig. 3
fig. 1
1
2
3
4
6
9
10
11
12
13
14
15
16
5
1
2
3
4
6
9
10
11
17
18
15
16
12
19 / 20
13
16
15
14
14
13
5
1
2
3
4
6
9
10
11
15
14
12
13
5
fig. 2
7
8
7
8
OM68 6/03
7
8
6-35-9 H or C
3
4
5
6-44-9C1
3
4
5

2
CARE AND CLEANING
Many of the bathroom cleaners in use today contain
aggressive chemicals and abrasives for the purpose of
removing soap scum and stains from porcelain, enamel, and
ceramic tile surfaces. Often these cleaners are also used to
clean the chrome, polished brass, or other finishes on
faucets, showerheads and other bathroom accessories.
Depending on the particular abrasive or chemical, application
of these products may result in either immediate or long-term
damage or even removal of the finish. Please be aware that
unintentional splashing or overspray of cleaners can be as
harmful as deliberate application.
Phoenix Products, Inc. recommends wiping with a soft,
damp cloth or towel.
General comments on the potential effects of
various types of cleaners are noted below:
* Foaming Cleaners- may cause crazing or cracking of
acrylic handles and plastic parts. Repeated use may
cause softening of protective organic overcoats on pol-
ished brass finishes.
* Bleach- may cause long term corrosion, damage to
finishes.
* Solvent Stain and Spot Removers- may cause cracking
of plastic parts, damage to finishes.
* Cleaners with Alcohol- may cause cracking in acrylic
handles, other plastic parts.
* Tile/Grout Cleaners- these will remove finishes.
* Lime Removers- typically contain either phosphoric or
hydrofluoric acids, which remove finishes.
* Abrasive Cleansers- even mild ones, will remove chrome,
brass, or any other finish. At first the finish will become
dull and scratched.
OPERATION AND CARE
SHOULD A LEAK DEVELOP - SINGLE HANDLE FAUCET
ALWAYS TURN OFF THE WATER SUPPLY. Open the fau-
cet lines to relieve any line pressure.
1) Remove the handle button (1).
2) Remove the handle screw or rear set screw (2).
3) Lift off handle (3).
4) Wrap a clean dry rag around the centerpiece nut (4) and
unscrew it.
5) Lift off ball cap (8.1)
6) Pull up on the metal ball lever (8.2) to remove the ball lever
and ball seat (8.3).
(Rock the lever back and forth to loosen. A pliers can be
used but take care not to damage the square handle
drive.)
7) Remove Bonnet Bottom (8.6).
8) Clean debris from underside of bonnet bottom and inside
the faucet body by flushing with water. Check bonnet
bottom inlet surface for scoring. Replace as necessary.
9) To remove the seat washers and springs (8.7, 8.8) insert
the tip of a pen into the washer and pull up at an angle.
10) Inspect the seat washers for wear or damage. If the
washer is cut or worn, it must be replaced with a genuine
Phoenix repair kit.
Reassembly
1) To replace the spring and seat washer it is helpful to
assemble them on the end of a pen. The spring fits into
the larger end of the seat washer. If there is a spring insert
(8.9), place it on the other end of the spring. Once the
spring and washer are positioned in the hole, the other
end of the pen can be used to tap the washer into place.
2) To assemble the cartridge, insert the ball lever into the
ball seat and rotate until the cross bar on the lever fits into
the notches on the ball seat (it will only fit one way).
3) Snap the ball lever into the bonnet bottom by aligning the
flat sides of the bottom of the lever and the hole in the
bonnet bottom. You may need a little pressure to snap it
into place. (Metal faucet bonnet bottom is a loose fit).
4) Place the bonnet bottom, ball seat and ball lever
assembly into the faucet with the holes in the bonnet
bottom at the back of the faucet.
5) Align the key on the ball seat with the notch on the hub
and apply gentle pressure until the top of the ball seat is
flush with the top of the hub.
6) Replace ball cap by rotating on the ball lever until it drops
down. Then rotate to line the notch on the ball cap with
the key on the top of the ball seat.
7) Replace centerpiece nut, handle , screw and button.
8.1
8.2
8.3
8.4
8.5
8.6
8.7
8.8
8.9
(some models)
Key
Notch
6-1201-5-0 (metal)
6-N1201-5-0 (plastic)
1
2
3
4
5
6
7
8
Hub
3
TWO HANDLE FAUCETS
WHAT KIND OF CARTRIDGE IS IN YOUR FAUCET?
To determine if your two handle faucet has a washerless
cartridge, view the handle at eye level and turn the hot
side handle on to flow water. If the handle moves
downward, the faucet has a washerless cartridge. If it
moves upward, it has a compression stem and bonnet
inside.
The compression stem and bonnet design for faucets has
been a standard in the plumbing industry for years. When
the faucet is closed, a rubber seat washer is compressed
against a seat in the body to shut off the water flow. There
is some tendency to overtighten the handle when
shutting off the water, which can cause unnecessary
wear. For the longest life, close the faucet only until water
stops.
SHOULD A LEAK DEVELOP - TWO HANDLE FAUCET
Leaks can be caused by debris in the water line that
prevents the seals from closing completely. Turning the
faucet full on and off several times may flush out the
small item(s) lodged in the faucet. If the problem
persists, you should dismantle and check the faucet
following these steps. (see fig. 1, 2 or 3)
COMPRESSION STEM AND BONNET CARTRIDGE
1) ALWAYS TURN OFF THE WATER SUPPLY. Open
the faucet lines to relieve any line pressure.
2) Unsnap the HOT and COLD index button (#1) on the
handle.
3) Remove the handle screw (2) using a phillips screw-
driver.
4) Lift off the handle. (3).
5) With a blade screwdriver, gently pry up the bonnet
lock washer (4) and lift the bonnet lock (5) off the
stem and bonnet.
6) Unscrew the brass stem and bonnet assembly (6)
counter-clockwise with a 3/4 6 pt. (or 12 pt.) deep
socket.
7) Check for debris in the faucet body and remove it by
flushing with water or brushing it out with a small
brush.
8) Check the seat washer (8) for wear or damage. If the
washer is cut or worn, you can temporarily repair the
faucet by removing the seat screw (7) and turning the
washer upside down and replacing it.
MAINTENANCE
It is helpful to use the faucet handle as a holder for the stem
when unscrewing the seat screw. If the seat washer is worn,
cut or hardened, it should be replaced. A replacement seat
washer in a Trade Size No. 00 (a 1/2 diameter seat washer)
is available at any hardware store.
NOTE: There may be a solid brass or a plastic renewable seat
in the base of the faucet. If there is a hex-shaped hole, it is
renewable and can be replaced. Check the surface of the
seat, it should be smooth. If nicks and scratches are present,
the renewable seat can be replaced. Replacement seats are
available through your dealer or local hardware store. Phoenix
part no. 40-12-1 for plastic faucets or use part no. 40-1 for
brass faucets. Streamway part no. 108-25 can also be used in
brass faucets only.
A 5/16 Allen wrench is used to remove and install brass
renewable seats, and a 1/4 for plastic. Use caution in
aligning the threads when re-installing.
9) You are ready to re-assemble the faucet now. Threads on
the bonnet assembly and on the stem body can be stripped
by cross-threading or overtightening. Be sure to align the
threads back into the body by gently turning counter-
clockwise until the threads match. Hand tighten in a clock-
wise direction, until assembly is snug in the body, then
tighten 1/2 turn more. Test for leaks by turning on water. If
there are further leaks, retighten 1/4 turn. DO NOT OVER-
TIGHTEN. Reinstall bonnet lock, shoulder down, with 12 pt.
opening engaged with stem and bonnet hex. Reinstall bonnet
lockwasher making sure the outer diameter is underneath all
four tabs of the shield.
Reinstall the handle, handle screw and button in the opposite
manner they were removed.
WASHERLESS CARTRIDGE
Remove the washerless cartridge by following the same steps
1 through 7 as for the compression stem and bonnet.
8) Remove any line trash. The screen in the shank may be
removed and back flushed to clear debris. Examine the o-ring
at the bottom of the stem for tears of wear. For an immediate
fix, replace this o-ring with trade size no. 012. For best
results, replace with genuine Phoenix washerless cartridge
part no. P82.
Reassemble following step 9 instructions.
/