Page is loading ...

ManualTreadmillwithPulse
Item#1005
OWNER’SMANUAL

1005.2‐121914

SERVICE ------------------------------------------------------------------------ 2
IMPORTANT LABELS -------------------------------------------------------- 3
PRODUCT SAFETY ---------------------------------------------------------- 4
OVERVIEW DRAWING ------------------------------------------------------ 5
PART LIST ---------------------------------------------------------------------- 6
HARDWARE PACKING LIST & TOOLS --------------------------------- 8
ASSEMBLY --------------------------------------------------------------------- 9
COMPUTER --------------------------------------------------------------------- 16
STORAGE ----------------------------------------------------------------------- 17
ADJUSTMENTS --------------------------------------------------------------- 18
LUBRICATION ----------------------------------------------------------------- 19
TROUBLE SHOOTING & MAINTENANCE ---------------------------- 20
WARM UP ---------------------------------------------------------------------- 21
WARRANTY -------------------------------------------------------------------- 22
FAX FORM ---------------------------------------------------------------------- 23
TABLEOFCONTENTS
1

IMPORTANT: FOR NORTH AMERICA ONLY
To request product service and order
replacement parts, please call our
customer service department at:
1-844-641-7921
Monday through Friday, 8:00 AM-5:00 PM Pacific Standard Time,
or email us at: service@paradigmhw.com
Please visit our website at www.paradigmhw.com.
Please have the following information ready when requesting for service:
Your name
Phone number
Model number
Serial number
Part number
Proof of Purchase
*Before returning this product to the store please contact
customer service at the contact number.
Paradigm Health & Wellness, Inc.
1189 Jellick Ave, City of Industry, CA 91748, USA
SERVICE
2

IMPO
R
R
TANT
L
3
L
ABELS

Basic precautions should always be followed, including the following
safety instructions when using this manual treadmill: Read all
instructions before using this manual treadmill.
1. Check every part of the equipment before exercise. If there is any
defective component, replace it immediately; keep the equipment out of
use until repair.
2. Make sure all parts, bolts and nuts are well assembled and locked before
exercise.
3. Never insert any object into any opening.
4. Never operate this manual treadmill if it is not working properly. If it has
been dropped or damaged, or been exposed to water, return the appliance
to a service center for examination and repair.
5. Do not attempt any maintenance or adjustments other than those
described in this manual. Should any problems arise, discontinue use
and consult an Authorized Service Representative.
6. Wear comfortable and suitable clothing when using the treadmill. Do not
use the treadmill barefoot, in only socks or in sandals, always wear athletic
shoes. Never wear loose clothing because it could run the risk of getting
caught in the treadmill.
7. Keep children and pets away from the equipment while in use.
8. Do not use the treadmill outdoors. This manual treadmill is for household
use only.
9. Only one person should be on the treadmill while in use.
10. Keep the manual treadmill on a solid, level surface with the minimum
safety area clearance of 78.7” x 118” of the manual treadmill. Be sure the
area around the treadmill remains clear during use and has adequate
clearance.
11. Hold the handlebar with your hands when starting or stopping exercise and
increasing or decreasing the speed.
12. If feeling chest pains, nausea, dizziness, or short of breath, you should
stop exercising immediately and consult your physician before continuing.
13. The maximum weight capacity for this product is 260 lbs.
WARNING: Before beginning any exercise program consult your
physician. This is especially important for the persons who are over 35
years old or who have pre-existing health problems. Read all instructions
before using any fitness equipment.
CAUTION: Read all instructions carefully before operating this
product. Retain this Owner’s Manual for future reference.
PRODUCTSAFETY
4

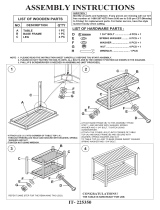
OVERVIEWDRAWING
5
1
2
3
4
7
10
11
14
15
19
23
24
25
26
22
6
28
29
50
36
33
42
58
32
63
27
54
57
44
30
43
34
35
35
34
35
60
57
59
46
47
39
52
17L
57
49
47
37R
57
43
18
20
48
59
61
17R
61
60
50
57
59
46
57
29
43
57
28
30
22
57
43
22
42
18
19
20
59
37L
21
55
40
16
56
41
55
56
41
55
21
42
55
56
41
40
55
38
23
42
43
54
21
16
5
53
53
53
33
12
13
51
42
12
47
62
12
13
51
42
12
47
62
31
31
45
45
9
8

No. Description Qty No. Description Qty
001 Rear Roller Ø60x395 1 026
Safety Tube B (□25x460)
1
002 Running Deck 1020x407x12 1 027 Spring Knob Ø8 1
003 Front Roller Ø60x395 1 028 Transport Wheel Ø50 2
004 Running Belt 2400x335x1.2 1 029
Square End Cap (□38)
2
005 Main Frame 1 030 Rubber Pad 4
006 Protective Cover 1 031
Extension Sensor Wire III
(180mm)
1
007 Base Frame 1 032 Sensor with Wire 1
008 Left Handlebar 1 033
Extension Sensor Wire I
(1250mm)
1
009 Right Handlebar 1 034
Extension Sensor Wire II
(250mm)
1
010 Left Handlebar Support Tube 1 035
Extension Hand Pulse Sensor Wire
(250mm)
2
011 Right Handlebar Support Tube 1 036 Wire Plug (Ø6xØ21x10) 1
012 Hand Pulse Sensor with Wire 2 037R Right Side Rail (950mm) 1
013 Handlebar Adorner 2 037L Left Side Rail (1020mm) 1
014 Computer Bracket Ø28 1 038 Magnet with Magnet Bracket 1
015 Computer (HR-1566SP) 1 039 Screw ST3x6 2
016
Rear Roller Adjustment Bolt
Plate
2 040
Rear Roller Adjustment Bolt
M6x50mm
2
017R Right Incline Adjuster 1 041 Hexagon Head Bolt M6x25 6
017L Left Incline Adjuster 1 042 Screw ST4x16 8
018 Incline Adjuster End Cap Ø50 2 043 Bolt M8x40mm 5
019 Incline Adjuster End Cap Ø38 2 044 Bolt M8x35mm 1
020 Locking Pin Ø8x60 2 045 Bolt M8x45mm 4
021 Main Frame End Cap T65x25 3 046 Carriage Bolt M8x55mm 4
022
Square End Cap (□25.4)
3 047 Bolt M8x16mm 4
023
Square End Cap (□20)
2 048 Washer Ø12.5xØ22 3
024
Safety Tube A (□20x500)
1 049 Sleeve Ø16xØ12.5x9mm 1
025
Safety Tube B Bushing
(F23xF20.3x42)
1 050 Bolt M10x55mm 2
PART LIST
6

No. Description Qty No. Description Qty
051
Handlebar Support Tube End
Cap Ø28
2 058 Screw ST3x12 2
052 Bolt M5x10mm 2 059 Washer M8 6
053 C Clip Ø12 3 060 Washer M10 2
054 Nylon Washer Ø8.2xØ16x2T 2 061
Computer Bracket Foam Grip
Ø23x3Tx390
2
055 Washer M6 8 062 Handlebar Foam Grip Ø23x3Tx580 2
056 Spring Washer M6 6 063 Screw ST4x12 2
057 Nylon Nut M8 10
7
PARTLIST

HARDWARE&TOOLSLIST
8
Allen Wrench 6mm
1 PC
Allen Wrench with Phillips
Screwdriver 5mm 1 PC
Wrench
1 PC
(63) Screw ST4x12
2 PCS
(47) Bolt M8x16mm
2 PCS
(50) Bolt M10x55mm
2 PCS
(57) Nylon Nut M8
4 PCS
(59) Washer M8
4 PCS
(60) Washer M10
2 PCS
(45) Bolt M8x45mm
4 PCS
(46) Carriage Bolt
M8x55mm
4 PCS

Ste
Att
a
Fra
M8
wit
h
NO
T
ST
E
Ha
p 1
a
ch both L
e
me (7) wit
h
Washers
(
h
Phillips
S
T
E: PLE
A
E
P 5 IS C
O
rdware:
(46) Car
r
M8x
5
4
P
e
ft/Right
H
h
four Car
r
(
59). Tig
h
S
crewdrive
A
SE DO N
O
O
MPLETE
r
iage Bolt
5
5mm
P
CS
H
andlebar
S
r
iage Bolt
s
h
ten bolts
a
r
and Wre
n
O
T FULLY
D.
A
S
(5
S
upport T
u
s
(46), four
a
nd nylon
n
ch provid
TIGHTEN
SSEMB
L
9
5
7) Nylon
N
4 PC
S
u
bes (10,
1
M8 Nylon
nuts with
t
ed.
H
A
RDW
A
L
Y
A
Phi
l
Tool
:
N
ut M8
S
1) onto th
e
Nuts (57)
,
t
he 5mm
A
A
RE IN ST
A
llen Wre
n
l
lip
s
Scre
w
Wren
c
(59
e
Base
,
and four
A
llen Wren
c
T
EP 1 UNT
n
ch with
w
driver 5m
m
c
h
9
) Washer
M
4 PCS
c
h
IL
m
M
8

6
63
5
Step 2
Attach the Protective Cover (6) onto the Main Frame (5) with two ST4x12
Screws (63). Tighten screws with the 5mm Allen Wrench with Phillips
Screwdriver provided.
Hardware:
.
ASSEMBLY
10
(63) Screw S4x12
2 PCS
Allen Wrench with
Phillips Screwdriver 5mm
Tool:

24
26
54
57
44
57
44
54
57
24
50
60
60
50
7
10
11
33
32
5
5
43
54
Step 3
Lift the front end of Main Frame (5) up by two or more people and then
attach the Main Frame (5) onto the Left/Right Handlebar Support Tubes
(10, 11) with two M10x55mm Bolts (50) and two M10 Washers (60).
Tighten bolts with the 6mm Allen Wrench provided. Please do not fully
tighten the bolts until the handlebars are installed.
Connect the Sensor Wire (32) from the Main Frame (5) to the Extension
Sensor Wire I (33) from the Right Handlebar Support Tube (11).
Remove one M8x35mm Bolt (44), one Ø8.2xØ16x2T Nylon Washer (54),
and one M8 Nylon Nut (57) from the Safety Tube A (24). Remove bolt
and nylon nut with the 5mm Allen Wrench with Phillips Screwdriver and
Wrench provided.
Remove one M8x40mm Bolt (43), one Ø8.2xØ16x2T Nylon Washer (54),
and one M8 Nylon Nut (57) from the Safety Tube B (26). Remove bolt
and nylon nut with the 5mm Allen Wrench with Phillips Screwdriver and
Wrench provided.
Fold up the Main Frame (5) and hold it by one person, release the Spring
Knob (27) by the other person and pull the Safety Tube A (24) to
stretched-out. Attach the Safety Tube B (26) onto the L-plate on the
Base Frame (7) with one M8x40mm Bolt (43), one Ø8.2xØ16x2T Nylon
Washer (54), and one M8 Nylon Nut (57) that were removed.
ASSEMBLY
Tool:
Wrench
Allen Wrench 6mm
Allen Wrench with
Phillips Screwdriver 5mm
11

Tighten bolt and nylon nut with the 5mm Allen Wrench with Phillips
Screwdriver and Wrench provided.
Attach the Safety Tube A (24) onto the Main Frame (5) with one
M8x35mm Bolt (44), one Ø8.2xØ16x2T Nylon Washer (54), and one M8
Nylon Nut (57) that were removed. Tighten bolt and nylon nut with the
5mm Allen Wrench with Phillips Screwdriver and Wrench provided.
NOTE: It is recommended that you always use the aid of a second
person when assembling the treadmill.
Hardware:
12
(50) Bolt M10x55mm
2 PCS
(60) Washer M10
2 PCS
ASSEMBLY

14
34
35
35
12
47
12
47
31
9
8
Step 4
Connect the Hand Pulse Sensor Wire (12) from Left handlebar (8) to
Hand Pulse Sensor Wire(35) from the Computer bracket (14). Connect
speed sensor wire (31) from the Right Handlebar (9) to the Speed Sensor
Wire(34) from the computer bracket (14).
Connect the Hand Pulse Sensor Wire (12) from the Left Handlebar (8) to
the Extension Hand Pulse Sensor Wire (35) from the Computer Bracket
(14).
Then install the Computer Bracket (14) to both Left/Right Handlebars
(8, 9) by inserting the Computer Bracket (14) onto both Left/Right
Handlebars (8, 9), using two M8x16mm Bolts (47). Tighten bolts with
the 5mm Allen Wrench with Phillips Screwdriver provided.
IMPORTANT: While installing the computer bracket onto the right and left
handlebars, make sure the wires are installed inside the right and left
handlebars and pay attention not to pinch the wires.
Hardware:
ASSEMBLY
(47) Bolt M8x16mm
2 PCS
Allen Wrench with
Phillips Screwdriver 5mm
Tool:
13

33
13
13
10
31
45
45
9
8
11
Step 5
Connect the Extension Sensor Wire I (33) from the Right Handlebar
Support Tube (11) to the Extension Sensor Wire III (31) from the Right
Handlebar (9).
Attach both Left/Right Handlebars (8, 9) onto both Left/Right Handlebar
Support Tubes (10, 11) with two Handlebar Adorners (13) and four
M8x45mm Bolts (45). Tighten bolts with the 5mm Allen Wrench with
Phillips Screwdriver provided.
IMPORTANT: While installing the both left/right handlebars onto both
left/right handlebar support tubes, make sure the wires are installed
inside the right handlebar support tube and pay attention not to pinch the
wires.
NOTE: PLEASE FULLY TIGHTEN ALL HARDWARE INSTALLED IN
STEP 1 TO STEP 5 WITH THE TOOLS PROVIDED.
Hardware:
ASSEMBLY
(45) Bolt M8x45mm
4 PCS
14
Allen Wrench with
Phillips Screwdriver 5mm
Tool:

15
52
35
34
14
Step 6
Remove two M5x10mm Bolts (52) from back of the Computer (15). Remove
bolts with the 5mm Allen Wrench with Phillips Screwdriver provided.
Connect the Extension Sensor Wire II (34) and Extension Hand Pulse Sensor
Wires (35) to the wires that come from the Computer (15). Then attach the
Computer (15) onto the Computer Bracket (14) with two M5x10mm Bolts (52)
that were removed. Tighten bolts with the 5mm Allen Wrench with Phillips
Screwdriver provided.
ASSEMBLY
Allen Wrench with
Phillips Screwdriver 5mm
Tool:
15

Ke
y
M
O
M
O
exc
SE
T
RE
S
AU
T
the
will
Dis
SC
A
TI
M
SP
E
DI
S
CA
L
OD
O
PU
L
Set
Yo
u
set.
Pre
Pre
Ho
w
1.
2.
3.
4.
5.
y
function
O
DE: Displ
a
O
DE key fo
r
c
ept the O
D
T
: To set
g
S
ET: To c
l
T
O ON/O
F
computer
turn off a
u
play func
t
A
N
M
E
E
ED
S
TANCE
L
ORIES
OMETER
L
SE
t
a goal v
a
u
can set
a
ss MODE
ss SET to
w
to insta
l
Remove
t
Place tw
o
Insure b
a
contact
w
Re-instal
l
If the dis
p
seconds
s:
a
y functio
n
r
2 secon
d
D
O (ODO
M
g
oal value
s
l
ear data
a
F
F: When
y
will turn o
n
u
tomaticall
y
t
ions:
Auto
m
Displ
a
Displ
a
Displ
a
Displ
a
rough
shoul
d
Displ
a
sessi
o
Displ
a
a
lue:
a
n exercis
e
to select
a
set the va
l
l the batt
e
t
he batter
y
o
"SIZE-
AA
a
tteries ar
e
w
ith batteri
e
l
the batte
r
p
lay is ille
g
before rei
n
n
selection
.
d
s, all data
M
ETER) d
a
s
as exerci
s
a
nd goal v
a
y
ou start t
o
n
. If you
l
y
.
m
atically s
c
a
ys your el
a
ys the cu
r
a
ys distan
c
a
ys calorie
guide for
d
not be u
s
a
ys accum
o
ns.
a
y the BP
M
e
goal, the
a
value yo
u
lue, then
s
e
ries:
y
cover at
t
A
A" batteri
e
e
correctly
e
s.
r
y cover.
g
ible or onl
n
stalling.
C
O
. Press
a
values wil
a
ta values
.
se target.
a
lues.
o
exercise
l
eave the
e
c
ans throu
g
l
apsed wo
r
r
rent spee
d
c
e of exer
c
e
s burned
d
comparis
o
s
ed in me
d
ulative dis
M
(Beats p
e
value will
u
’d like to
s
s
tart your
e
t
he rear of
es into th
e
positioned
y partial l
e
O
MPUT
16
a
nd hold th
l clear to
z
.
or press
a
e
quipment
g
h each d
i
r
kout time
d
.
c
ise sessi
o
d
uring exe
r
o
n of differ
e
d
ical treat
m
tance fro
m
e
r Minute
s
be counte
d
s
et.
e
xercise.
computer
.
e
battery h
o
and batte
e
gible, rem
ER
e
z
ero
a
ny key on
for 4 min
u
splay mo
d
in minute
s
ns.
r
cises. (
T
e
nt exerci
s
m
ent).
m
combine
d
s
).
d
down fo
r
.
o
using.
ry springs
ove batter
the comp
u
u
tes, the p
o
d
e.
s
and seco
T
his data i
s
s
e session
s
d
exercise
r
the value
are in pro
p
r
ies and w
a
u
ter,
o
we
r
nds.
s
a
s
and
you
p
er
a
it 15

FOLDING UP THE TREADMILL
To fold up the treadmill, place one hand on the back end of the treadmill and the
other hand to pull the Spring Knob. Carefully lift the end of the treadmill up into
the upright position until the Spring Knob "pops" down into the locked position.
Make sure the deck is securely locked before moving the treadmill. (See
diagrams A and B.)
The unit can be carefully tilted onto its transport wheels for easy moving and
storage. Store the treadmill in a clean and dry environment away from
children.
SETTING DOWN THE TREADMILL
To set down the treadmill, place one hand on the back end of the treadmill and
the other hand to pull the Spring Knob, then carefully lower the deck to the
ground until the Spring Knob "pops" down into the locked position. (See
diagrams C and D.)
Note: Do not stand under the deck when setting down the treadmill.
TO PREVENT INJURY PLEASE MAKE SURE YOU HAVE A FIRM HOLD
WHEN LIFTING UP OR SETTING DOWN THE DECK.
STORAGE
17
A B
Spring Knob
Spring Knob
C D

Adj
Pla
c
lift
t
ha
n
A
dj
u
int
o
loc
k
NO
T
the
sh
o
Inc
l
an
d
Ad
j
1.
2.
3.
Th
e
shi
f
the
ba
c
Re
p
If t
h
Scr
e
tur
n
det
e
the
usting th
e
c
e one ha
n
t
he rear e
n
n
d to remo
v
u
ster to th
e
o
the holes
k
the Inclin
T
E: Make
Incline A
d
o
uld be a
d
l
ine Adju
s
d
cause in
j
usting th
e
The runn
adjusted
come loo
during u
s
belt will
b
If the run
n
left or rig
h
on the m
a
handleb
a
your righ
t
of the ru
n
If the bel
t
should s
e
However
Wrench
w
A
djustm
e
matches
e
n try runn
i
f
ting away
clockwise
c
k towards
p
eat this p
r
h
e running
e
wdrive
r
p
n
in the clo
e
rmine if t
h
running b
e
e
Incline
A
n
d on the
r
n
d of the M
v
e the Loc
e
desired
p
on the M
a
e Adjuste
r
sure whe
d
juster th
d
justed to
s
ters at di
f
j
ury.
e
Runnin
g
ing belt is
at the fact
o
se during
t
s
e. After
p
b
egin to st
r
n
ing belt b
h
t side, th
e
a
in frame
a
ar
s with bo
t
t
or left fo
o
n
ning belt
t
t
begins to
e
e the belt
, if the run
n
w
ith Phillip
s
e
nt Bolt 1/
2
the directi
o
i
ng on the
from cent
e
direction.
the cente
r
r
ocedure
u
belt is slip
p
rovided a
n
ckwise dir
e
h
e running
e
lt is not sl
A
djuster
r
ear end o
f
ain Fram
e
king Pin.
p
osition a
n
a
in Frame
a
r
in place.
n adjusti
n
a
t both In
the same
f
ferent an
g
g
Belt
initially se
t
o
ry. Ho
w
t
ransporta
t
p
rolonged
r
etch out.
egins to s
h
e
user can
a
nd hold t
h
t
h hands.
o
t to run o
n
t
hat is opp
o
slip to the
start to c
o
n
ing belt i
s
s
Screwdr
i
2
turn in a
c
o
n of the
s
center of
t
e
r, turn th
e
You sho
r
.
u
ntil the ru
n
ping durin
g
n
d turn bot
e
ction. Y
belt is stil
l
ipping.
ADJ
f
the Main
e
up and u
s
Adjust th
e
n
d insert th
a
nd Inclin
e
n
g the inc
l
cline Adj
u
angle.
U
g
les can
c
t
and
w
ever it m
a
tion and/o
r
use, the
h
ift to eith
e
stand
h
e
Then us
e
n
the side
o
site to th
e
e
left use y
o
o
rrect itself
s
still shifti
n
i
ve
r
provid
c
lockwise
d
s
lip).
t
he runnin
g
e
same Re
a
uld see th
e
n
ning belt
g
use, the
n
t
h the left
a
Y
ou should
l
slipping.
USTM
E
18
Frame, th
e
s
e the oth
e
e
Incline
e Locking
e
Adjuster
t
l
ine angle
u
sters
U
sing the
c
ause the
a
y
r
er
e
e
direction
o
ur right f
o
by movin
g
n
g away fr
o
ed and tu
r
d
irection (
t
g
belt agai
n
a
r Adjust
m
e
belt star
t
is centere
d
n
use the
5
a
nd right r
e
now run
o
Repeati
n
E
NTS
e
n
er
Pin
t
o
o
f
treadmill
of the slip
o
ot on the
r
g
back tow
o
m center
,
r
n the left
o
t
urn the s
a
n
. If the
r
m
ent Bolt a
n
to correct
d
.
5
M
A
llen
W
e
ar roller a
d
o
n the runn
n
g the abo
v
to be uns
.
r
ight side.
w
ards the c
,
use the
5
o
r right Re
a
a
me side b
r
unning be
nother 1/4
t
itself by
m
W
rench wit
h
djustment
n
ing belt to
v
e proced
u
table
You
e
nter.
5
M Allen
a
r Roller
o
lt that
lt is still
turn in
m
oving
h
Phillips
bolts 1/4
u
re until
/