Sharp QW-GD53I443X Owner's manual

Category
Dishwashers
Type
Owner's manual

Sharp QW-GD53I443X is a 15-place setting dishwasher with a height of 32 inches, a width of 23 inches, a depth of 22 inches, and a total power of 1900W. It features a turbo-drying system and a ceiling spray arm to ensure better washing and drying performance, as well as an interior light for easier loading and unloading. The dishwasher also has a salt dispenser, a detergent and rinse aid dispenser, and a rating plate with all the necessary information about the appliance. Additionally, it includes a water decalcification system and the ability to adjust salt and rinse aid consumption.

Sharp QW-GD53I443X is a 15-place setting dishwasher with a height of 32 inches, a width of 23 inches, a depth of 22 inches, and a total power of 1900W. It features a turbo-drying system and a ceiling spray arm to ensure better washing and drying performance, as well as an interior light for easier loading and unloading. The dishwasher also has a salt dispenser, a detergent and rinse aid dispenser, and a rating plate with all the necessary information about the appliance. Additionally, it includes a water decalcification system and the ability to adjust salt and rinse aid consumption.

EN-3
CHAPTER-1: EXPLANATION OF PRODUCT
Technical specications 5
Conformity with the standards and test data 5
CHAPTER-2: SAFETY INFORMATION AND RECOMMENDATIONS
Recycling 6
Safety information 6
R e c o m m e n d a t i o n s 8
Items not suitable for dishwashing 8
CHAPTER-3: INSTALLING THE MACHINE
Positioning the machine 8
Water connections 9
Water inlet hose 9
Water outlet hose 9
Electrical connection 10
Prior to using the machine 11
CHAPTER-4: PREPARING THE MACHINE FOR USE
The importance of water decalcication 11
Filling with salt 11
Testing strip 11
Adjusting salt consumption 12
Detergent usage 12
Filling the detergent compartment 12
Combined detergent 13
Filling with rinse aid and making the setting 13
CHAPTER-5: LOADING YOUR DISHWASHER
Dish rack 14
Alternative basket loads 16
CHAPTER -6: PROGRAMME DESCRIPTIONS
Programme items 17
CHAPTER -7: SWITCHING ON THE MACHINE AND SELECTING A PROGRAMME
Switching on the machine 20
Programme follow-up 20
Changing a programme 21
Changing a programme with resetting 21
Switching the machine off 21
CHAPTER-8: MAINTENANCE AND CLEANING
Filters 23
Spray arms 23
Hose lter 23
CHAPTER-9: FAILURE CODES AND WHAT TO DO İN CASE OF FAILURE 24
CHAPTER-10: PRACTICAL AND USEFUL INFORMATION 25
Dear Customer,our goal is to offer you, high quality products that exceed your expectations. Your appliance is
produced in modern facilities and is carefully tested for quality.
Before using your appliance, carefully read this guide which includes basic information for safe installation,
maintenance and use.
The operating instructions apply to several models. Differences may therefore occur.
CONTENTS
EN-4
1. Upper basket with racks
2. Upper spray arm
3. Lower basket
4. Lower spray arm
5. Filters
6. Rating plate
7. Control Panel
8. Detergent and rinse-
aid dispenser
9. Salt dispenser
10. Upper basket track latch
11. Upper Cutlery Basket
1
2
3
4
5
6
7
8
9
10
11
=
Turbo Drying Unit:
This system provides
better drying performance
for your dishes.
Ceiling Spray
Arm:
It provides better
washing for the
dishes at upper
basket.
13
12
CHAPTER -1: EXPLANATION OF PRODUCT
=
Interior light :
Provides illumination
inside the dishwasher
helping with loading
and un-loading.
14
EN-5
Technical specifications
Conformity with the standards and Test data / EC Declaration of Conformity
All stages related to the machine are executed in accordance with the safety
rules provided in all relevant directives of the European Community. 2004/108/
EC, 2006/95/EC,IEC 436/DIN 44990, EN 50242
Important Note for User:For a softcopy of this user manual, please contact the
following address:
[email protected]”.In your e-mail, please provide the model
name and serial number (20 digits) which you can find on the appliance door.
Capacity 15 place settings
Height 820 mm - 870 mm
Width 598 mm
Depth 550 mm
Net Weight 38 kg
Electricity input 220-240 V, 50 Hz
Total Power 1900 W
Heating Power 1800 W
Pump Power 100 W
Drain Pump Power 25 W
Water supply pressure 0.03 MPa (0,3 bar)-1 MPa (10 bar)
Current 10 A
CHAPTER -1: TECHNICAL SPECIFICATIONS
EN-6
CHAPTER -2: SAFETY INFORMATION AND RECOMMENDATIONS
Recycling
• Recyclable materials are used in certain components and packaging.
• Plastic parts are marked with international abbreviations: (>PE< , >PS< ,
>POM<, >PP<, )
• Cardboard parts have been produced from recycled paper which should be
disposed of into waste paper collection containers for recycling.
• Such materials are not suitable for garbage bins. They should be delivered to
recycling centres instead.
• Contact relevant centres in order to obtain information on methods and points
of disposal.
Safety Information
When you take delivery of your machine
• If you see any damage on your machine’s packaging, please notify your
retailer.
• Unwrap the packaging materials as indicated and dispose of them in
accordance with the rules.
The points to pay attention during machine installation
• Choose a suitable, safe and level place to install your machine.
• Carry out the installation and connection of your machine by following the
instructions.
• We recommend that the machine is installed by an authorised installer, and
should only be serviced by an approved technician.
• Only original spare parts should be used with the machine.
• Before installing, be sure that the machine is unplugged.
• Check whether the indoor electrical fuse system is connected according to
the regulations.
All electrical connections must match values on the rating plate.
• Be sure that the machine does not stand on the electricity supply cable.
• Never use an extension cord or a multiple socket for making a connection.
The plug should be easily accessible after installation.
After installation, run it unloaded for the first time.
In daily use
• This machine is for household use; do not use it for any other purpose.
Commercial usage of the dishwasher will void the guarantee.
• Do not use detergents and rinse aids that are not specifically designed for
dishwashers. Improper of such items may invalidate the warranty.
• Due to risk of explosion, do not put into the machine’s washing section any
chemical dissolving agents such as solvents.
• Check whether plastic items are heat-resistant before washing.
EN-7
CHAPTER -2: SAFETY INFORMATION AND RECOMMENDATIONS
•This appliance can be used by children aged from 8 years and above and
persons with reduced physical, sensory or mental capabilities or lack of
experience and knowledge if they are supervised or have been given instructi-
on concerning use of the appliance in a safe way and understand the hazards
involved. Children should not play with the appliance.Cleaning and user
maintenance should not be made by children without supervision.
• Do not put unsuitable and heavy items above the basket capacity into your
machine. SHARP will not be responsible for any damage on the inner parts.
• The door should not be opened whilst the machine is operating. A safety devi-
ce will ensure that the machine stops if opened.
• To avoid accidents, do not leave the door open.
• Place knives and other sharp-ended objects in the cutlery basket in blade-
down
position.
• If the supply cord is damaged, it must be replaced by SHARP, or its service
agent.
• If EnergySave option is selected as “Yes”, the door will be opened at the end
of the program. Do not force the door closed to avoid harming the auto door
mechanism for 1 minute. The door must be open for 30 minutes to dry effecti-
vely( in models with auto door opening system ).
Warning: Do not stand in front of the door after the auto-open signal sounds.
For your children’s safety
After removing the machine’s packaging, make sure that the packaging
material is out of reach of children.
• Do not allow children to play with or start the machine.
• Keep children away from detergents and rinse aid.
• Keep children away from the machine while it is open because there may still
be residues of cleaning substances inside the machine.
• Be sure that your old machine does not pose any threat to your children.
Children are known to have become locked in old machines. To prevent such
a situation, break your machine’s door lock and tear off the electrical cables.
In case of malfunction
Any repair performed by anyone other than authorized service personnel
will invalidate your warranty.
• Prior to any repair work on the machine, be sure that the machine is isolated
from the mains. Switch off the fuse or unplug the machine.Do not pull by the
cable when unplugging. Make sure to turn off the water tap.
EN-8
CHAPTER -2: SAFETY INFORMATION AND RECOMMENDATIONS
Recommendations
• For energy and water saving, remove coarse residues on your dishes before
placing the dishes into the machine. Start your machine after having fully
loaded it.
• Use the pre-wash programme only when necessary.
• Place hollow items such as bowls, glasses and pots into the machine in such
a way that they will face down.
• You are not recommended to overload your machine or load it in a way other
than that which is indicated.
Items not suitable for dishwashing:
• Cigarette ash candle leftovers, polish, paint, chemical substances, ironalloy
materials.
• Forks, spoons and knives with wooden or bone, or ivory or nacre-coated
handles; glued items,items soiled with abrasive, acidic or base chemicals.
• Plastic items that are not heat-resistant, copper or tin-coated containers.
Aluminium and silver objects (they may discolour, become dull).
• Certain delicate glass types, porcelain with ornamental printed patterns
as they fade even after the first wash; certain crystal items as they lose their
transparency over time, cutlery that is not heat-resistant, lead crystal
glasses, cutting boards, items manufactured with synthetic fibre.
Absorbent items as sponges or kitchen rags are not suitable for dishwashing.
Warning:Take care to buy dishwasher-proof sets in your future purchases.
INSTALLING THE MACHINE
Positioning the machine
When determining the installation place, choose an accessible place for easy
loading and unloading of the dishes.
Do not put your machine in any location where there is the possibility of the
room temperature falling below 0°C.
Before positioning, take the machine out of its packaging by following the
warnings located on the package.
Position the machine close to a water tap or drain. You need to site your
machine, taking into consideration that its connections cannot be altered once
they are made. Do not grip the machine by its door or panel in order to move it.
Take care to leave sufficient clearance from all sides of the machine for moving
it back and forth during cleaning.
Make sure that the water inlet and outlet hoses do not get squeezed while
positioning the machine. Also, make sure that the machine does not stand on
the electrical cable.Adjust the machine’s adjustable feet so that it can stand
level and balanced. Proper positioning of the machine ensures problem-free
opening and closing of the door. If the door of machine does not close properly,
check if the machine is stable on the floor if not, adjust the feet and ensure its
stable position.
EN-9
Water connection
Indoor plumbing must be suitable for installing a dishwasher. Also, we recommend
that you fit a filter at the entrance of your property so as to avoid any damage
to your machine because of contamination (sand, clay, rust etc.) that might be
occasionally carried in through the mains water supply or the indoor plumbing,
and to prevent such complaints as yellowing and formation of deposits after
washing.
Water inlet hose
Do not use the water inlet hose of your old machine.
Use the new one supplied with your machine instead. If
you connect a new or long - unused water inlet hose
to your machine ,run water through it for a while before
making the connection. Connect the water inlet hose
directly to the water inlet tap. The pressure supplied by
the tap should be at a minimum of 0.03 Mpa and and at
a maximum of 1 Mpa.If the water pressure is above 1
Mpa,a pressure-relief valve should be fitted inbetween.
After making connections, the tap should be turned on fully and checked for
water tightness. For safety purposes, we recommend that you turn off the wa-
ter inlet tap when the machine is not going to be used for an extended period
of time.
NOTE: An Aquastop water etc. spout is used in some
models. With Aquastop, a potentially dangerous
tension exists.Do not cut the Aquastop water spout.
Do not let it get folded or twisted.
Water outlet hose
The water drain hose can be connected either directly
to the water drain hole or to the sink outlet spigot.
Using a special bent pipe (if available), the water can
be drained directly into the sink via hooking the bent
pipe over the edge of the sink. This connection sho-
uld
be between 50 and 110 cm from the floor plane.
CHAPTER -3: INSTALLING THE MACHINE
EN-10
Warning: When a drain hose longer than 4 m is used, the dishes might
remain dirty. In that case, SHARP will not accept responsibility.
Electrical connection
The earthed plug of your machine should be connected to an earthed outlet
supplied by suitable voltage and current. If there is no earthing installation,
have a competent electrician to carry it out. In case of usage without earthing
installed, our company will not be responsible for any loss of usage that might
occur.
The indoor fuse current value should be 10-16 A. Your machine is set accor-
ding to 220-240 V. If the mains voltage in your location is 110 V, connect a
transformer of 110/220 V and 3000 W inbetween.
The machine should not be plugged in during positioning. Always use the coa-
ted plug supplied with your machine. Running in low voltage will cause a decli-
ne in washing quality. The machine’s electrical cable should be replaced by an
authorised service or an authorised electrician only. Failure to do so may lead
to accidents. For safety purposes, we recommend that you disconnect the
plug when the machine is not going to be used for an extended period of time.
In order avoid electric shocks, do not unplug when your hands are wet.
When disconnecting your machine from the mains supply, always pull from the
plug. Never pull the cord itself.
CHAPTER -3: INSTALLING THE MACHINE
EN-11
Prior to using the machine for the rst time
• Check whether the electricity and supply water specications match the values indicated by the installation
instructions for the machine.
• Remove all packaging materials inside the machine.
• Set the water softener.
Add 1 kg salt into the salt compartment and ll with water up to a level at which it will almost overow.
• Fill the rinse aid compartment.
PREPARING THE MACHINE FOR USE
The importance of water decalcication
For a good washing function, the dishwasher needs soft, i.e. less calcareous water. Otherwise, white lime
residues will remain on the dishes and the interior. This will negatively affect your machine’s
washing, drying and shining performance. For this reason, a softener system is used on dishwashers. The
softener system has to be refreshed so that it operates with the same performance also during the next wash.
For this purpose, dishwasher salt is used.
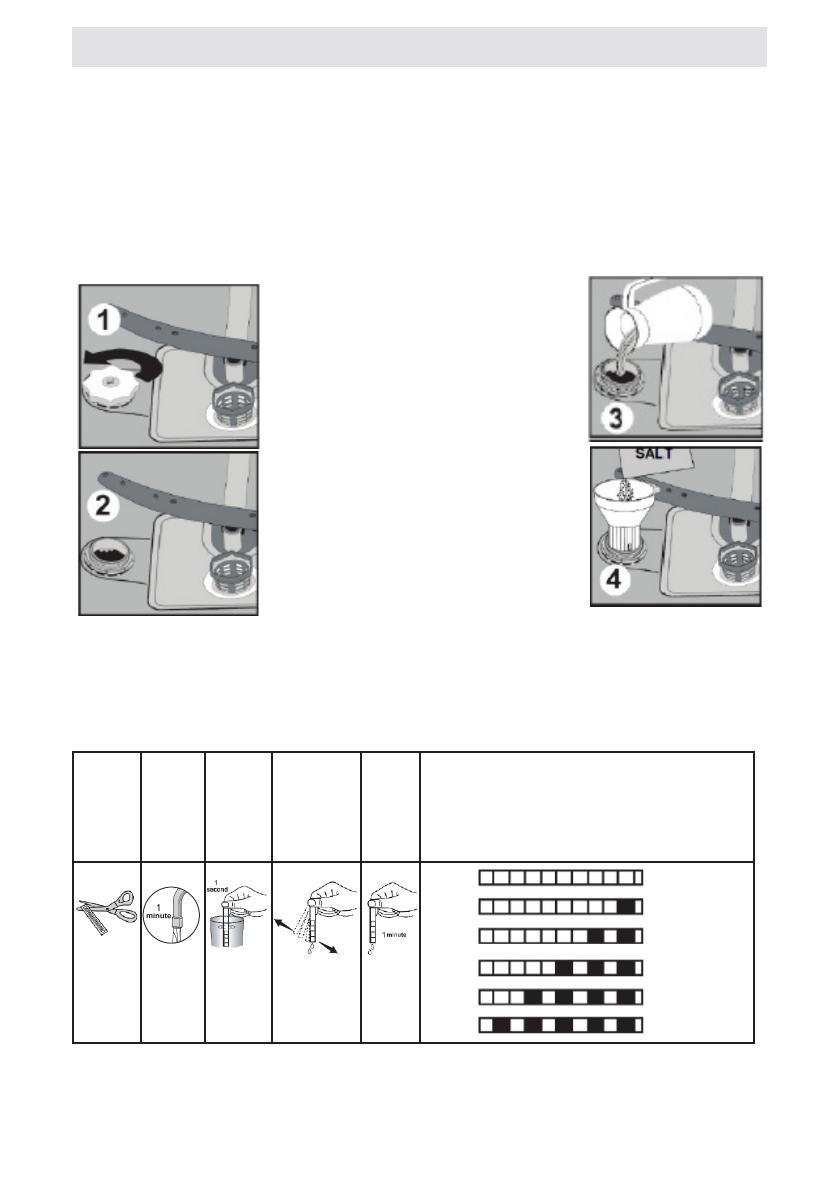
Filling with salt
Use softener salt specically produced for use in
dishwashers. To put softener salt, rst remove the
lower basket and then open the salt compartment
cap by turning it counter clockwise.1 2 At rst use
ll the compartment with 1kg salt and water3 at
overowing level If available, using the funnel
4provided will make lling easier. Ret the cap and
close it After every 20th-30th wash, add salt into
your machine until it lls up (approx. 1 kg) Fill
the salt compartment with water at rst use only.
We recommend to use small grained or powder
softener salt. Do not put table salt into your
machine. Otherwise, the function of the softener the
compartment may decrease over time. When you
start the machine, the salt compartment gets lled
with water. Therefore, add the softener salt in prior
to starting your machine. This way, overowing
salt gets immediately cleaned up through the
wash operation. If you will not wash any dishes
immediately after adding salt, then run a short
washing program with an empty machine in order
to avoid corrosion on your machine due to the salt
overow while lling the salt container. In order
to understand whether or not the amount of
softener salt in the machine is sufcient, check the transparent section on the salt compartment cap. There is
sufcient salt if the transparent section is green. Salt has to be added if it is not green.
Testing strip
The washing effectiveness of your machine depends on the softness of the tap water. For this reason,
your machine is equipped with a system that reduces the hardness in mains water supply. The
washing effectiveness will increase when the system is correctly set. To nd out the water hardness
level of water in your area, contact your local water board or determine water hardness level by using
the test strip(if available).
Open
the
testing
strip
Run
water
through
your
tap for
1 min.
Keep
the
testing
strip in
water
for
1.sec.
Shake the
testing strip
after taking
it out of
water
Water
for 1
min.
Make your machine’s water hardness setting
according to the result obtained through the testing
strip.
Level 1 No Lime
L e v e l 2 V e r y l o w
lime content
L e v e l 3 L o w
lime content
L e v e l 4 M e d i u m
lime content
Level 5 Lime content
L e v e l 6 H i g h
lime content
CHAPTER -4: PREPARING THE MACHINE FOR USE
EN-12
3
12
Water
hardness
level
German
hardness
level dH
French
hardness
level dF
British
hardness
level dE
Hardness Level Indicator
1 0-5 0-9 0-6 L1 is seen on display.
2 6-11 10-20 7-14 L2 is seen on display.
312-17 21-30 15-21 L3 is seen on display.
4 18-22 31-40 22-28 L4 is seen on display.
5 23-31 41-55 29-39 L5 is seen on display.
6 32-50 56-90 40-63 L6 is seen on display.
CHAPTER -4: PREPARING THE MACHINE FOR USE
Adjusting salt consumption
After restting the machine, with the door open;
While touching the program button 3 turn on the machine with the power button. 1
Continue to touch the program button until “SL” appears on the display. 2
Release the program touch button when “SL” disappears from the display. 2
The current water hardness setting will appear on the display. 2
Press the program touch button 3 to select the desired level according to Table of Water Hardness Level
Settings.
At any pressure on the program touch button 3 will increment the hardness level.
The level changes from Level 6 to Level 1 when the program button 3 is pressed.
To save the setting to memory, power off the machine. 1
Detergent usage
Use a detergent specically designed for use in domestic dishwashers.
You can nd powder,gel,and tablet detergents that have been designed for household dishwashers.
Detergent should be put into the compartment prior to starting the machine. Keep your detergents in cool, dry
places out of reach of your children.
Do not overll the detergent compartment; otherwise it may cause scratches on your glasses as well as lead to
a poorly dissolved detergent.
Should you need more information concerning the detergent you will use, contact the detergent manufacturers
directly.
Filling the detergent compartmentv
Push the latch to open the detergent container as shown in the image. 1 The Detergent pod has level lines
inside. The Detergent pod can take a total of 40 cm3 of detergent. Open the dishwasher detergent and pour into
the larger compartment b 25 cm3 if dishes are heavily soiled or less 15 cm3.2 If dishes have been kept dirty for a
very long time with, dried food waste on them or the dishwasher has been overloaded pour a 5cm3 of detergent
into the prewash compartment and start the machine. You may have to add more detergent into your machine,
depending on the degree of soil and on the water hardness level in your area.
Adjust the water hardness setting of your machine according to the level specied on the test strip.
NOTE: Hardness level is adjusted to level 3 as a factory setting.
EN-13
Combined detergents
Combined detergents may include various properties. Before using the detergent, read the instructions carefully.
Generally combined detergents produce sufcent results under certain conditions only.
Points to consider when using this type of products:
• Check the specications of the product whether it is combined or not.
• Check if the detergent used is appropriate for the hardness of mains water.
• Observe the instructions of products on the packaging.
Always put the tablets into the detergent compartment in the detergent dispenser.
• You need to contact the manufacturers and nd out about the suitable conditions of use.
• If you use appropriate products, they ensure savings in salt and/or rinse aid consumption.
• The scope of warranty for your machine does not cover any complaints caused by the use of these types of
detergents.
Recommended usage: If you want to obtain better results while using combined detergents, add salt and rinse
aid into your machine and adjust the water hardness setting and the rinse aid setting to the lowest position.
Solubility of the tablet detergents produced by different companies can vary depending on
the temperature and time. Therefore, it is not recommended to use such detergents in short
programs. It is more suitable to use powder detergents.
Warning: Should any problem, which you have not encountered before arise with the use of this type of
detergent, contact the detergent manufacturer directly.
When you stop using combined detergents
• Fill the salt and rinse aid compartments.
Adjust the water hardness setting to the highest position and run an empty-wash.
Adjust the water hardness level.
• Make the suitable rinse aid setting.
Filling with rinse aid and making the setting
Adequate amount of rinse aid prevents the accumulation of white water drops, lime stains, white lm stripshaped.
It also increases drying performance.
To add rinse aid, remove the rinse aid compartment cap by turning it.1 Fill the rinse aid compartment with rinse
aid until the rinse aid level indicator becomes dark. 2: Ret the cap and close it by turning it in a way so that the
nails correspond to one another.
By checking the rinse aid level indicator on the detergent dispenser, you can understand whether or not your
machine needs rinse aid. A dark indicator b means that there is rinse aid in the compartment, while a light
indicator a shows that you need to ll the compartment with rinse aid.
The rinse aid level adjuster can be set to a position between 1 and 6. Factory setting for rinse aid is the
position 3.
You need to increase the degree of the adjuster if water stains form on your dishes after a wash,
whereas you need to decrease the degree if a blue stain is left when wiped by hand. 3
Warning: Use only those rinse aid materials which are allowed for use in the machine. As rinse aid residues left
as a result of overowing will create extremely high amounts of foam and thus reduce the washing performance,
remove the excess amount of rinse aid by wiping it with a rag.
1
3
CHAPTER -4: PREPARING THE MACHINE FOR USE
EN-14
2
1
LOADING YOUR DISHWASHER
Place dishes properly into the machine. There are two seperate baskets to load dishes into your machine.The
lower basket is for round and deep items. The upper basket is for thin and narrow items. You are recommended
to use the cutlery grid in order to obtain the best result. To avoid any possible injuries, place long-handle and
sharp-pointed knives with their sharp points facing down or horizontally on the baskets.
Warning: Place your dishes into your machine in a way that they will not prevent the upper and lower spray arms
from spinning.
Dish rack
You can place different sizes of glasses under these racks thanks
to the adjustable height feature. You can use racks in 2 different
heights.
Foldable racks
Foldable racks on the upper basket are designed in order to let
you place big items easier such as pots, pans, etc. If required,
each part can be folded separately, or all of them can be folded
and larger spaces can be obtained. To adjust the foldable racks,
either raise them upwards,or fold them down.
Top basket height adjustment while it is full
The basket height adjustment mechanism on the top basket of your machine is designed to let you adjust the
height of your top basket upwards or downwards, without removing it from your machine when it is full, and create
large spaces at the top or bottom area of your machine as needed. The basket of your machine is set to the upper
position in factory setting. In order to raise your basket, hold it from both sides and pull it upwards. In order to
lower it, hold it from both sides again, and leave it. In the loaded basket adjustment mechanism, make sure that
both sides are in the same position. (up or down)
Lower basket
Folding racks
In the lower basket of the machine, there are four folding racks that are designed to allow you to make it easier
to place big items such as pots, pans, etc. If required, each part can be folded separately, or all of them can be
folded and larger spaces can be obtained. To adjust them , raise them upwards, or fold down.
CHAPTER-5: LOADING YOUR DISHWASHER
1 2
12
EN-15
CHAPTER-5: LOADING YOUR DISHWASHER
Upper Cutlery Basket
The upper cutlery basket is designed for you to place forks, spoons and knives, long utensils and small items
Because it can easily be taken out of the machine, it allows your dishes to be taken out of the machine along with
the basket after washing.
The Upper Cutlery Basket is composed of two pieces; if you need to make space for the dishes in the upper bas-
ket, you can take out the left or right part of the upper cutlery basket in order to obtain more space.
Warning: Knives and other sharp objects must be placed horizontally in the cutlery basket.
EN-16
CHAPTER-5: LOADING YOUR DISHWASHER
Alternative basket loads
Lower Basket
Top basket
Incorrrect loads
Important Note for Test Laboratories
For detailed information on performance tests, please contact following address:
[email protected]” . In your email, please provide the model name and serial
number (20 digits) which you can nd on the appliance door.
EN-17
CHAPTER -6: PROGRAMME DESCRIPTIONS
Programme items
Programme No
Programme
names and
temperatures
Prewash (P1) Quick 30’
40°C( P2 )
Eco
(reference )
50°C ( P3)
Dual Wash
60°C ( P4)
Type of food
waste
Pre-wash
to rinse and
loosen residue
awaiting full
load then select
a programme
Coffee, milk,
tea, cold meats,
vegetables, not
kept for long
Coffee, milk, tea, cold
meats, vegetables ,
not kept for long
Soups, sauces,
pasta, eggs, pilaf,
potato and oven
dishes, fried foods
Level of soil light medium medium
Detergent
amount
B: 25 cm3 /
15 cm3
A: 5 cm3
A+B A+B A+B
35°C Wash 40°C Wash 50°C Wash 40°C Wash
Hot rinse Cold Rinse Cold Rinse 65°C Wash
End Hot rinse Hot rinse 45°C Wash
End Dry Hot rinse
End Dry
End
Programme
duration
(min.)
18 30 195 112
Electricity
consumption
(kW hours)
0,57 0,88 0,84 1,43
Water
consumption
(liters)
7,7 10,9 9 15,4
Warning: Short programs do not include a drying step. The values declared above are the values obtained
under laboratory conditions according to relevant standards. These values can change depending on conditions
of product’s use and environment (network tension, water pressure, water input temperature and environment
temperature).
EN-18
Programme items
CHAPTER -6: PROGRAMME DESCRIPTIONS
Programme
No
Programme
names and
temperatures
Express 50’
65°C ( P5)
Hygiene 60°C (P6)
Auto Delicate
30-50°C(P7)
Auto Intensive
50-70°C(P8)
Type of food
waste
Soups, sauces,
pasta, eggs,
pilaf, potato and
oven dishes, fried
foods
Dishes with
dense dirt waiting
for a long time or
requiring hygienic
washing
Automatically adjust the washing time with
temperature and amount of water by determining
the soil level of dishes
Level of soil medium heavy light heavy
Detergent
amount
B: 25 cm3 /
15 cm3
A: 5 cm3
A+B A+B A+B A+B
65°C Wash 60°C Wash Automatically adjust the washing time with
temperature and amount of water by determining
the soil level of dishes
Warmish Rinse 65°C Wash
Hot rinse Cold Rinse
End 50°C Wash
Hot rinse
Dry
End
Programme
duration
(min.)
50 154 77-91 124-179
Electricity
consumption
(kW hours)
1,29 1,75 0,81-0,96 1,22-1,8
Water
consumption
(liters)
10,7 18,5 10,6-17,7 12,3-24,6
**Only powder detergent should be used in cycle of prewash programme.
*** You can wash your dishes through washing performance A by using cycle of Super 50 min.
EN-19
CHAPTER -7: SWITCHING ON THE MACHINE AND SELECTING A
PROGRAMME
1.) Power On/Off Touch Button
After the Power On/Off touch is pressed, two dashes appear in the program display. Touch the ‘’On/Off touch but-
ton’’ with your ngertip for 1 sec to turn the machine on or off.
2.) Program Touch Button
Use the Program touch button to select a suitable program for your dishes.
3.) Program Display
The program display indicates the length of the programs and the remaining time during the program. You can
also follow-up the selected programs by this display.
4.) Delayed Start Touch Button
You can delay the start time of a selected program from 1 to 19 hours by pressing the delayed start touch button of
the machine. When the delayed start touch button is pressed, “1h” appears on the program display. If you continue
pressing the delay timer touch button, the time will increment from 1 to 19 shown on the display. The delayed start
can be activated by selecting the delay time and the desired washing program with the Program touch button. It
is also possible to select the program rst and the delayed start afterwards, depending on the last value entered.
To cancel delayed start, either select the delay timer as ‘’0h’’, or hold the program touch button for 3 seconds. The
display will inform you how many seconds you need to hold the button by “3-2-1..” to cancel the delay.
Note: If the delay touch button is pressed and held, the delay timer starts changing faster (the rate of change is
proportional to the hold pressing time). When the delayed start touch button is pressed for a long period of time,
the counter stops at “h:00”.
5.)Energy Save Touch Button
The energy save option activates the door opening system at the end of the program. The auto door
opening system provides the required drying performance at low rinsing temperatures and reduces
energy consumption.
6.)½ Half Load Touch Button
Using the function ½ , three sorts of washing up can be done those being lower basket, upper basket
and both baskets.
If you have a small quantity of dishes in the machine and if you have to wash them,
you can activate the semi-lling function available for some of the programs. If you have
dishes in both baskets, press the ½ key and select both lamps are lit.
If you only have dishes in the upper basket, press the ½ key and select the upper lamp
illuminated. As this will only wash items in the upper basket, make sure that there are no
items in the lower basket.
If you only have dishes in the lower basket, press the ½ key and select the lower lamp
illuminated. As this will only wash items in the lower basket, make sure that there are no items
in the upper basket.
Note : If you have used an extra feature on the latest washing program, this feature will remain active on the
next washing program until the machine is switched off and on again. If you do not want to use this feature on
the newly selected washing program, press the selected feature button again, and check that the lamp on the
button goes off.
Note: When a program that is incompatible with the Extra silent & fast option is selected, when the button is press
the a buzzer sound is heard whilst indicates that the selected option is not available.
(1) (2) (4) (5) (6) (7)
(8)
(9)
(10)
(3)
(11)
EN-20
7.) Extra Fast Touch Button
This washes the dishes with more pressure, thus shortening the time of the selected program and provides more
economical water usage.
Note: This option can only be selected at the beginning of the program.
8.) Extra Silent Touch Button
Washes the dishes with less pressure, thus provides more sensitive and silent washing.
Note: “When a program that is incompatible with the Extra silent & fast option is selected,
when the button is pressed a buzzer sound is heard which indicates that the selected option is not available.
9.) Tablet Detergent Touch Button ( 3 in 1 button )
Press the tablet detergent touch button when you use combined detergents that include salt and rinse aid.
10.) Salt Warning Indicator
To determine whether there is sufcient softening salt in the machine, check to see if the Salt warning light on the
display is lit. When Salt warning light starts coming on, add salt to the salt compartment.
11.) Rinse aid Warning Indicator
To determine if there is sufcient rinse aid in the machine check the rinse aid warning light on the display. When
the rinse aid warning light starts coming on, add rinse aid to the rinse aid compartment.
End of Program
The machine makes a buzzer sound 5 times when the program is completed. When the door is opened after the
selected washing program is completed, the buzzer activation will end and a ‘0’ character is showed on display.
Note: Each time the machine is switched on, the Eco program and Energy save option are set to Cross-Out
default and previously chosen options are cancelled. When selecting programs other than Eco, the Energy save
icon will go out.
Operating your machine
Switching on the machine
1- Touch the power On/Off key.
When the machine is powered on,when the On/Off touch button (1) is pressed, two dashes appear in the
program display.
2- When selecting a program with the program touch button (2), the program selected ( P1,P2,etc ) appears on
the program display , from (P1 to P8) and the duration of the program are displayed alternately for 3 sec. for the
program and then 1 sec. for the duration time.
3- “If desired, you can choose additional functions. (4-9)
4- Close door.The program starts automatically.
Note:If you decide not to start to machine after selecting the program, press the on/off touch button (1). The
machine will be ready for the new program selection when you press on/off touch button (1) again. Select the
new program by pressing the program touch button (2).
Program follow-up
- When the door is opened after the selected washing program is completed, the buzzer activation will end and
a ‘0’ character is showed on display (3).
- If the door is opened during washing cycle, the remaining time of the selected program is shown on the display
(3).
- The machine makes a buzzer sound 5 times when the program is completed.
(1) (2) (4) (5) (6) (7)
(8)
(9)
(10)
(3)
(11)
CHAPTER -7: SWITCHING ON THE MACHINE AND SELECTING A
PROGRAMME
  • Page 1 1
  • Page 2 2
  • Page 3 3
  • Page 4 4
  • Page 5 5
  • Page 6 6
  • Page 7 7
  • Page 8 8
  • Page 9 9
  • Page 10 10
  • Page 11 11
  • Page 12 12
  • Page 13 13
  • Page 14 14
  • Page 15 15
  • Page 16 16
  • Page 17 17
  • Page 18 18
  • Page 19 19
  • Page 20 20
  • Page 21 21
  • Page 22 22
  • Page 23 23
  • Page 24 24
  • Page 25 25
  • Page 26 26
  • Page 27 27

Sharp QW-GD53I443X Owner's manual

Category
Dishwashers
Type
Owner's manual

Sharp QW-GD53I443X is a 15-place setting dishwasher with a height of 32 inches, a width of 23 inches, a depth of 22 inches, and a total power of 1900W. It features a turbo-drying system and a ceiling spray arm to ensure better washing and drying performance, as well as an interior light for easier loading and unloading. The dishwasher also has a salt dispenser, a detergent and rinse aid dispenser, and a rating plate with all the necessary information about the appliance. Additionally, it includes a water decalcification system and the ability to adjust salt and rinse aid consumption.

Ask a question and I''ll find the answer in the document

Finding information in a document is now easier with AI