Page is loading ...


1
2BTABLE OF CONTENTS
SAFETY PRECAUTIONS ----------------------------------------------------------------- 2-5
Important voltage information, grounding instructions, how often you exercise,
how hard you exercise, how long you exercise, beginner treadmill program
target heart rate zone.
TECHNICAL SPECIFICATIONS -------------------------------------------------------- 6
UNPACKING & ASSEMBLY ----------------------------------------------------------- 7-12
Parts, hardware kit and assembly drawing
WARM UP & COOL DOWN ------------------------------------------------------------- 13
PANEL CONTROL ------------------------------------------------------------------------ 14
Control panel function
PROGRAM ------------------------------------------------------------------------------ 15-19
OPERATION -------------------------------------------------------------------------------- 20
BELT ADJUSTMENT -------------------------------------------------------------------- 21
CARE & MAINTENANCE -------------------------------------------------------------22-23
TROUBLE SHOOTING ------------------------------------------------------------------ 24

2
3BSAFETY PRECAUTIONS
Thank you for your purchasing our products. Even though we go to great efforts to ensure the
quality of each product, occasional error, and/or omissions do occur. In any event should you find
this product to be defective or missing parts please contact us.
IMPORTANT: Read all instructions and warnings before assembly and operation.
UImportant Voltage Information
Before plugging the power cord into an electrical outlet, verify that the voltage requirements for your
area match the voltage of the treadmill that you have received. The power requirements for the
treadmill include a grounded, dedicated circuit, rated for one of the following figure. See the serial
number decal for the exact voltage requirements of your treadmill.
WARNING: Don't attempt to use this unit with a voltage adapter. Don't attempt to use this
unit with an extension cord.
UGrounding Instructions
This treadmill must be grounded. If it should malfunction or break down, grounding provides
a path of least resistance for electric current to reduce the risk of electric shock.
This product is equipped with a cord having an equipment-grounding conductor and a grounding
plug. The plug must be plugged into an appropriate outlet that is properly installed and grounded in
accordance with all local codes and ordinances.
Please make sure that the treadmill is connected to an outlet having the same configuration as the
plug. Do not use a ground plug adapter to adapt the power cord to a non-grounded outlet.
115V EURO PLUG 208-220V
NEMA 5-20 CEE 7/7 NEMA 6-15
The power requirements
for the treadmill include a
grounded, dedicated
circuit, rated for one of the
following:
115 VAC 5%, 60HZ and 20
amps; 208/220 VAC,
60HZ, 15 amps or 230 VAC
5%, 50HZ and 15amps.

3
4BSAFETY PRECAUTIONS
UBefore beginning
1). Only one person at a time should use this equipment. If dizziness, nausea, chest pains, or any
other abnormal symptoms are experienced while using this treadmill, stop the workout at once.
2). Do not exceed MAX. user weight: 159 kg (350 Ibs. )
3). Always use this treadmill on a clear and level surface. Do not operate in damp or wet conditions.
4). Don't insert any object into any openings.
5). Before using this equipment to exercise, always perform stretching exercises to properly warm
up.
6). Defective components should be replaced immediately and keep the equipment out of use until
repaired.
7). Always wear appropriate workout clothing and shoes when exercising. Do not wear loose fitting
clothing that could get caught in the equipment.
8 Place treadmill on a level surface. Provide 2m clearance behind rear roller and .5M clearance on
each side. Do not place the treadmill on any surface that blocks air openings. To protect the floor or
carpet from damage, place a mat under the treadmill.
9). Contact your physician before starting a workout or training program. Have your doctor review
your training and diet programs suggest a workout routine.
10). Review all warning labels on the treadmill.
11) Keep the top belt surface clean from dirt and debris
Important Safety Instructions
1). Keep children and pets away from this equipment at all times.
2). Make sure all bolts and nuts are tightened when equipment is in use. Periodic maintenance is
required on all exercise equipment to keep it in good condition.
3). To prevent unsupervised use by children; store Safety Key in a secure location.
4). Stop the treadmill if unexpected discomfort occurs during the exercise.
5). Correct steps of stopping your treadmill:
Press STOP button→ grasp the handlebars with both hands→ Step onto the side rails → Carefully
exit the treadmill after belt comes to a stop.
6). If there is any error sign shown on the monitor before/during exercising, please refer to the
Trouble Shooting section in your owner's manual according to the code number of the error sign.
7). Turn off the power after using.
8). If the power cord is damaged, it must be replaced by the manufacturer or its service agent or a
similarly qualified person in order to avoid a hazard.
9Warning: Incorrect or excessive training may be detrimental to health.
10).
Read and understand the emergency stop procedures

4
IMPORTANT SAFETY INSTRUCTIONS – SAVE THESE INSTRUCTIONS
This icon means a potentially hazardous situation exists which, if not avoided, could
result in death or serious injury.
When using an electrical appliance, basic precautions should always be followed, including the following:
1. Read all instructions before using this appliance.
2. DANGER – To reduce the risk of electric shock, always unplug this appliance
from the electrical outlet immediately after using and before cleaning.
3. WARNING – To reduce the risk of burns, fire, electric shock, or injury to persons:
This appliance should never be left unattended when plugged in. Unplug it from the outlet
when it is not in use, and before putting on or taking off parts,
Close supervision is necessary when this appliance is used by, on, or near children, invalids,
or disabled persons,
Use this appliance only for its intended use as described in the Owner’s Manual. Do not use
attachments not recommended by the manufacturer,
Never operate this appliance if it has a damaged cord or plug, if it is not working properly, if it
has been dropped or damaged, or if it has been dropped into water. Return the appliance to
a service center for examination and repair,
Keep the cord away from heated surfaces,
Never drop or insert any object into any opening of this appliance,
Do not use this appliance outdoors, and
To disconnect this appliance, turn all controls to the off position, then remove the plug from
the outlet.
4. WARNING – Connect this appliance to a properly grounded outlet only. See Grounding
Instructions.
Hint of how to dispose
Do not dispose of electrical appliances as unsorted municipal waste, use separate collection
facilities.
Contact your local government for information regarding the collection systems available.
If electrical appliances are disposed of in landfills or dumps, hazardous substances can leak
into the groundwater and get into the food chain, damaging your health and well-being.
When replacing old appliances with new once, the retailer is legally obligated to take back
your old appliance for disposal at least for free of charge.
5BSAFETY PRECAUTIONS
If you need assistance, please call Med-Fit Systems Customer Service at 1-800-235-2233

5
5BSAFETY PRECAUTIONS
USAFETY KEY
The safety key will stop the treadmill belt in case of a fall.
Never operate treadmill without attaching safety key to your
clothing.
WARNING: BEFORE STARTING ANY EXERCISE
PROGRAM CONSULT YOUR PHYSICIAN.
This is especially important for individuals over the
age of 35 or persons with preexisting health
problems. Read all instructions before using any fitness equipment. We assume no
responsibility for personal injury damage sustained by or through the use of this treadmill.
How often you exercise:
You should exercise three to four times a week to improve your cardiovascular and muscle fitness.
How hard you exercise:
Intensity of exercise is reflected in your heart rate. Exercise must be sufficiently rigorous to
strengthen your heart muscle and condition your cardiovascular system.
Only your doctor can prescribe the target training heart range for you. Before starting any exercise
program consult your physician.
How long you exercise:
Sustained exercise conditions your heart, lungs and muscles. The longer you are able to sustain
exercise within your target heart range, the greater the aerobic benefits. To begin maintain 2~3
minutes of steady, rhythmic exercise, then check your heart rate.
Emergency Stop switch
The function of the emergency stop is to help the user get off the treadmill safely in the case of an
emergency. In case of an emergency, press the safety key, hold the handrails and get off when
the belt comes to a stop.
Attach the safety key
to your waist.
Safety key

6
6BSAFETY PRECAUTIONS
BEGINNER TREADMILL PROGRAM
EXERTION LEVEL DURATION
WEEK 1 Easy 6~12 minutes
WEEK 2 Easy 10~16 minutes
WEEK 3 Moderate 14~20 minutes
WEEK 4 Moderate 18~24 minutes
WEEK 5 Moderate 22~28 minutes
WEEK 6 Slightly higher or slightly lower 20 minutes
WEEK 7 Add interval training 3 minutes at moderate exertion with 3 minutes at
higher exertion for 24 minutes
UTARGET HEART RATE ZONE
220-your age = maximum heart zone
101
*This appliance is not intended for use by persons (including children) with reduced physical
sensory or mental capabilities, or lack of experience and knowledge, unless they have been given
supervision or instruction concerning use of the appliance by a person responsible for their safety.
*The noise value list below is when it is at unloaded
top speed: LpAeq(dB) < 70dB
You should not workout at your maximum heart
rate. The recommended Heart Rate Zone is a
percentage of your maximum heart rate,
between 60% and 80% of your maximum heart
rate.
* Lower limit of Target Heart Rate Zone
=maximum heart rate X 0.6
* Upper limit of Target Heart Rate Zone
=Maximum heart rate X 0.8
(This is recommended by American Heart
Association. Before starting an exercise
program, please consult your physician
to understand your physical situation)

7
1B
TECHNICAL SPECIFICATIONS
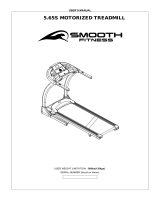
USPECIFICATIONS:
Length: 212 cm (85in)
Width: 92 cm (36.6in)
Running area: 55cm x 154cm (21.7in x 60.6in)
Weight of product: 185 kg ( 407 lbs)
Power elevation: 0~15% motorized (front incline)
Programs: Manual, 5 preset programs, 2 user programs, 2 HRC.
Manual mode: Yes
Standard features: Total time, Distance memorize, Hand pulse, Receiver, Calories, Heart rate.
Emergency stop: Pull the safety key, press emergency stop switch.

8
UNPACKING & ASSEMBLY
U
PARTSU
Main body
Packing Handle bar set
Left console
mast cover
#2-6 #3-10 #3-6 #3-5
#3-9 #3-2 #3-1
Console Console mast set Right console
mast cover

9
UHARDWARE KIT
M8x25mm / 4pcs
(Console /
Handle bar set)
M8 / 4pcs
(Console /
Handle bar set)
M5x15mm / 4pcs
(Console mast set)
M8X15mm / 10pcs
(Console mast set)
#3-3 #3-4 #3-7 #3-8
M8 curve
Washer / 18pcs
#3-15
#3-17
End cap / 4pcs
(Lower console
cover)
Allen wrench /
1pcs(6mm)
Allen wrench /
1pcs(6mm)
Allen wrench /
1pcs(5mm)
Silicon
Lubricant
X1
X1
M3x12mm / 1pc
(Power cord))
#3-16
Power cord locker /
1pc
(Power cord))
#3-18
M8X15mm / 8pcs
(Console mast set)

10
Carefully unpack the treadmill near its final location. Place your treadmill on a level flat surface. It is
recommended that you place a protective covering on your floor.
*Notice: Because of heavy weight, assembly requires two people.
Step1: Slide handlebars into console
1).Slide handlebar into console, Secure using four M8x25mm screws and M8 washers as shown.
Step 2: Slide the right console mast down on to the console mast support tube.
1). Feed console wiring through right console mast while sliding right console mast down on to the
console mast support tube. Secure using M8*15mm bolts and M8 curve washer (Do not completely
tighten the M8*15mm bolts until Step3.
2).Slide the console mast cover and packing into two sides of console mast. (Do not attach the
console mast cover until Step3).
M8x25mm
X4
M8
#3-3
#3-4
X4
X1
X10
M8x15mm
#3-9
#3-6 #3-5
#3-8
X1
X1
X1
M8 curve
washer X10
#3-15

11
Step 3: Attach the console to the console mast
1).Connect the right side of console cables and carefully tuck wires in mast to avoid damage.
2).Assemble the console into the console mast.
3).Fasten console mast and console by hex wrench with 8pcs M5x15mm screws and 8pcs curve
washers.
4).Put 4pcs plastic end cap into console lower cover.
5).Tighten the bolts (From Step 2) of console mast with base frame console tube.
6). Slide the console mast cover and packing down, and secure using the M5*15mm bolt.
Please tear the protective film away from side rails, and paste the non-slip appliqué in
the appropriate position.
non-slip appliqué
M8x15mm
X8
#3-8
#3-5
M8 curve
washer X8
M5x15mm
X4
#3-7
X4
#3-16

12
WARM UP & COOL DOWN
A successful exercise program consists of a warm up, an aerobic exercise, and a cool down.
Warming up is an important part of your workout, and should begin every session. It prepares your
body for more strenuous exercise by heating up and stretching out your muscles. At the end of your
workout, repeat these exercises to reduce sore muscle problems. We suggest the following
warm-up and cool-down exercises:
UHEAD ROLLS
Rotate your head to the right for one count, feeling the stretch up the left side of
your neck. Next rotate your head back for one count, stretching your chin to the
ceiling and letting your mouth open. Rotate your head to the left for one count, and
finally, drop your head to your chest for one count.
Repeat this action for several times.
11BUSHOULDER LIFTS
Lift your right shoulder up
toward your ear for one count.
Then lift your left shoulder up
for one count as you lower
your right shoulder.
Repeat this action for several times.
12BUSIDE STRETCHES
Open your arms to the side and
continue lifting them until they
are over your head. Reach your
right arm as far upward toward
the ceiling as you can for one
count. Feel the stretch up your
right side. Repeat this action with
your left arm.
13BUINNER THIGH STRETCH
Sit with the soles of your feet
together with your knees pointing
outward. Pull your feet as close
into your groin as possible. Gently
push your knees toward the floor.
Hold for 15 seconds.
Repeat this action 3-5 times.
HAMSTRING STRETCHES
Keep your right leg straight and the left foot on the floor; try to stretch your
right hand toward your toe, hold this posture for 15 seconds.
Relax, then repeat the action for your left leg.
UQUADRICEPS STRETCH
With one hand against a wall for
balance, reach behind you and
pull your right foot up. Bring your
heel as close to your buttocks as
possible. Hold for 15 seconds and
repeat with left foot up.
UCALF/ACHILLES STRETCH
Step your right foot in front of your
body. Lean against a wall with
your arms and stretch your left foot
backward your body. Bend
forwards your right foot, and
slightly push your buttocks toward
to the wall for 15 seconds.
Repeat the action with front left
foot and rear right foot for another
15 seconds.
UTOE TOUCHES
Slowly bend forward from your
waist, letting your back and
shoulders relax as you stretch
toward your toes.
Reach down as far as you can and
hold for 15 seconds.

13
20BPANEL CONTROL
Display Function
Time
Indicate time you workout or countdown.
Distance
Indicate accumulative traveled distance.
Calories
Indicate estimated calories burned.
Heart Rate
Estimated heart rate.
Speed
Indicate current running speed.
Incline
Indicate current incline level.
M.W.
Message Window and show program profile.
Buttons Function
Incline ▲ / ▼
Adjust incline when exercising.
Adjust value when program setting.
Speed ┼ / ─
Adjust running speed when exercising.
Adjust value when program setting.
Enter
Get into the program which you select.
Confirm the value that you set.
Select
Make selection of program.
Switch the Message Window display when exercising.
LAPSPEEDINCLINESCANLAP
Start / Stop or Pause
Start the treadmill. Speed slowly increases to user setting.
Stop or Pause the treadmill, the speed will slowly decrease to a stop.
Quick incline
Five one-touch buttons to reach your ideal incline.
Quick speed
Five one-touch buttons to reach your ideal speed.
Emergency Stop
Stop the treadmill, will be cut off the motor power, stop time will depend on
user weight and speed.
M.W.
Emergency
Stop

14
PROGRAMS
PROGRAMS DESCRIPTION
1.【Manual】:
1.1. Press 『SELECT』 to select the Manual program. Message Window shows program profile then
shows【PRESS ENTER TO SET OR START TO BEGIN】, press 『START』to begin workout or
『ENTER』to setting.
1.1.1. Press『ENTER』for Time setting: Message Window shows【SET TIME THEN PRESS ENTER】,
press 『speed up』or 『speed down』to set the target exercise time then press 『ENTER』to confirm
the setting.
1.1.2. Body weight setting: Message Window shows 【SET BODYWEIGHT THEN PRESS ENTER】,
press 『speed up』or 『speed down』to set user weight then press 『ENTER』to confirm the setting.
1.1.3. Calories setting: Message Window shows【SET CALORIES THEN PRESS ENTER】, press
『speed up』or 『speed down』to set target consumption calories then press 『ENTER』to confirm
the setting.
1.1.4. Message Window shows【PRESS START TO BEGIN OR SELECT TO RESET】press
『START』to begin workout or 『SELECT』to exit the program.
1.2. Press 『START』, the Message Window shows【3→2→1→GO】.
1.2.1. Preset speed = lowest speed, incline=0.
1.2.2. If set time is not zero (count down mode) the program profiles change segment time=time/32,
else every 1 minute will change the program profile segment.
1.2.3. The Message Window will show【END OF WORKOUT SUMMARY】 when the time or
calories count down to the end.
SPEED INCLINE
Manual Hill Cardio
Interval Fat Burn Strength

15
PROGRAMS
2. 【Preset Programs】:HILL、FATBURN、CARDIO、STRENGTH、INTERVAL
2.1. Press 『SELECT』 to select the preset programs. Message Window show program profile then
show 【PRESS ENTER TO SET OR START TO BEGIN】, press 『START』to begin workout or
『ENTER』to setting.
2.1.1. Press『ENTER』for Time setting: Message Window shows【SET TIME THEN PRESS ENTER】,
press 『speed up』or 『speed down』to set the target exercise time then press 『ENTER』to confirm
the setting.
2.1.2. Body weight setting: Message Window shows 【SET BODYWEIGHT THEN PRESS ENTER】,
press 『speed up』or 『speed down』to set user weight then press 『ENTER』to confirm the setting.
2.1.3. Max speed setting: Message Window shows program profile graph, press 『speed up』or
『speed down』to set max speed, the program profile graph will be change and exercise intensity
will depend on max speed. Press 『ENTER』to confirm the setting.
2.1.4. Message Window shows【PRESS START TO BEGIN OR SELECT TO RESET】press
『START』to begin workout or 『SELECT』to exit the program.
2.2. Press 『START』, the Message Window shows【3→2→1→GO】.
2.2.1. Speed and incline automatically change according to the preset programs.
2.2.2. The program profiles change segment (change speed & incline) time=time/32.
2.2.3. The Message Window will show【END OF WORKOUT SUMMARY】when the time counts
down to the end.

16
PROGRAMS
3.【USER】
3.1. Press 『SELECT』 to select the User program. Message Window shows program profile, then
shows【PRESS ENTER TO SET OR START TO BEGIN】, press 『START』to begin workout or
『ENTER』to adjust settings.
3.1.1. Press『ENTER』for Time setting: Message Window shows【SET TIME THEN PRESS ENTER】,
press 『speed up』or 『speed down』to set the target exercise time then press 『ENTER』to confirm
the setting.
3.1.2. Body weight setting: Message Window shows 【SET BODYWEIGHT THEN PRESS ENTER】,
press 『speed up』or 『speed down』to set user weight then press 『ENTER』to confirm the setting.
3.1.3. Set speed and incline of every segment: Message Window shows speed profile first, press
『speed up』or 『speed down』to set the speed and press 『incline up』or 『incline down』to set
the incline in first segment, then press 『ENTER』to confirm the setting and set next segment.
Repeat. Up to 32 segments can be set.
3.1.4. Press 『START』to begin workout or press 『SELECT』to exit the program.
3.2. Press 『START』, the Message Window shows【3→2→1→GO】.
3.2.1. Speed and incline automatically change according to your setting.
3.2.2. The program profiles change segment (change speed & incline) time=time/32.
3.2.3. The Message Window will show 【END OF WORKOUT SUMMARY】 when the time counts
down to the end.

17
PROGRAMS
4. 【HRT】
4.1. This mode requires a wireless heart rate transmitter. Position heart rate transmitter until signal
is received by treadmill. If signal isn’t being received, Message Window will show “Check pulse
graph”, all settings are disabled and treadmill reverts to idle mode after 60 seconds.
4.2. Press 『SELECT』 to select the HRT1 or HRT2. Message Window shows HRC60% or
HRC80% then shows 【PRESS ENTER TO SET OR START TO BEGIN】, press『START』to begin
workout or『ENTER』to set.
4.2.1. Press『ENTER』for Time setting: Message Window shows 【SET TIME THEN PRESS
ENTER】, press 『speed up』or 『speed down』to set the target exercise time then press 『ENTER』
to confirm the setting.
4.2.2. Age setting: Message Window shows 【SET AGE THEN PRESS ENTER】, press 『speed
up』or 『speed down』to set user age then press『ENTER』to confirm the setting.
4.2.3. It will show estimated target heart rate after age is set, Message Window shows【SET HEART
RATE THEN PRESS ENTER】, you can press 『speed up』or 『speed down』to adjust. Press
『ENTER』to confirm the setting.
4.2.4. Message Window shows 【PRESS START TO BEGIN OR SELECT TO RESET】press
『START』to begin workout or 『SELECT』to exit the program.
4.3. Press 『START』, the Message Window shows【3→2→1→GO】
4.3.1. Speed and incline automatically change according to your set heart rate.
4.3.1.1 Compares real and set heart rate to change speed or incline. The first change in speed or
incline occurs at15 seconds.
4.3.1.2. 【real heart】 ≦ 【set heart rate-25】speed & incline will not change.
4.3.1.3. 【real heart】 ≦ 【set heart rate-15】
incline will increase 1 level every 15 seconds till max level.
4.3.1.4. 【real heart】 ≦ 【set heart rate-5】 incline will increase 1 level every 30 seconds till max level.
4.3.1.5. 【real heart】 ≧ 【set heart rate+5】 speed will decrease 0.3 every 15 seconds till min speed.
Incline will decrease 1 level after speed decreased 15 seconds.
4.3.1.6. 【real heart】 ≧ 【set heart rate+15】 speed will decrease 0.5 every 15 seconds till min speed.
Incline will decrease 1 level after speed decreased 15 seconds.
4.3.1.7. 【real heart】 ≧ 【set heart rate+25】 speed & incline will not change.
4.3.1.8. 【real heart】 ≧ 【set heart rate+30】Message window will be warning user.
4.3.2. The program profiles change segment (change speed & incline) time=time/32.
4.3.3. The Message Window will show 【END OF WORKOUT SUMMARY】 when the time counts
down to the end.

18
PROGRAMS
【PROFILE TABLE】
Message window VERTICAL LED DISPLAY LEVEL
LED 1 2 3 4 5 6 7 8
MAX SPEED%
12.5 25 37.5 50 62.5 75 87.5 100
INCLIN(0-15)
0-1 2-3 4-5 6-7 8-9 10-11 12 13-15
INCLIN(0-14)
0-1 2-3 4-5 6-7 8-9 10 11 12-14
INCLIN(0-13)
0-1 2-3 4-5 6-7 8 9 10 11-13
INCLIN(0-12)
0-1 2-3 4-5 6 7 8 9 10-12
Preset Program Profile(SPEED in %)
Prog. SEG 1 2 3 4 5 6 7 8 9 10 11 12 13
Speed 50 50 50 60 60 60 70 70 80 80 70 70 80
P1
Incline 0 0 1 1 2 2 2 3 3 4 4 4 5
Speed 50 50 60 60 70 70 80 80 90 90 100 100 100
P2
Incline 0 1 2 3 4 5 4 3 2 2 5 4 3
Speed 50 50 60 60 70 70 70 80 70 70 80 60 60
P3
Incline 0 1 1 2 2 2 3 4 2 2 4 1 1
Speed 50 50 60 60 60 70 70 70 80 80 80 90 90
P4
Incline 0 1 2 4 6 8 7 5 6 8 7 6 5
Speed 50 50 60 60 70 80 90 50 50 90 100 50 50
P5
Incline 0 1 2 3 5 2 3 6 2 3 7 2 3
Prog. SEG 14 15 16 17 18 19 20 21 22 23
Speed 90 90 100 100 90 90 80 70 70 80
P1
Incline 5 5 6 6 5 5 5 4 4 4
Speed 100 100 100 100 100 100 100 100 100 100
P2
Incline 5 5 3 3 3 4 5 4 4 3
Speed 70 80 70 60 60 70 80 70 70 100
P3
Incline 1 3 2 1 1 4 3 2 2 4
Speed 100 100 100 100 100 90 90 80 80 80
P4
Incline 4 3 3 4 3 6 5 4 3 3
Speed 60 70 90 50 50 80 90 50 50 80
P5
Incline 8 2 3 5 3 7 2 3 8 2
Prog. SEG 24 25 26 27 28 29 30 31 32
Speed 80 70 70 60 60 60 50 50 50
P1
Incline 3 3 2 2 2 1 1 0 0
Speed 100 100 100 100 90 80 70 60 50
P2
Incline 2 2 3 5 4 3 2 1 0
Speed 80 70 70 60 70 80 70 60 50
P3
Incline 3 3 2 1 3 4 3 2 1
Speed 70 70 70 60 60 60 50 50 50
P4
Incline 6 5 7 7 5 3 1 0 0
Speed 90 100 50 50 90 70 60 50 50
P5
Incline 3 5 3 1 6 5 3 0 0
P1=HILL, preset speed 4 MPH/6KPH 。 P2=FAT BURN, preset speed 3 MPH/5KPH 。
P3=CARDIO, preset speed 4 MPH/6KPH 。 P4=STRENGTH, preset speed 5 MPH/7KPH 。
P5=INTERVAL, preset speed 5 MPH/7KPH 。

19
OPERATION
FOLLOW THESE INSTRUCTIONS TO LEVEL YOUR TREADMILL:
An uneven floor or improper adjustable pad level can cause the treadmill to wobble during use as
well as the incline adjustment to function incorrectly. Please follow the procedure described below to
make sure the treadmill adjustable pads are adjusted correctly prior to use. You may need the
assistance of another person to perform this adjustment.
First locate the two adjustable pads under the running deck frame. Loose the screws of
adjustable pad cover, and remove the adjustable pad cover. Then simply rotate them in or
out to adjust the level of the treadmill. When properly adjusted the treadmill should sit
firmly on both adjustable pads and all cushions.
/