
KOdak
EasYShare
Digital
Camera •
Appareil
photo
nUmerique
Camara digital •
Camera
digital
User guide •
GUide
d'utilisation
Guia del
usuario •
GUia
do
Usuario
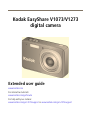
V1273
1
73

www.kodak.com/go/v1073support, v1273support 1
ENGLISH
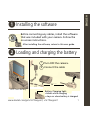
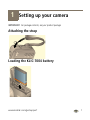
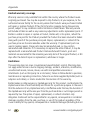
Installing the software
Loading and charging the battery
After installing the software, return to this user guide.
Before connecting any cables, install the software
that was included with your camera. Follow the
on-screen instructions.
or
Turn OFF the camera.
1
Connect the cable
2
Battery Charging light:
• blinks while charging
• stays on when battery is charged
KLIC-7004 battery

2 www.kodak.com/go/easysharecenter
ENGLISH
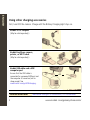
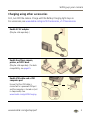
Using other charging accessories
First, turn OFF the camera. Charge until the Battery Charging light stays on.
Kodak 5V AC adapter
(May be sold separately.)
Kodak EasyShare camera,
printer, or HDTV dock
(May be sold separately.)
Kodak USB cable and a USB
computer port
Ensure that the USB cable is
connected to a powered USB port and
the computer is turned on (not in
sleep mode). See
www.kodak.com/go/USBcharging.
Purchase accessories www.kodak.com/go/v1073accessories, v1273accessories
or

www.kodak.com/go/v1073support, v1273support 3
ENGLISH
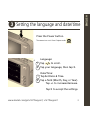
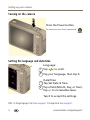
Setting the language and date/time
The camera turns on in Smart Capture mode.
Press the Power button.
2
1
Tap +/- to increase/decrease.
Tap a field (Month, Day, or Year).
Tap Set Date & Time.
2
1 to scroll.
Language:
Date/Time:
X
Tap your language, then tap X.
Tap X to accept the settings.
Tap

4 www.kodak.com/go/easysharecenter
ENGLISH
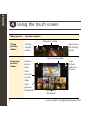
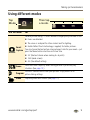
Using the touch screen
When you are Tap the screen to
Taking
pictures,
videos...
Reviewing
pictures,
videos...
Open/close
the Settings
panel
Change a setting
Change
capture
modes
Tag a
picture,
video as a
favorite
Delete a
picture,
video
Tag a picture, video
View
previous
picture,
video
Open/close
thumbnails
View
previous
thumbnails

www.kodak.com/go/v1073support, v1273support 5
ENGLISH
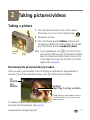
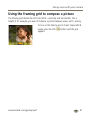
Taking a picture
To learn more about Smart Capture and other modes, see page 12.
You can repeatedly press Info to
turn on/off controls and status
icons.
When you press the Shutter button
halfway down, the framing marks
remain locked on the face or the
in-focus subject, even if you move
the camera.
Press the Shutter button halfway to set exposure. When
the framing marks turn green, press the Shutter button
completely down.
1
Press the Power button to turn on the
camera on in Smart Capture mode.
2
Framing
marks
Info

6 www.kodak.com/go/easysharecenter
ENGLISH
Reviewing pictures/videos
Tag a picture, video
as a favorite
Delete a
picture,
video
Tag a picture, video
View
previous
picture,
video
Open/close
thumbnails
View
previous
thumbnails
Press the
Review
button to
enter/exit
Review.

www.kodak.com/go/v1073support, v1273support 7
ENGLISH
Transferring pictures/videos
Purchase accessories www.kodak.com/go/v1073accessories
www.kodak.com/go/v1273accessories
Learn more about connecting www.kodak.com/go/howto
Dock compatibility www.kodak.com/go/dockcompatibility
Kodak EasyShare
printer dock,
camera dock, or
HDTV dock
(may be sold separately)
USB cable
Connect, then turn on camera.
or

8 www.kodak.com/go/easysharecenter
ENGLISH
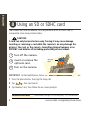
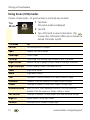
Using an SD or SDHC card
Your camera has internal memory. You can purchase an SD or SDHC card to
conveniently store more pictures/videos.
CAUTION:
A card can only be inserted one way; forcing it may cause damage.
Inserting or removing a card while the camera is on may damage the
pictures, the card, or the camera. Formatting internal memory or an
SD/SDHC card deletes all (including protected) pictures/videos.
IMPORTANT:
For best performance, format the card in the camera before taking pictures.
1 Press the Menu button, then tap the Setup tab.
2 Tap , then tap Format.
3 Tap Memory Card, then follow the on-screen prompts.
Purchase accessories www.kodak.com/go/v1073accessories, v1273accessories
optional
card
1
Turn off the camera.
2
Insert or remove the
optional card.
3
Turn on the camera.

www.kodak.com/go/v1073support, v1273support 9
ENGLISH
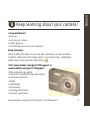
Keep learning about your camera!
Visit www.kodak.com/go/v1073support or
www.kodak.com/go/v1273support:
• the extended user guide
• interactive troubleshooting and repairs
• interactive tutorials
• FAQs
• downloads
• accessories
• printing information
• product registration
Congratulations!
You have:
• set up your camera
• taken pictures
• transferred pictures to your computer
Keep learning!
Finish reading this book, so you can take and share your best pictures!
To better understand each menu option, use camera Help—highlight a
menu choice, then press the Info button.

10 www.kodak.com/go/easysharecenter
ENGLISH
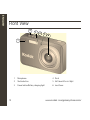
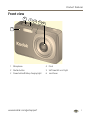
Front View
1 Microphone 4 Flash
2 Shutter button 5 Self-timer/AF assist light
3 Power button/Battery charging light 6 Lens/Cover
5
3
1
6
4
2

www.kodak.com/go/v1073support, v1273support 11
ENGLISH
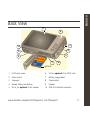
Back View
1 LCD/Touch screen 6
Slot for optional SD or SDHC card
2 Zoom control 7 Battery compartment
3 Strap post 8 Tripod socket
4 Review, Menu, Info buttons 9 Speaker
5
DC-In, for optional 5V AC adapter
10 USB, A/V Out/Dock connector
5
7
6
3
4
1
optional
2
10
8
9

12 www.kodak.com/go/easysharecenter
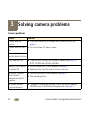
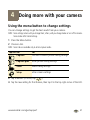
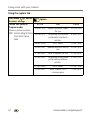
1 Doing more with your camera
Use this mode For
Smart
Capture
General picture taking—it offers excellent image quality and ease of use.
■ Faces are detected.
■ The scene is analyzed for other content and for lighting.
■ Kodak Perfect Touch technology is applied, for better pictures.
You can choose the best picture size and aspect ratio for your needs—just
press the Menu button and choose Picture Size.
■ 3:2 (the best choice when making 4 x 6 prints)
■ 16:9 (wide screen)
■ 4:3 (the default setting)
Scene
Point-and-shoot simplicity when taking pictures in practically any
situation.
Program
The most creative control over your pictures. Enjoy access to all
picture-taking settings.
Video
Taking videos with sound.
Tap
Mode.
Then
tap a
mode.

Doing more with your camera
www.kodak.com/go/v1073support, v1273support 13
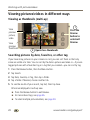
Taking a video
1 Tap Mode.
2 Tap Video.
The camera enters Video mode.
3 Press the Shutter button completely down,
then release it. To stop recording, press and release
the Shutter button again.
Using the 3X optical zoom
1 Use the LCD to frame your subject.
2 To zoom in, press Telephoto (T).
To zoom out, press Wide Angle (W).
3 Take the picture or video.
Using digital zoom
Use digital zoom in any picture-taking mode to get up to 5X magnification beyond
optical zoom. Press Telephoto (T) until the slider is at the top of the optical zoom range.
Release Telephoto (T), then press it again.
NOTE: You may notice decreased image quality when using digital zoom. The slider pauses and turns red
when the picture quality reaches the limit for an acceptable 4 x 6-in. (10 x 15 cm) print. You cannot
use digital zoom in Smart Capture or video mode.

Doing more with your camera
14 www.kodak.com/go/easysharecenter
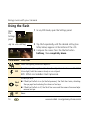
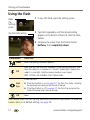
Using the flash
1 In any Still mode, open the Settings panel.
2 Tap Flash repeatedly, until the desired setting (see
table, below) appears at the bottom of the LCD.
3 Compose the scene. Press the Shutter button
halfway, then completely down.
O
pen
the
Settings
panel
T
ap t
h
e
Fl
as
h
sett
i
ng
Flash modes Flash fires
Auto When the lighting conditions require it.
Fill
Every time you take a picture. Use when the subject is in shadow or is “backlit.”
In low light, hold the camera steady or use a tripod.
NOTE: Fill flash is not available in Smart Capture mode.
Red
Eye
In Red Eye flash:
■ If Red Eye Preflash is on (in the Setup menu), the flash fires twice, shrinking
the eye pupil and reducing the chance of red eye.
■ If Red Eye Preflash is off
,
the flash fires once and the camera firmware helps
remove red eye
.
Off Never

Doing more with your camera
www.kodak.com/go/v1073support, v1273support 15
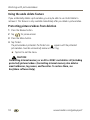
Using the self-timer
Use the self-timer when you want to be included in a picture, or to ensure a steady
Shutter button press. Place the camera on a tripod or flat surface.
1 In any Still mode, tap Settings to open the Settings
panel.
2 Tap Self-Timer/Burst repeatedly, until the desired
Self-timer icon appears at the bottom of the LCD:
10 seconds—A picture is taken after a 10-second
delay (so you have time to get into the scene).
2 seconds—A picture is taken after a 2-second
delay (for a steady, auto-shutter release on a tripod).
2 shot—The first picture is taken after a 10-second
delay. A second picture is taken 8 seconds later.
3 Compose the scene. Press the Shutter button halfway, then completely down.
The camera takes the picture/pictures after the delay.
Using burst
Use burst to take up to 3 pictures in quick succession.
1 In P mode (or in some SCN modes), tap Settings to open the Settings panel.
2 Tap Self-Timer/Burst repeatedly, until the Burst icon appears on the LCD.
3 Press the Shutter button halfway to focus and set exposure.
4 Press the Shutter button completely down and hold it to take pictures.
Self-timer/Burst

Doing more with your camera
16 www.kodak.com/go/easysharecenter
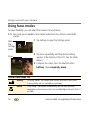
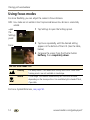
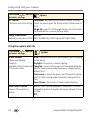
Using focus modes
For more flexibility, you can adjust the camera’s focus distance.
NOTE: Focus modes are not available in Smart Capture mode because focus distance is automatically
selected.
1 Tap Settings to open the Settings panel.
2 Tap Focus repeatedly, until the desired setting
appears at the bottom of the LCD. (See the table,
below.)
3 Compose the scene. Press the Shutter button
halfway, then completely down.
O
pen
the
Settings
panel
Focus
Use this focus mode For
Infinity Far-away scenes. The camera uses infinity auto-focus. Auto-focus
framing marks are not available in Landscape.
Macro Close range. The camera automatically sets the focus distance
depending on the zoom position. Use available light instead of flash, if
possible.

Doing more with your camera
www.kodak.com/go/v1073support, v1273support 17
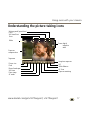
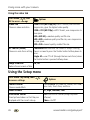
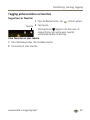
Understanding the picture-taking icons
Mode
Picture size
Macro/Landscape
Exposure metering
ISO
White Balance
digital
telephoto
wide
Zoom:
Tag name
Self timer
Flash
Long time exposure
Settings panel (open/close)
Date stamp
AF mode
AF Zone
Exposure
compensation
Flash
Self-timer/Burst
Focus

18 www.kodak.com/go/easysharecenter
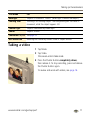
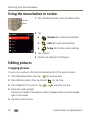
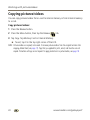
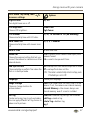
2 Working with pictures/videos
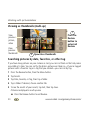
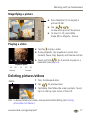
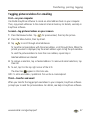
Deleting pictures/videos
1 Press the Review button.
2 Tap for previous/next.
3 Tap Delete, then follow the screen prompts. To exit,
tap X in the top right corner of the LCD.
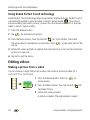
Protecting pictures/videos from deletion
1 Press the Review button.
2 Tap for previous/next.
3 Press the Menu button.
4 Tap Protect.
The picture/video is protected. The Protect icon appears with the protected
picture/video. Favorites automatically receive a Protect tag.
■ Tap Exit to exit the menu.
CAUTION:
Formatting internal memory or an SD or SDHC card deletes all (including protected)
pictures/videos. Formatting internal memory also deletes email addresses, tag names, and
favorites.
De
l
ete

Working with pictures/videos
www.kodak.com/go/v1073support, v1273support 19
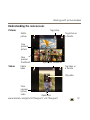
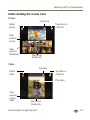
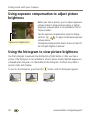
Understanding the review icons
Tag picture as
a favorite
Delete
picture
Tag picture
View
previous
picture
Open/close thumbnails
View
previous
thumbnails
Pictures
Tag video as
a favorite
Delete
video
View
previous
picture,
video
Open/close
Play video
Videos
Page is loading ...
Page is loading ...
Page is loading ...
Page is loading ...
Page is loading ...
Page is loading ...
Page is loading ...
Page is loading ...
Page is loading ...
Page is loading ...
Page is loading ...
Page is loading ...
Page is loading ...
Page is loading ...
Page is loading ...
Page is loading ...
Page is loading ...
Page is loading ...
Page is loading ...
Page is loading ...
Page is loading ...
Page is loading ...
Page is loading ...
Page is loading ...
Page is loading ...
Page is loading ...
Page is loading ...
Page is loading ...
Page is loading ...
Page is loading ...
Page is loading ...
Page is loading ...
Page is loading ...
Page is loading ...
Page is loading ...
Page is loading ...
Page is loading ...
Page is loading ...
Page is loading ...
Page is loading ...
Page is loading ...
Page is loading ...
Page is loading ...
Page is loading ...
Page is loading ...
Page is loading ...
Page is loading ...
Page is loading ...
Page is loading ...
Page is loading ...
Page is loading ...
Page is loading ...
Page is loading ...
Page is loading ...
Page is loading ...
Page is loading ...
Page is loading ...
Page is loading ...
Page is loading ...
Page is loading ...
Page is loading ...
Page is loading ...
Page is loading ...
Page is loading ...
Page is loading ...
Page is loading ...
Page is loading ...
Page is loading ...
Page is loading ...
Page is loading ...
Page is loading ...
Page is loading ...
Page is loading ...
Page is loading ...
Page is loading ...
Page is loading ...
Page is loading ...
Page is loading ...
Page is loading ...
Page is loading ...
Page is loading ...
Page is loading ...
Page is loading ...
Page is loading ...
Page is loading ...
Page is loading ...
Page is loading ...
Page is loading ...
Page is loading ...
Page is loading ...
-
 1
1
-
 2
2
-
 3
3
-
 4
4
-
 5
5
-
 6
6
-
 7
7
-
 8
8
-
 9
9
-
 10
10
-
 11
11
-
 12
12
-
 13
13
-
 14
14
-
 15
15
-
 16
16
-
 17
17
-
 18
18
-
 19
19
-
 20
20
-
 21
21
-
 22
22
-
 23
23
-
 24
24
-
 25
25
-
 26
26
-
 27
27
-
 28
28
-
 29
29
-
 30
30
-
 31
31
-
 32
32
-
 33
33
-
 34
34
-
 35
35
-
 36
36
-
 37
37
-
 38
38
-
 39
39
-
 40
40
-
 41
41
-
 42
42
-
 43
43
-
 44
44
-
 45
45
-
 46
46
-
 47
47
-
 48
48
-
 49
49
-
 50
50
-
 51
51
-
 52
52
-
 53
53
-
 54
54
-
 55
55
-
 56
56
-
 57
57
-
 58
58
-
 59
59
-
 60
60
-
 61
61
-
 62
62
-
 63
63
-
 64
64
-
 65
65
-
 66
66
-
 67
67
-
 68
68
-
 69
69
-
 70
70
-
 71
71
-
 72
72
-
 73
73
-
 74
74
-
 75
75
-
 76
76
-
 77
77
-
 78
78
-
 79
79
-
 80
80
-
 81
81
-
 82
82
-
 83
83
-
 84
84
-
 85
85
-
 86
86
-
 87
87
-
 88
88
-
 89
89
-
 90
90
-
 91
91
-
 92
92
-
 93
93
-
 94
94
-
 95
95
-
 96
96
-
 97
97
-
 98
98
-
 99
99
-
 100
100
-
 101
101
-
 102
102
-
 103
103
-
 104
104
-
 105
105
-
 106
106
-
 107
107
-
 108
108
-
 109
109
-
 110
110


Kodak V1073 - EASYSHARE Digital Camera User manual
- Type
- User manual
- This manual is also suitable for
Ask a question and I''ll find the answer in the document
Finding information in a document is now easier with AI
Related papers
-
Kodak M873 User manual
-
Kodak EasyShare Z5010 Extended User Manual
-
-
-
-
-
Kodak EasyShare Z1485 IS User guide
-
-
Kodak V803 User manual
-