Black
Cyan
Magenta
Yellow
Code: HG2000 IM
Date: 110225 Edition: 06 Op: DCR
INSTRUCTION MANUAL
HG2000
20 0 0 W
HE AT GU N

2
CONT EN TS
Warranty Power Tools
For full details please visit us at www.909.com
Warranty 2
Introduction 3
Environmental protection 3
Description of symbols 3
Specifications 3
General safety instructions 4
Additional safety rules for heat guns 5
Know your product 7
Features 8
Operation 9
Fitting the accessories 10
Using the heat gun on its stand 10
Cool down procedure 10
Power interruption 11
Applications 11
Safety procedures for removing paint 12
Maintenance 13

3
Description of symbols
The rating plate on your tool may show symbols.
These represent important information about the
product or instructions on its use.
Wear hearing protection.
Wear eye protection.
Wear breathing protection.
Double insulated for additional protection.
Conforms to relevant standards
for electromagnetic compatibility.
For safe operation read instruction manual.
Specifications
Voltage: 230–240V ~ 50Hz
Wattage: 2000W
Heat Setting Range: 50°–650°C
Insulation: Double insulated
Weight: 0.85 kg
Introduction
Your new 909 power tool will more than satisfy
your expectations. It has been manufactured under
stringent 909 Quality Standards to meet superior
performance criteria.
You will find your new tool easy and safe to operate,
and, with proper care, it will give you many years
of dependable service.
CAUTION. Carefully read through this entire Instruction
Manual before using your new 909 Power Tool. Take
special care to heed the Cautions and Warnings.
Your 909 power tool has many features that will make
your job faster and easier. Safety, performance, and
dependability have been given top priority in the
development of this tool, making it easy to maintain
and operate.
Environmental protection
Recycle unwanted materials instead
of disposing of them as waste. All tools,
hoses and packaging should be sorted,
taken to the local recycling centre and
disposed of in an environmentally safe way
.

4
General safety rules
WARNING. Read all safety warnings and all instructions.
Failure to follow the warnings and instructions may result in
electric shock, fire and/or serious injury.
Save all warnings and instructions for future reference.
The term “power tool” in the warnings refers to your mains-
operated (corded) power tool or battery-operated (cordless)
power tool.
1) Work area safety
a) Keep work area clean and well lit. Cluttered or dark
areas invite accidents.
b) Do not operate power tools in explosive
atmospheres, such as in the presence of flammable
liquids, gases or dust. Power tools create sparks which
may ignite the dust or fumes.
c) Keep children and bystanders away while operating a
power tool. Distractions can cause you to lose control.
2) Electrical safety
a) Power tool plugs must match the outlet. Never modify
the plug in any way. Do not use any adapter plugs with
earthed (grounded) power tools. Unmodified plugs and
matching outlets will reduce risk of electric shock.
b) Avoid body contact with earthed or grounded
surfaces, such as pipes, radiators, ranges and
refrigerators. There is an increased risk of electric
shock if your body is earthed or grounded.
c) Do not expose power tools to rain or wet conditions.
Water entering a power tool will increase the risk of
electric shock.
d) Do not abuse the cord. Never use the cord for
carrying, pulling or unplugging the power tool.
Keep cord away from heat, oil, sharp edges or
moving parts. Damaged or entangled cords increase
the risk of electric shock.
e) When operating a power tool outdoors, use an
extension cord suitable for outdoor use. Use of a cord
suitable for outdoor use reduces the risk of electric shock.
f) To reduce the risk of electric shock, the manufacturer
recommends the use of a residual current device
with a rated residual current of 30mA or less at
all times.
3) Personal safety
a) Stay alert, watch what you are doing and use
common sense when operating a power tool. Do not
use a power tool while you are tired or under the
influence of drugs, alcohol or medication. A moment
of inattention while operating power tools may result in
serious personal injury.
b) Use personal protective equipment. Always wear eye
protection. Protective equipment such as dust mask,
non-skid safety shoes, hard hat, or hearing protection used
for appropriate conditions will reduce personal injuries.
c) Prevent unintentional starting. Ensure the switch
is in the off-position before connecting to power
source and/or battery pack, picking up or carrying
the tool. Carrying power tools with your finger on the
switch or energising power tools that have the switch
on invites accidents.
d) Remove any adjusting key or wrench before
turning the power tool on. A wrench or a key left
attached to a rotating part of the power tool may result
in personal injury.
e) Do not overreach. Keep proper footing and balance
at all times. This enables better control of the power tool
in unexpected situations.
f ) Dress properly. Do not wear loose clothing or
jewellery. Keep your hair, clothing and gloves away
from moving parts. Loose clothes, jewellery or long hair
can be caught in moving parts.
g) If devices are provided for the connection of dust
extraction and collection facilities, ensure these are
connected and properly used. Use of dust collection
can reduce dust-related hazards.

5
4) Power tool use and care
a) Do not force the power tool. Use the correct power
tool for your application. The correct power tool will
do the job better and safer at the rate for which it was
designed.
b) Do not use the power tool if the switch does not turn
it on and off. Any power tool that cannot be controlled
with the switch is dangerous and must be repaired.
c) Disconnect the plug from the power source and/or
the battery pack from the power tool before making
any adjustments, changing accessories, or storing
power tools. Such preventive safety measures reduce
the risk of starting the power tool accidentally.
d) Store idle power tools out of the reach of children
and do not allow persons unfamiliar with the power
tool or these instructions to operate the power tool.
Power tools are dangerous in the hands of untrained users.
e) Maintain power tools. Check for misalignment or
binding of moving parts, breakage of parts and any
other condition that may affect the power tool’s
operation. If damaged, have the power tool repaired
before use. Many accidents are caused by poorly
maintained power tools.
f ) Keep cutting tools sharp and clean. Properly
maintained cutting tools with sharp cutting edges are
less likely to bind and are easier to control.
g) Use the power tool, accessories and tool bits etc.
in accordance with these instructions, taking into
account the working conditions and the work to be
performed. Use of the power tool for operations different
from those intended could result in a hazardous situation.
h) This appliance is not intended for use by persons
(including children) with reduced physical, sensory
or mental capabilities, or lack of experience and
knowledge, unless they have been given supervision or
instruction concerning use of the appliance by a person
responsible for their safety.
i) Children should be supervised to ensure that they do
not play with the appliance.
5) Service
a) Have your power tool serviced by a qualified repair
person using only identical replacement parts. This
will ensure that the safety of the power tool is maintained.
Additional safety rules for heat guns
• A fire may arise if this appliance is not used with care.
• Be careful when using the appliance in places where
there are combustible materials, such as inflammable
liquids, rags, wood shavings and the like.
• Do not apply the heat to the same place for a long time.
• Do not use in the presence of an explosive atmosphere.
• Heat may be conducted to combustible materials which
are out of sight
• Place the appliance on its stand whenever you place it
down and after use and allow to cool before storage.
• Never leave the appliance unattended when in use.
• Rags, cloths, cord, string, wood shavings and the like
should never be left around the work area.
• Support the work properly.
• If you are interrupted when operating the appliance,
complete the process and switch off before looking up.
• When using the appliance, use safety equipment
including safety goggles or shield, breathing mask
and protective clothing including safety gloves.
Wear goggles
Wear earmuffs
Wear a breathing mask
• Never attempt to use the appliance to dry animals,
clothing or hair.
• Never use this appliance as a hair dryer.
• Always use in ventilated areas.
• Do not leave the appliance unattended when in use.

6
• This product is designed for light domestic use only, it
is not designed for industrial purposes and whilst every
care has been taken to make this hot air gun safe,
accidents can happen. By following this simple safety
guide you can avoid accidents.
WARNING: During application the heat nozzle must be kept
at least 16 mm away from the work piece. This is to allow
air flow.
WARNING. We recommend the use of a residual current
device with a residual current rating of 30mA or less.
Unpacking
Due to modern mass production techniques, it is unlikely
that your 909 Power Tool is faulty or that a part is missing.
If you find anything wrong, do not operate the tool until the
parts have been replaced or the fault has been rectified.
Failure to do so could result in serious personal injury.

7
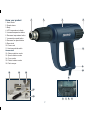
Know your product
1. Heat nozzle
2. Guard sleeve
3. Body
4. LCD temperature indicator
5. Increase temperature button
6. Decrease temperature button
7. Increase fan speed button
8. Decrease fan speed button
9. Rear stand
10. Power cord
11. Heat range slide switch
Accessories
12. Glass protection nozzle
13. Spoon reflector nozzle
14. Cone nozzle
15. Fishtail surface nozzle
16. Paint scraper
3
21
11
4
9
9
10
5 7 8 6
151312
16
14

8
Features:
Variable temperature control
The variable temperature control enables the temperature to
be set and adjusted between 50°C and 650°C, depending
upon the type of material and the work to be carried out.
LCD temperature display
The temperature indicator (4) gives the temperature during
operation.
Note: The temperature indicator gives the temperature for
reference only.
Variable speed fan control.
The speed of the fan can be adjusted to one of 5 speed
settings. The fan speed does not effect the output
temperature but provides a regulated air volume at the
preset temperature.
The fan speed can be adjusted by pressing the fan speed
buttons (7 & 8).
Heat range selector switch.
The heat range selector switch (11) is a 3 position slide
switch.
These are:
Position 0: Stop/Off
Position I: 50°
Position II: 50°–650°

9
Operation
Follow the steps below to turn on and operate
the HG2000 heat gun.
To operate the heat gun at the
pre-set low temperature 50°C.
1. Check to ensure the slide selector switch is in the Off
position. Plug in the mains cable into a 240V power
outlet, and turn on.
2. Slide the selector switch to position I. The temperature
display will show 50°C, being the set temperature in
position I.
NOTE: the temperature cannot be altered in setting position I.
3. To start the heat gun, press any one of the 4 buttons
under the display.
4. To change the air flow (speed of the fan): press the top
centre button to increase the fan speed, or the lower
centre button to reduce the fan speed. In total, there are
5 speed settings for the fan.
5. To stop the heat gun, slide the selector switch to the Off
position (O).
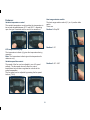
To operate the heat gun at higher
temperatures, up to 650°C.
1. Check to ensure the slide selector switch (11) is in the off
position (O). Plug in the mains cable into a 240V power
outlet, and turn the power point on.
2. Slide the selector switch to position II.
The temperature display will show the previous set
temperature in position II.
3. Start the heat gun by pressing
any one of the 4 buttons under
the display.
4. Select the temperature
required by, pressing the
button on the left hand side
marked to increase the
temperature or the button
on the right marked to
decrease the temperature.
NOTE: the temperature range for position II is between
50°C and 650°C.

10
5. Select the air flow by pressing the top centre button to
increase the fan speed, or the lower centre button to
reduce the fan speed. In total, there are 5 speed settings
for the fan.
6. To stop the heat gun, slide the selector switch to Off (O).
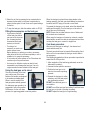
Fitting the accessories on the heat gun
• An accessory that falls
off the heat gun while in
use can set an object on
fire. Accessories must
be mounted firmly and
securely on the unit.
• Touching a hot
accessory or nozzle can
lead to serious burns.
Before attaching or replacing a nozzle or accessory,
either allow the unit to cool down completely or use a
suitable tool to grasp the accessory.
• A hot nozzle can set a surface on fire. Place down hot
nozzles only on fire-proof surfaces.
• An incorrect or defective nozzle can lead to heat
accumulation and damage the heat gun. Use only
original nozzles that are suitable for this heat gun.
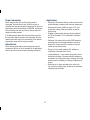
Using the heat gun on its stand
The rear of the body of the heat
gun, and the rear of the lower
section of its handle, are designed
to be used as a standing base.
When in use the nozzle of the
heat gun points vertically upward.
For stationary type operation it is
suggested to use in this position.
Furthermore, for the cool down
process, it is again suggested to use this position.
When the heat gun is placed down during breaks in the
heating operation, the heat gun should always be placed on
its stand, and NOT laying on its side or nose down.
To operate the heat gun on its stand, select the desired heat
setting and fan setting. Turn the heat gun on its end so it
sits on the rear of the housing.
NOTE: Ensure the air intake vents are clear of debris and
the air intake is not restricted.
When using the heatgun on its stand on a bench or similar
raised surface, ensure the cable is well supported and does
not drag the heat gun or cause it to topple over.
Cool down procedure
After using the heat gun on setting II, the element and
nozzle are extremely hot.
The heat gun should never be turned off from setting II and
left to cool on its own unless the heat gun is shut down in
an emergency.
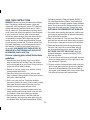
The following suggested cool down procedure is provided to
extend the life of the product.
1. After completion of the task being performed, move the
slide switch to setting I.
2. Increase the fan speed to maximum.
3. Position the heat gun on its
stand so the nozzle is pointing
upwards.
4. Operate the heat gun for a few
minutes or until the heat output
has significantly reduced.
DO NOT store the heat gun in a
hot condition.
DO NOT turn off the heat gun from setting II and then leave
the heat gun on its side or pointing downward.
DO NOT subject the heat gun to rough handling.

11
Power interruption
When using the heat gun, and the mains power is
interrupted, the heat gun will stop. When the power is
reinstated the heat gun settings will resume to the previous
temperature and air flow settings. HOWEVER, the heatgun
will not actually start until one of the 4 buttons under the
display has been pressed.
If the slide selector switch has been previously moved to
the off position when the power was interrupted, then the
selector switch will need to be moved back to the desired
temperature range and the heat gun started.
Intended use
When observing the safety rules and using the original
accessories, this hot air tool is intended for all applications
with hot air that are listed in these operating instructions.
Applications
• Shrinking of shrink-down tubing, solder connectors and
solder terminals, packaging and electrical components.
• Deforming of articles made from acrylic, PVC, and
polystyrene, tubing, plates and profiles, as well as
moist woods.
• Welding of thermoplastic polymer, flooring materials
of PVC and linoleum, PVC-coated fabric, tarpaulins
and foils.
• Soldering of tin, special silver solder, SMD elements,
cable lugs, and for loosening soldered connections.
• Removal of old and even thick coatings of oil paint,
varnish and synthetic plaster.
• Drying of colour shade samples, filler, adhesives,
construction joints and stucco forms.
• Joining adhesives - Large-surface gluing with contact
adhesives, activation of pressure-sensitive adhesives,
acceleration of bonding processes, releasing of bonding
points as well as releasing or bonding of edge band or
veneer.
• Defrosting of icy stairs and steps, door locks, boot
lids, car doors or water pipes, as well as for defrosting
refrigerators and freezers.

12
READ THESE INSTRUCTIONS
WARNING: Extreme care should be taken when stripping
paint. The peelings, residue and vapours of paint may
contain lead, which is poisonous. Any pre-1977 paint may
contain lead and paint applied to homes prior to 1995 is
likely to contain lead. Once deposited on surfaces, hand to
mouth contact can result in the ingestion of lead. Exposure
to even low levels of lead can cause irreversible brain
and nervous system damage; young and unborn children
are particularly vulnerable. Before beginning any paint
removal process you should determine whether the paint
you are removing contains lead. This can be done by your
local health department or by a professional who uses a
paint analyser to check the lead content of the paint to
be removed. LEAD-BASED PAINT SHOULD ONLY BE
REMOVED BY A PROFESSIONAL AND SHOULD NOT
BE REMOVED USING A HEAT GUN.
Persons removing paint should follow these
guidelines:
1. Move the work piece outdoors, if this is not possible,
keep the work area well ventilated. Open the windows
and put an exhaust fan in one of them. Be sure the fan is
moving the air from inside to outside.
2. Remove or cover any carpets, rugs, furniture, clothing,
cooking utensils and air ducts.
3. Place drop cloths in the work area to catch any paint
chips or peelings. Wear protective clothing such as extra
work shirts, overalls and hats.
4. Work in one room at a time. Furnishings should be
removed or placed in the centre of the room and covered.
Work areas should be sealed off from the rest of the
dwelling by sealing doorways with drop cloths.
5. Children, pregnant or potentially pregnant women and
nursing mothers should not be present in the work area
unit the work is done and all clean up is complete.
6. Wear dust respirator mask or a dual filter (dust and
fume) respirator mask which has been approved by the
Occupational Safely and Health Administration (OSHA),
the National Institute of Safety and Health (NIOSH), or
the United States Bureau of Mines. These masks and
replaceable filters are readily available at major hardware
stores. Be sure the mask fits. Beards and facial hair may
keep masks from sealing properly. Change filters often.
DISPOSABLE PAPER MASKS ARE NOT ADEQUATE.
7. Use caution when operating the heat gun. Keep the heat
gun moving as excessive heat will generate fumes which
can be inhaled by the operator.
8. Keep food and drink out of the work area. Wash hands,
arms and face and rinse mouth before eating or drinking.
Do not smoke or chew gum or tobacco in the work area.
9. Clean up all removed paint and dust by wet mopping
the floors. Use a wet cloth to clean all walls, sills and
any other surface where paint or dust is clinging. DO
NOT SWEEP, DRY DUST OR VACUUM. Use a high
phosphate detergent or trisodium phosphate (TSP) to
wash and mop areas.
10. At the end of each work session put the paint chips and
debris in a double plastic bag, close it with tape or twist
ties and dispose of properly.
11. Remove protective clothing and work shoes in the work
area to avoid carrying dust into the rest to the dwelling.
Wash work clothes separately. Wipe shoes off with a
wet rag that is then washed with the work clothes. Wash
hair and body thoroughly with soap and water.

13
Maintenance
WARNING. When performing any maintenance ensure the
plug of the appliance is removed from the power source.
Air flow through the heat gun is important. Keep the side
air vents clear of debris and dirt build up by using a small
brush.
Do not use solvents or flammable cleaning solutions, and
never operate the heat gun to clear out vents.
Keep the slide switch clean and free of dirt. Grit could jam
the slide.
Keep the housing of the heat gun clean using a soft damp
cloth or similar cleaning cloth.
Solvents, detergents, and cleaners should not be used.
Cordset replacement
If the supply cord is damaged, it must be replaced by the
manufacturer, its service agent or similarly qualifies persons
in order to avoid a hazard.

-
 1
1
-
 2
2
-
 3
3
-
 4
4
-
 5
5
-
 6
6
-
 7
7
-
 8
8
-
 9
9
-
 10
10
-
 11
11
-
 12
12
-
 13
13
-
 14
14