
3D func tionality Pulse Platform
User Guide
Valid for F70, F80 and F90 series projectors.
601–0469/00
27/02/2018

Barco Fredrikstad AS
Habornveien 53, N-1630 Gamle Fredrikstad, Norway
Phone: +47 6930 4550
Fax: +47 6930 4580
Support: [email protected]
Visit us at the web: www.barco.com
Printed in Norway

Table of contents
TABLE OF CON TENTS
1. 3D principles ....................................................................................................... 3
1.1 3D projection......................................................................................................................... 3
1.2 The difference between Active Stereo & Passive Stereo output................................................................... 4
2. Input Modes ........................................................................................................ 7
2.1 Input channel setup. ................................................................................................................. 7
2.2 Synchronization...................................................................................................................... 8
2.3 3D input specification................................................................................................................ 8
2.3.1 DVI-I........................................................................................................................... 8
2.3.2 Display Port 1.2 ............................................................................................................... 8
3. Projector 3D setup ................................................................................................11
3.1 Preparing 3D setup ..................................................................................................................11
3.2 Block diag ram connections. .........................................................................................................11
3.3 Setup 3D mode. ..................................................................................................................... 11
601–0469 3D FUNCTIONALITY PULSE PLATFORM 27/02/2018
1

Table of contents
2 601–0469 3D FUNCTIONALITY PULSE PLATFORM 27/02/2018

1. 3D principles
1. 3D PRINCIPLES
1.1 3D projection
About
The projectors based on the Pulse software platform are c apable of displaying 3D images and movies
in both active and passive
stereoscopic 3D.
The projectors default method is active s tereo output.
When using passive stereo output, special equipment and setup is required.
This m anual concerns setup procedures, equipment and necessary knowledge which is nec essary to set up the projec tor for 3D
rendering.
In addition to the pr ojector se tup, it is also a setup pro cedure for the 3 D source. T he procedures for the 3D sour ce equipment is not
mentioned in this manu al, due to the large num ber of this kind of equipment.
Setup of a 3D installation, is a dem anding task that requires a certain level of theoretical knowledge of the techniques around 3D
rendering. If setup and use of the 3D mode is not p erformed correctly, there is a risk of image artifacts that will dis turb the experienced
quality of the picture. It is therefore of great im portance to setup and configure the 3D m ode in a proper way
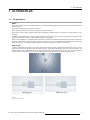
3D principle
To present 3D (stereoscopic) images on the screen, two images must be projected, superimposed onto the s ame screen. The two
images represent the view that we normally see through each eye, and in or der to reproduce a correct 3D image for the viewer, the
projected imag es m ust be filtered and processed so that the perceived picture appear s as 3D for the viewer. T he principles us ed
for this p rocess is called Active Stereo output, and Passive Stereo output. These two princ iples are desc ribed below.
Left eye view
Right eye view
Image 1-1
The principle of 3D rendering
601–0469 3D FUNCTIONALITY PULSE PLATFORM 27/02/2018 3

1. 3D principles
1.2 The difference between Active Stereo & Passive Stereo output
About
The Barco P ulse based projectors have an implemented functionality for Active 3D output, which is the s tandard mode for the Pulse
platform.
In add ition, the P ulse platform also hav e the p ossibility for rendering pass ive 3D. Th is requires a special v ersion of the p rojector
which can be ordered on a separate ar ticle num ber. This version contains ex tra hardware in the optics path.
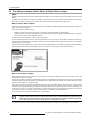
What is Passive Stereo output?
Passive S tereoscopic 3D (also known as “Pa ssive Stereo”) is the traditional, standard method of creat
ing the illusion of depth in an
image, by using pas sive goggles.
There are several sub methods, such a s:
• Different color spec trum on each channel (eye), recognized by goggles with different colored glas ses.
• Polarizing m ethod with different polarization on each channel (eye) using passive goggles with polar
ized lenses. The Barc o
passive stereo output uses the polarization m ethod.
In order to preserve the polarization, a silver screen must be used.
On m ost passive displays ev ery other row of pixels are polarized for one eye o r the other. This method is also known as interlacing.
Passive output also requires e xternal equipment in t he form of a ac tive p olarization filter moun ted in front of the lens. This equipment
is supplied from a 3
rd
part vendor.
The v iewer wears passive g lasses which contain a pa ir of o pposite polarizing filters. As each filter only passes light which is sim ilarly
polarized and blocks the oppos ite polarized light, each eye only sees one o f the images, and the effect is achieved.
Image 1-2
What is Active Stereo output?
Field sequential 3D (also k nown as active 3D or A
ctive S tereo) is a technique of displaying stereoscopic 3D ima ges, which is the
standard mode for the Pulse platform.
The principle of operation is that the image intended for the left eye is presented while blocking the right eye’s view, then presenting
the right-eye image while block ing the left eye, and repeating this so rapidly that the interruptions do not interfere with the perce ived
fusion of the two im ages into a single 3D image.
This system se tup uses liquid crystal shutter glasses ( also known as active shutter glasses). Each eye’s glass c onta ins a liquid
crystal layer which has the property of becom ing opaque when voltage is applied, being otherwise transparent. T he glasses are
controlled by a timing signal that allows the glasses to alternately block one eye, and then the other, in synchronization with the
refresh rate of the screen. The timing sync hronization to the video equipment may be achiev ed via a wired s ignal or via wireless
communication, this by using eith er an infrared or radio frequency (e.g. Bluetooth, DLP link) transmitter.
There are several types of 3D glasses available from 3
rd
part vendors.
If a 3D emitter is used that radiates IR beam s, the IR beams may interfere with the IR communica tion b etween
projector and the remote control unit. If such interference occurs, connect the RCU to the projector u sing the
remote cable. It is also advised to turn the IR receivers on the projector off to avoid the 3D emitter interference.
To turn off the IR receivers, refer to the User g uide for the projector concerned.
The options in the projector software allow you to fine-tune the 3D settings accordingly to the specifications of the 3D emitter.
4
601–0469 3D FUNCTIONALITY PULSE PLATFORM 27/02/2018

1. 3D principles
Image 1-3
601–0469 3D FUNCTIONALITY PULSE PLATFORM 27/02/2018 5

1. 3D principles
6 601–0469 3D FUNCTIONALITY PULSE PLATFORM 27/02/2018

2. Input Modes
2. INPUT M ODES
About
There are two different 3D input modes; A ctive and passive. The principles and setup is explained below.
2.1 Input channel setup
About
There are two input ports that can be us ed and configu red for 3D rendering: DVI-I and Disp layport 1.2. Both ports have two input
channels each, and c an be used in either pass ive or active stereo input mode.
A simple explanation of the tw o modes are described below.
Since the standa rd output m ode for the Pulse based projectors are Active stereo, the input signals always will be converted to a
active output.
Active stereo input.
One channel input. (One cable). This signal combines both left and right signal in a sequence with a u pdate frequency of 120Hz.
This means that the update frequency for each channel (left and right eye) is 60 Hz. B ut since every other frame for eac h ey e is
blanked out by the goggles, this also means that the projected image i
s pe rceived as 60 Hz.
When DVI source is used an extra sync signal mus t be used.
When using a Displayport source, the sync s ignal is present in the signal cable, but external sync can also be used if necess ary.
The signal format in active m ode is sequential, ie the image for the left and right eye comes every other time. This also m eans that
the up date frequency for the rendered 3D picture is 60 Hz.
Projector source selection: Single input.
Sequential input
(Active stereo)
Input
Image 2-1
Active stereo input principle.
Source setup
Refer to the manual for the spec ific graphic source.
Select active stereo display mode
For DVI, co nnect the synchronization signal from the source to the BNC sync input no. 1 on the projector.
Passive stereo input.
Use two channel input (two cab les), one for each eye. Update frequency limited to 60 Hz for eac h channel. Dual Sequential input
source (DVI or Display port) must be used. No ex ternal sync signal required in this modus .
Projector source selection: Sequential input.
601–0469 3D FUNCTIONALITY PULSE PLATFORM 27/02/2018
7

2. Input Modes
Dual input
(Passive stereo)
Input 2
Input 1
Image 2-2
Passive stereo input principle
Source setup
Refer to the manual for the spec ific graphic source.
Select passive stereo display mode
2.2 Synchronization
There are two sync inputs in use in the Pulse projector 3D mode.
• Mini-DIN connector: O utput sync for the 3D glasses. 5V , 765mA nom, available in the connector. Suitable for supplying the
IR emitter for the 3D goggles.
• BNC Sync port 1. Bidirectional. For sync signal from source.
2.3 3D input sp ecification.
2.3.1 DVI-I
Specifi ca tions
Param eter Value
Connector DVI-I fem ale digital RGB
Signal characteristics DVI 1.0, Digital, TMDS
Max. cable length
25 m ( 24 AWG)
Max. pixel rate
330 MHz (dual link), 165 Mhz (single link)
Scan format
Progressive
Max. input data resolution
1920x1200 60Hz (Single link), 2560x1600 60Hz (Dual
Link).1920x2400 @ 60Hz
Bit depth 8 bit
EDID
Supported
HDCP Supported
2.3.2 Display Port 1.2
Specifi ca tions
Param eter Value
Connector Standard D isplay port
Signal characteristics
DP 1.2
Functionality Mandatory
Max. cable length
15m(24AWG)-RBR;
2m(24AWG)–HBR1,HBR2
8 601–0469 3D FUNCTIONALITY PULSE PLATFORM 27/02/2018

2. Input Modes
Param eter Value
Supported Link R ate
RBR, HBR1, HBR2
Scan format
Progressive
Max. input data resolution
2560x1600@120Hz WQ X GA / 3840x2 400 @ 60Hz ( 4K ) Max
Bit depth 8, 10, 12 bit
EDID
Supported
601–0469 3D FUNCTIONALITY PULSE PLATFORM 27/02/2018 9

2. Input Modes
10 601–0469 3D FUNCTIONALITY PULSE PLATFORM 27/02/2018

3. Projector 3D setup
3. PROJECTOR 3D SETUP
3D setup
Setup of a 3D installation requires an advanced understanding of the 3D sy stems, both for the projector, and also for the signal
source.
Regarding setup of the signal source, refer to the user manu al for the specific unit.
In 3D setup, it is crucial that the projected images are p erfectly synchronized through the whole sign
al path, from the signal source
to the picture viewed through the 3D goggles.
See instructions in this chapter to set up t he projector for this feature.
In 3D m ode, the m axim um resolution is WQXGA, meaning that 3D mode will not work in 4K UHD m ode.
3.1 Preparing 3D setup
Preparing external connection and equipment.
1. Connect the desired source cable(s) to the projector. Meaning DVI o r Displayport, single or dual.
2. Setup and connect the 3D emitter (goggle equipment) to the mini-DIN sync connector. See op erators manual for the desired
equipment.
Connect sync from the source to the B NC 1 sync c onnector input.
3. Power on the projector.
4. Select the correct source input from the Source menu.
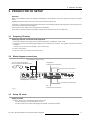
3.2 Block diagram connections
Sync to active 3D goggles
Power available: 5V, 765mA max.
Sync from the image source
Displayport
DVI
Active input connection
Passive input connection
Passive input connection
Active input connection
L
R
RF
Backpanel F70 shown
Image 3-1
3.3 Setup 3D mode.
Setup 3D mode.
1. Enter the Source menu, and select the desired input source.
- For active stereo input, s elect Displayport 1 or DVI-1
- For passive stereo input, s elect Dual d isplayport sequential, or Dual DV I sequential
601–0469 3D FUNCTIONALITY PULSE PLATFORM 27/02/2018
11

3. Projector 3D setup
Image 3 -2
Image 3-3
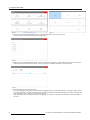
2. Enter the menu Home/Installation/Display Setup, and select AutoStereo in the drop down menu.
(The other choices in the drop down menu is not applicable).
Image 3-4
3. Enter the m enu Home/Installation/3D S etup, and set the dark time to 1600us or 1850us depending on which c olorwheel in-
stalled.(The projector detect the co lor wheel, and only one option is available, depending on the color w heel).
Image 3-5
4. Run a 3D image or mov ie from the source.
Put on the 3D goggles, and verify by looking through the g oggles with one eye at the time that only one image is visible in each
eye. A double picture or a shade of the picture from the other side shall not be observed. Repeat for both sides, and adjust the
Sync Delay slider until a “clean” picture is visible in each ey e.
If the 3D picture looks a bit “strange” through the 3D g oggles, the solution is to s wap eyes by enabling the S wap eyes button in
the menu.
12
601–0469 3D FUNCTIONALITY PULSE PLATFORM 27/02/2018
-
 1
1
-
 2
2
-
 3
3
-
 4
4
-
 5
5
-
 6
6
-
 7
7
-
 8
8
-
 9
9
-
 10
10
-
 11
11
-
 12
12
-
 13
13
-
 14
14


