Page is loading ...

PMS 2747 and PMS 186
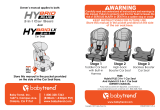
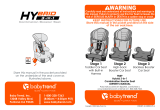
WARNING: Avoid serious injury or death to your child. Never
use your Fit 4 Child Restraint without the softgoods in place. You
must read and understand the Softgoods Removal instructions and
the instructions in the User Guide. If you do not understand these
instructions, DO NOT attempt to remove the softgoods, STOP
and call Chicco at 1-877-424-4226.
INSTRUCTIONS:
Fit 4 Softgoods Removal/Installation
IMPORTANT: Please also refer to the instructions that came with your product.
Completely loosen Harness by pressing Harness
Release Button on the front of the Child Restraint and
pulling out on both of the Harness Straps. Then unbuckle
the Chest Clip and Harness Buckle.
1
Remove the Crotch Strap Pad by pulling the Crotch
Strap Pad up and off the Harness Buckle, as shown.
2
Remove the Stage 1 Positioner by pulling the
Shoulder Straps out through the side openings on the pad
and thread the Harness Buckle through the slot in the pad.
Remove the Stage 1 Positioner from the Child Restraint.
3
If desired, Unhook the Hook and Loop Tab on the
outside of the Shoulder Pad to remove the pad. Repeat for
the other Shoulder Pad. Note: The Shoulder Pads may be
used in Stages 1, 2, and 3.
4
1
SS0020E_01
SOFTGOODS REMOVAL Stage 1:
If desired, Reattach the Crotch Strap Pad and
Shoulder Pads for Stage 2 use
. Pull the Harness Buckle
forward and insert the Crotch Strap Pad tongue down into
the same opening as the Harness Buckle. The Crotch Strap
Pad tongue will be behind the Harness Buckle. Thread the
Harness Buckle up into the Crotch Strap Pad.
5
Be sure to
adjust the Crotch Strap Pad so that the
Fabric Notches are positioned below the slot in the top layer
of padding. Note: The Crotch Strap Pad may be used in stages
1, 2, and 3.
6
Fabric
Notch
Fabric
Notch

2
Locate and undo both side snap buttons, as shown.
12
Thread the Shoulder Straps out through the side openings on the Stage 2 Positioner. Pull forward on the seat
fabric and Stage 2 Positioner, as shown. Then reach under the seat bottom fabric and undo both Snap Buttons attaching
the Stage 2 Positioner to the seat bottom fabric.
13
Locate and undo the top snap button on the Stage 2
Positioner side wing. Below the snap button, pull the
plastic tab from the pocket. Repeat for the other side.
11
Remove the Crotch Strap Pad by pulling the Crotch
Strap Pad up and off the Harness Buckle, as shown. Also
remove the Shoulder Pads, if desired.
8
Completely loosen Harness by pressing Harness
Release Button on the front of the Child Restraint and
pulling out on both of the Harness Straps. Then unbuckle
the Chest Clip and Harness Buckle.
7
SOFTGOODS REMOVAL Stage 2:
Slide both Headrest Flaps from the side pockets on
the Headrest. Remove the Stage 1 & 2 Headrest Insert
from the Child Restraint.
10
Lift the Headrest to the highest position. Unsnap
both Snap Buttons located on the bottom section of the
Stage 1 & 2 Headrest insert, as shown.
9

3
Unhook the elastic loop below the front edge of the Child Restraint, and thread the Harness Buckle down through
the slot in the pad. Remove the Stage 2 Positioner from the Child Restraint. If desired, re-attach the Crotch Strap Pad
and Shoulder Pads for Stage 3 use
. Thread the Crotch Strap Pad tongue down into the same opening as the Harness Buckle
(See Step 5 and 6 in Softgoods Removal Stage 1).
14
Completely loosen Harness by pressing Harness
Release Button on the front of the Child Restraint and
pulling out on both of the Harness Straps. Then unbuckle
the Chest Clip and Harness Buckle.
15
Raise the headrest to the highest position and remove BOTH of the Cup Holders. Press the orange button located
on the bottom edge of the Cup Holder and lift up, repeat for the other side.
17
Remove the Crotch Strap Pad by pulling the Crotch
Strap Pad up and off the Harness Buckle, as shown. Also
remove the Shoulder Pads.
16
SOFTGOODS REMOVAL Stage 3 & 4:

At the top edge of the seat back, pull back gently
on both of the plastic tabs and lift up fabric. Remove the
fabric from the top edge of the seat back.
With the Child Restraint facing you, pull forward on
the fabric and guide it off of the Headrest frame. Undo
both snap buttons holding the headrest fabric in place at
the bottom of the Headrest frame, as shown.
4
With the Child Restraint facing you, pull forward on
the fabric. Guide it off of the Child Restraint Seat frame
and then around the Headrest frame.
22
Undo both snap buttons on the inside of the seat
pad, as shown. Then lower the Headrest to the lowest
position.
20 21
On one side of the Child Restraint open the LATCH
Storage compartment. Locate and unhook the elastic
loop, as shown. Pull the fabric edge out and around the
orange Lap Belt guide.
23
At the back of the Headrest, pull back gently on both
of the plastic tabs at the top of the Headrest and pull up
on the Headrest fabric.
18 19

5
Release both elastic straps located inside the cup
holder attachment cutout. Repeat steps 24 and 25 for the
other side.
24
Thread the Harness Buckle down through the slot in
the pad and pull the FABRIC up around the front and sides
of the seat frame. Then carefully pull fabric around the
Harness Adjuster Strap Cover and remove the Seat Bottom
Pad. The plastic Harness Adjuster Strap Cover is NOT
removable. Remove the Fabric.
25
Fabrics may be hand washed using mild soap and water, or machine washed in cold water on delicate cycle using mild
detergent. Hang to dry. DO NOT BLEACH. Please consult your product manual for additional care and maintenance
instructions.
DO NOT remove the Harness Straps. Contact Chicco Customer Service at 1-877-424-4226 for assistance or additional
information.
Cleaning Instructions:
Open the Crotch Strap Lock and fully recline the seat (Position 1). Tilt the Child Restraint back and locate the
crotch strap metal bar underneath the seat. Turn metal bar slightly and push the corner through the slot. Work the
metal bar through the slot while pulling Harness Buckle out on the other side.
NEVER use Child Restraint without the Crotch Strap installed.
CROTCH STRAP REMOVAL:
26

Pull the fabric down and around the front edge and
insert the headrest into the top opening in the fabric. Pull
the fabric around the back of the Seat Frame.
Guide one corner of the metal bar through slot in the Crotch Strap Lock compartment. With the seat fully
reclined (Position 1), pull the metal bar through the slot from underneath the seat. Make sure the metal bar lays flat on
the bottom of the seat, as shown.
NEVER use Child Restraint without the Crotch Strap installed.
27
CROTCH STRAP INSTALLATION:
SOFTGOODS INSTALL Stage 3 & 4:
Make sure the Headrest is in the lowest position and open the LATCH storage compartments. Place the Seat Pad
onto the Child Restraint frame and thread the Harness Buckle up through the correct slot in the seat pad. Then carefully
guide the fabric around the Harness Adjuster Strap Cover.
1
2
6
At the front of the Child Restraint start tucking the
fabric edge into the outside groove following it up the side
to the Cup Holder attachment.
3

While pulling on the Front elastic strap, press in on
the fabric guiding it into the groove. Wrap the elastic
strap around the post inside the Cup Holder cutout. Tuck
the fabric edge around the outside Cup Holder frame,
making sure the grooves in the Cup Holder frame are not
covered by the fabric.
4
Pull on the other elastic strap while guiding the fabric
down and around the Cup Holder edge and into the notch.
Wrap the elastic strap around the post and repeat for the
other side.
5
7
Pull the Shoulder Harness Straps through the openings
in the fabric and attach the chest clip and the harness
buckle.
6
Press and push the fabric around the inside edge of
the orange Lap Belt Guide. If this becomes difficult, the
blunt end of a pen or something similar may be used to help
tuck the fabric around the edge.
7
Locate the elastic strap near the back of the Lap Belt
Guide, pull on the strap and tuck the fabric around the
upper edge of the Lap Belt Guide. Wrap the elastic strap
around the post inside the LATCH belt compartment. Close
the compartment and repeat for the other side.
8
Tuck and press the fabric into both side edges of the
Child Restraint. At the top of edge of the Child Restraint,
locate the plastic tabs. Press both tabs into the top edge
until they stay in position under the tab cutouts.
9

Attach the Cup holders to the Child Restraint. Match the “R” and “L” Cup Holders to the Child Restraint, as shown.
Make sure the fabric is tucked in along the Child Restraint lip to allow the Cup Holder to be attached properly. Line up
the Cup Holder pin and the two guides with the openings on the Child Restraint, as shown. Push in and then push down
on the Cup Holder until it clicks into place. Repeat for the other side.
13
R
L
Pin
Guide
8
At the back edge of the Headrest locate the plastic
tabs. Press them into the headrest frame until they click
into position, as shown.
11
Attach both snap buttons on the Headrest fabric
to the Headrest frame, as shown. If setting up for use
in Stage 4, please reference pages 112 to 117 in your user
guide. If not, pull the Shoulder Harness straps around to lay
on top of the Headrest fabric.
12
Attach both snap buttons on the seat fabric, as shown. Pull the Headrest up to the highest position.
Slide the
Headrest fabric onto and around both sides of the Headrest frame. Tuck the fabric edges into the Headrest frame
edges, as shown.
10

If desired, attach the Crotch Strap Pad for Stage 3
& 4 use
. Thread the Crotch Strap Pad tongue down into the
same opening as the Harness Buckle (See Step 5 and 6 in
Softgoods Removal Stage 1).
14
SOFTGOODS INSTALL Stage 2:
Completely loosen Harness by pressing Harness
Release Button on the front of the Child Restraint and
pulling out on both of the Harness Straps. Then unbuckle
the Chest Clip and Harness Buckle.
Raise the headrest to the highest position and
remove Crotch Strap Pad.
17
9
16
If desired, attach both sides of the Hook and Loop
Tabs on the outside of the Shoulder Pad, as shown.
Repeat for the other Shoulder Pad.
15
Slide both Headrest Flaps into the side pockets on
the Headrest.
18
Slide Shoulder Straps into Headrest Slots, then
attach both snap buttons located on the bottom section
of the Stage 1 & 2 Headrest Insert, as shown.
19

10
Pull forward on the seat fabric and Stage 2 Positioner ,
as shown. Wrap both snap button straps down and under
the seat fabric. Using your fingers, line up and attach both
snap buttons to the underside of the seat fabric.
23
Attach both side snap buttons, as shown.
Place the Stage 2 Positioner on the Child Restraint.
Thread the Harness Buckle up through the correct slot in
the seat pad and pull the Shoulder Straps over the Stage 2
Positioner and into the side openings in the seat pad.
20
Locate and pull the adjuster strap through the opening on the seat pad. Attach the elastic strap on the front of the
Stage 2 Positioner by pulling the elastic strap under the front edge of the seat bottom and loop it around both hooks. If
desired, re-attach the Crotch Strap Pad for Stage 2 use
.
24
Insert the plastic tab into the pocket crease, and
attach the top snap button on the Stage 2 Positioner side
wing. Repeat for the other side. Double check to make sure
the plastic tab is pushed all of the way down into the
pocket.
21
22

Completely loosen Harness by pressing Harness
Release Button on the front of the Child Restraint and
pulling out on both of the Harness Straps. Then unbuckle
the Chest Clip and Harness Buckle.
25
Remove the Crotch Strap Pad by pulling the Crotch
Strap Pad up and off the Harness Buckle, as shown. Lower
the Headrest to the lowest position.
26
Attach both the Shoulder Pads to the Shoulder
Harness straps using the Hook and Loop Tabs, as shown.
Attach the Crotch Strap Pad.
Make sure to
adjust the Crotch Strap Pad so that the Fabric Notches are positioned
below the slot in the top layer of padding.
31
SOFTGOODS INSTALL Stage 1:
Fabric
Notch
Fabric
Notch
Place the Stage 1 Positioner on the Child Restraint.
Thread the Shoulder Straps into the side openings on the
positioner pad and thread the Harness Buckle up into the
correct slot in the pad.
27
28
11
Before lowering the Headrest to the lowest position,
lift up on the bottom edge of the Headrest Insert. Locate
the lower portion of the Headrest Pad and fold it under.
29
Tuck the bottom Headrest Pad behind the Stage 2
Positioner pad, but in front of the Stage 3 & 4 seat pad, as
shown.
30
/