Page is loading ...


CPFAFD
Automatic
362-261
IN
ST
RU
CT
I
ON
S
Foreword
Your
dream
has
come
true!
You
are
now
the
proud
owner
of
a
Pfaff-Automalic
362-261
——
the
sewing
machine
with
unlimited
possibilities.
The
machine
you
have
chosen
has
a
built-in
vibrator
which
enables
you
to
darn
without
hoops.
An
exclusive
feature
of
Pfaff
sewing
machines,
the
Stopmatic
ensures
thatyour
machine
is
ready
for
sewing
at
any
time.
This
instruction
book
will
help
you
understand
the
machine
and
give
you
valuable
tips
to
make
sewing
more
fun
for
you.
Even
if
you
are
an
experienced
seamstress,
you
will
find
this
book
a
valuable
guide
to
easy
sewing
——
Pfaff-Automatic
Sewing.
Fallow
these
simple
instructions
and
familiarize
yourself
with
the
exclusive
automatic
features
of
your
machine.
You
will
find
sewing
exciting
on
your
easy-to-operate
Pfaff-Autamatic.
If
you
have
any
sewing
problems,
please
contact
your
Pfoff
dealer.
He
will
be
glad
to
help
you
at
any
time.
G.
M.
PFAFF
AG
Karisruhe-Durlach
Branch

z
1
Thread
take-up
lever
2
Top
control
(D)
cover
3
Embroidery
pattern
length
lever
(E)
4
Dial
(C)
5
Zigzag
fingertip
control
6
Bobbin
winder
7
Stop
motion
knob
8
Stitch
length
dial
9
Reverse
teed
control
10
Light
switch
11
Drop
seed
control
12
Needle
plate
13
Free
arm
cover
(enclosing
transverse
rotary
sewing
hook)
2
14
Needle
15
Automatic
needle
threader
16
Needle
thread
tension
17
Sewlight
18
Stitch
width
dial
(A)
19
Needle
position
lever
(B)
1
2
3
45
17
18’”19’
15
13—i
8
I
—
12
11
R
8153A

R
8138
A
20
Balance
wheel
21
Collapsible
spool
pins
22
Top
cover
23
Needle
threader
control
24
Face
cover
25
Presser
bar
lifter
(also
used
to
operate
the
Stopmatic)
26
Sewing
loot
thumb
screw
27
Sewing
foot
28
Snap-out
workplate
3
29
Free
arm
30
Double
receptacle
for
speed
control
and
power
cords
31
Free
arm
top
cover
32
Needle
set
screw
4__
-_r_4
av#
3O
F::::
26
27

fr
Make
sure
the
electric
circuit
is
A.
C.
before
you
plug
in
the
machine.
Electrical
Information
Push
plug
1
into
receptacle
2,
and
plug
3
at
other
end
of
cord
into
the
wall
outlet.
Cord
4
leads
to
the
speed
control.
Place
the
foot
control
under
the
cabinet
within
easy
reach
of
your
foot.
Rest
the
right
toot
on
the
speed
control
and
press.
The
harder
you
press,
the
faster
the
machine
will
run.
a
R
7132
F

The
Stopmatic
Push
the
raised
presser
bar
lifter
toward
the
machine
as
far
as
it
will
go——and
the
motor
will
automatically
lift
the
take-up
lever
and
the
needle
to
the
positions
re
quired
for
threading
the
needle
and
re
moving
the
work.
(Don’t
forget
to
plug
in
the
machine,
though.)
Whenever
you
have
to
raise
the
needle,
operate
the
Stopmatic
lever.
Fundamentals
of
Machine
Operation
Make
sure
stop
motion
knob
b
is
tightened
before
you
begin
sewing
(clockwise
as
indicated
by
white
arrow).
If
you
want
to
turn
balance
wheel
a
by
hand
(al
though
normally
there
is
no
need
to
do
so),
always
turn
it
toward
you
(counter-clockwise
as
shown
by
black
arrow.)
Never
run
a
threaded
machine
unless
you
have
fabric
under
the
presser
foot.
The
machine
will
feed
the
material
under
the
sewing
foot
automatically.
All
you
have
to
do
is
guide
the
work.
Never
try
to
hasten
feeding
by
pushing
or
pulling
the
fabric
while
stitching
because
the
needle
may
bend
or
break.
Before
you
begin
and
after
you
have
completed
a
seam,
always
operate
the
Stopmatic
lever
to
raise
the
take-up
lever
to
a
position
about
/?
below
the
top
of
its
stroke
(see
ill.).
When
in
this
position,
the
needle
can
be
threaded
with
the
needle
threader,
or
the
work
be
removed
from
the
machine.
5
DRO8S
R
7506
b
11,
-
DR
084
4W

R
8007
Dial
G
regulates
the
stitch
length
(the
higher
the
number
on
the
dial,
the
longer
the
stitch).
To
back-
tack
the
end
of
a
seam,
simply
depress
the
finger-tip
control.
6
Straight
Stitching
Set:
Dial
C=O
Dial
AO
Lever
B=
4
.4
Lever
E
engages
and
disengages
the
Automatic
mechanism.
If
you
don’t
need
this
mechanism
for
a
longer
period,
set
lever
E
at
“0”.
I
This
setting
is
indicated
on
pages
32
to
51
as
follows:
A=0
.
C=0
E==O
\i1i1
r
I
R
7998

R
7999
Zigzag
Sewing
Set:
Dial
C==O
If
you
want
to
sew
a
few
wide
zigzag
stitches
while
the
machine
is
set
for
straight
stitching
(A
on
0),
merely
press
down
the
finger-tip
control.
When
the
lever
is
released,
the
machine
resumes
straight
stitching
automatically.
To
sew
longer
zigzag
seams,
turn
dial
A
to
desired
stitch
width
(indicated
by
numbers
I
to
4).
When
dial
A
is
set
between
1
and
2,
you
can
double
the
stitch
width
by
depress
ing
the
finger-tip
control
(important
for
making
buttonholes>.
When
you
push
the
control
up,
the
machine
will
sew
straight,
regardless
of
the
stitch
width
set
(ideal
for
tying
off
zigzag
seams).
Lever
B
changes
the
position
of
the
needle
in
the
needle
plate
slot.
Thus
the
stitch
ing
can
be
moved
from
the
center
to
the
left
or
right
of
the
slot,
as
desired.
Dial
G
lengthens
zigzag
stitches
or
packs
them
more
closely
to
gether
(satin
stitch).
The
position
of
ever
B
(left,
center,
right)
inch
cafes
the
position
of
the
needle
in
the
needle
plate
slot.
4—
.
cEp
7
R
7995

Swing
back
the
cover
on
control
D.
Your
embroidery
design
dial
shows
all
the
primary
designs
you
can
make
with
the
Automatic.
Pick
your
design
and
turn
the
dial
so
it
points
to
that
design.
The
numbers
in
the
slot
indicate
the
machine
dial
settings
which
will
give
you
the
design
you
have
chosen.
Here
is
an
example:
Turn
control
A
to
0.
Flick
lever
B
left
(as
indicated
by
arrow).
Turn
dial
C
clockwise
until
5
is
at
top.
Turn
dial
0
clockwise
until
3
is
opposite
red
mark
(see
arrow).
And
watch
your
Automatic
conjure
upthe
design
you
want.
_________
To
ensure
that
the
zigzag
stitches
are
packed
closely
to
gether,
set
dial
G
(page
6)
between
0.2
and
0.4,
depend
ing
on
the
type
of
fabric
and
the
thread
size.
\
R
8002
Setting
Machine
for
Automatic
Embroidery
Set:
Lever
E=3
B+
C5
D3
Important
11
1
IL
I.
I
‘1
To
avoid
heavy
working
of
the
automatic
embroidery
mechanism
after
periods
of
idleness,
occasionally
set
lever
E
on
3,
dial
0
on
4,
and
dial
C
on
5.
Then
unthread
the
needle,
raise
the
presser
bar
lifter
and
run
the
machine
for
a
few
minutes.
To
obtain
an
attractive
design,
set
dial
0
(page
6)
between
0.2
and
0.4
(depending
on
type
of
fabric
and
thread
size)
so
that
stitches
are
packed
closely
together.
4
’4iJ
8
R8045

D3_,
The
arrow
appearing
in
box
B
indicates
whether
lever
B
should
be
moved
to
the
right,
left
or
central
position.
A
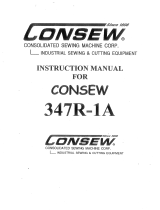
You
can
produce
a
nice
border
effect
(see
above
illustration)
by
simply
moving
lever
B
from
the
left
to
the
center
and
right,
without
changing
settings
A,
C
and
D.
This
is
an
advantage
of
the
Pfaff-Auiomatic.
Mast
designs
are
made
with
dial
A
set
on
“0”
(see
box
A
an
dial
wheel)
so
that
this
setting
need
hardly
be
changed.
A
Big
Advantage
of
the
Pfaff-Automatic
Each
of
the
primary
designs
pictured
on
the
embroidery
design
dial
can
be
sewn
in
different
lengths.
Therefore
you
can
vary
the
appearance
of
the
pattern
without
changing
the
stitch
length.
The
pattern
length
is
controlled
by
lever
E,
which
has
seven
graduations——four
numbered
(1,
3,
5,
and
7)
and
three
un
numbered.
Maximum
pattern
length
is
obtained
by
setting
E
on
“7”,
and
minimum
length
by
setting
it
on
“1”.
When
it is
set
on
“0”,
the
Automatic
mechanism
is
disengaged.
9
Ui
I
264
A
A
A
LeverEat:
7
3
5
7
rz

Winding
the
Bobbin
Hold
balance
wheel
a
and
turn
stop
motion
knob
b
all
the
way
to
the
left
(counter-clockwise).
Place
spool
of
thread
on
right-hand
spool
pin.
The
bobbin
thread
should
always
be
the
same
size
as
that
used
on
the
spool,
or
a
little
finer.
Pull
thread
from
spool
and
lead
it
clockwise
around
thread
retainer
stud
g,
crossing
the
thread.
I
-
-—,-————
2
3
1.
.1
H
R
7101
.L.

11
j
Pull
it
through
thread
guide.
Pass
end
of
thread
through
slot
in
bobbin,
from
inside.
Set
bobbin
on
bobbin
winder
spindle
so
that
key
at
base
of
spindle
enters
slot
in
bobbin.
Press
in
lever
i.
Hold
end
of
thread
and
slowly
start
machine.
Having
wound
a
few
turns,
break
off
end
of
thread
and
continue
winding
at
a
faster
pace.
j
Bobbin
winder
will
stop
automatically
when
bobbin
is
full.
If
you
don’t
want
a
full
bobbin,
press
out
lever
i
when
sufficient
amount
of
thread
has
been
wound.
You
may
continue
sewing
while
you
are
winding
bobbin
without
disconnecting
balance
wheel.
6
7
8
1
[
iL.
©
R7100
4
R
7067
S
R7102
R7o99
-—

Operate
the
Stopmatic
lever
to
raise
the
needle
ond
open
free
arm
cover.
Lift
lotch
k
with
your
forefinger.
Pull
out
bobbin
case
with
bobbin
by
holding
the
latch.
When
you
release
latch
k,
the
empty
bobbin
drops
out.
As
shown
in
illustration
1,
hold
bobbin
in
left
hand
so
that
the
thread
end
tolls
from
the
lop
down
toward
you,
and
insert
bobbin
into
bobbin
case.
12
4..
-cD
Inserting
a
Full
Bobbin
into
Bobbin
Case
Hold
the
bobbin
firmly
in
the
bobbin
case
and
pull
the
thread
into
the
case
slot.
Pull
the
thread
under
the
tension
spring
until
it
emerges
from
the
opening
at
the
end
of
the
spring.
Leave
about
three
inches
of
thread
hanging
from
the
bobbin
case.
Hold
the
case
by
its
open
latch,
so
that
the
bobbin
cannot
fall
out.
V
A
Removing
the
Bobbin
Case
—
—.—

Inserting
the
Bobbin
Case
Make
sure
the
needle
is
still
in
its
highest
position.
With
thumb
and
forefinger
of
left
hand,
lift
latch
k
and
turn
bobbin
case
until
slot
at
end
of
latch
points
up
(see
arrow).
Then
place
it
on
center
stud
s
of
hook.
In
replacing
the
bobbin
case,
it
is
best
to
hold
the
loose
end
of
thread
so
that
it
will
not
get
jammed
between
bobbin
case
and
hook.
Release
latch
k.
Press
against
bobbin
case
until
you
hear
it
snap
into
place.
An
improperly
inserted
bobbin
case
will
cause
needle
breakage.
AT
i
L
3
R5870
4
R
5868
R
8159
iir
A
Close
free
arm
cover.
13

Recommended
Needle
and
Thread
Sizes
The
appearance
of
the
finished
seam
is
dependent
on
the
correct
relationship
between
needle,
thread
and
fabric.
Select
the
proper
thread
sizes
and
needles
from
this
chart.
The
same
size
threads
should
be
used
in
the
needle
and
on
the
bobbin.
Some
experienced
seamstresses
prefer
a
somewhat
thinner
bobbin
thread.
However,
the
bobbin
thread
never
should
be
thicker
than
the
needle
thread.
Types
of
Fabrics
Mercerized
Needle
Silk
Cotton
Size
0
Fine
Fabrics
80
60
to
such
as
georgette,
chiffon,
batiste,
to
000
or
voile,
lawn,
silk.
100
70
twist
Lightweight
Fabrics
70
such
as
dress
silks
and
cottons,
A
&
B
to
80
sheer
woolens,
shirting,
dra-
twist
80
peries.
Medium
Fabrics
50
such
as
lightweight
woolens,
to
B
&
C
90
madras,
muslin,
brocades,
heavy
twist
70
silks
and
rayon,
gabardine.
Heavy
Fabrics
such
as
coating,
denim,
corduroy,
to
C
&
D
100
slipcover
fabrics,
bed
tickings,
twist
50
lightweight
canvas.
Very
Heavy
Fabrics
24
90
such
as
heavy
tickings,
canvas,
to
E
to
overcoating,
sailcloth,
up-
twist
40
110
holstery.
Synthetics,
Rayon,
Acetate
Determined
by
Determined
including
nylon,
orion,
dacron,
weight
ol
fabric
bythreadsize
plastics,
etc.
40
to
50
50
to
80
14
—
—
-

Important
Facts
about
Needles
On
Pfaff
362
sewing
machines,
System
130R,
flat-shank
needles
are
used
for
all
ordinary
sewing
and
embroidery
work.
The
needle
system
is
stamped
on
the
needle
plate.
Genuine
Pfaff
needles,
System
130R.
are
available
from
every
Pfaff
dealer.
Bent
or
blunt
needles
should
not
be
used.
Changing
the
Needle
Operate
the
Stopmatic
lever
to
raise
the
needle,
and
lower
sewing
foot.
Loosen
needle
set
screw
0
half
a
turn
Ef
and
pull
old
needle
out
of
needle
clamp.
Insert
new
needle
into
opening
of
needle
clamp
and
push
it
up
as
far
as
it
will
go.
Make
sure
that
flat
side
of
shank
faces
toward
the
back
and
long
groove
toward
you.
Tighten
needle
set
screw
0.
I
R
6798
15

-
-
-ew
-•
I
I
•
T
•
•(
i
:,
:
j•.____
—‘
,I-••
%
‘•
I____•__%_
(I
\
‘..•.
•——-
I
I
1
‘
‘-.•--
‘
*
F
Y•%.
\
\\
‘S
L-.•
I
.‘s\k
S
-‘
4._(
I\
%
I
——
I
--——-—-
‘‘-‘
:‘
;.=
4F)
I
Upper
Threading
Place
spool
of
thread
on
spool
pin
I
and
lead
thread
end
through
holes
in
thread
guides
2
and
3
and
through
both
thread
retainer
openings
4
(see
illustration
opposite).
Pull
thread
between
any
two
of
tension
discs
5,
as
illustrated,
and
jerk
it
far
over
to
the
right
so
that
it
slips
properly
into
the
slot
and
under
the
thread
check
spring.
At
the
same
time,
press
the
thread
passing
down
to
the
tension
against
the
top
cover
of
the
machine.
Bring
take-up
lever
6
as
high
as
it
will
go
and
pass
thread
from
right
to
left
through
one
of
the
holes
at
its
end.
Pull
thread
into
slots
at
left
of
thread
guides
7
and
8
and
then
into
the
slot
at
left
of
needle
clamp
9.
Then
thread
needle,
front
to
back.
The
automatic
needle
threader
will
do
this
for
you
easily
and
quickly.
16
I
I
t
1
r

[1
1.
1
VceI.9d

Operating
the
Needle
Threader
Operate
the
Stopmatic
lever
to
lift
the
needle
to
its
raised
position
(which
has
been
reached
when
the
ascending
take-up
lever
is
about
/sz
below
the
top
of
its
stroke,
as
illustrated
on
page
5).
Now
lower
the
sewing
foot
and
——
With
your
left
hand
push
needle
threader
control
down
until
threader
prong
w
(see
opposite
page)
penetrates
needle
eye.
Keep
control
in
this
position.
Hold
thread
loosely
and
lead
it
from
left
around
the small
pin,
then
place
it
behind
hook
of
threader
prong.
Release
control
slightly
until
prong
w
reverses
and
pulls
thread
through
needle
eye.
Jerk
control
down
again
so
the
thread
loop
will
fall
off
the
prong.
Pull
thread
through
needle
eye
and
release
control.
DR
086
1
R8013
2
R8009
3
iØ’
—
‘D1
4
—
—
R
8010
L
4
w

When
you
have
had
sufficient
needle
threading
practice,
you
may
shorten
the
procedure
as
follows:
Push
needle
threader
control
down.
Place
thread
behind
hook
of
prong
w
so
that
its
end
is
about
‘/2
inch
to
the
right
of
the
prong.
Slowly
re
lease
control.
Prong
w
now pulls
end
of
the
thread
—
instead
of
the
loop
—
through
needle
eye.
R
8158
;.
*
I
Since
the
take-up
lever
is
almost at
its
highest
point
when
you
thread
the
needle,
it
is
sufficient
to
pull
only
about
three
inches
of
thread
through
the
needle
eye.
V
Drawing
Up
the
Bobbin
Thread
A
Hold
needle
thread
lightly
in
your
left
hand.
Turn
balance
wheel
toward
you
until
the
needle
moves
down
and
up
again
and
take-up
lever
reaches
its
highest
position.
Lightly
pull
needle
thread
to
draw
bobbin
thread
up
through
needle
plate
slot.
Place
both
threads
back
under
sewing
foot
before
you
put
fabric
into
machine.
19
--
sw
‘V’T2
—
/