GE PWR04FANBBS Owner's manual
- Category
- Wine coolers
- Type
- Owner's manual
This manual is also suitable for

ge.com
Safety Instructions ........... 2, 3
Installation Instructions ........ 4
Operating Instructions
Automatic Humidity Control ..... 6
Control Settings .............. 5, 6
Locking the Controls ........... 6
Care and Cleaning ......... 7-1o
Replacing the Light Bulb ........ 8
Rmersing the Door . ......... 9, 10
Troubleshooting Tips ...... 11, 12
Consumer Support
Consumer Support ............ 16
Product Registranon ........ 13, 14
V_'arranty .................... 15
Write the model and serial
numbers here:
Model #
Serial #
Find these numbers inside the
wine chiller on the leit side.
197D#613PO03 49-60428 11-05JR

IMPORTANTSAFETYINFORMATION.
READALLINSTRUCTIONSBEFOREUSING.
WARNING!
Use this appliance only for its intended purpose as described in this Owner's Manual.
SAFETYPRECAUTIONS
When using electrical appfiances, basic safety precautions should be foflowed, including
the following:
_: This wine chiller must be properly installed
and located in accordance with these
instructions before it is used.
Do not allow children to climb, stand or hang
on the shelves in the wine chiller. They could
damage the wine chiller and seriously ii_jure
them selves.
::Ji::Do not store or use gasoline or other
flammable vapors and liquids in the
vicinity of this or anv other appliance.
::Ji::Before replacing a burned-out light bulb, the
wine chiller should be unplugged in order to
avoid contact with a live wire filament.
(A burned out light bulb may break when
being replaced.)
_: Keep fingers (rot of the "pinch point" areas;
clearances between the doors and between
the doors and cabinet are necessarily small.
Be carefifl closing doors when children are
in the area.
_: Unplug the wine chiller befiwe cleaning and
making repairs.
NOTE: Westrongly recommend that any serviclhg be
performed by aqualified individual
::Ji::Do not store or install this appliance outdoors.
DANGER!RISKOFCHILDENTRAPMENT
PROPERDISPOSALOFTHEWINECHILLER
Child entrapment and suflbcation are not
problems of the past.flmked or abandoned
re&igeration products are still dangerous.**
even if they will sit for 'ijust a tbw days."
If you are getting rid of your old appliance,
please Ibllow the instructions below to help
prevent accidents.
Before You ThrowAway YourOld
Refrigeration Product:
_: Take off the doors.
iJi::i,eave the shelves in place so that children
may not easiE climb inside.
Refrigerants
All refl'igeration products contain refl'igerants,
which tinder federal law Inust be rellloved prior
to product disposal. If wm are getting rid of an
old refrigeration product, check with the
company handling the disposal about what
to do.
USEOFEXTENSIONCORDS
Because of potential safety hazards under certain conditions, we strongly recommend against
the use of an extension cord.
However, if xou must use an extension cord, it is absolutelx necessary that it be a UIAisted,
3-wire grounding type appliance extension cord haxing, a grounding type I)lu°_ and outlet and
that the electrical rating of the cord be 15 amperes (minimmn) and 120 xolts.

ge.com
HOWTOCONNECTELECTRICITY
Do not, under any circumstances, cut or remove the third (ground) prong from the power cord.
For personal safety, this appfiance must be properly grounded.
The power cord of this appliance is equipped
with a 3-prong (grounding) plug which mates
with a standard 3-prong (grounding) wall outlet
to minimize the possibility of electric shock
hazard from this appliance.
Have the wall outlet and circuit checked by a
qualified electrician to make sm'e the outlet is
properly grotmded.
If w)u have only a standard 2-prong wall outlet,
it is w)ur personal respoi_sibility and obligation
to have it replaced with a properly grounded
3-prong wall outlet.
The wine chiller should always be phlgged into
its own individual electrical outlet which has
a w)ltage rating that nmtches the rating plate.
This provides the best perfln'mance and also
prevents overloading house wiring circtfits which
cotfld cause a fire hazard fl'om overheated wires.
Never tmphlg yore" wine chiller by ptflling on
the power cord. Always grip pltlg firmly and
ptfll straight out from the outlet.
Repair or replace immediately all power cords
that have become fl'aved or otherwise damaged,
Do not use a cord that shows cracks or abrasion
damage along its length or at either end.
When moving the wine chiller away ti'om the
wall, be careflfl not to roll over or damage the
power cord.
READANDFOLLOWTHISSAFETYINFORMATIONCAREFULLY.
SAVETHESEINSTRUCTIONS
3

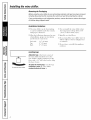
Installingthewine chiller.
Removing the Packaging
Before using the wine chiller, be sure all packing materials and tape have been removed,
including the protective film covering the control and any film protecting the cabinet.
If you are discarding an old refrigeration product, remove the doors to reduce the danger
of children being trapped inside.
Installation Guidelines
::Ji::The wine chiller can be fl'eestanding
or can be installed under the counter,
with proper clearances.
::Ji::Allow tile fl)lh)wing clearances fin" ease
of installation, proper air circulation
and electrical connections:
Each side llA" (38 ram)
Top 2" (51 ram)
Back 2" (51 ram)
::Ji::Do not install tile wine chiller where
tile temperature will go beh)w 55°F
(13°(7) or above 90°F (32°C).
::Ji::Install it on a level floor.
_: Do not install tile wine chiller where it
will be subject to direct s/mlight, heat
or i/loisttlre.
::Ji::Do not store {)I"install this appliance
otltdooI's.
Toraise the wine chiller
Leveling Legs
Adjustable legs at tile front corners at
tile wine chiller should be set so tile
wine chiller is firmly positioned on the
flora; with a 1/8" tilt to the back to hel I)
tile door closure.
7"0adjustthelevelinglegs, mrn tile legs
clockwise toraise tile wine chilleI;
counterclockwisetolower it.
4

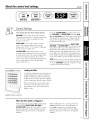
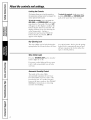
Aboutthe contro/and settings, ge.co,,
ControlSettings
The controls give you three setting options.
RED WINE--Use hn" the storage ot red wines.
This setting will provide a storage teillperattli'e
of 55°F (l 3°C), which is optinnun for the
storage of red wine.
WHITEWINE--Use for the storage of white
wines. This setting will provide a storage
temperatm'e of 45°F (7°C), which is optimum
for the storage of white wine.
CUSTOM TEMP--This setting allows you to
customize the temperature when storing both
red and white wines. The custom temperature
can be set anywhere between 40 ° to 65°F
(4 ° to 18°C). The recommended temperature
when storing half red wine and half white
wine is 50°F (10°C).
Press the CUSTOMTEMPpad. This will convert
the RED WlNE and WHITE WlNE pads into temp
up and temp down pads. Short taps to these pads
will change the temperature setting slowly. To
change the temperature setting more quickl>
press and hold the pad.
When you make your selection (WHITE WINE
RED WINEor CUSTOMTEMP)you will see the set
temperature show up in the display. However,
shortly alter the selection has been made, the
display will show the actual temperatm'e of the
wine chiller. You will then see the temperatm'e
in the display change as the actual temperattu'e
of the wine chiller reaches the set temperature.
NOTE; In the event of a power taihu'e, when the
power is restored, the controls automatically are
set to the RED WINE setting, If needed, reset the
controls to the desired setting.
. j/i
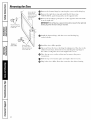
Suggested bottle arrangement
Loading the Wine
_s with any refrigeration l)rodu(t, there is
a slight temperature variance at (litterent
locations within the cabinet. In this wine
chille_; the lower shelves provide a slightly
cooler temperature than the ul)per shelves.
X_]_en storing both red and white wines,
it is best to store the white wine on the
lower shelves where the temperature is
slightly coole_:
When the Wine Chiller is Plugged In
After I)lugging in the wine chiller and making
your selection (WHITE WINE, RED WINE or
CUSTOM TEMP), allow the wine chiller to reach
the set teml)eramre before hmding y(mr wine.
This may take up to 12 horn's to completely
stabilize.
After loading the wine, you may notice the
actual temperature rise. The ac!justment of
the actual temperature reaching the set
temperatm'e will be reflected in the display:
This mav take up to 12 horn's to completely
stabilize.

Aboutthe controlsand settings.
Locking the Controls
Thisfeaturea//owsyouto/ock thecontro/sso
thetemperaturesettingscannotbe changed.The
lhtefior //ghtwi//stiff function.
Tolock thecontrols, press and h(>ld the
REDWINEand INTERIORLIGHTpads at the
same time tot 3 seconds. The word LOC
will appear in the display to indicate the
lockout feature has been activated. Tile
display will then go back to showing the
actual temperature. Anvtime a
temperature pad is pressed while the
lockout feature is actiw_ted, LOCwill
appear in tile displa>
To unlock the controls, simply press and
hold tile RED WINE and INTERIOR LIGHT
[)ads at tile same time for 3 seconds.
Key-Ejecting Lock
Tile wine chiller can be locked using tile
spring-loaded lock located above the door.
As a safety teatm'e, tile key fl)r tile spring-
loaded lock is automatically ejected and
will not remain in the lock in either the
open or closed position.
Wine Chiller Light
Press tile INTERIORLIGHTpad to mrn tile
interior light on or off.
If you turn on tile light and (11) not turn
it off; it will automaticallv turn off alier
one hollY,
Automatic Humidity Control
Tile inside of tile wine chiller
automatically maintains tile necessary
level of hmnidity to protect wine corks
fl'om drying out. As a result, fl'ost Inav
form on the inner surtaces. See Care and
Cleaning for instructions on removing
excessive fl'ost buildup.

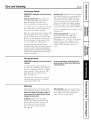
Camandcleaning, ge.com
Cleaning the Outside
IMPORTANT'. Unplug the wine chiller before
cleaning.
Keep the outside clean. The cabinet can
be washed with mild soap and water.
Rinse thoroughly with clear water.
Never use abrasive scouring powders.
Use a glass cleaner or mild soap and water
and a sott cloth to clean the glass door.
Do not use any abrasive powders.
_]i)e the control panel with a damp cloth.
Dry thoroughly: Do not use cleaning
sprays, large amotmts of soap and water;
abrasives or sharp objects on the panel--
they can damage it. Some paper towels
can also scratch the control panel.
Do not wipe the wine ch///er with a soi/ed
dishcloth or towel Thesemay leave a residue that
can erode the paint. Donot use scouring pads,
powdered cleaners, bleach or cleaners containing
bleach because these products can scratch and
weaken the paint finish.
Stainless steel. Regularly clean and polish
tl_e stainless steel areas (on some models)
with a commercially awfilable stainless
steel cleaner such as Slainle,ss Sled ,Vlag'i__
to preserve and protect the fine finish.
Slainle,_s Sled Mag'i_¢_is available through
GE Parts and Accessories, 800.626.2002,
or ge.com. Order part nmnber _SX10X15.
Do not use appliance wax or polish on the
stainless steel.
Protect the paint finish. The finish on
the outside of the wine chiller is a
high-quality, baked-on paint finish.
With proper care, it will stay new-looking
and rust-fi'ee for years. Apply a coat of
kitchen/appliance wax when the wine
chiller is ne_. and then at least twice
a veaI k
Cleaning the Inside
IMPORTANT'. Unplug the wine chiller before
cleaning.
To clean the inner liner and racks, use
a warm water and baking soda solution--
al)out one tablespoon (15 ml) of baking
soda to a quart (1 liter) of water. This
both cleans and neutralizes odors.
Rinse and wipe dry.
The vinyl door gasket may be cleaned
with mild soap and water or a baking
soda solution. Rinse well.
Do not use detergents, scouring powders,
spray cleaners or other harsh chemicals to
clean the interior.
Defrosting
Defrost whenever frost on the inside surfaces
of the storage area becomes 1/8" (3 ram)thic/c
Never use a heater of any kind, scraper or
sharp instrument to remove frost as it may
damage the wine chiller.
Todefrost, unplug the wine chiller.
Remove the contents and wipe inside
surfaces and racks with a clean towel.
If fl'ost does not come off easily,
allow the fix)st to melt somewhat
and wipe off.
After defrosting, make sure inside surtaces
are dry; then return the contents to the
wine chiller and set the temperature
control to the desired setting.

Careand cleaning.
In the Eventof a Power Failure
If the power fifils, open the door as
infl'equently as possible to maintain
the temperature. A gradual rise in
temperature should not have any
adverse efl'ect on the wine.
If it is extremely hot, you may want to
(reload the wine fl'om the wine chiller and
move the wine to a cooler location tmtil
power is restored.
When power is restored, the controls
automatically are set to the REDWINE
setting, If needed, reset the controls to
the desired setting.
Preparing to Move
Unload tile wine, then secure tile racks b_ Besurethewine chl//er stays In an upright
taI)ing, them in place to prex ent damab,e posltlonduringthemove.
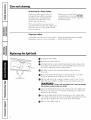
Replacingthelightbulb.
Step5:
Removetwo screws
Unplug tile wine chille_:
If tile door is locked, mflock it.
Tile light bulb is located behind a light shield in tile ceiling of tile
wine chiller near tile fl'ont. To remove tile light shield, remove tile
two screws at the back corners of the shield.
Pull down on the back of the light shield to release the two
front tabs.
O Remove tile light bulb housing by removing tile two screws that
attach the housing to the ceiling of the wine chiller.
Pull the bulb out of the receptacle. Replace with a 5 watt, ] 2 volt
bulb. This type of bulb is available at most automotive parts stores.
WARNING:Usinga rate higher,ha,swattsmay amage
the electronic controls on the wine chiller.
O Attach tile light bulb housing to tile ceiling of tile wine chiller with
tile two screws. Make sure not to pinch or damage any of tile wires
attached to the housing.
I,ine up the light shield with the indentation on the ceiling of the
wine chiller, then push tile fl'ont of tile shield up until tile fl'ont tabs
clip into place. Replace the screws at the back of the shield.
O Plug tile wine chiller back in.

ReversingtheDoor. ge.cem
Topcover
Back of wine chiller
Unplug the wine chiller,
@ Remove the two screws at the back of the top cover,
I,ift the back of the cover up about 2" (5 cm) and then slide it
fin'ward slightly, but do not remove,
Top
i)
Disconnectpower
connectors
O Tilt the co_er on its side. I,ocate the connectors at the
top power
fI'ont of the co_,ei'. Disconnect each connector bv, [)ressing, in on
the locking, tab on the side of the connector, then I)ullin°_ out.
Set coxer aside.
Front of wine chiller
Removescrewsand
movetootherside
Removeplug buttonand,--.,,__lbT_-
moveto otherside /,_
///=
/
Remove scre/wsand Top of wine chiller
top hinge,andmove
to otherside
0
O
Q
O
O
(:areflfllv la_ the wine chiller on its back.
Remove the screws on the top hinge (_ight side). Remove the hinge.
On the opposite side, remove the screws attaching the top plate to
the cabinet, and install them in the holes leit vacant bv the top
hinge screws.
Remove the small plug button ,fi'om the top leit side of the door and
install it in the hole on the right side.
Insert the hinge pin ti'om the top hinge into the hole on the top leti
side of the door. Attach the top hinge to the cabinet with the screws.
Make sure the door is aligned with the wine chiller cabinet befln'e
tightening the screws.

Reversingthe Door.
Removelevelingleg
andspacerandmove
to otherside
Removerightdoor
stopandscrews.
Installleft doorstop
(packedseparately/
andscrewson
otherside
O I_emove the botton_ hinoe by removino the screws and leveling le ,
O Remo_e the right door stop and install the left door stop
(_._R 13X 10274), packed separatel_ on the opposite side.
O Remove the leveling leg and spacer on the opposite side and install
it on the right side.
IMPORTANT'.Theleft leg has a spacer that must be moved to the right side
leveling leg when the door swing is reversed.
O Install the bottom hinge with the screws and levelino
leg,
on the left side.
Bottom of
wine chiller
\
Removeleveling
leg, screws,bottom
hingeandwasher,and
moveto otherside
0
0
0
0
G
Stand the wine chiller upright.
Open and close the door, checking the alignment of the door to the
cabinet. If necessa_T; loosen the screws attaching the top hinge to
the cabinet, realign the door and retighten the screws.
Place the top cover on the cabinet and reconnect the power
connections,
Slide the top cover back in place and replace the two screws.
Plug in the wine chiller. Reset the controls to the desired settin ,
10

Beforeyoucall forservice...
Troubleshooting -tips
Save time and money/. Review the charts on the foflowing
pages first and you may not need to carl for service.
ge.com
Possible Causes What ToDo
Wine chiller does not Wine chiller is maplugged. * Push tile plug completely iuU> tile outlet.
operate and the display
The circuit breaker is tripped/ * Replace fl/se or reset the breaker.
is blank
the fuse is blown.
Vibration or rattling Wine chiller is on ml * See tile Levering Legs section.
(slight vibration uneven surface.
is normal)
Motor operates for Normal when wine chiller * Wait 12 hours fl>r the wine chiller to completely
long periods or cycles is first plugged in. cool down.
Often occurs when large * This is normal.
amounts of wine are placed
in wine chiller.
Door left open. • Door is not sell_ch>siug. _Mways make stlre that the
door is closed alter opening.
• Check to see if a bottle is holding door open.
Hot weather or frequent • This is normal.
door openings.
Temperature control set • See About the control and settings.
at the coldest setting.
Wine chiller is too close • See the Installation Guidelines section fi>r the
to the wall. COlTect cle;ll';inces.
Wine chiller too warm Normal when wine chiller • _ait 12 hours fl>r the wine chiller to completely
is first plugged in. cool down.
Often occurs when large • This is normal.
amounts of wine are placed
in wine chiller.
Temperature control • See About the control and settings.
not set cold enough.
Warm weather or frequent • Set the temperattu'e ('outrol one step ('older.
door openings. See About the control and settings.
Wine chiller is too close • See the InstallationGuidelinessection fin" the
to the wall. (OITe(t ('le;ll';ln(-e_.
Door left open. • Door is not sell:closing. _Mwa)'s make stlre that the
door is closed after opening.
• Check to see if a bottle is holding door open.
• When the power came back on, the wine chiller
retttrued to the defatdt setting, which is RED WINE,
Reset the control to the desired setting.
If the temperature setting is
not showing what you last
selected, a power outage
may have occurred.
//

Beforeyoucall forservice...
Possible Causes What ToDo
Wine chiller has odor Interior needs cleaning, * See Care and cleaning.
Moisture forms on Not tmusual during periods *Wipe suriace dry.
outsideof wine chiller of high hmnidity.
Moisture collects inside Too frequent or too long
(in humidweather, door openings,
air carriesmoisture
into wine chiller when Wine bottles touching
door is opened) the back wall.
Frost forms on interior This is normal.
surfacesofwine chiller
Door left open.
• Reposition bottles.
• See the Defrosting section.
• Excessive fl'ost may fl)rm if the door is leit open.
See the Defrosting section.
• Door is not sel6closiug. Always make sure that the
door is closed after ol)euiug.
• Check to see if a bottle is holding door open.
Winechiller too cold Temperature control • See About the control and settings,
is set too cold,
If the temperature setting is • When the power came back on, the wine chiller
not showing what you last returned to the defimlt setting, which is REDWINE,
selected, a power outage Reset the control to the desired setting.
may have occurred.
The room temperature where • For proper operation, the room temperature should
the wine chiller is located is be equal to or greater than the set temperature (>t the
too cold, wine chiller.
Temperature in the This is normal. • After you set the teInl)erature, the display will go
displayis notthe back to showing the actual temperature.
temperaturethat
was just set.
Temperature pads do Temperature pads have • T(> uuh>ck, simply press and hold the RED WINE
not respond been locked, and the INTERIOR LIaHTpads at the same time
fl>r 3 seconds. LOC will appear in the display when the
teml)erature l)ads have been locked.
Condensation on front Wine chiller is located in a • _Vil)e ott the condensation with a clean, dry ch)th.
of door high hmnidity enviromnent.
• Locate the wine chiller in a lower lmmiditv
euvil'OUl//cut.
Water on floor behind Door left open. • Door is not selfXclosiug. Always make sure that the
wine chiller door is ch)sed after ol)euiug.
• Check to see if a bottle is holding door open,
/2

GE Service Protection Plus 'M
GE, a name recognized worldwide fbr quality and dependability, offers you
Service Protection Plus'_'--comprehensive protection on all yore appliances--
No Matter What Brand!
Benefits Include:
• Backed by GE
• All brands covered
• Unlimited service calls
• All parts and labor costs included
• No out-of-pocket expenses
• No bidden deductibles
• One 800 number to call
We TICover Any Appliance.
Anywhere. Anytime.
You _dll be completel) satisfied with our service protection or )ou ma) request )our mone) back
on the remaining value of your contract. No questions asked. It's that simple.
Protect yore" refrigerator, dishwasher, washer and dryer, range, TV_ VCR and much more--a_y brand!
Plus there's no extra charge flw emergency service and low monthly financing is available. Even icemaker
coverage and toed spoilage protection is offered. You can rest easy, knowing that all your valuable
household products are protected against expensive repairs.
Place ,our confidence in GE and call us in the U.S. toll-free at _UU._Z_.ZZZ_
for l//Ol'e infol'I//atiOll.
:_,_*]1 hi}in(Is (o_.{!l_{!(L tip t(t _0 ){!iris Ill(I, ]11 the (on[lllenl tl [.S.
_ (Jill here
Please place in envelope and mail to:
GeneralElectricCompany
Warranty Registration Department
P.O. Box 32150
Louisville, KY 40232-2150
13

Consumer Product Ownership Registration
Deal Customer:
Thank you for purchasing our product and thank you for placing your confidence in us.
VVe are proud to ha_e you as a customer!
Follow these three steps to protect your new appliance investment:
Complete and mail
your Consumer
Product Ownership
Registration today.
ttaw' the peace of
mind of knowing wc
C_lll COlltact VOI/ ill
the tmlikely event of a
satbly modificalion.
Atter mailing tile
registration below,
store this document
ill a sati' place. It
contains inlkmnation
you will need should
you require service.
Our selwice number is
800.GE.CARES
(8t)0.432.2737).
Read your Owner's
Malmal carefilllv.
It will help you
operat( your lle'*_
appliance properly.
Model Number Serial Number
, , , , , , I I , , , , , , , I
Important: If you did not get a registration card with your
product, detach and return the form below to
ensure that your product is registered, or register
online at ge.com.
................................................................................................... _,,,,_ Cm h(r<
Consumer Product Ownership Registration
Model Number Serial Number
, I
Ms. M*>,. Mixs
Fir,,1 I I Lasl]
Name I I I I I I I I I Nain(! I I I I I I I I I I I I
SI r( (!1 I
Addr( ss I I I I I I I I I I I I I I I I I I I I I I I I
Apt. # I , I
(;i,,I I I
l)me Placed
In Use Ill
Monlh
I I I I I I E-lnailAddress*
Zip I
, , , , , , , , , , , I s._.,I , 1 .ode , ,
_,l_l,<,,-Ii , I-I , , I-I ,
I I
I I
I
I
GE Consumer& Industrial
Appliances
General Electric Company
Louisville, KY40225
ge.com
* Please provide your eqnail address to receive, xia eqnail, discomlts, special off}:rs and other important
commmlications ti-om GE Appliances ((;EA).
[ Check here if you do not want to receive commmlications ti-om GEA's carefully selected partners.
FAILI JRE TO (X)MPI ETE AN[) RETI JRN TIIIS CARD D()ES NOT DIMINISt t YOI JR
"_,:\RI_ \N'I_" RIGttTS.
For information about GEA's privacy and data usage poll(3, go to ge.com and click on 'Privacy
Polks"" or call 800.626.2224.
14

Wine Chiller Warranty.(Forc.stemersintheUnitedStates)
All warranty service provided by our Factory Service Centers,
or an authorized Customer Care®technician. To schedule service,
on-line, 24 hours a day, visit us at ge.com, or carl 800.GE.CARES
(800.432.2737).Please have serial number and model number
available when calling for service.
Staple your receipt here.
Proof of the original purchase
date is needed to obtain service
under the warrant_
GEWill Replace:
GEand GEPROFILEMODELS:
Any patter the wine chiller which fifils due to a defect in materials or worlunauship.
From the date of the Dudng this limited one-year warranty, GE will also provide, free of charge,all lal)or and
originalpurchase related serxice to replace the (lefectixe part.
GEPROFILEMODELS ONLY:
Five Years Any part of thesealed refrigerating system (the compressox; condensex; exaporator
(GE Profile models only) and all connecting, tubino)_ which fifils due to a (lefe('t in materials or workmanship.
From the date of the During this limited five-year sealed refrigerating system warranty, GE will also pro_ide,
originalpurchase free ofcharge, all lal)or and related serxice to replace the (]efe('d',e part in the sealed
refiJgerafing system.
_; Service trips to your home to teach you how to use
the product.
_ Improper installation, delivery or maintenance.
_; Failure of the product if it is abused, misttsed, or used for
other thml the intended purpose or used commercially.
;;Ji::Loss of food due to spoilage.
_ Replacement of house fuses or resetting of circuit
breakers.
_ Damage caused after delivery.
!;/:Replacement of the light bulbs, if included, or water filter
cartridge, if included, other than as noted above.
!;/:Dmuage to the product caused by accident, fire, floods
or acts of God.
!;_:h_cidentaJ or consequenfiaJ dmuage caused by possible
defects with this appliance.
!;_:Product not accessible to provide required service.
EXCLUSION OFIMPLIED WARRANTIES--Your sole and exclusive remedy is product repa# as provided in this
Limited Warranty. Any impfied warranties, including the implied warranties of merchantability or fitness for a
particular purpose, are limited to one year or the shortest period allowed by law.
This warranty is extended to the original purchaser and any succeeding owner for products purchased for home
use within the USA. If the product is located in an area where service by a GEAuthorized Servicer is not available,
you may be responsible for a trip charge or you may be required to bring the product to an Authorized GEService
location for service. In Alaska, the warranty excludes the cost of shipping or service calls to your home.
Some states do not allow the exclusion or limitation of incidental or consequential damages. This warranty gives
you specific legal rights, and you may also have other rights which vary from state to state. Toknow what your
legal rights are, consult your local or state consumer affairs office or your state's Attorney General
Warrantor: General Electric Company. Louisville, KY 40225
75

ConsumerSupport.
gEAppliancesWebsite ge.com
Have a question or need assistance with your appliance? Try the GE Appliances _.Vebsite 24 hom_ a day,
any day of the year'. For greater convenience and taster se_Mce, you can now download Owner's Manuals,
order parts, catalogs, or even schedule service on-line. You can also "_sk Our Team of EN)erts .....
your questions, and so much more...
ScheduleService
Expert (;E repair setsice is (mix ()tie step awa) fl'om your door Get on-line and schedule your serxice at
your conxenience 24 hom_ am {lax of the xear! Or ('all 800.(;E.(_ARES (800.432.2737) during n(mnal
business hours.
ge.com
RealLifeDesignStudio ge.com
GE SUl_ports the Universal Design concept--products, services and environments that can be used by
people of all ages, sizes and capabilities. We recognize the need to design fin" a wide range of physical and
mental abilities and impaimmnts. For details of GE's Universal Design applications, including kitchen
design ideas fin" people with disabilities, check out otlr _,Vebsim today. For the heating impaired, please call
800.TDD.GEAC (800.833.4322).
ExtendedWarranties
ge.com
Purchase a (;E extended warran b and learn about special discounts that are available while }our warran b,
is still in effect. You can purchase it on-line an}time, or call 800.626.2224 during nomml business hours.
(;E (_onsulner Home Serxices will still be there alter your warrant} expires.
PartsandAccessories
ge.com
Individuals qualified to setMce their own appliances can have parts or accessories sent directly to their
homes (VISA, MasterCard and Discover cards are accepted). Order on-line today, 24 hom_ every' day or
by phone at 800.626.2002 during nomml business hou_.
Instructions contained in this manual cover procedures tobe performed by any user. Other servicing generally
should be referred to qualified service personnel Cautionmust be exercised, since improper servicing may cause
unsafe operation.
ContactUs
ge.com
If you are not safistied with the service you receive fl'om (;E, contact us on our Website with all the details
including your phone numbe_; or write to: General Manage_; Customer ]?,elations
GE Appliances, Appliance Park
I,ouisville, KY 40225
RegisterYourAppliance
Register your new applimlce on-line--at your convenience! Timel) product registration will allow for
enhanced communication and prompt service under the terms of_our warranty should the need a_ise.
You may also mail in the pre-pfinted registration card included in the I)ackin°_ material.
ge.com
] _ Printed in China
-
 1
1
-
 2
2
-
 3
3
-
 4
4
-
 5
5
-
 6
6
-
 7
7
-
 8
8
-
 9
9
-
 10
10
-
 11
11
-
 12
12
-
 13
13
-
 14
14
-
 15
15
-
 16
16


GE PWR04FANBBS Owner's manual
- Category
- Wine coolers
- Type
- Owner's manual
- This manual is also suitable for
Ask a question and I''ll find the answer in the document
Finding information in a document is now easier with AI
Related papers
Other documents
-
Honeywell 88013 User manual
-
-
Inalto IWC46 User manual
-
Esatto EWC46 User manual
-
 Ewave EWWC2SI User manual
-
 Argos Wine Cooler User manual
-
AMERICANA A3316ABSERBB Owner's manual
-
Marvel Refrigerated Wine Chiller User manual
-
Hotpoint FFUQ 18 Series Owner's manual
-
 GE Monogram Beverage Dispenser ZDWG240 User manual


