GE JES1142SJ04 Owner's manual
- Category
- Microwaves
- Type
- Owner's manual
This manual is also suitable for

ge.com
0
©
Safety Instructions ........ 2-6
Operating Instructions
Convenience Features .... 13-15
Microwave Terms ........... 18
Oven Features ............ 7, 8
Other Features .......... ] 6, 17
Power Levels ............... 9
Time Features .......... 10-19
Care and Cleaning ........ 19
Troubleshooting Tips ...... 20
Things That Are Normal ..... 20
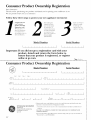
Consumer Support
Consumer Support . . .Back Co_er
Product Registration ...... 21,22
Warranty ................. 23
Write the model and serial
numbers here:
Model #
Serial #
_m can find them on a label inside
the oven.
JESl142
3513913700 49-40495 07-06 5[7

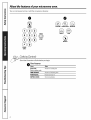
IMPORTANTSAFETYINSTRUCTIONS.
READALLINSTRUCTIONSBEFOREUSING.
WARNING'!
For your safety, the information in this manual must be followed to minimize the risk of fire or explosion, electric shock,
or to prevent property damage, personal inju_ or loss of life.
PRECAUTIONSTOAVOIDPOSSIBLEEXPOSURE
TOEXCESSIVEMICROWAVEENERGY
(a) Do NotAttempt to o[)erate this oven with tile door
open since ol)en<loor operation can result in ham/fill
expiisure to n/ici'owave energy': It is iinl)ortant not to
defeat or tanll)er with tile sale U inmrloc!<s.
(11) Do NotPlace ai g ol)iect between tile oven fl'ont ti_ce
and tile door or allow soil or cleaner residue to
accunlulate on sealing surli_ces.
(c) Do NotOperatetile ()veil if it is daniaged. It is
l)articularly inll)ortant that tile oven door close
i)roi)erly and that there is no daniage to the:
(]) door (bent),
(2) hin,*es and latches (broken or loosened),
(3) door seals and sealing surti_ces.
(d) The Oven Should Not be ac!iusted or rei)aired b)
anyone except l)rol)erly qualified seIMce l)ei_onnel.
IMPORTANTSAFETYINSTRUCTIONS.
Use this appfiance only for its intended purpose as described in this Owner's Manual.
When using electrical appfiances basic safe_/ precautions should be followed, including the following:
• Read and fl)llow tile specific i)recaufions in tile
Precautions to Avoid Possible Exposure to Excessive
Microwave Energy section above.
• This apl)liance illtlSt be grounded. (]onnect only
to a i)i'oi)erly grounded outlet. See the Grounding
Instructions section on page 5.
• hlstall or locate this ai)pliance ()ill)' in accordance with
the provided installation instruct.ions.
• Be certain to place the fl'ont SUll'ilce of the door 3" or
inore back fl'oin tile counteitop edge to avoid accidental
til)ping of tile al)pliance in noimal usage.
• This nficrowave ()veil is not al)proved or tested fin,
IlI}lI]Ile rise.
• Do not nlount this al)pliance over a sink.
• Do not illO/lnt tile IllicI'owa\'e ()veil oveI" oi" Ileal" any
l)oi_ion of a heating or cooking apl)liance.
• Do not store anything direcflv on top of the nficrowave
()veil Stlll'ilce when tile IlliCFOWaVe oven is in ol)eration.
• Do not operate this apl)liance if it has a danlaged l)ower
cord or phig, if it is not working l)rol)erl > or if it has
been danlaged or drol)ped.
• Do not cover or block any ol)enings oil the al)pliance.
• Use this al)pliance only fin" its intended use as described
in this nlanual. Do not use corrosive cheniicals or val)oi_
in this api)liance. This inicrowave oven is specifically
designed to heat, (liT or cook tood, and is not intended
fl)r laboratory or industrial use.
• Do not store this al)pliance outdooi_. Do not use this
product near watei_fi)r exainl)le, in a wet baseinent,
near a swinmfing i)ool, near a sink or in sinfilar
locations.
2
• Kee I) power cord away fl'oIn heated surlilces.
• Do not inlinei_e i)ower cord or phig in wateI:
• Do not let power cord hang over edge of table or
CO/InteY,
• To reduce the risk of fire in the oven cavity:
--Do not overcook food. Carefiilly attend al)pliance
when papeI; plastic ()r other conibustible inaterials are
placed inside the oven while cooking.
--Renlove wire twist-ties and metal handles fl'oin paper or
plastic containei_ befiwe placing theni in tile oven.
--Do not use the oven for storage puil)oses. Do not leave
paper products, cooking utensils or fl)od in tile ()veil
when not in rise.
--If InateIJals inside tile oven ignite, kee I) tile oven door
closed, turn tile oven off and disconnect tile power cord,
or shut off power at tile flIse ()r circuit breaker i)anel.
If tile door is opened, tile fire may sl)read.
• See door surli_ce cleaning instructions in tile Care and
cleaning of the microwave oven section of this nlanual.
• This apl)liance ni ust only be sei','iced by qualified service
l)ei_onnel. Contact tile nearest authoiized service fi_cilitv
fin" exanlinafion, repair or a(!iusUnent.
• _s with any al)pliance, close supeiMsion is necessary
when used by children.
SAVETHESEINSTRUCTIONS

A WARNING!
ARCING
If you see arcing, press the CLEAR/OFFpad and correct the problem.
Arcing is the microwave ternl tor sparks in the oven.
Arcing is caused by:
• Metal or toil touching tile side ot tile oven.
• Foil not molded to tood (Ul_turned edges act
like antennas).
• Met;fl, such as twist-ties, poultt T pins or gold-
rimmed dishes, in tile microwave.
• Recycled paper towels containing small metal
pieces being used in the microwave.
g_com
FOODS
Do not pop popcoi'n in yotti" I/ticI'OWa;'e oven
tmless in a special microwave popcorn accessm w
or tmless x_)tl use l)opcorn labeled fin" use in
microwave ovens.
• Some products such as whole eggs and sealed
containers--fin" example, closed jars--are able
to explode and should not be heated in this
tllict'owave oven, Sttch ttse ol tile microwave oven
could result in iqjmT:
• Do not boil eggs in a microwave oven. Pressm'e
will build ttp inside egg yolk and will cattse it to
bmst, possibly resulting in iqjtu>
• Operating tile microwave with no food inside fi:,r
tllot'e than a tllinttte or two tllaV Cause datllage
to tile oven and could strut a fire. It increases tile
heat at'ottnd tile i/lagnett'on and c}ltl shorten
the life of the oven.
• Foods Mth tmbroken outer "skin" such as
potatoes, hot dogs, sausages, tomatoes, apples,
chicken li\'ets and other giblets and egg yolks
should be pierced to allow steam to escape
dining cooking.
• Avoid heating baby food in glass jms, even
with the lid ofl_ Make sm'e all infimt tood is
thoroughly cooked. Stir food to distribute tile
heat evenly: Be carefltl to prevent scalding
when wamfing t0m/ula. Tile container may feel
cooler than the formula really is. Mwavs test tile
flm/mla before feeding tile baby.
• Don't defl'ost fl'ozen beverages in narro_mecked
bottles (especially carbonated beverages). Even
if tile container is opened, pressure can build up.
This can cause the container to bttt_t, possibly
resulting in iqjm>
• SUPERHEATEDWATER
Liquids,such as water,coffeeortea are ableto
beoverheatedbeyondthe boilingpointwithout
appearingtobe boiling.Visiblebubblingor boiling
whenthe containerisremovedfrom themicrowave
ovenis notalwayspresent.THISCOULDRESULT
IN VERYHOTLIQUIDSSUDDENLYBOILINGOVER
WHENTHECONTAINERISDISTURBEDORA
SPOONOROTHERUTENSILIS INSERTEDINTO
THELIQUID.
To reduce tile risk ot iqjtn 7 to persons:
--Do not overheat tile liquid.
--Stir tile liquid both befl)re and halfkvay through
heating it.
--Do not use straight-sided container with narrow
necks,
--_Mier heating, allow the container to stand in the
microwave oven fi:,r a short time betore removing
the container:
--Use extt'eille cat'e when inserting a Sl)OOn oY
other utensil into tile container:
• Hot foods and steam can cause burns. Be careful
when opening anv containers of hot food,
including popcorn bags, cooking pouches and
boxes. To prevent possible iqjtu> direct steam
away fl'om hands and ti_ce.
Do not overcook potatoes. They could dehydrate
and catch fire, causing damage to w_ur oven,
Cook ineat and poultt T thoroughlx_meat to at
least an INTERNAl, temperature of 160°F and
poultry to at least an INTERNAl, temperature
ot 180°E Cooking to these temperatm'es usually
protects against toodborne illness.
3

IMPORTANTSAFETYINFORMATION.
READALLINSTRUCTIONSBEFOREUSING.
WARNING!
MICROWAVE-SAFECOOKWARE
Make sure all cookware used in vo/li" iilici'ow_lve
oven is suitable fin" microwa\'ing. Most glass
casseroles, cooking dishes, measuring cups, custard
cups, potte_ T or china dinnerware which does not
have metallic trim or glaze with a metallic sheen
can be used. Some cookware is labeled "suitable
fin" micr_wa\'ing."
• If w)u are not sure if a dish is microwave-safe,
use this rest: Place in the oven both the dish
you are resting and a glass measuring cup filled
with 1 cup of water--set the ineasulJng cup
either in or next to the dish. Microwave
30-45 seconds at high. If the dish heats,
it should not be used fi:,r microwa\'ing.
If the dish remains cool and only the water in
the cup heats, then the dish is microwave-sate.
• If you use a meat them_ometer while cooking,
make sure it is sale for use in microwave ovens.
• Do not use recycled paper products. Recycled
paper towels, napkins and waxed paper can
contain metal fecks which may cause arcing
or ignite. Paper products containing nflon or
nvhm filaments should be avoided, as they
may also ignite.
• Some sWr()li)am tra)_s (like those that meat
is packaged on) have a thin strip of metal
embedded in the bottom. When microwa\'ed,
the metal can burn the floor of the oven or
ignite a paper towel.
• Do not use the microwave to d_T newspape_.
• Not all plastic wrap is suitable fin" use in
micrm_ve ovens. Check the package fl)r
proper use.
• Paper towels, waxed paper and plastic wrap
can be used to cover dishes in order to retain
moisture and pre\'ent spattering. Be sure to
vent plastic wrap so steam can escape.
• Cookware may become hot because of heat
transferred fl'om the heated food. Pot holde_
may be needed to handle the cookware.
"Boilable" cooking pouches and tightly closed
plastic bags should be slit, pierced or vented as
directed by package. If they are not, plastic could
bm_t dm_ing or immediately after cooking,
possibly resulting in injury. Also, plastic storage
containet_ should be at least partially uncovered
because they form a fight seal. _]/ell cooking
with containe_ tightly covered with plastic wrap,
remove covering careflfllv and direct steam away
fl'om hands and face.
Llse frill only as directed in this guide. TV dim_e_
may be microwa\'ed in foil trays less than 3/4"
high; remove the top toil cover and return the
tray to the box. X4]mn using fifil in the microwave
oven, kee I) the foil at least 1" away fl'om the sides
of the oven.
• Plastic cookware--Plastic cookware designed fin.
microwave cooking is very useflfl, but should be
used carehlllv_ Even micro_we-sate plastic may
not be as tolerant _ff overcooking conditions as
aI'e glass or ceI'alllic I//atelJals and Ill}IV st)lien or
char if subjected to short periods of overcooking.
In hmger exposm'es to overcooking, the fi)od
and cookware could ignite.
Follow these guidelines."
] Use microwave-sate plastics only and use
them in strict compliance with the cook\ware
Ilia n/llil Cttli'er's i'ecoi//illendations.
Do not illiCi'Owa;e ei/ll)t } containei3.
Do not pemfit children to rise plastic
cookware without complete supervision.
4

g_com
GROUNDINGINSTRUCTIONS
WARNING-Improperuseethegroundingplugcanresultinariskofelectricshock.
This appliance must be g_x_unded. In the event of
an electrical short circuit, grounding reduces the
risk of electric shock by providing an escape wire
for the electric current.
This appliance is equii)ped with a power cord
having a grounding wire with a grounding i)lug.
The i_lug must be phlgged into an outlet that is
propedy installed and grounded.
Consult a qualified electrician or se_Mce technician
if the grounding instructions are not completely
undeistood, or if doubt exists as to whether the
appliance is propedy grounded.
If the outlet is a standard 2-prong wall outlet,
it is your personal responsibility and obligation
to have it replaced with a propedy grounded
3-prong wall outlet.
[)o not tinder _liiV cii'ctliiiS[;lnces Ctl[ OI" i'elllOve
the third (ground) prong ti'om the power cord.
_'¥1_ do not i'ecoiilillend using [111 extension cord
with this appliance. If the power cord is too
short, have a qualNed electrician or service
technician install an outlet near the appliance,
(See EXTENSION CORDS section,)
For best operation, plug this appliance into its
own electrical outlet to prevent flickering of lights,
blowing of fllse or tripping of circuit breaker:
ADAPTERPLUGS
Usage situations where appliance's power cord will be disconnected infrequently.
Because of potential safety hazards under certain conditions,
we strongly recommend against the use ofan adapter plug.
Howe\'e_; if you still elect to use an adapter, where local codes
pemfit, a TEMPORARYCONNECTION mav be made to a im,perlv
grounded 2-prong wall receptacle by the use of a LrI, listed adapter
which is available at most local hardware stores.
The laiger slot in the adapter must be aligned with the linger slot in
the wall receptacle to provide proper polarity in the connection of
the power cord.
(Adapter plugs not
permittedinCanada)
Alignlarge [ "l_Fi I
prongs/slots _ .L_ [
_/" Ensure proper ground
TEMPORARY andfirmconnection
METHOD beforeuse.
CAUTION."Attaching the adapter ground terminal to the wall receptacle cover screw does not ground
the appliance unless the cover screw is metal, and not insulated, and the wall receptacle is grounded
through the house wiring.
_m should have the circuit checked by a qualified electrician to make sure the receptacle is properly
grounded.
&,_]_endisconnecting the power cord flxm_ the adapte_; alwa):s hold the adapter with one hand. If this
is not done, the adapter ground temfinal is very likely to break with repeated use. Should this hai_pen,
DO NOYUSEthe appliance until a proper ground has again been established.
Usage situations where appfiance's power cord will be disconnected frequently.
Do not use an adapter plug in these situations because fl'equent disconnection of the power cord places
undue strain on the adapter and leads to eventual failure of the adapter ground te_ninal. Yi)u should
have the 2-prong wall receptacle replaced with a 3-prong (grounding) receptacle by a qualified electrician
before using the appliance.

IMPORTANTSAFETYINFORMATION.
READALLINSTRUCTIONSBEFOREUSING.
a,WARNING!
EXTENSIONCORDS
A short power supply cord is provided to reduce the risks resulting fl'om becoming entangled in or tripping
oveI" a longer cord.
Extension cords may be used if you are carefifl in using them.
If an extension cord is used--
B The marked electrical rating of the extension cord should be at least as great as the electrical rafino of
the appliance;
, , /1 . -x_are cord and it must be i)lugged,, into a 3-slot outlet;
_The extension cord nlust be a grotmding-t_ )e 3 "
I_l The extension cord should be arranged so that it xfill not drape over the cotmtertop or tabletop where
it can be pulled on by children or tripped oxer mfintentionall).
If )ou use an extension cord, the interior light ma) flicker and the blower sotmd max vat", when the
i/licrowa;e oxen is on, Cooking times I/l[ly be longeY, too,
READANDFOLLOWTHISSAFETYINFORMATIONCAREFULLY.
SAVETHESEINSTRUCTIONS

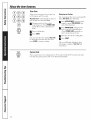
Aboutthe featuresofyourmicrowave oven. gecom
Throughout this manual, features and appearance may vary from your model.
1100Watts
Featuresof theOven
O Door Latches.
Window with Metal Shield. Screen allows
cooking, to be xiewed while keel)iw,
illici'owaxes contined in tile oxen,
O ConvenienceGuide.
O TouchControlPanelDisplay.
O oorLatchRelease.Press latch release to
open dooi:
O Removable Turntable. Turntnble and support
must be in place when using tl_e oxen. The
turntable ma_ be remo',ed for cleaning.
Removable Turntable Support.The mrntnble
support must be in place when using the
()_,en,
NOTE:Rat/))gplate, oven vent(s)and oven lightare located
on the inside walls of themicrowave oven.

Aboutthe featuresofyourmicrowave oven.
Youcan microwave by time or with the convenience features.
0
TIME
DEFROST
sT,°T
POWER
LEVEL
0
POPCORN FROZENPIZZA BEVERAGE
REHEAT COOK
AUTO
DEFROST
CookingContro/s
Check the Convenience Guide before you begin.
o Time Features
Press
TimeCook
Pressnumberpads
TIMEDEFROST
POWERLEVEL
EXPRESSCOOK
Enter
Amountofcookingtime
Amountofdefrostingtime
Powerlevel0to HI
Startsimmediately!

Aboutchangingthepower level gecom
G
POWER
LEVEL
®®
®®
®®
®
_P_ESSCOOK
START
Tile power level ma) be entered or
changed before entering the time for
Time Cook.
B Press POWERLEVELrepeatedly to
select power lexel 0 to HI.
m Enter cooking time.
_ Press START
khriable power levels add fle_biliP, ' to
lllici'ow;ive cooking. Tile power levels on
tile IllicI't)_;Ive oven can be COIlll)aI'ed to
tile surfilce units on a range. Each power
level gives you microwave enei W a certain
percent of the time. Powerlevel 70is
microwave energy 70% ot tile time. Power
level 30 is eneigy 30% of the time. Most
cooking will be done on HI which gives you
100% poweI: HI power level will cook tipster
but fl)od may need more fl'equent stirring,
rotating or turning ovei: A lower setting
will cook more evenly and need less stirring
or rotating ot tile fi)od. Some fi)ods may
have better fla\'m; texture or appearance
if one of the lower settings is used. Use a
lower power level when cooking toods
that have a tendency to boil oveI, such as
scalloped potatoes.
Rest periods (when tile microwave energy'
cycles off) give time fi)r tile tood to
"equalize" or transter heat to the inside
of tile fi)od. An example of this is shown
with power level 30--the defl'ost cycle,
If microwave ener_ did not cvcle ofl_
tile outside of tile %od would cook betore
the inside was deti'osted.
Hero am some examplos of uses for various
power Iovels:
HI: Fish, bacon, vegetables, boiling liquids.
Med-High70: Gentle cooking ot meat and
poultIT; baking casseroles and reheating.
Medium 50".Slow cooking and tenderizing
fi)r stews and less tender cuts of nleat.
Low2Oor30: Defl'osting; simmering;
delicate sauces.
Warm10"KeeI)im*.,fi)od waIm; softening
butter.

Aboutthe timefeatures.
®
_XP_SSCOOK
©
START
Time Cook
_&Jlows VOtl 1o i/licrowaxe for _lil] til/le tip
to 99 minutes and 99 seconds.
Hlpower level is automatically set, but you
may change it fl)r more flexibility,
_ Change power level if you don't
want filll powei: (Press' POWERLEVEL
repeatedl.v to select a desired power
level,)
_'_ Enter cooking time.
[]Press START
You ma) open the door during Time Cook
to check the food. Close the door and
press STARTto resume cooking
DefrostingandCooking
Y)u can program the oven to automatically
begin Time Cook after defi'osting.
F_ PressAUTO DEFROST and select rood
weight, or press TIME DEFROST and
enter deli'osting tim e.
_'_ Press POWERLEVEL.Chanoe power
le',el if _ou donk want flfll power;
(Press POWERLEVELrepeatedly to
select a desired power level.)
_ Enter the amount of cooking time.
D Press START
The oven will begin defl'osting. _dter
deti'osting is complete, Time Cook will
Co/int down.
gcslssc_o_
®
START
ExpressCook
This is a quick way to set cooking time fox 30 seconds. It will add 30 seconds to the time
each time the pad is pressed. The oxen will start immediately:
10

ge.com
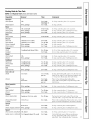
CookingGuidefor time Cook
NOTE: Use Hl power level unless otherwise noted.
Vegetable Amount Time Comments
Asparagus
(fresh spears) l lb. 5 to 8 min., In ] ½-qt. cas_ro/e, pl_ce ]/4 cup water:
Mad-High (7)
(frozen spears) lO-oz, package 4 to 7 rain. In l-qt. casserole.
Beans
(fresh green) 1 lb. cut in half 10 to 15 min. In 1½-(l t. cas_role, place ]/2 cup water:
(frozen green) lO-oz, package 4 to 8 rain. in 1-qt. casserole, place 2 tablespoons _ate_:
(frozen lima) lO-oz, package 4 to 8 rain. in 1-qt. casserole, place l/4 cup xxate_:
Beets
(fresh, whole) 1 bunch 16 to 22 rain. In 2-qt. casserole, place 1/2 cup w_tei:
Broeeofi
(fresh cut) 1 bunch (1¼ to l½ lbs.) 5 to 9 rain. In 2-qt. casserole, place 1/2 cup _atei:
(fresh spears) 1 bunch (1¼ to l½ lbs.) 7 m 11 min. In 2-qt. casserole, place l/4 cup _ate_:
(frozen, chopped) lO-oz, package 4 to 7 rain. in 1-qt. casserole.
(frozen spears) lO-oz, package 4 to 7 rain. in 1-qt. casserole, place 3 tablespoons _ate_:
Cabbage
(fresh) l medium head (about 2 lbs.) 6 to 10 min. In 1½- or 2-qt. casserole, place l/4 cup watei:
(wedges) 5 to 9 rain. in 2- or 3-qt. casserole, place l/4 cup _ ate_:
Carrots
(fresh, sliced) 1 lb. 4 to 8 rain. In 1½-tit. cas_role, place ]/4 cup watei:
(frozen) lO-oz, package 3 to 7 rain. in 1-qt. casserole, place 2 tablespoons _atel;
Cauliflower
(flowerets) 1 medium head 7 to 11 rain. In 2-qt. casserole, place ]/2 cup _atel;
(fresh, whole) 1 medinm head 7 to 15 min. in 2-qt. casserole, place 1/2 cup _atei:
(frozen) lO-oz, package 3 to 7 rain. In 1-qt. casserole, place 2 tablespoons _atei:
Corn
(frozen kernel) lO-oz, package 2 to 6 rain. Ill ]-qt. casserole, place 2 tablespool]s water.
Corn on the cob
(fresh) 1 to 5 ears
(frozen)
I IA m 4 rain.
per ear
(fresh, whole, sweet
or white)
Spinach
(fresh)
(frozen, chopped,and leaf)
Squash
(fresh,summer,andyellow)
(winter, acorn, or butternut)
1 ear 3 to 6 rain.
2 m 6 ears 2 to 3 rain.
per eav
Mixed vegetables
(frozen) lO-oz, package 2 m 6 rain.
Peas
(fresh, shelled) 2 lhs. unshelled 7 m 10 rain.
(frozen) lO-oz, package 2 to 6 rain.
Potatoes
(fresh,cubed, white) 4 potatoes (6 to 8 oz. each) 9 to 12 rain.
1 (6 to 8 oz.) 2 to 4 rain.
lO m 16 oz. 3 m 6 min.
lO-oz, package 3 m 6 rain.
1 lb. sliced
1 to 2 squash (about 1 lb. each)
3toSmin.
5to9min.
in 2<it. glass baking dish, place corn. If corn is in
husk, use no v_lter; if corn has been husked, add
l/4 cup watei: Rearrange after half of tinle.
Place in 2<it. oblong glass baking dish.
Co_er with _ented plastic wrap. Rearrange after
half of time.
In l<1t. casserole, place 3 tablespoons _ter.
In 1<1t. casserole, place ]/4 cup watei:
In l-qt. casserole, place 2 tal)lespoons watei:
Peel and cut into l-inch cubes. Place in 2-qt.
casserole with l/2 cup _x_tel; Stir after half of time.
Pierce with cooking fblk. Place in the o_en, 1 inch
apart, in circulal arrangement. [_et stand 5 minutes.
In 2-qt. casserole, place washed spinach.
In 1<1t. casserole, place 3 tablespoons _z_ter.
In ] ½-qt. casserole, place 1/4 cup water.
(]tit in half and remove fibrous membranes.
In 2<tt. glass baking dish, place squash cut-
side<l()\_L Turn cut-side-up after 4 minutes. ] ]

About the time features.
TIME
DEFROST
®
ExP_SSceol
0
START
TimeDefrost
Mlo_vs w)u to defrost fin" a selected length
of time. See the Defrosting Guide fin.
suggested times, (Auto Defrost explained in
the About the convenience features section.)
_ Press TIME DEFROST
_p_ Enter deti"osfing time.
_ Press START
D Turn the toed over after half the time.
D Press START
M one half of selected defl'osting time, turn
food over and break apart or rearrange
pieces fin" more even deti'osfing, Shield anv
waml areas with small pieces of toil. The
oven will continue to defrost if you don't
open the door and ttlrn the toed.
A dull thunlI)ing, noise may be heard
during defrosting. This is normal when
oxen is not oi)erafing, at HI powei:
DefrostingTips
• Foods ti'ozen ill l/aper or plastic can be
defl'osted ill the package. Closed packages
should be slit, pierced or vented AFTER
fi)od has partially defrosted. Plastic storage
containels should be partially uncovered.
Family-size, prepackaged frozen dinnei_
can be deti'osted and microwaved. If the
food is ill a fi)il containei; transter it to a
micn mm'e-sate dish.
Foods that spoil easily should not be
allowed to sit out fin" more than one
hour alter defl'osfing. Roonl telnl)erature
i)rolnotes the growth ot hamlflll
bacteria,
• For lnore even deti'osting (ff laiger fi)ods,
such as roasts, use Auto Defrost. Be sure
large meats are completely deti'osted
befi)re cooking.
• _]/ell deli'osted, fl)od should be cool
but softened ill all areas. If still slightly
icy, return to the nficrowave veiT briefl 5
or let it stand a few nfinutes.
DefrostingGuide
Food Time Comments
Breads, Cakes
Bread, buns, or rolls (I piece) 1/4 rain.
Sweet rolls (approx. 12 oz.) 2 to 4 rain. Rearrange after half the time.
Fish and Seafood
Fillets, frozen (I lb.) 6 to 9 rain.
Shellfish, smallpieces (I lb.) 3 to 7 rain. Place block in casserole. Ttml over and break up after half the dine.
Fruit
Plastic pouch--1 or2 1 to 5 rain.
(lO-oz.package)
Meat
Bacon (I lb.)
Franks(I lb.)
GromMmeat (I lb.)
Roast:beef lamb,veal pork
Steaks,chops andcutlets
Poultry
Chicken,broiler-fryer,cutup
(2½ to3 Ibs.)
Chicken,whole (2½to 3Ibs.)
Cornishhen
Tnrkeyhroast (4to 6 Ibs.)
12
2 to 5 rain.
2 to 5 rain.
4 to 6 rain.
9 to 13mhx
per lb.
4 to 8 min.
per lb.
14 to 20 mhl.
20 to 25 mha.
7to 13 rain.
per lb.
3 to 8 min.
per lb.
Place tmopened package in oven. I,et stand 5 minutes after defrosting.
Place unopened package in oven. Microwave just until fi_mks can be sepm_lted.
I,et stand 5 minutes, if necessm3, to conlplete defi'osting.
Turn meat o\er after first half of dine.
Use power level I0.
Place unwrapped meat in cooking dish. Tuna oxer after first half of time and
shield warm areas with fi)il. _Mter second half of tilne, separate pieces with table
knife, bet stand to complete defl_osting.
Place _Tapped chicken in dish. Unwrap and turn oxer after filet half of time. After
second half of dine, sepm_te pieces and place in cooking dish. Micr(_xe 2 to 4
rain utes more, if necessa D. [_et stand a fe_ rain utes to finish defi'osting.
Place _vTapped chicken in dish. Alter half the time, Um_Tap and turll chicken eve1:
Shield warm areas with fi)il. To complete defi'osting, run cold water in the cm'itv
tmtil gdblets can be removed.
Place tm_vTapped hen in the oven breast-skle-up. Turn o\er after first half of time.
Rnn cool water in the croft\ until giblets can be removed.
Place tm_vTapped breast in microwave-safe dish breast-side<lo_v_l..Mter first half
of dine, tm'n breast-skle-up and shieM warm areas with foil. Defi'ost fi)r second
half of tinle. I.et stand l to 2 hours in refiJgerator to c()mplem defi'osting.

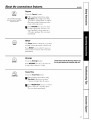
About the convenience features, gecom
POPCORN
Use only with prepackaged
microwave popcorn weighing
1.75to3.5 ounces.
Popcorn
To use tile Popcorn feature:
[]Follow )acka-e instructions, using
Time Cook it the package is less than
1.75 ounces or linger than 3.5 ounces.
Place the package of popcorn in the
center of tile i/licrow;ive.
[]
Press POPCORN once tot a 3.5 ounce
package of i)opcorn, twice for a 3.0
ounce package or three times for a
1.75 ounce package. The o_en starts
immediately.
REHEAT
Reheat
Tile Reheat fbatm'e reheats 12 or 15 ounce
servings of many previously cooked toods.
Press REHEATonce to select 12 o/mces or
twice to select 15 ounces. The oven starts
immediately.
©
BEVERAGE
Beverage
To use the Beverage fl_amre:
Press BEVERAGEonce lot 1 cup, twice tot
2 cups or three times tot 3 cups.
Drinks heated with the Beverage feature may
be very hot Remove the container with care.
FROZEN PIZZA
FrozenPizza
To use tile Frozen Pizza teatm'e:
_r_ Follow )ackaoe instructions, using
Time Cook if the pizza is less than
7 ounces or laxger than 14 ounces.
_p'_ Press FROZENPIZZA once for a 7 o/mce
pizza or twice for a 14 or/nee pizza.
The oven starts immediately:
13

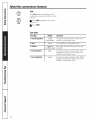
About the convenience features.
©
_r_ESSCOOK
©
START
Cook
The Cookteatm'e autonmficall} sets the
cooking times and power le;els fin" a ; _riet},
of toods.
B Press COOK repeatedly to select fi)od
t}i)e 1-5.
_'_ Press START
Cook Guide
FoodType Weight
I CannedVegetables 1 cm_
(14 to 16 oz.)
2 Soup 12 oz.
3 Potatoes 4 potatoes
8 to 10 oz. each
4 Fresh Vegetables 16 oz.
5 Frozen Vegetables 16 oz.
Comments
Use Inicr()wave-safe casserole or b()wl. Cover
with lid or vented plastic wrap.
Cover with lid or vented plastic wrap.
Pierce skin with tork. Place potntoes on the
turntable.
Use microwave-sate casserole or bowl. Add
2 tablespoons water fin" each serving. Cover
with lid or vented plastic wrap.
Use microwave-sate casserole or bowl. Follow
package instructions for adding water: Cover
with lid or vented plastic wrap.
/4

ge.com
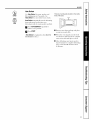
AUTO
DEFROST
@
START
Auto Defrost
Use AUtO Defrost tor meat, poultx}, and
fish weighing up to 2.5 pounds. Use
Time Defrost for most other ti'ozen foods.
Auto Defrost autonmficall_ sets die defl'osting
times and power levels to gi_e exert
defl'osting results tor meats, poult_} and fish.
[]Press AUTO DEFROSTrepe'atedly to
select 1 to 2.5 pounds.
_'_ Press START
(77meDefrostis explained in the About the
time features section.)
There is a handy guide located on the inside
front of the oven.
Guide
• Remove meat fl'om I)ackage, and place
on microwaxe-safi _ dish.
• _._]]en the oven signals, mrn the food
ove_: Remove deii'osted meat or shield
w;mn areas with small pieces of toil.
• _Mier defi'osting, most meats need to
st;rod 5 minutes to complete deli'osting.
Imge roasts should st;rod ti)r about
30 minutes.
15

About the other features.
©
CLOCK
®
Clock
Press to enter the time ot day.
_r_ Press CLOCKonce to select 12 hour time or twice to select 24 hour time.
_'_ Enter time of day.
_€_ Press CLOCK.
©
PAUSE
CLEAR
START
Pause/Clear
In addition to cancelling selections, PAUSE/CLEAR allows you to stop cooking without
o})enino_ the door or clearing the display. Press STARTto restart the oxen.
©
PAUSE
CLEAR
Child Lock-Out
You may lock the control panel to prevent the microwave fl'om being accidentally
started or used by children.
To lock or mflock the controls, press and hold PAUSE/CLEARfi)r about three seconds.
When the control panel is locked, the lock indicator will be lit.
16

ge.com
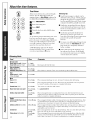
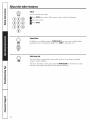
G
KITCHEN
TIMER
AUTO
DEFROST
TIME
DEFROST
POWER
LEVEL
®®
®®
®®
®
_xp_ss_0a_
©
START
Kitchen timer
Thispad performs three functions:
• It operates as a minute time_:
• It can be set to delay cooking.
• It can be used as a hold setting alter deti'osfing.
Howto Use as a Minute Timer
Tile Kitchen Timer operates without microwaxe energy.
B Press KITCHEN TIMER.
] gnteI" tile alllO/int of time vo/i want to co/int down,
_€_ Press STARTX4q/en tile time is up, tile timer will signal.
How to Use to Delay the Start of Cooking
Y}m can set tile microwaxe to dela_ tile start ot cooking up to 99 minutes
and 99 seconds.
B Press KITCHEN TIMER.
_'_ Enter tile amount of time to delay tile start ot cooking.
_€_ Px'essPOWERLEVELChange power level if' you don't want full powex:
(Press POWER LEVELrepeatedl) to select a desired power lexel.)
L_ Enter tile amount ot cooking time.
_'_ Press START
Tile timer will begin counting down to zero and cooking will then beoin
How to Use to Set a Holding Time
B Press AUTO DEFROSTand select food weight, or press TIMEDEFROSTand
enter deh'osting time.
] Press KITCHEN TIMER.
] Enter tile amount of time _ou want tile o_en to hold.
Press START
Tile oxen will beoin_ defl'osting., _Mter deli'osting, is complete, tile holding time
will count down.
17

Microwave terms.
Term Definition
Arcing Arcing is the microwave telin for sparLs in the oven. Arcing is caused by:
• metal or foil touching the side of the oven.
• foil that is not molded to tood (upturned edges act like antennas).
• metal such as twist-ties, poultry pins, gold-rimmed dishes.
• recycled paper towels containing small metal pieces.
Covering Cox'ex_ hold in moisture, allow fin" more even heating and reduce cooking time. Venting plastic wrap
or covedng with wax paper allo_vs excess steam to escape.
Shielding In a regular, oxen, you shield chicken breasts or baked toods to I)rex ent oxe>browning,. _q_en
microwaving, you use small strips ot foil to shield thin parts, such as the tips ot wings and legs
on poult_> which would cook betore larger parts.
Standing _tne When you cook with regular ovens, fi_ods such as roasts or cakes are allowed to stand to finish cooking
or to set. Standing time is especially important in microwave cooking. Note that a microwaved cake
is not placed on a cooling rack.
Venting _Mter covering a dish with plastic wrap, you vent the plastic wrap by turning back one corner so
excess stealll C_lll escape.
18

Careand cleaning ofthemicrowave oven.
Helpful Hints
An occasional thorough wiping with a solution at baking soda and water keeps the
inside fi'esh.
Unplug the cord before cleaning any part of this oven.
de.cam
How to Cleanthe Inside
Walls,Floor,InsideWindow,MetalandPlasticPartsontheDoor
Some spatteI_ can be removed with a paper towel; othei_ may require a damp cloth.
Remove greasy spatteI_ with a sudsy cloth, then rinse with a damp cloth. Do not use
abrasive cleaneis or shaq) utensils on oven walls.
Toclean the surface of the door and the surface of the oven that come together upon
closing, use only mild, nonabrasive soaps or detergents using a sponge or soft cloth.
Rinse with a damp cloth and dry.
Never use a commercial oven cleaner on any part of your microwave.
Removable Turntableand Turntable Support
To prevent breakage, do not place tile turntable into water just atter cooking. Wash it
caretully in wam_, sudsy water or in tile dishwashei: Tile turntable and support can be
broken if dropped. Remembei; do not operate tile oven without tile turntable and
support in place.
How to Cleanthe Outside
Do not use cleaners containing ammonia or alcohol on the microwave oven. Ammonia or
alcohol can damage the appearance of the microwave.
Case
Clean tile outside ot tile microwave Mth a sudsy cloth. Rinse with a damp cloth and then
dry: Wipe tile window clean with a damp cloth.
ControlPanel and Door
Wipe with a damp cloth. DI y thoroughly. Do not use cleaning sprays, laige amounts _ff
soap and wateI; abrasives or shaq) objects on tile panel--they can damage it. Some paper
towels can also scratch the control panel.
Door Surface
It is important to kee I) tile area clean where tile door seals against tile microwave. Use only
mild, non-abrasive deteigents applied with a clean sponge or soft cloth. Rinse well.
Power Cord
If tile cord becomes soiled, unplug and wash Mth a damp cloth. For stubborn spots, sudsv
water InaV be used, but be certain to rinse with a damp cloth and (liT thoroughly betore
plugging cord into ()ttflet.
Stainless Steel (on some models)
Oo not use a steel-wood pad; it will scratch the surface.
To (lean tile stainless steel s/lrtilce, tlse a hot, dall/p cloth with a mild detergent suitable
for stainless steel surtilces. Use a clean, hot, damp cloth to remove soap. Dry with a dry,
clean cloth. Mways scrub lightly in the direction of the grain.
19

Troubleshooting7ips.
Problem Possible Causes What To Do
Oven will not start A fuse in your home may be * Replace tilse or reset circuit breakex:
blown or the circuit breaker
tripped.
Power surge. * UnI)lug tile microwave oven, then plug it back in.
Plug not fully inserted into wall * Make sure tile 3-prong plug on tile (wen is flfllv inserted
outlet, into wall outlet.
Door not securely dosed. * Open tile door and close securely:
Controlpanel lighted, Door not securely closed. * Open tile door and close securely.
yet oven will not start STARTpad not pressed after * Press START
entering cooking selection.
Another selection entered * Press PAUSE/CLEAR
already in oven mid PAUSE/CLEAR
pad not pressed to cmzcel it.
PAUSE/CLEARwas pressed * Reset cooking, I)r°gram, and press START
accidentally.
Microwaveovencontrol
willnot work
The control has been locked.
(When the control panel is
locked, the lock indicator
will be lit.)
" Press and hold PAUSE/CLEARtor about three seconds
to unlock tile control.
Things ThatAre Normal With YourMicrowave Oven
• Steam or \:q)or escaping from around
tile do(n:
• IJght reflection around door or outer case.
• Dimming oven light and change in
tile bh)wer sound at power levels other
than high.
• Dull thumlfing sound while (wen is
operating.
• TV/radio interlerence might be noticed
while using the microwave. Similar to
tile interference caused bv other small
appliances, it does not indicate a problem
with the microwave. Plug the microwave
into a different electrical circuit, move tile
I'adio or TV as ][ili- [llV_ly ti()ill tile i/licFowave
as possible, or check tile position and
signal of the TV/radio antenna.
2O
Page is loading ...
Page is loading ...
Page is loading ...
Page is loading ...
-
 1
1
-
 2
2
-
 3
3
-
 4
4
-
 5
5
-
 6
6
-
 7
7
-
 8
8
-
 9
9
-
 10
10
-
 11
11
-
 12
12
-
 13
13
-
 14
14
-
 15
15
-
 16
16
-
 17
17
-
 18
18
-
 19
19
-
 20
20
-
 21
21
-
 22
22
-
 23
23
-
 24
24


GE JES1142SJ04 Owner's manual
- Category
- Microwaves
- Type
- Owner's manual
- This manual is also suitable for
Ask a question and I''ll find the answer in the document
Finding information in a document is now easier with AI
Related papers
Other documents
-
GE Profile JVM3670BF User guide
-
Magic Chef mco160uw Owner's manual
-
Hotpoint RVM1435WH001 Owner's manual
-
Kenmore 91147814200 Owner's manual
-
-
Hotpoint RVM1635SK01 Owner's manual
-
Frigidaire FMV145KB2 Owner's manual
-
Hotpoint RVM1535MM2SA Owner's manual
-
-