Page is loading ...

GLO-RAY
®
Max Watt Infrared Strip Heaters
Rampes Chauffantes Max Watt
GRAM and GRAML Series/Série
Installation and Operating Manual
Manuel d'installation et d'utilisation
P/N 07.04.439.00
© 2014 Hatco Corporation
Do not operate this equipment unless you
have read and understood the contents of
this manual! Failure to follow the
instructions contained in this manual may
result in serious injury or death. This
manual contains important safety
information concerning the maintenance,
use, and operation of this product. If
you’re unable to understand the contents
of this manual, please bring it to the
attention of your supervisor. Keep this
manual in a safe location for future
reference.
English = p 2
No opere este equipo al menos que haya
leído y comprendido el contenido de este
manual! Cualquier falla en el seguimiento
de las instrucciones contenidas en este
manual puede resultar en un serio lesión
o muerte. Este manual contiene
importante información sobre seguridad
concerniente al mantenimiento, uso y
operación de este producto. Si usted no
puede entender el contenido de este
manual por favor pregunte a su
supervisor. Almacenar este manual en
una localización segura para la referencia
futura.
Ne pas utiliser cet équipement sans avoir
lu et compris le contenu de ce manuel !
Le non-respect des instructions
contenues dans ce manuel peut entraîner
de graves blessures ou la mort. Ce
manuel contient des informations
importantes concernant l'entretien,
l'utilisation et le fonctionnement de ce
produit. Si vous ne comprenez pas le
contenu de ce manuel, veuillez le signaler
à votre supérieur. Conservez ce manuel
dans un endroit sûr pour pouvoir vous y
référer plus tard.
Français = p 18
WARNING
ADVERTENCIA
AVERTISSEMENT
Register Online!
(see page 2)
S'inscrire en ligne!
(voir page 18)
hatcocorp.com

CONTENTS
English
Form No. GRAMM-1114
2
INTRODUCTION
Hatco Glo-Ray® Max Watt Strip Heaters ensure maximum food
holding and minimize the risk of food-borne illness. Optimum
safety and quality is the result of food held at the proper serving
temperatures using Glo-Ray’s pre-focused heat patterns. The
pre-focused heat pattern prevents foods from being over-
cooked in the middle and cooling off around the edges by
concentrating higher temperatures to the outer edges of holding
surfaces where heat loss is the greatest. Utilizing specially
designed reflectors to direct the heat from the element, Glo-
Ray Strip Heaters safely maintain peak serving temperatures
longer without cooking the food beyond the point of excellence.
Glo-Ray Max Watt Strip Heaters are available from the factory
with or without shatter-resistant incandescent lights to illuminate
the warming area. These bulbs have a special coating that
guards against injury and food contamination in the event of
breakage.
Glo-Ray Max Watt Strip Heaters are a product of extensive
research and field testing. The materials used were selected
for maximum durability, attractive appearance, and optimum
performance. Every unit is inspected and tested thoroughly
prior to shipment.
This manual provides the installation, safety, and operating
instructions for Glo-Ray Max Watt Strip Heaters. Hatco
recommends all installation, operating, and safety instructions
appearing in this manual be read prior to installation or
operation of the Strip Heaters.
Safety information that appears in this manual is identified by
the following signal word panels:
WARNING indicates a hazardous situation which, if not
avoided, could result in death or serious injury.
CAUTION indicates a hazardous situation which, if not
avoided, could result in minor or moderate injury.
NOTICE is used to address practices not related to
personal injury.
NOTICE
CAUTION
WARNING
Important Owner Information ..............................................2
Introduction...........................................................................2
Important Safety Information...............................................3
Model Description.................................................................4
Model Designation................................................................4
Specifications........................................................................5
Electrical Rating Charts.......................................................5
Dimensions .........................................................................7
Installation .............................................................................8
General ...............................................................................8
Recommended Mounting Heights.......................................9
Minimum Clearance Requirements.....................................9
Installing Permanent Units ................................................10
Installing Chain Suspended Units .....................................11
Electrical Information.........................................................12
Remote Control Enclosures ..............................................13
Operation.............................................................................14
General .............................................................................14
Maintenance ........................................................................15
General .............................................................................15
Daily Cleaning...................................................................15
Replacing Display Light Bulbs ..........................................15
Troubleshooting Guide ......................................................16
Options and Accessories...................................................17
Limited Warranty.................................................................17
Authorized Parts Distributors............................Back Cover
IMPORTANT OWNER INFORMATION
R
e
c
o
rd
th
e
m
o
d
e
l
n
u
m
b
e
r, s
e
ri
a
l
n
u
m
b
e
r, v
o
l
t
a
g
e
, a
n
d
purchase
date
of
your
stri
p
heater
i
n
the
spaces
bel
ow
(specif
icat
ion
label
locat
ed
on
t
he
underside
of
t
he
unit
).
P
lease
have
t
hi
s
i
nf
ormat
i
on
avai
l
abl
e
w
hen
cal
l
i
ng
H
at
co
f
or
servi
ce
assi
st
ance.
Model
N
o.
____
_____
______
_____
______
_____
_____
Seri
al
N
o.
____
_____
______
_____
______
_____
_____
V
ol
t
age
______
_____
______
_____
______
_____
_____
D
at
e
of
Purchase
___
______
_____
______
_____
_____
Re
gis
te
r y
our unit!
C
ompl
et
i
ng
onl
i
ne
w
arrant
y
regi
st
rat
i
on
w
i
l
l
prevent
del
ay
i
n
obt
ai
ni
ng
w
arrant
y
coverage.
Access
t
he
H
at
co
w
ebsi
t
e
at
www.
hatcocorp.
com
,
sel
ect
t
he
Part
s
&
Servi
ce
pul
l
-dow
n
menu,
and
cl
i
ck
on
“Warrant
y
R
egi
st
rat
i
on”.
Business
Hours: 8:00 AM to 5:00 PM Central Standard Time (CST)
(Summer Hours: June to September—
8:00
AM to 5:00 PM CST Monday–Thursday
8:00
AM to 2:30 PM CST Friday)
Telephone: 800-558-0607; 414-671-6350
e-mail: part[email protected]
Fax: 800-690-2966 (Parts and Service)
414-671-3976 (International)
Additional information can be found by visiting our web site at
www.hatcocorp.com.
24 Hour 7 Day Parts and Service
Assistance available in the United States
and Canada by calling 800-558-0607.

IMPORTANT SAFETY INFORMATION
English
Form No. GRAMM-1114
3
ELECTRIC SHOCK HAZARD:
• Units require a hardwired connection to on-site
electrical system. Connection must be properly
grounded and of correct voltage, size, and
configuration for electrical specifications of unit.
Contact a qualified electrician to determine and perform
proper electrical connection.
• Turn OFF power switch, turn off power at circuit
breaker, and allow unit to cool before performing any
cleaning, adjustments, or maintenance.
• DO NOT submerge or saturate with water. Unit is not
waterproof. Do not operate if unit has been submerged
or saturated with water.
• This unit is not “jet-proof” construction. Do not use jet-
clean spray to clean this unit.
• Do not steam clean or use excessive water on unit.
• Use only Genuine Hatco Replacement Parts when
service is required. Failure to use Genuine Hatco
Replacement Parts will void all warranties and may
subject operators of the equipment to hazardous
electrical voltage, resulting in electrical shock or burn.
Genuine Hatco Replacement Parts are specified to
operate safely in the environments in which they are
used. Some aftermarket or generic replacement parts
do not have the characteristics that will allow them to
operate safely in Hatco equipment.
FIRE HAZARD: Do not install MaxWatt strip heaters above
or around combustible surfaces. Discoloration or
combustion could occur. Max Watt strip heaters must be
installed in non-combustible surroundings only.
EXPLOSION HAZARD: Do not store or use gasoline or
other flammable vapors or liquids in the vicinity of this or
any other appliance.
Use only light bulbs that meet or exceed (National
Sanitation Foundation (NSF) standards and are specifically
designed for food holding areas. Breakage of light bulbs
not specially coated could result in personal injury and/or
food contamination.
This unit is not intended for use by children or persons
with reduced physical, sensory, or mental capabilities.
Ensure proper supervision of children and keep them away
from the unit.
Make sure all operators have been instructed on the safe
and proper use of the unit.
Make sure food product has been heated to the proper
food-safe temperature. Failure to heat food product
properly may result in serious health risks. This unit is for
pre-heated food product only.
WARNING
For installation with chains, make sure the chains have
sufficient strength and are securely fastened to both the
unit and the mounting location. Poorly installed chains
may cause the unit to loosen and fall. Do not place
anything on top of units installed with chains.
This unit has no “user-serviceable” parts. If service is
required on this unit, contact an Authorized Hatco Service
Agent or contact the Hatco Service Department at
800-558-0607 or 414-671-6350; fax 800-690-2966; or
International fax 414-671-3976.
BURN HAZARD: Some exterior surfaces on the unit will get
hot. Use caution when touching these areas.
Standard and approved manufacturing oils may smoke up
to 30 minutes during initial startup. This is a temporary
condition. Operate unit without food product until smoke
dissipates.
Strip heaters equipped with incandescent lights that
require a circuit breaker larger than 20 amps for the heat
element must have a separate circuit breaker for the
incandescent lights that is 20 amps or less.
To ensure safe and proper operation, refer to the Clearance
Requirements listed in the Installation section of this
manual.
Installation of two or more separate units with less than
3″ (76 mm) between housings may result in premature
failure of component parts. Failure to provide proper
spacing may result in heat damage to electrical
components and will void warranty.
Units are voltage-specific. Refer to specification label for
electrical requirements before beginning installation.
Do not add a decorative soffit to hide a pass-through
mounted strip heater. Excessive heat can cause unit
failure.
To prevent premature failure of components due to
excessive heat, remote mounted control enclosures must
be installed outside the strip heater heat zone.
Damage to any countertop material caused by heat
generated from Hatco equipment is not covered under the
Hatco warranty. Contact the manufacturer of the
countertop material for application information.
Use non-abrasive cleaners and cloths only. Abrasive
cleaners and cloths could scratch the finish of the unit,
marring its appearance and making it susceptible to soil
accumulation.
Do not locate unit in area with excessive air movement
around unit. Avoid areas that may be subject to active air
movements or currents (i.e., near exhaust fans/hoods, air
conditioning ducts, and exterior doors).
NOTICE
CAUTION
WARNING
Read the following important safety information before using this equipment to avoid serious
injury or death and to avoid damage to equipment or property.

All Models
Hatco Glo-Ray
®
Max Watt Strip Heaters keep hot foods at
optimum serving temperatures longer. Foods do not dry out or
become discolored; even the most delicate dishes hold that
“just-prepared” look. The Glo-Ray pre-focused heat pattern
directs heat from a tubular element to bathe the entire holding
surface.
Glo-Ray Max Watt strip heaters are constructed with aluminum
housings in lengths of 18″ (457 mm) to 144″ (3658 mm).
Dual models allow for side-by-side mounting of two heating
elements to provide a wider holding area (dual models are
constructed with a standard 3″ [76 mm] or optional 6″ [152 mm]
spacer between heating elements).
All Glo-Ray Max Watt Strip Heaters have several mounting
options. Optional electronic infinite control switches,
incandescent lighting, and halogen lighting are available.
GRAM-XX: Aluminum housing, single element depth
GRAML-XX: Aluminum housing, incandescent
lights, single element depth
GRAM-XXD: Aluminum housing, dual element depth
GRAML-XXD: Aluminum housing, incandescent
lights, dual element depth
MODEL DESCRIPTION
English
Form No. GRAMM-1114
4
G R A M L - XX D
Glo-Ray
Aluminum Housing
L = Incandescent Light
No Character = No Lighting
D = Dual Element Depth
No Character = Single Element Depth
Width (in inches)
Max Watt
GRAM-48 Model
GRAML-48 Model
GRAML-48D Model with 3″ (76 mm) spacer
GRAML-48D Model with 6″ (152 mm) spacer
MODEL DESIGNATION

SPECIFICATIONS
English
Form No. GRAMM-1114
5
Model GRAM-18 Watts: 450 Shipping Weight: 6 lbs. (3 kg)*
V
oltage 120 208 240
Amps 3.8 2.2 1.9
M
odel GRAM-24 Watts: 650 Shipping Weight: 7 lbs. (3 kg)*
Voltage 120 208 240
Amps 5.4 3.1 2.7
Model GRAM-30 Watts: 825 Shipping Weight: 8 lbs. (4 kg)*
Voltage 120 208 240
A
mps 6.9 4.0 3.4
Model GRAM-36 Watts: 1000 Shipping Weight: 9 lbs. (4 kg)*
Voltage 120 208 240
A
mps 8.3 4.8 4.2
Model GRAM-42 Watts: 1175 Shipping Weight: 10 lbs. (5 kg)*
V
oltage 120 208 240
Amps 9.8 5.6 4.9
M
odel GRAM-48 Watts: 1300 Shipping Weight: 11 lbs. (5 kg)*
Voltage 120 208 240
Amps 10.8 6.3 5.4
Model GRAM-54 Watts: 1500 Shipping Weight: 13 lbs. (6 kg)*
Voltage 120 208 240
A
mps 12.5 7.2 6.3
Model GRAM-60 Watts: 1700 Shipping Weight: 14 lbs. (6 kg)*
V
oltage 120 208 240
Amps 14.2 8.2 7.1
M
odel GRAM-66† Watts: 1875 Shipping Weight: 16 lbs. (7 kg)*
Voltage 120 208 240
Amps 15.6 9.0 7.8
Model GRAM-72
n
† Watts: 2075 Shipping Weight: 17 lbs. (8 kg)*
Voltage 120 208 240
Amps 17.3 10.0 8.6
Model GRAM-84
n
† Watts: 2400 Shipping Weight: 19 lbs. (9 kg)*
Voltage 120 208 240
Amps 20.0 11.5 10.0
Model GRAM-96
n
† Watts: 2675 Shipping Weight: 21 lbs. (10 kg)*
Voltage 120 208 240
Amps 22.3 12.9 11.1
Model GRAM-108†
•
Watts: 3000 Shipping Weight: 23 lbs. (10 kg)*
Voltage 120 208 240
Amps --- 14.4 12.5
Model GRAM-120†
•
Watts: 3400 Shipping Weight: 26 lbs. (12 kg)*
Voltage 120 208 240
Amps --- 16.4 14.2
Model GRAM-132†
•
Watts: 3750 Shipping Weight: 30 lbs. (14 kg)*
Voltage 120 208 240
Amps --- 18.0 15.6
Model GRAM-144†
•
Watts: 4150 Shipping Weight: 33 lbs. (15 kg)*
Voltage 120 208 240
Amps --- 20.0 17.3
Electrical Rating Chart — GRAM Models Electrical Rating Chart — GRAML Models
May require additional switches, consult factory for applications.
† Glo-Ray models 66″ through 144″ contain tandem (end-to-end) elements that may be individually controlled.
• Not available in 120 volts.
* Add 2 – 8 lbs. (1 – 3 kg) to shipping weight depending on size of remote control enclosure.
n
NOTE: GRAML models that have multiple voltages
listed, such as 120/208 or 120/240, have multiple
internal circuits. For example a 120/208 volt unit
utilizes 120 volts for light circuit and 208 volts for
the heat circuit(s). Consult the Electrical Diagram
supplied with the unit for specific information.
CAUTION! Light-equipped strip heaters that require
a circuit breaker 20 amps or larger must be installed
with a remote control enclosure containing a fuse
rated at 20 amps or less for the light circuit.
Model GRAML-18 Watts: 570 Shipping Weight: 9 lbs. (4 kg)*
V
oltage 120 120/208 120/240
Amps 4.8 3.2 2.9
M
odel GRAML-24 Watts: 770 Shipping Weight: 10 lbs. (5 kg)*
Voltage 120 120/208 120/240
Amps 6.4 4.1 3.7
Model GRAML-30 Watts: 945 Shipping Weight: 11 lbs. (5 kg)*
Voltage 120 120/208 120/240
A
mps 7.9 5.0 4.4
Model GRAML-36 Watts: 1180 Shipping Weight: 13 lbs. (6 kg)*
Voltage 120 120/208 120/240
A
mps 9.8 6.3 5.7
Model GRAML-42 Watts: 1355 Shipping Weight: 15 lbs. (7 kg)*
V
oltage 120 120/208 120/240
Amps 11.3 7.1 6.4
M
odel GRAML-48 Watts: 1540 Shipping Weight: 17 lbs. (8 kg)*
Voltage 120 120/208 120/240
Amps 12.8 8.3 7.4
Model GRAML-54 Watts: 1740 Shipping Weight: 19 lbs. (9 kg)*
Voltage 120 120/208 120/240
A
mps 14.5 9.2 8.3
Model GRAML-60
n
Watts: 2000 Shipping Weight: 21 lbs. (10 kg)*
V
oltage 120 120/208 120/240
Amps 16.7 10.7 9.6
M
odel GRAML-66
n
†
Watts: 2175 Shipping Weight: 22 lbs. (10 kg)*
Voltage 120 120/208 120/240
Amps 18.1 11.5 10.3
Model GRAML-72
n
† Watts: 2435 Shipping Weight: 24 lbs. (11 kg)*
Voltage 120 120/208 120/240
Amps 20.3 13.0 11.6
Model GRAML-84
n
† Watts: 2820 Shipping Weight: 28 lbs. (13 kg)*
Voltage 120 120/208 120/240
Amps 23.5 15.0 13.5
Model GRAML-96
n
† Watts: 3155 Shipping Weight: 32 lbs. (15 kg)*
Voltage 120 120/208 120/240
Amps 26.3 16.9 15.1
Model GRAML-108†
•
Watts: 3540 Shipping Weight: 36 lbs. (16 kg)*
Voltage 120 120/208 120/240
Amps --- 18.9 17.0
Model GRAML-120†
•
Watts: 4000 Shipping Weight: 40 lbs. (18 kg)*
Voltage 120 120/208 120/240
Amps --- 21.3 19.2
Model GRAML-132†
•
Watts: 4410 Shipping Weight: 44 lbs. (20 kg)*
Voltage 120 120/208 120/240
Amps --- 23.5 21.1
Model GRAML-144†
•
Watts: 4870 Shipping Weight: 48 lbs. (22 kg)*
Voltage 120 120/208 120/240
Amps --- 26.0 23.3

SPECIFICATIONS
English
Form No. GRAMM-1114
6
Model GRAM-18D Watts: 900 Shipping Weight: 14 lbs. (6 kg)*
V
oltage 120 208 240
A
mps 7.5 4.3 3.8
M
odel GRAM-24D Watts: 1300 Shipping Weight: 16 lbs. (7 kg)*
V
oltage 120 208 240
Amps 10.8 6.3 5.4
M
odel GRAM-30D Watts: 1650 Shipping Weight: 18 lbs. (8 kg)*
Voltage 120 208 240
Amps 13.8 7.9 6.9
Model GRAM-36D
n
Watts: 2000 Shipping Weight: 21 lbs. (10 kg)*
Voltage 120 208 240
A
mps 16.7 9.6 8.3
Model GRAM-42D
n
Watts: 2350 Shipping Weight: 24 lbs. (11 kg)*
V
oltage 120 208 240
Amps 19.6 11.3 9.8
M
odel GRAM-48D
n
W
atts: 2600 Shipping Weight: 27 lbs. (12 kg)*
Voltage 120 208 240
Amps 21.7 12.5 10.8
Model GRAM-54D
n
Watts: 3000 Shipping Weight: 30 lbs. (14 kg)*
Voltage 120 208 240
Amps 25.0 14.4 12.5
Model GRAM-60D
n
Watts: 3400 Shipping Weight: 34 lbs. (15 kg)*
Voltage 120 208 240
A
mps 28.3 16.3 14.2
Model GRAM-66D
n
† Watts: 3750 Shipping Weight: 37 lbs. (17 kg)*
Voltage 120 208 240
Amps 31.3 18.0 15.6
Model GRAM-72D
n
† Watts: 4150 Shipping Weight: 41 lbs. (19 kg)*
Voltage 120 208 240
Amps 34.6 20.0 17.3
Model GRAM-84D
n
†
•
Watts: 4800 Shipping Weight: 44 lbs. (20 kg)*
Voltage --- 208 240
Amps --- 23.1 20.0
Model GRAM-96D
n
†
•
Watts: 5350 Shipping Weight: 52 lbs. (24 kg)*
Voltage --- 208 240
Amps --- 25.7 22.3
Model GRAM-108D†
•
Watts: 6000 Shipping Weight: 59 lbs. (27 kg)*
Voltage --- 208 240
Amps --- 28.9 25.0
Model GRAM-120D†
•
Watts: 6800 Shipping Weight: 66 lbs. (30 kg)*
Voltage --- 208 240
Amps --- 32.7 28.3
Model GRAM-132D†
•
Watts: 7500 Shipping Weight: 73 lbs. (33 kg)*
Voltage --- 208 240
Amps --- 36.1 31.2
Model GRAM-144D†
•
Watts: 8300 Shipping Weight: 80 lbs. (36 kg)*
Voltage --- 208 240
Amps --- 39.9 34.6
Electrical Rating Chart —
GRAM-XXD Models
Electrical Rating Chart —
GRAML-XXD Models
NOTE: GRAML-XXD models that have multiple voltages
listed, such as 120/208 or 120/240, have multiple
internal circuits. For example a 120/208 volt unit
utilizes 120 volts for light circuit and 208 volts for
the heat circuit(s). Consult the Electrical Diagram
supplied with the unit for specific information.
CAUTION! Light-equipped strip heaters that require
a circuit breaker 20 amps or larger must be installed
with a remote control enclosure containing a fuse
rated at 20 amps or less for the light circuit.
M
odel GRAML-18D Watts: 1020 Shipping Weight: 14 lbs. (6 kg)*
Voltage 120 120/208 120/240
Amps 8.5 5.3 4.8
Model GRAML-24D Watts: 1420 Shipping Weight: 16 lbs. (7 kg)*
Voltage 120 120/208 120/240
A
mps 11.8 7.3 6.4
Model GRAML-30D Watts: 1770 Shipping Weight: 19 lbs. (9 kg)*
V
oltage 120 120/208 120/240
Amps 14.8 8.9 7.9
M
odel GRAML-36D
n
W
atts: 2180 Shipping Weight: 22 lbs. (10 kg)*
Voltage 120 120/208 120/240
Amps 18.2 11.1 9.8
Model GRAML-42D
n
Watts: 2530 Shipping Weight: 25 lbs. (11 kg)*
Voltage 120 120/208 120/240
A
mps 21.1 12.8 11.3
Model GRAML-48D
n
Watts: 2840 Shipping Weight: 29 lbs. (13 kg)*
V
oltage 120 120/208 120/240
Amps 23.7 14.5 12.8
Model GRAML-54D
n
Watts: 3240 Shipping Weight: 33 lbs. (15 kg)*
Voltage 120 120/208 120/240
A
mps 27.0 16.4 14.5
Model GRAML-60D
n
Watts: 3700 Shipping Weight: 37 lbs. (17 kg)*
V
oltage 120 120/208 120/240
Amps 30.8 18.8 16.7
Model GRAML-66D
n
† Watts: 4050 Shipping Weight: 39 lbs. (18 kg)*
Voltage 120 120/208 120/240
Amps 33.8 20.5 18.1
Model GRAML-72D
n
† Watts: 4510 Shipping Weight: 42 lbs. (19 kg)*
Voltage 120 120/208 120/240
Amps 37.6 23.0 20.3
Model GRAML-84D
n
†
•
Watts: 5220 Shipping Weight: 47 lbs. (21 kg)*
Voltage 120 120/208 120/240
Amps 43.5 26.6 23.5
Model GRAML-96D
n
†
•
Watts: 5830 Shipping Weight: 56 lbs. (25 kg)*
Voltage 120 120/208 120/240
Amps 48.6 29.7 26.3
Model GRAML-108D†
•
Watts: 6540 Shipping Weight: 64 lbs. (29 kg)*
Voltage --- 120/208 120/240
Amps --- 33.3 29.5
Model GRAML-120D†
•
Watts: 7400 Shipping Weight: 72 lbs. (33 kg)*
Voltage --- 120/208 120/240
Amps --- 37.7 33.3
Model GRAML-132D†
•
Watts: 8160 Shipping Weight: 79 lbs. (36 kg)*
Voltage --- 120/208 120/240
Amps --- 41.6 36.8
Model GRAML-144D†
•
Watts: 9020 Shipping Weight: 86 lbs. (39 kg)*
Voltage --- 120/208 120/240
Amps --- 45.9 40.6
May require additional switches, consult factory for applications.
† Glo-Ray models 66″ through 144″ contain tandem (end-to-end) elements that may be individually controlled.
• Not available in 120 volts.
* Add 2 – 8 lbs. (1 – 3 kg) to shipping weight depending on size of remote control enclosure.
n

Model Width (A) Depth (B) * Height (C)
GRAM-XXD and
GRAML-XXD
18″–144″
(457–3658 mm)
15″
(381 mm)
2-1/2″
(64 mm)
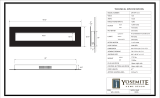
Model Width (A) Depth (B) Depth (C) Height (D)
GRAM
18″–144″
(457–3658 mm)
6″
(152 mm)
7-1/4″
(184 mm)
2-1/2″
(64 mm)
GRAML
18″–144″
(457–3658 mm)
9″
(229 mm)
10-1/4″
(259 mm)
2-1/2″
(64 mm)
English
Form No. GRAMM-1114
7
SPECIFICATIONS
Dimensions — GRAM and GRAML Models
A
D
C
B
Front View — Model GRAM
Bottom View — Model GRAM
A
D
C
B
Front View — Model GRAML
Bottom View — Model GRAML
Dimensions — Single Element Strip Heaters
* Dimension shown is standard with 3″ (76 mm) spacer; when used with 6″ (152 mm) spacer, add 3″ (76 mm).
Dimensions — GRAM-XXD and GRAML-XXD Models
A
C
B
Front View — Model GRAML-XXD
Bottom View — Model GRAML-XXD
Dimensions — Dual Element Strip Heaters

English
Form No. GRAMM-1114
8
INSTALLATION
General
Use the information in this section to prepare for and install a
Max Watt Strip Heater. Make sure to locate the specific
information in this section for the type of installation. Strip
heaters are shipped with most components pre-assembled.
Dual units are supplied with a required 3″ (76 mm) or
6″ (152 mm) spacer pre-assembled at the factory.
Optional mounting equipment and remote control enclosures
must be installed on location.
FIRE HAZARD: Do not install MaxWatt strip heaters above
or around combustible surfaces. Discoloration or
combustion could occur. Max Watt strip heaters must be
installed in non-combustible surroundings only.
To ensure safe and proper operation, refer to the “Minimum
Clearance Requirements” listed in the Installation section
of this manual.
Damage to any countertop material caused by heat
generated from Hatco equipment is not covered under the
Hatco warranty. Contact the manufacturer of the
countertop material for application information.
To prevent unit failure from excessive heat, do not add a
decorative soffit to hide a pass-through mounted strip
heater.
NOTE: Contact the countertop manufacturer of the base
material for application information and surface
temperature limits before installing the unit.
1. Remove the unit from the shipping carton and remove all
packing materials.
NOTE: To prevent delay in obtaining warranty coverage,
complete online warranty registration. See the
IMPORTANT OWNER INFORMATION section for
details.
2. Remove tape and protective packaging from all surfaces
of the unit.
NOTE: If unit is equipped with optional equipment, see the
OPTIONS AND ACCESSORIES section near the back
of this manual.
3. Install/mount the unit in an appropriate location.
a. Verify recommended mounting heights and minimum
clearance requirements are met for the appropriate
model. Refer to “Recommended Mounting Heights” and
“Minimum Clearance Requirements” in this section.
c. For permanent unit installation, refer to “Installing
Permanent Units” in this section.
b. For chain suspension installation, refer to “Installing
Chain Suspended Units” in this section.
WARNING
CAUTION
NOTICE
Dual Mounting
When mounting units side-by-side, a space not less than 3″
(76 mm) must be maintained between units. Dual units ordered
from the factory are shipped with a pre-assembled 3″ (76 mm)
or 6″ (152 mm) spacer.
Installation of two or more separate units with less than
3″ (76 mm) between housings may result in premature
failure of component parts. Failure to provide proper
spacing may result in heat damage to electrical
components and will void warranty.
Under Shelf Mounting
When mounting a unit under a shelf, use adjustable angle
brackets to assure proper spacing. Remote control enclosures
are required to keep switches out of the heat zone and prevent
premature failure.
Pass-Through
If pass-through area is 12″ to 16″ (305 to 406 mm) deep, a
single unit can be used. For a 20″ to 24″ (508 to 610 mm) deep
pass-through area, a dual unit is recommended. Installation of
multiple units must have a minimum spacing of 3″ (76 mm)
between heaters.
NOTICE

English
Form No. GRAMM-1114
9
INSTALLATION
Recommended Mounting Heights
Recommended Mounting Height for
GRAM and GRAML models in all lengths
(excluding dual models).
Recommended Mounting Height for
GRAM-XXD and GRAML-XXD dual models with a
3″ (76 mm) spacer in all lengths.
Recommended Mounting Height for
GRAM-XXD and GRAML-XXD dual models with a
6″ (152 mm) spacer in all lengths.
18″–24″
(457–610 mm)
Mounting
Height
18″ (457 mm)
24″ (610 mm)
15″ (381 mm)
21″ (533 mm)
18″–24″
(457–610 mm)
Mounting
Height
6″
(152 mm)
12″ (305 mm)
14″–18″
(356–457 mm)
Mounting
Height
Add 3″ (76 mm)
for units with lights.
Models (A) (B) (C)
GRAM and 12″ 3″ 1″
GRAML (305 mm) (76 mm) (25 mm)
GRAM-XXD 15″ 3″ 1″
GRAML-XXD (381 mm) (76 mm) (25 mm)
C
Shelf
Back Wall
Counter
A
B
Non-Combustible Clearance Requirements
Minimum Clearance Requirements
FIRE HAZARD: Do not install MaxWatt strip heaters above
or around combustible surfaces. Discoloration or
combustion could occur. Max Watt strip heaters must be
installed in non-combustible surroundings only.
WARNING

English
Form No. GRAMM-1114
10
INSTALLATION
Installing Permanent Units
Strip heaters can be mounted permanently with tubular stands
or angle brackets. Refer to the proper permanent mounting
section for the installation procedure.
Tubular Stand Mounting
Tubular stand mounting permanently attaches the unit to a
countertop or serving table. All wiring may be concealed within
one of the tubular stands.
To ensure safe and proper operation, refer to the
“Minimum Clearance Requirements” listed in the
INSTALLATION section of this manual.
Tubular stands are available in aluminum non-adjustable
heights from 14″-24″ (356-610 mm).
NOTE: Tubular stands are not field retrofittable.
NOTE: If wiring is to be concealed, a 1″ (25 mm) diameter hole
must be provided in the mounting surface centered
under the stand containing the wiring conduit.
Countertop Conduit Hole Dimension
1. Position the unit upside-down on a flat surface.
NOTE: Units for this application are supplied with the conduit
attached to one side of the unit. Conduit should not be
removed.
2. If applicable, route the flexible conduit through the center of
one of the stands.
3. Pull the conduit-side stand up against the unit and secure
the stand to the unit using the screws supplied.
4. Align the opposite-side stand with the mounting holes at
the other end of the unit and secure the stand to the unit
using the screws supplied.
5. If applicable, route the flexible conduit through the 1″
(25 mm) diameter hole cut into the mounting surface.
6. Secure the stands to the mounting surface.
NOTE: Two pairs of stands will be needed for mounting dual
units.
1-3/16″
(30 mm)
Distance from end of unit to center of conduit hole.
Needed for 1″ diameter hole cutout in mounting surface.
CAUTION
Tubular Stand Mounting
Adjustable Angle Bracket Mounting
Mounting a strip heater with adjustable angle brackets
permanently attaches the unit to the underside of a shelf. Units
can be mounted to a flat shelf or a shelf with rolled/flanged
edges. A minimum gap of 1″ [25 mm] is required between the
unit and the bottom of the rolled or flanged edge to prevent heat
damage to the electrical system of the unit.
To ensure safe and proper operation, refer to the Clearance
Requirements listed in the Installation section of this
manual.
If the shelf has a rolled or flanged edge, use the appropriate
screw hole locations on the adjustable angle brackets to mount
the unit 1″ (25 mm) below the lowest edge of the rolled or
flanged shelf. The adjustable angle brackets can provide a 1″
[25 mm], 1-1/2″ [38 mm], or 2″ [51 mm] gap between the unit
and the underside of the shelf.
Do not conceal unit. Unit must be installed below the
lowest edge of a rolled or flanged shelf. Failure to mount
unit properly may result in premature failure of
components and void the product warranty.
Mounting
Screw
Flexible
Conduit
Tubular
Stand
CAUTION
NOTICE

English
Form No. GRAMM-1114
11
INSTALLATION
Installing Chain Suspended Units
Chain suspension mounting attaches a strip heater to an
overhead surface with the use of “S” hooks. Chain suspended
units are available for single housing models only.
NOTE: Units ordered with the “S” hook option come with two
hanger tabs mounted to each end of the unit, two “S”
hooks, and two 6″ (152 mm) pieces of connecting chain.
Additional chain (P/N 05.03.020.00) can be ordered from
Hatco for the overhead mounting system or another
option can be determined by a qualified installer.
For installation with chains, make sure the chains have
sufficient strength and are securely fastened to both the
unit and the mounting location. Poorly installed chains may
cause the unit to loosen and fall. Do not place anything on
top of units installed with chains.
To ensure safe and proper operation, refer to the “Minimum
Clearance Requirements” listed in the Installation section
of this manual.
NOTE: The strength of the chain supplied by Hatco is sufficient
to hold the weight of the unit securely only when
mounted properly.
NOTE: Dual units cannot be mounted using the “S” hook and
chain system.
1. Prepare the overhead mounting system for the “S” hooks.
Make sure the system is secure and is set up so the unit
will be suspended at a level, safe, and proper distance from
walls, counter, and food.
2. Loosen, but do not remove the screws securing the hanger
tabs on each end of the unit. Rotate the tabs up, then
tighten the screws securely.
3. Securely attach one of the 6″ (152 mm) connecting chains
between each pair of hanger tabs.
4. Attach an “S” hook to the center of each connecting chain.
5. Carefully lift the unit and attach the “S” hooks on each end
of the unit to the overhead mounting system. Make sure
the unit is level.
“S” Hook Mounting
WARNING
“S” Hook
Connecting Chain
Hanger Tab
Screw
Overhead Mounting
System
Flanged Shelf Installation
1. Position the unit on a flat surface with the heating element
facing down.
2. Remove the two center screws from the end plate at one
end of the unit. These screws do not need to be replaced.
3. Remove the two upper end plate screws.
4. Align the appropriate holes on the adjustable angle bracket
with the end plate mounting holes on the unit. Secure the
angle bracket with the end plate screws.
5. Repeat steps 2 – 4 for the opposite end of the unit.
Adjustable Angle Bracket Installation
6. Fasten the angle brackets to the underside of the shelf
using appropriate fasteners (not supplied by Hatco).
NOTE: Two pairs of brackets will be needed for dual units.
Dual Unit Mounting
1″ (25 mm)
Gap
Minimum
Shelf with 3/4″ (19 mm)
flanged edge
Adjustable
Angle
Bracket
Lowest edge of
flanged shelf.
Removed
Center Screws
Adjustable
Angle Bracket
End Plate
Screws
Two adjustable
angle brackets
on each end
for dual units.

English
Form No. GRAMM-1114
12
INSTALLATION
Electrical Information
Refer to the wiring diagram supplied with the unit and
specification label attached to the unit for specific electrical
information. Also, refer to the ELECTRICAL RATING CHARTS
for unit specific information.
ELECTRIC SHOCK HAZARD: For hard-wired units, all
electrical connections must be in accordance with local
electrical codes and any other applicable codes.
Connections should be made by a qualified, licensed
electrician.
Strip heaters equipped with incandescent lights that
require a circuit breaker larger than 20 amps for the heat
element must have a separate circuit breaker for the
incandescent lights that is 20 amps or less.
NOTE: If the unit being installed is not shown or listed in this
manual, refer to the wiring diagram supplied with the
unit and the installation information on the unit for further
instructions.
Power Supply
Install supply wire and connectors suitable for at least 194°F
(90°C).
• Use a minimum of No. 14 AWG copper wire for individual
circuits up to 15 amps.
• Use a minimum of No. 12 AWG copper wire for individual
circuits 15 to 20 amps.
• Use a minimum of No. 10 AWG copper wire for individual
circuits 20 to 25 amps.
NOTE: Refer to the wiring diagram supplied with the unit and
specifications label attached to the unit for specific
electrical information.
CAUTION
WARNING
Conduit Connection
Units supplied with a right angle fitting and flexible conduit
attached have had all internal connections completed at the
factory. Attach the proper power supply leads to the high
temperature lead wires in the conduit.
Conduit Connections
Remote Control Enclosures
Hatco remote control enclosures include switches, wire leads,
and/or indicator lights and are shipped ready for installation.
The RMB Series require one remote control enclosure per strip
heater. The RMB2 Series allows multiple strip heaters to be
connected to one remote control enclosure.
NOTE: Remote control enclosures are available in several
configurations depending on the model. All enclosures
are built in accordance with UL standards to
accommodate switches, indicator lights, and wiring.
To prevent premature failure of components due to
excessive heat, remote mounted control enclosures must
be installed outside the strip heater heat zone.
Right Angle Fitting
Conduit
NOTICE
Remote Mounted Enclosure Installation Locations
D
O
N
O
T
I
N
S
T
A
L
L
E
N
C
L
O
S
U
R
E
I
N
T
H
I
S
A
R
E
A
D
O
N
O
T
I
N
S
T
A
L
L
E
N
C
L
O
S
U
R
E
I
N
T
H
I
S
A
R
E
A
Mounting
Screw
Mounting
Flange
Mounting
Flange
Heat

English
Form No. GRAMM-1114
13
INSTALLATION
Models
Opening Cutout
Dimensions
Screw Hole
Dimensions
(A) (B) (C) (D) (E)
RMB2-1R
4-3/4″
(121 mm)
10-1/8″
(257 mm)
1-1/8″
(29 mm)
2-1/2″
(64 mm)
10-7/16″
(265 mm)
RMB2-2R
4-3/4″
(121 mm)
13-1/8″
(333 mm)
1-1/8″
(29 mm)
2-1/2″
(64 mm)
13-7/16″
(341 mm)
Remote Control Enclosures — RMB Series
RMB Series remote control enclosures are available in various
configurations for use with strip heaters. Remote control
enclosures locate controls away from the heat of the unit,
increasing the life span of the controls. All models are built in
accordance with UL standards with toggle switch(es), indicator
light(s), and wiring.
Consult the factory for specific remote control enclosure for your
application and specific installation information.
NOTE: Refer to the OPTIONS AND ACCESSORIES section for
optional Infinite Remote Control Enclosure.
NOTE: RMB Series remote control enclosures require one
remote control enclosure per strip heater.
IMPORTANT NOTE:
Remote mounted enclosures must be installed in a cool, dry
location as far away from any heat zone as possible. Do not
mount enclosures directly on, under, or above unit. Do not
mount enclosures in direct contact with any heated surface or
near any steam generating equipment.
Top View
A
B
C
E
Front View
Side View
D
Cutout Dimensions — RMB2s
Dimensions — RMB2s
B
A
E
D
C
RMB2 Series Cutout Dimensions
Models
Width
(A)
Width
(B)
Height
(C)
Depth
(D)
Height
(E)
RMB2-1R
10-1/8″
(257 mm)
11″
(279 mm)
5-1/2″
(140 mm)
4-1/4″
(109 mm)
4-5/8″
(116 mm)
RMB2-2R
13-1/8″
(333 mm)
14″
(356 mm)
5-1/2″
(140 mm)
4-1/4″
(109 mm)
4-5/8″
(116 mm)
Remote Control Enclosure — RMB2 Series
RMB2 Series remote control enclosures allow multiple strip
heaters to be wired to and controlled by a single enclosure. The
total amp draw of all connected strip heaters cannot exceed the
rating of the remote control enclosure. Consult the factory for
information regarding the proper RMB2 Series remote control
enclosure for a specific application.
RMB2 Series Dimensions

English
Form No. GRAMM-1114
14
OPERATION
General
Use the following information to operate the Glo-Ray
®
Max Watt
Strip Heaters.
Read all safety messages in the IMPORTANT SAFETY
INFORMATION section before operating this equipment.
BURN HAZARD: Some exterior surfaces on unit will get
hot. Use caution when touching these areas.
Standard and approved manufacturing oils may smoke up
to 30 minutes during initial startup. This is a temporary
condition. Operate unit without food product until smoke
dissipates.
Controls
Strip heaters come with remote mounted controls. The following
is a list of the available controls for the strip heaters.
NOTE: Units cannot be equipped with built-in controls.
ON/OFF (I/O) Toggle Switch—Turns power on and off to the
heating elements and/or the lights (depending on control
configuration).
Electronic Infinite Switch—Turns on the power and controls
the temperature of the heating elements. The electronic infinite
control is available on a remote control enclosure.
Lights ON/OFF Toggle Switch—Turns power on and off to the
lights.
Indicator Light—Illuminates when power is on, shuts off when
power is off.
NOTE: Toggle switches cannot be used on circuits that exceed
15 amps.
Startup
1. Turn on the heating element(s). The indicator light (if
equipped) will illuminate and the heating elements will
energize.
• If unit is equipped with a ON/OFF (I/O) toggle switch,
move the toggle switch to the ON (I) position.
• If unit is equipped with an optional infinite control(s), turn
the control to the desired setting.
NOTE: Allow 15–20 minutes to reach operating temperature.
2. On models equipped with display lights, move the light
ON/OFF (I/O) toggle switch to the ON (I) position.
CAUTION
WARNING
Remote Control Enclosures
Shutdown
1. Move the ON/OFF (I/O) toggle switch to the OFF (O)
position or turn the optional infinite control(s) to the
OFF (O) position.
• The indicator light (if equipped) will shut off and the
heating elements will shut down.
2. On models equipped with display lights, move the light
ON/OFF (I/O) toggle switch to the OFF (O) position.
ON/OFF (I/O)
Toggle Switch
Indicator Light
Electronic
Infinite Switch
ON/OFF (I/O)
Toggle Switch
Indicator
Light
RMB Series
RMB2 Series

English
Form No. GRAMM-1114
15
MAINTENANCE
General
Glo-Ray Max Watt Strip Heaters are designed for maximum
durability and performance with minimum maintenance.
ELECTRIC SHOCK HAZARD:
• Turn OFF power switch, turn off power at circuit
breaker, and allow unit to cool before performing any
cleaning, adjustments, or maintenance.
• DO NOT submerge or saturate with water. Unit is not
waterproof. Do not operate if unit has been submerged
or saturated with water.
• Do not steam clean or use excessive water on unit.
• This unit is not “jet-proof” construction. Do not use jet-
clean spray to clean this unit.
This unit has no “user-serviceable” parts. If service is
required on this unit, contact an Authorized Hatco Service
Agent or contact the Hatco Service Department at
800-558-0607 or 414-671-6350; fax 800-690-2966; or
International fax 414-671-3976.
Use only Genuine Hatco Replacement Parts when service
is required. Failure to use Genuine Hatco Replacement
Parts will void all warranties and may subject operators of
the equipment to hazardous electrical voltage, resulting in
electrical shock or burn. Genuine Hatco Replacement Parts
are specified to operate safely in the environments in which
they are used. Some aftermarket or generic replacement
parts do not have the characteristics that will allow them to
operate safely in Hatco equipment.
Use non-abrasive cleaners and cloths only. Abrasive
cleaners and cloths could scratch the finish of the unit,
marring its appearance and making it susceptible to soil
accumulation.
Daily Cleaning
To preserve the finish of the strip heater, it is recommended that
all surfaces be cleaned daily.
1. Turn off the unit and allow the unit to cool.
2. Wipe down all metal surfaces with a water-dampened, non-
abrasive cloth. Stubborn stains may be removed with a
good stainless steel or non-abrasive cleaner. Clean hard
to reach areas using a small brush and mild soap.
3. Wipe dry the entire unit using a non-abrasive, dry cloth.
WARNING
NOTICE
Replacing Display Light Bulbs
Use only light bulbs that meet or exceed National
Sanitation Foundation (NSF) standards and are specifically
designed for food holding areas. Breakage of light bulbs
not specially coated could result in personal injury and/or
food contamination.
The display light is an incandescent or optional halogen bulb
that illuminates the warming area. These bulbs have a special
coating to guard against injury and food contamination in the
event of breakage.
To replace a display light bulb:
1. Disconnect the power supply and wait until the unit has
cooled.
2. Unscrew the light bulb from the unit and replace it with a
new, specially-coated incandescent or optional halogen
bulb.
NOTE: Hatco shatter-resistant light bulbs meet NSF standards
for food holding and display areas. For 120, 120/208,
and 120/240 volt applications, use Hatco P/N
02.30.043.00.
NOTE: Halogen bulbs are available as an option. For 120,
120/208, and 120/240 volt applications, use Hatco P/N
02.30.081.00.
WARNING

Symptom Probable Cause Corrective Action
Unit is turned “On” but there
is no heat.
No power to unit. Check circuit breaker and reset as necessary.
Switch is defective. Contact Authorized Service Agent or Hatco for assistance.
Wiring is open. Contact Authorized Service Agent or Hatco for assistance.
Heating element defective. Contact Authorized Service Agent or Hatco for assistance.
Heat is inadequate. Unit mounted too high above target area. Lower unit, putting effective heat closer to target.
Excessive air movement around strip
heater target area.
Restrict or redirect air movement (air conditioning duct
or exhaust fan) away from unit.
Incorrect power supply (low). Check power supply to unit, making sure it matches
rating on the unit. If power supply is incorrect, change to
match rating on unit.
Heat is excessive. Unit mounted too close to target area. Check to see that installation is within specifications for
type/model. Increase mounting height if too close.
Voltage supply too high. Check power supply to unit, making sure it matches
rating on unit. If power supply is incorrect, change to
match rating.
Control switches burn out. Unit mounted improperly. Move the unit the proper distance away from walls,
counters, and/or pass-through shelves. Refer to the
INSTALLATIONsection for guidelines.
Remote control enclosure is mounted
too close to the heat zone.
Move remote control enclosure away from the heat zone.
Refer to the INSTALLATIONsection for guidelines.
Switches used are not Hatco supplied. Genuine Hatco Parts are specified to operate safely and
properly in the environment in which they are used.
Contact Authorized Service Agent or Hatco to replace
switches with Genuine Hatco Replacement Parts.
English
Form No. GRAMM-1114
16
TROUBLESHOOTING GUIDE
This unit must be serviced by qualified personnel only.
Service by unqualified personnel may lead to electric
shock or burn.
WARNING
ELECTRIC SHOCK HAZARD: Turn OFF power switch, turn
off power at circuit breaker, and allow unit to cool before
performing any cleaning, adjustments, or maintenance.
WARNING
Troubleshooting Questions?
If you continue to have problems resolving an issue, please
contact the nearest Authorized Hatco Service Agency or Hatco
for assistance. To locate the nearest Service Agency, log onto
the Hatco website at www.hatcocorp.com and click on
Find Service Agent, or contact the Hatco Parts and Service
Team at:
Telephone: 800-558-0607 or 414-671-6350
e-mail: part[email protected]
Fax: 800-690-2966 or 414-671-3976

OPTIONS AND ACCESSORIES
English
LIMITED WARRANTY
Form No. GRAMM-1114
17
1. PRODUCT WARRANTY
Hatco warrants the products that it manufactures (the
“Products”) to be free from defects in materials and
workmanship, under normal use and service, for a period of one
(1) year from the date of purchase when installed and
maintained in accordance with Hatco’s written instructions or
18 months from the date of shipment from Hatco. Buyer must
establish the Product’s purchase date by registering the Product
with Hatco or by other means satisfactory to Hatco in its sole
discretion.
Hatco warrants the following Product components to be free
from defects in materials and workmanship from the date of
purchase (subject to the foregoing conditions) for the period(s)
of time and on the conditions listed below:
a) One (1) Year Parts and Labor PLUS One (1) Additional
Year Parts-Only Warranty:
Conveyor Toaster Elements (metal sheathed)
Drawer Warmer Elements (metal sheathed)
Drawer Warmer Drawer Rollers and Slides
Strip Heater Elements (metal sheathed)
Display Warmer Elements (metal sheathed air heating)
Holding Cabinet Elements (metal sheathed air heating)
Heated Well Elements — HW and HWB Series
(metal sheathed)
b) One (1) Year Parts and Labor PLUS Four (4) Years
Parts-Only Warranty:
3CS and FR Tanks
c) One (1) Year Parts and Labor PLUS Nine (9) Years
Parts-Only Warranty on:
Electric Booster Heater Tanks
Gas Booster Heater Tanks
d) Ninety (90) Day Parts-Only Warranty:
Replacement Parts
THE FOREGOING WARRANTIES ARE EXCLUSIVE AND IN
LIEU OF ANY OTHER WARRANTY, EXPRESSED OR
IMPLIED, INCLUDING BUT NOT LIMITED TO ANY IMPLIED
WARRANTY OF MERCHANTABILITY OR FITNESS FOR A
PARTICULAR PURPOSE OR PATENT OR OTHER
INTELLECTUAL PROPERTY RIGHT INFRINGEMENT.
Without limiting the generality of the foregoing, SUCH
WARRANTIES DO NOT COVER: Coated incandescent light
bulbs, fluorescent lights, heat lamp bulbs, coated halogen light
bulbs, halogen heat lamp bulbs, xenon light bulbs, LED light
tubes, glass components, and fuses; Product failure in booster
tank, fin tube heat exchanger, or other water heating equipment
caused by liming, sediment buildup, chemical attack, or
freezing; or Product misuse, tampering or misapplication,
improper installation, or application of improper voltage.
2. LIMITATION OF REMEDIES AND DAMAGES
Hatco’s liability and Buyer’s exclusive remedy hereunder will
be limited solely, at Hatco’s option, to repair or replacement
using new or refurbished parts or Product by Hatco or a Hatco-
authorized service agency (other than where Buyer is located
outside of the United States, Canada, United Kingdom, or
Australia, in which case Hatco’s liability and Buyer’s exclusive
remedy hereunder will be limited solely to replacement of part
under warranty) with respect to any claim made within the
applicable warranty period referred to above. Hatco reserves
the right to accept or reject any such claim in whole or in part.
In the context of this Limited Warranty, “refurbished” means a
part or Product that has been returned to its original
specifications by Hatco or a Hatco-authorized service agency.
Hatco will not accept the return of any Product without prior
written approval from Hatco, and all such approved returns shall
be made at Buyer’s sole expense. HATCO WILL NOT BE
LIABLE, UNDER ANY CIRCUMSTANCES, FOR
CONSEQUENTIAL OR INCIDENTAL DAMAGES, INCLUDING
BUT NOT LIMITED TO LABOR COSTS OR LOST PROFITS
RESULTING FROM THE USE OF OR INABILITY TO USE THE
PRODUCTS OR FROM THE PRODUCTS BEING
INCORPORATED IN OR BECOMING A COMPONENT OF
ANY OTHER PRODUCT OR GOODS.
RMB with Infinite Controls
A remote control enclosure with infinite control(s) is available
as a factory installed option. It also includes toggle switch(es)
and indicator light(s).
Display Lights
Max watt strip heaters may be equipped from the factory with
incandescent display lights or halogen display lights to
illuminate the warming area.
Hatco shatter-resistant bulbs guard against injury and food
contamination in the event of breakage. The display lighting
meets National Sanitation Foundation (NSF) standards for food
holding and display areas.
Display Lights
NOTE: Display lights cannot be retrofitted to units.
Display Lights

Formulaire n° GRAMM-1114
18
Français
Ce m
anuel
fourni
t
l
es
c
ons
i
gnes
d'
i
ns
tal
l
ati
on,
de s
éc
uri
té et
de
fo
n
ctio
n
n
e
me
n
t
d
e
s
r
a
mp
e
s
ch
a
u
ffa
n
te
s
G
lo
-
R
a
y
Ma
x
Wa
tt.
H
a
tco
vo
u
s r
e
co
mma
n
d
e
d
e
lir
e
l’e
n
se
mb
le
d
e
s in
str
u
ctio
n
s
d’
i
ns
tal
l
ati
on, de s
éc
uri
t
é et
de f
onc
ti
onnem
ent c
ont
enues
dans
c
e m
anuel
av
ant
d’
i
ns
tal
l
er
et d’
uti
l
i
s
er l
'
apparei
l
.
L
e
s
co
n
sig
n
e
s
d
e
sé
cu
r
ité
q
u
i
a
p
pa
r
a
isse
n
t
d
a
n
s
ce
ma
n
u
e
l
so
n
t
identifiées par les mots indicateurs suivants :
AVERTISSEMENT indique une situation dangereuse qui, si
elle n’est pas évitée, peut provoquer la mort ou des
blessures graves.
ATTENTION indique une situation dangereuse qui, si elle
n’est pas évitée, peut provoquer des blessures légères ou
moyennes.
AVIS est utilisé pour des questions sans rapport avec des
blessures corporelles.
AVIS
ATTENTION
AVERTISSEMENT
INTRODUCTION
Les rampes chauffantes Glo-Ray
®
Max Watt de Hatco
garantissent une durée de conservation des aliments maximale et
minimisent le risque de maladies d'origine alimentaire. Une
sécurité et une qualité optimales sont le résultat de la conservation
des aliments aux bonnes températures de service en utilisant les
modèles de transferts thermiques préétablis par Glo-Ray. Les
modèles de transferts thermiques préétablis empêchent les
aliments d'être trop cuits au milieu et tièdes sur les bords en
concentrant les températures plus élevées vers les bords
extérieurs des surfaces de service, où la perte de chaleur est la
plus importante. Grâce à des réflecteurs spécialement conçus
pour diriger la chaleur depuis l'élément, les rampes chauffantes
Glo-Ray permettent aux aliments de conserver des températures
de service bien réparties en toute sécurité et ce, sans les cuire
au-delà de leur point de cuisson optimal.
Les rampes chauffantes Glo-Ray Max Watt sont disponibles en
sortie d'usine avec ou sans lampes à incandescence résistantes
à l'éclatement destinées à éclairer la zone de chauffage. Ces
ampoules possèdent un enduit spécial destiné à éviter toute
blessure et toute contamination des éléments en cas de casse.
Les rampes chauffantes Glo-Ray Max Watt sont des produits issus
d'une recherche approfondie qui ont subi des essais pratiques. Les
matériaux utilisés ont été sélectionnés pour un maximum de
durabilité, d'aspect esthétique et de performance optimum. Chaque
appareil est minutieusement inspecté et testé avant expédition.
Informations Importantes pour le Propriétaire ................18
Introduction.........................................................................18
Consignes de Sécurité Importantes .................................19
Description du Modèle .......................................................20
Désignation du Modèle ......................................................20
Caractéristiques Techniques.............................................21
Tableau des caractéristiques électriques .........................21
Dimensions .......................................................................23
Installation ...........................................................................24
Généralités........................................................................24
Hauteurs Recommandées pour le Montage .....................25
Exigences en matière de dégagements minimum............25
Installation d'unités Permanentes .....................................26
Installation d'unités Suspendues à des Chaînes ..............27
Informations sur le câblage électrique ..............................28
Compartiment de contrôle à distance ...............................29
Mode d'emploi.....................................................................30
Généralités........................................................................30
Maintenance ........................................................................31
Généralités........................................................................31
Nettoyage quotidien ..........................................................31
Remplacement du tube d'éclairage ..................................31
Guide de Dépannage..........................................................32
Options et Accessoires......................................................33
Garantie Limitée..................................................................33
Autorisés Distributeurs de Pièces ........Couverture Arrière
INFORMATIONS IMPORTANTES POUR LE PROPRIÉTAIRE
Notez le numéro de modèle, le numéro de série, la tension et la
date d'achat de l'appareil dans les espaces ci-dessous (étiquette
de spécification située sur le côté de l'appareil). Veuillez avoir
cette information à portée de la main si vous appelez Hatco pour
assistance.
Modèle No.____________________________________
Numéro de série________________________________
Voltage ______________________________________
Date d’achat __________________________________
Enregistrez votre appareil!
Remplissez la garantie en ligne pour éviter les retards pour
faire jouer la garantie. Accédez au site Web Hatco
www.hatcocorp.com, sélectionnez le menu déroulant Parts
& Service, puis cliquez sur Warranty Registration.
Horaires
ouvrables: 8h00 à 17h00
Heure du Centre des États-Unis (CST)
(Horaires d’été : juin à septembre—
8h00 à 17h00 CST du lundi au jeudi
8h00 à 14h30 CST le vendredi)
Téléphone: 800-558-0607; 414-671-6350
Courriel: [email protected]
Télécopieur: 800-690-2966 (Pièces et Service après-vente)
414-671-3976 (Internationale)
Des renseignements supplémentaires sont disponibles sur
notre site Web à www.hatcocorp.com.
Service d'assistance et de pièces de
rechange disponible 7j/7, 24h/24 aux
États-Unis et au Canada en composant
le 800-558-0607.
SOMMAIRE

CONSIGNES DE SÉCURITÉ IMPORTANTES
Formulaire n° GRAMM-1114
19
Français
Pour l'installation avec des chaînes, assurez-vous que les chaînes
sont suffisamment résistantes et qu'elles sont solidement fixées à
la fois sur le réchauffeur de bande et sur l'espace de montage. Des
chaînes mal installées peuvent entraîner le relâchement et la chute
du réchauffeur. Ne rien placer sur des réchauffeurs installés avec
des chaînes.
DANGER DE BRÛLURE : Certaines surfaces extérieures de
l’appareil deviennent chaudes. Toucher ces zones de l’appareil
avec précaution.
Les graisses standards et approuvées utilisées lors de la
fabrication peuvent provoquer des fumées au cours du démarrage
initial pendant 30 minutes. Il s'agit d'un état temporaire. Utilisez
l'appareil sans produit alimentaire jusqu'à ce que la fumée
disparaisse.
Les rampes chauffantes équipées de lumières incandescentes qui
nécessitent un disjoncteur de plus de 20 ampères pour l'élément
chauffant doivent avoir un disjoncteur séparé pour les lumières
incandescentes de 20 ampères ou moins.
Assurez-vous que le fonctionnement est sûr et adapté. Référez-
vous aux « Exigences d'espace minimum » indiquées dans la
section Installation de ce manuel.
L'installation de deux appareils ou plus avec moins de 3 po
(76 mm) entre les boîtiers peut entraîner le défaillance prématurée
des composants. La chaleur due à l'incapacité de fournir un
espacement adapté peut entraîner des dommages des composants
électriques qui ne sont pas couverts par la garantie.
Les unités ne fonctionnent qu'à la tension spécifiée. Reportez-
vous à l'étiquette des caractéristiques des exigences électriques
avant de commencer l'installation.
Ne masquez pas une rampe chauffante montée sur un passe-plat
avec une sous-face décorative. Une température excessive peut
entraîner une panne de l'unité.
Pour éviter une défaillance prématurée des composants due à une
chaleur excessive, les compartiments de contrôle à distance
doivent être installés à l'extérieur de la zone de chaleur des
rampes chauffantes.
Les dommages pouvant être causés au dessus de comptoir par
l'équipement de Hatco ne sont pas couverts par la garantie de
Hatco. Contactez le fabricant du comptoir pour les informations
concernant l'application.
Utilisez seulement des nettoyants non abrasifs et des chiffons
doux. Les chiffons et nettoyant abrasifs pourraient érafler la
finition de l'unité, entachant son apparence et la rendant
susceptible à l'accumulation de saleté.
Ne placez pas l'appareil dans un endroit où la circulation de l'air
est trop forte. Évitez les zones pouvant être soumises à des
mouvements d'air ou à des courants d'air actifs (c.-à-d. à proximité
de ventilateurs / capots d'échappement, conduites de climatisation
et portes donnant sur l'extérieur).
AVIS
ATTENTION
AVERTISSEMENT
DANGER DE DÉCHARGE ÉLECTRIQUE :
• Les appareils requièrent un branchement câblé au système
électrique local. Le câblage doit être mis à la terre de manière
appropriée. Son voltage, ses dimensions et sa configuration
doivent également correspondre aux spécifications
électriques de l'appareil. Contactez un électricien qualifié pour
procéder au choix et à l'installation des branchements
électriques adaptés.
• Mettez l'interrupteur sur « ARRÊT », coupez le courant au
disjoncteur et laissez refroidir l'appareil avant d'effectuer toute
opération de nettoyage, de réglage ou d'entretien.
• NE PAS immerger l’appareil ni le saturer d’eau. L’appareil n’est
pas étanche à l’eau. Ne pas le faire fonctionner s’il a été
immergé ou saturé d’eau.
• Ne pas nettoyer à la vapeur ni utiliser trop d’eau sur l’appareil.
• Cet appareil n’est pas étanche aux jets. Ne pas utiliser de jet
sous pression pour nettoyer l’appareil.
• Utilisez uniquement des pièces de rechange d'origine Hatco
lorsque l'entretien est nécessaire. Utilisez des pièces
détachées Hatco authentiques sous peine d'annuler toutes les
garanties et d'exposer l’utilisateur à des tensions électriques
dangereuses pouvant entraîner une électrocution ou des
brûlures. Les pièces de rechange authentiques Hatco sont
spécifiées pour fonctionner en toute sécurité dans les
environnements dans lesquels elles sont utilisées. Certaines
pièces de rechange génériques ou d'après-vente n'ont pas les
caractéristiques qui leur permettent d'opérer en toute sécurité
dans les équipements Hatco.
RISQUE D'INCENDIE: N'installez pas les rampes chauffantes Max
Watt au-dessus ou à proximité de surfaces combustibles, sous
peine de subir une décoloration ou une combustion. Les rampes
chauffantes Max Watt doivent être installées dans un
environnement non combustible uniquement.
RISQUE D'EXPLOSION: Ne conservez pas ou n'utilisez pas
d'essence ou d'autres vapeurs ou liquides inflammables à
proximité de cet appareil ou de tout autre appareil.
N'utiliser que des ampoules électriques qui correspondent ou qui
surpassent les standards de la Fondation Nationale des Affaires
Sanitaires (NSF) et qui sont spécifiquement conçus pour les
espaces de conservation des aliments. La casse d'ampoules
électriques non enduites de manière spécifique pourrait entraîner
des lésions corporelles et/ou une contamination des aliments.
Cet appareil ne doit pas être utilisé par des enfants ou des
personnes avec des capacités physiques, sensorielles ou
mentales diminuées. Assurez-vous que les enfants sont bien
surveillés et tenez-les à l'écart de l'appareil.
Assurez-vous que tous les opérateurs ont été formés à l'utilisation
sûre et correcte de l'appareil.
S'assurer que le produit alimentaire a été chauffé à une
température adaptée au maintien de sa salubrité avant de le mettre
dans l'appareil sous peine de risques graves pour la santé. Cet
appareil est destiné au maintien au chaud de produits alimentaires
préchauffés uniquement.
Cet appareil ne contient aucune pièce réparable par l’utilisateur. Si
cet appareil doit être réparé, contacter un réparateur Hatco agréé
ou le Service après-vente Hatco au 800-558-0607 ou
414-671-6350 ; télécopieur 800-690-2966; télécopieur
internationale 414-671-3976.
AVERTISSEMENT
Lisez l'information de securite importante suivante avant d'utiliser cet équipement pour éviter
des dommages ou la mort sérieux et pour éviter d'endommager l'équipement ou la propriété.

DESCRIPTION DU MODÈLE
Formulaire n° GRAMM-1114
20
Français
Tous les Modèles
Les rampes chauffantes Glo-Ray
®
Max Watt de Hatco gardent
les aliments chauds à des températures de service optimales
plus longtemps. Les aliments ne se dessèchent et ne se
décolorent pas ; même les plats les plus délicats donnent
l'impression de tout juste sortir du fourneau. Les modèles de
transferts thermiques préétablis de Glo-Ray dirigent la chaleur
émise par un élément tubulaire afin qu'elle baigne entièrement
la surface de service.
Les rampes chauffantes Glo-Ray Max Watt sont équipées de
boîtiers en aluminium de longueurs comprises entre 457 mm
(18″) et 3 658 mm (144″).
Les modèles doubles permettent d'installer côte à côte deux
rampes afin de chauffer une surface de service plus large (les
modèles doubles sont construits avec une entretoise standard
de 76 mm [3″] ou 152 mm [6″] entre les éléments de chauffage).
Toutes les rampes chauffantes Glo-Ray Max Watt présentent
plusieurs options de montage. Commutateurs électroniques à
progression, éclairage incandescent et halogène sont
disponibles en option.
GRAM-XX: Boîtier en aluminium, profondeur élément
simple
GRAML-XX: Boîtier en aluminium, éclairage
incandescent, profondeur élément simple
GRAM-XXD: Boîtier en aluminium, profondeur élément
double
GRAML-XXD: Boîtier en aluminium, éclairage
incandescent, profondeur élément double
Modèle GRAM-48
Modèle GRAML-48
Modèle GRAML-48D avec entretoise de 76 mm (3″)
Modèle GRAML-48D avec entretoise de 152 mm (6″)
G R A M L - XX D
Glo-Ray
Boîtier en aluminium
L = Éclairage incandescent
Aucune lettre = Pas d'éclairage
D = Profondeur élément double
Aucune lettre = profondeur élément simple
Largeur (ponces)
Max Watt
DÉSIGNATION DU MODÈLE
/