ATENCIÓN: INSTRUCCIONES DE SEGURIDAD IMPORTANTES
LEA Y OBSERVE TODAS LAS INSTRUCCIONES DE SEGURIDAD
• No use productos de temporada al aire libre a menos
que se indique que son aptos para usar en interiores y
al aire libre. Cuando los productos se usan en
aplicaciones al aire libre, conecte el producto a un
interruptor de circuito de fallas con conexión a tierra
(GFCI). Si no se ha proporcionado un GFCI, consulte a
un electricista calificado para realizar una instalación
correcta.
• Este producto de uso estacional no está previsto para
instalación o uso permanente.
• No debe montarse ni colocarse cerca de estufas a gas
o eléctricas, chimeneas , velas u otras fuentes
similares de calor.
• No fije los cables del producto con grampas o clavos,
y no lo coloque sobre ganchos filosos o clavos.
• No permita que las lámparas se apoyen sobre el
cordón eléctrico o sobre ningún cable.
•
Desenchufe el producto al irse de la casa, al retirarse
p
or la noche, o al dejarlo sin atender.
• ATENCIÓN: Éste es un producto eléctrico – ¡no es un
juguete! Para evitar riesgos de incendio, quemaduras,
lesiones personales y choque eléctrico, no se debe
jugar con el producto ni dejarlo al alcance de niños
pequeños.
• No use este producto para ningún fin que no sea el
indicado.
• No cuelgue adornos u otros objetos del cable, cordón o
cable de luces.
• No cierre las puertas o ventanas sobre el producto o
sobre los cables de extensión, pues esto puede dañar
el aislamiento de los cables.
• Nunca haga funcionar este producto si el cable
eléctrico o el enchufe están dañados.
•
Use solamente las bombillas de recambio
e
specificadas por el fabricante.
• Lea y siga todas las instrucciones que están en el
producto o que se entregan con éste.
INSTRUCCIONES DE USO Y CUIDADO
•
Cuando guarde el producto, quítelo cuidadosamente
del lugar donde estaba colocado, incluidos los árboles,
ramas o arbustos, a fin de evitar todo esfuerzo
indebido sobre los conductores, conexiones y alambres
del producto.
• Cuando el producto esté fuera de uso, guárdelo
cuidadosamente en un lugar fresco y seco, protegido
contra la luz solar.
Coronas sin iluminación / Preiluminadas con conector
Dando Forma
El producto es enviado de fábrica con las puntas de las
ramas comprimidas hacia el centro. Cada punta de rama
debe moverse a una posición adecuada para darle al
producto un aspecto natural. Esto también llevará a la
pieza a sus dimensiones anunciadas. El cuidado y la
atención que le presta a este proceso final, resultará en
una decoración Navideña genuinamente bella y atractiva.
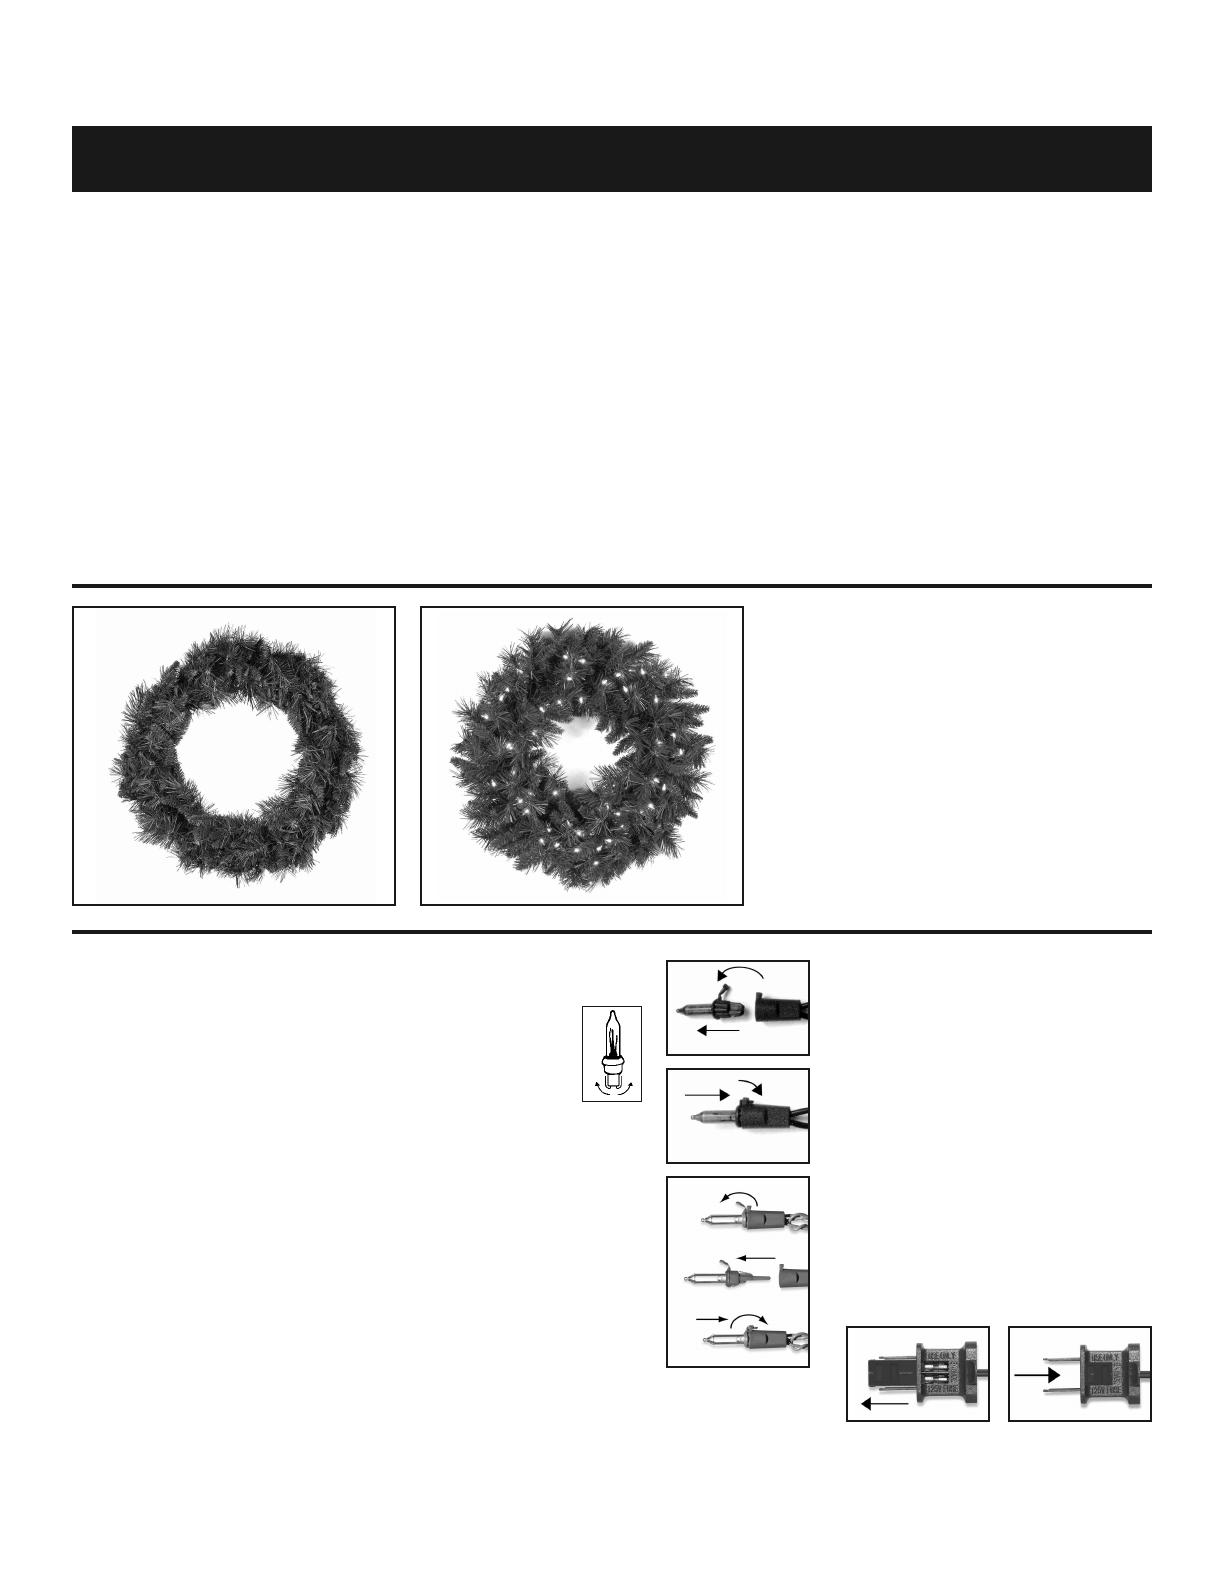
El moldeado se realiza agarrando suavemente las puntas
de las ramas y separándolas lejos del centro. La foto
ANTES muestra el producto tal como se ve fuera de la
caja. La foto DESPUES muestra cómo el producto debe
lucir luego de una conformación adecuada.
Instrucciones de uso
para Dual Color
®
(si está equipado)
El interruptor de mano controla las
funciones de las luces. Hay 10
funciones. Cada una se activa
pisando dicho interruptor. El orden
de las funciones es:
Luces estáticas blancas cálido;
parpadeo blanco calido; luces
estáticas multicolor; parpadeo
multicolor; luces estáticas pastels;
luces desvanecedoras de blanco
cálido a multicolor; luces
desvanecedoras aleatorias; luces
desvanecedoras blanco cálido;
luces desvanecedoras multicolores;
centelleante de blanco cálido a
multicolor.
Las funciones de las luces siempre
siguen la secuencia.
ANTES DESPUES
Instrucciones Para Remplazo de Luces
1. Desenchufe el cordón eléctrico de la fuente
de energía.
2. Jale de la traba de bombillas (si
se incluye) para soltar la
bombilla del casquillo. Levante
delicada-mente la bombilla
hacia arriba (Figura 1).
3. Antes de insertar la nueva bombilla en el
casquillao, asegúrese de que los dos cables
a los lados de la base de la bombilla estén
levan-tados y al ras con la base (diagrama
de la derecha).
4. Inserte cuidadosamente una bombilla
nueva en el casquillo y oprima la traba de
bombillas (si se incluye) hasta que encaje en
su lugar haciendo un chasquido (Figura 2).
Luces LED (Figura 3)
1. Desconecte el cable principal de cualquier
fuente de energía.
2. Levante hacia arriba la pestaña de bloqueo
liberando así la lámpara del conector. Remueva
la lámpara gentilmente directo hacia afuera.
3. Inserte una nueva lámpara cuidadosamente
dentro del conector (la lámpara está diseñada
para conectar en un único sentido) y presione
la pestaña de bloqueo nuevamente en su
lugar de origen.
NOTA: Problemas en los fusibles es
usualmente la razón del mal funcionamiento
de las luces. Los fusibles son encuentra en el
enchufe de las luces. Si uno quemado,
reemplácelo con el fusible extra en la bolsa
de accesorios.
Instrucciones Para Remplazo
de Fusibles
1. Desenchufe el cable de las luces.
2. Deslice la cubierta de acceso a los
fusibles para apartarla del lado del cable
eléctrico (en la dirección de la flecha,
Figura 4) y poder ver los fusibles.
3. Retire los fusibles del compartimiento y
examínelos. Reemplace todo fusible
quemado con uno nuevo.
4. Para cerrar el compartimiento de fusibles,
deslice la cubierta de acceso hacia el lado
del enchufe del cable eléctrico (Figura 5).
Fig. 1
Fig. 2
Fig. 4 Fig. 5
Fig. 3
CONSERVE ESTAS
INSTRUCCIONES

