Aspes ALVI600 User manual

Category
Dishwashers
Type
User manual

This manual is also suitable for

EN
ALVI600
EN - 2

This user manual contains important information on safety and instructions intended to
assist you in the operation and maintenance of your appliance.
Please take the time to read this user manual before using your appliance and keep this
book for future reference.
  
WARNING Serious injury or death risk
 Dangerous voltage risk
 
 Injury or property damage risk
 Operating the system correctly
EN - 3

 4
1.1 General Safety Warnings ..............................................................................................4
 .....................................................................................................5
1.3 During Usage..................................................................................................................6
 9
2.1 Machine Positioning ......................................................................................................9
2.2 Water Connection ..........................................................................................................9
2.3 Water Inlet Hose .............................................................................................................9
2.4 Drain Hose (Model Depending) ....................................................................................10
2.5 Electrical Connection ....................................................................................................10
 11
3.1 General Sppearance ....................................................................................................11
 ...............................................................................................11
 13
 ....................................................................13
4.2 Salt Usage (IF AVAILABLE) ..........................................................................................13
4.3 Fill The Salt (IF AVAILABLE) ........................................................................................13
 .......................................................................................................................14
4.5 Water Hardness Table .................................................................................................14
 .................................................................................................14
4.7 Setting .........................................................................................................................14
4.8 Detergent usage ..........................................................................................................15
4.9 Filling the detergent ......................................................................................................15
4.10 Using combined detergents .......................................................................................15
4.11 Rinse-aid usage ........................................................................................................15
4.12 Filling the rinse-aid and setting ..................................................................................15
 17
5.1 Recommendations .......................................................................................................17
5.2 Alternative Basket Loads .............................................................................................19
 20
 21
 24
8.1 Filters ............................................................................................................................24
8.2 Spray Arms ...................................................................................................................24
8.3 Drain Pump...................................................................................................................25
 26
EN - 4


• Read these instructions carefully before using your
appliance and keep this manual for future reference.
Please check the packaging of your machine
before installation and the outer surface of the
machine once the packaging has been removed. Do
not operate the machine if it appears damaged or if
the packaging has been opened.
• Packaging materials protect your machine from any
damage that might occur during transportation. The
packaging materials are environmentally friendly
as they are recyclable. Use of recycled material
reduces raw material consumption and decreases
waste production.
This appliance can be used by children aged from
8 years and above, and by persons with reduced
physical, sensory or mental capabilities or lack of
experience and knowledge if they have been given
supervision or instruction concerning the use of the
appliance in a safe way and understand hazards
involved. Children should not be allowed to play with
the appliance.
Remove packaging and keep it out of reach of
children.
Keep children away from detergents and rinse
aids.
EN - 5
There may be some residue left in the machine
after washing. Keep children away from the machine
when it is open.

• Choose a suitable and safe place to install your
machine.
• Only original spare parts should be used with the
machine.
Unplug the machine before installation.
Your machine must only be installed by an
authorised service agent. Installation by anyone other
than an authorised agent may cause your warranty to
be void.
Check that the indoor electrical fuse system is
connected in line with safety regulations.
All electrical connections must match the values on
the plate.
Ensure the machine does not stand on the
electrical supply cable.
Never use an extension cord or a multiple socket
connection.
The plug should be accessible after the machine is
installed.
• After installation, run your machine unloaded for the

The machine must not be plugged in during
positioning.
EN - 6
Always use the coated plug supplied with your
machine.
If the electrical cable is damaged, it should only

• Connect the hose directly to the water inlet tap. The
pressure supplied by the tap should be a minimum
of 0.03 MPa and a maximum of 1 MPa. If the
pressure exceeds 1 MPa, a pressure relief valve


• This machine is for domestic use only; do not use
it for other purposes. Commercial use will void the
guarantee.
Do not stand, sit or place loads on the open door
the dishwasher.
Only use detergents and rinse aids produced

responsible for any damage that may occur due to
misuse.
Do not drink water from the machine.
Due to the danger of explosion, do not place any
chemical dissolving agents into the machine’s washing
section.
• Check the heat-resistance of plastic items before
washing them in the machine.
Only put items in the machine which are suitable for

EN - 7
Do not open the door while the machine is in
operation, hot water may spill out. Safety devices
ensure the machine stops if the door is opened.
The machine door should not be left open. It may
cause accidents.
Place knives and other sharp objects in the cutlery
basket in a blade-down position.
For models with the automatic door-opening
system, when the EnergySave option is active, the
door will open at the end of a program. To prevent
damage to your dishwasher, do not attempt to close
the door for one minute after it has opened. For

after a programme has ended. Do not stand in front of
the door after the auto-open signal sounds.
In the case of a malfunction, repair should only
be performed by an authorised service company,
otherwise the warranty will be void.
Before repair work, the machine should be
disconnected from the mains. Do not pull the cable to

Operation at a low voltage will cause a decline in
performance levels.
For safety, disconnect the plug once a program has

To avoid an electric shock, do not unplug the
machine with wet hands.
EN - 8
Pull the plug to disconnect the machine from the
mains, never pull on the cord.
EN - 9


When positioning the machine, place it in
an area where dishes can be easily loaded
and unloaded. Do not put the machine in
an area where the ambient temperature
falls below 0°C.
Read all warnings located on the packaging
before removing the packaging and
positioning the machine.
Place the machine close to a water tap
and drain. Take into consideration that the
connections will not be altered once the
machine is in position.
Do not hold the machine by its door or
panel.
Leave an adequate distance around the
machine to allow ease of movement when
cleaning.
Ensure the water inlet and outlet
hoses are not squeezed or trapped
and that the machine does not stand on the
electrical cable while positioning.
Adjust the feet so the machine is level and
balanced. The machine should be placed

and the door of the machine will not close
properly.
Please install the decorative panel
as indicated on the assembly sheet.
Otherwise, the door may not open properly
and steam leakage problem may occur.


inlet supply in order to prevent damage to
your machine due to contamination (sand,
rust, etc.) from indoor plumbing. This will
also help prevent yellowing and deposit
formation after washing.
Note printing on the water inlet hose!
If models are marked with 25°, the water
temperature may be max. 25 °C (cold
water).
For all other models:
Cold water preferred; hot water max.
temperature 60 °C.

WARNING: Use the new water inlet
hose supplied with your machine, do not
use an old machine’s hose.
WARNING: Run water through the
new hose before connecting.
WARNING: Connect the hose
directly to the water inlet tap. The pressure
supplied by the tap should be a minimum
of 0.03 MPa and a maximum of 1 MPa. If
the pressure exceeds 1 MPa, a pressure

connection.
WARNING: After the connections are
made, turn the tap on fully and check


EN - 10
An Aquastop water spout is available
with some models. Do not damage it
or allow it to become kinked or twisted.

Connect the water drain hose directly to
water drain hole or to the sink outlet spigot.
This connection should be minimum 50

dishwasher is placed.
 Items will not wash
properly if a drain hose longer than 4 m
is used.

WARNING: Your machine is set to
operate at 220-240 V. If the mains voltage
supply to your machine is 110 V, connect

between the electrical connection.















 



EN - 11

12

 Upper basket with racks
 Upper spray arm
 Lower basket
 Lower spray arm
 Filters
 Rating plate
 Control panel
 Detergent and rinse-aid dispenser
 Cutlery basket
Salt dispenser
 Upper basket track latch
This system
provides better drying performance your
dishes.

Capacity 12 place
settings
Dimensions
Height
Width
Depth
820-870 (mm)
598 (mm)
570 (mm)
Net weight 32,4 kg
Operating

frequency
220-240V
50 Hz
Total current 10(A)
Total power 1900(W)
Water supply
pressure
Maximum:
1 (Mpa)
Minimum:
0.03 (Mpa)
EN - 12

Some machine components and
packaging consist of recyclable
materials.
Plastics are marked with the
international abbreviations:(>PE<,
>PP<, etc. )
The cardboard parts consist of recycled
paper. They can be put into waste
paper containers for recycling.
Material unsuitable for domestic waste
must be disposed of at recycling
centres.
Contact a relevant recycling centre to
obtain information about disposal of
different materials.

Packaging materials protect your
machine from damage that may occur
during transportation. The packaging
materials are environmentally friendly
as they are recyclable. The use of
recycled material reduces raw material
consumption and therefore decreases
waste production.

We declare that our products meet the
applicable European Directives, Decisions
and Regulations and the requirements
listed in the standards referenced.

The symbol on the product or
on its packaging indicates that
this product may not be treated
as household waste. Instead, it
shall be taken to the applicable
collection point for the recycling
of electrical and electronic
equipment. By ensuring
this product is disposed of correctly,
you will help prevent potential negative
consequences for the environment and
human health, which could otherwise be
caused by inappropriate waste handling of
this product. For more detailed information
about recycling this product, please contact
your local city office, your household waste
disposal service or the shop where the
product was purchased.
EN - 13




• Make sure the electricity and supply

indicated in the installation instructions
for the machine.
• Remove all packaging material inside the
machine.
• Set the water softener level.
• Fill the rinse aid compartment..

For a good washing function, the
dishwasher needs soft, i.e. less calcareous
water. Otherwise, White lime residues
will remain on the dishes and the interior

machine’s washing, drying and shining

the softener system, the ions forming the
hardness are removed from the water and
the water reaches the softness required to
obtain the best washing result. Depending

water, these ions that harden the water
accumulate rapidly inside the softener
system. Therefore, the softener system
has to be refreshed so that it operates with
the same performance also during the next
wash. For this purpose, dishwasher salt is
used.
Machine can only be used by special
dishwasher salt to soften the water. Do not
use any small grained or powdered type
of salts which can easily soluble. Using
any other type of salt can damage your
machine.

To add softener salt, open the salt
compartment cap by turning it counter
clockwise. 
compartment with 1 kg salt and water 

using a funnel 
Replace the cap and close it. After every
20-30 Cycles add salt into your machine

3 4
1 2




use in dishwashers.
When you start your dishwasher, the salt

put the softener salt in prior to starting your
machine.

do not start the machine immediately, run
a short washing program to protect your
machine against corrosion.
EN - 14




   

1
2
3
4
5
6
1
minute
1
second
1
minute
 The factory hardness level setting is “3”. If the water is well water or has a hardness


    
1 0-5 0-9 0-6 P1-9h LEDs are on.
2 6-11 10-20 7-14 P2-9h LEDs are on.
3 12-17 21-30 15-21 
4 18-22 31-40 22-28 3h-9h LEDs are on.
5 23-31 41-55 29-39 6h-9h LEDs are on.
6 32-50 56-90 40-63 P1-6h-9h LEDs are on.

The dishwasher is equipped with a water softener which reduces the hardness in the

company or use a test strip (if available).


Open the door of the machine.
Turn on the machine, and press the Programme button as soon as the machine is
turned on.
Hold down the Programme button until all leds blink once.
The machine will display the last setting.
Set the level by pressing the Programme button.
Switch off the machine to save the setting.


for domestic dishwashers. Keep your
detergents in cool, dry places out of reach
of children.
Add the proper detergent for the selected
program to ensure the best performance.
The amount of detergent needed depends
on the cycle, load size, and soil level of
dishes.

compartment more than required; otherwise
you can see whitish streaks or bluish layers
on glass and dishes and may cause glass
corrosion. Continued use of too much
detergent may cause machine damage.
Using little detergent can result in
poor cleaning and you can see whitish
streaksin hard water. See the detergent
manufacturers instructions for a further
information.

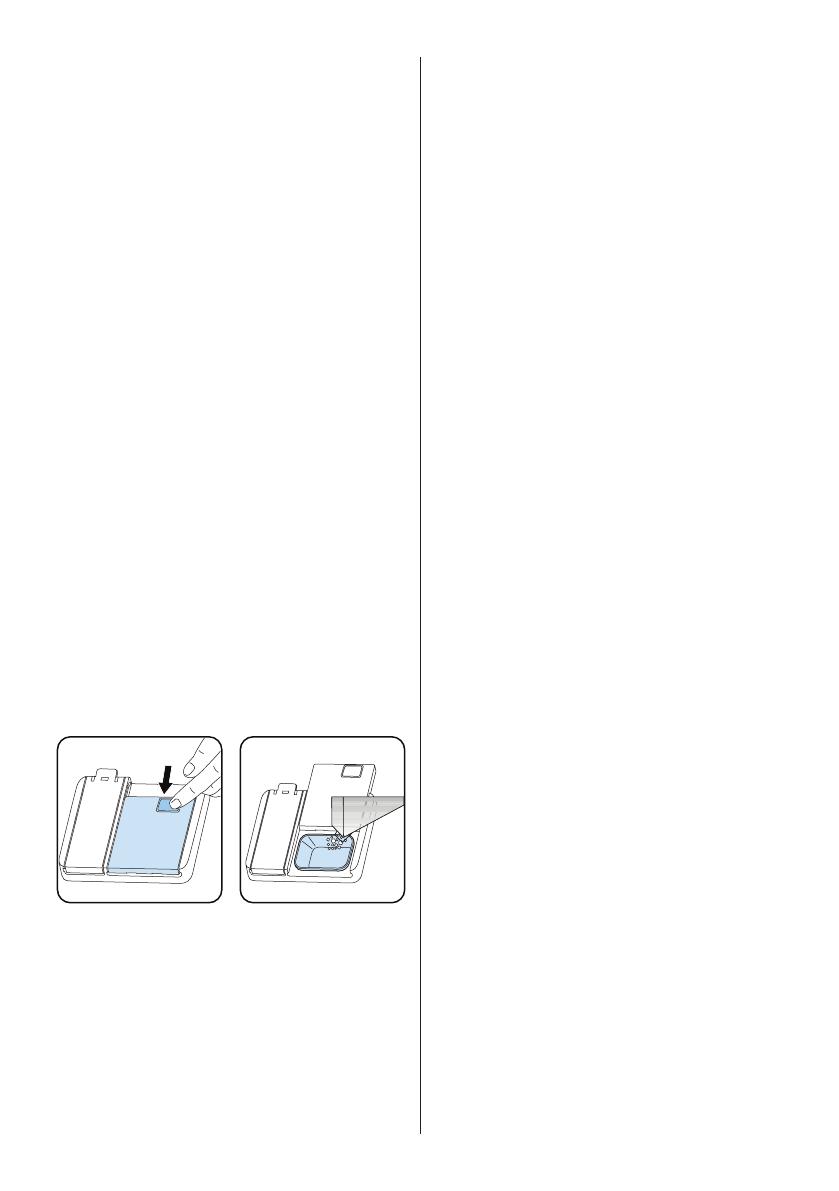
Push the latch to open the dispenser and
pour in the detergent. Close the lid and
press it until it locks in place. The dispenser

each programme. If the dishes are heavily
soiled, place additional detergent in the pre-
wash detergent chamber.
DETERGENT

These products should be used according
to the manufacturers instructions.
Never put combined detergents into the
interior section or the cutlery basket.
Combined detergents contain not only
the detergent but also rinse-aid, salt
replacement substances and additional
components depending on the combination.
We recommend you do not use combined
detergents in short programmes.
Please use powder detergents in such
programmes.
If you encounter problems when using
combined detergents, please contact the
detergent manufacturer.
When you stop using combined detergents,
make sure that water hardness and rinse
aid settings are set to the correct level.

The rinse aid helps to dry the dishes without
streaks and stains. Rinse-aid is required for
stain-free utensils and clear glasses. The
rinse aid is automatically released during
the hot rinse phase. If rinse aid dosage
setting set too low, whitish stains remains
on dishes and dishes do not dry and
washed clean. If rinse aid dosage setting
set too height, you can see bluish layers on
glass and dishes.


the rinse-aid compartment cap. Fill the
compartment with rinse aid to the MAX level
and then close the cap. Be careful not to

up any spills.


Open the door of the machine.
Turn on the machine, and press the
Programme button as soon as the
machine is turned on.
Hold down the Programme button until
all leds blink twice. Rinse aid setting
follows water hardness setting.
The machine will display the last setting.
Change the level by pressing the
programme button.
Switch off the machine to save the
setting.
EN - 15
The factory rinse aid level setting is “4”.
If the dishes are not drying properly or are
spotted, increase the level. If blue stains
form on your dishes, decrease the level.
  
1 Rinse-aid not
dispensed
P1-9h LEDs are on
2 1 dose is
dispensed
P2-9h LEDs are on
3 2 doses are
dispensed

4 3 doses
dispensed
3h-9h LEDs are on
5 4 doses
dispensed
6h-9h LEDs are on
EN - 16
EN - 17

For best results, follow these loading
guidelines.
Loading the household dishwasher up to the
capacity indicated by the manufacturer will
contribute to energy and water savings.
Manual pre-rinsing of tableware items leads
to increased water and energy consumption
and is not recommended You can place
cups, glasses, stemware, small plates,
bowls, etc. in upper basket. Do not lean long
glasses against one another or they cannot
remain steady and may receive damage.
When placing long stem glasses and
goblets, lean them against the basket edge
or rack and not against other items.
Place all containers such as cups, glasses
and pots into the dishwasher with the
opening facing downwards otherwise water
can collect on items.
If there is cutlery basket in machine, you
are recommended to use the cutlery grid
in order to obtain the best result. Place all
large (pots, pans, lids, plates, bowls etc.)
and very dirty items in the lower rack.
Dishes and cutlery should not be placed
above each other.
Take care not to obstruct
the rotation of spray arms.
WARNING:Make sure after loading
the dishes do not prevent opening the
detergent dispenser.

Remove any coarse residue on dishes
before placing the dishes in the machine.
Start the machine with full load.
Do not overload the drawers or place
dishes in the wrong basket.
WARNING: To avoid any possible
injuries, place long-handle and sharp-
pointed knives with their sharp points facing
down or horizontally on the baskets.
EN - 18


Turn the Rail Stop Clips, at the ends of the
rails, to the sides to open them (as shown
in the image below), then pull out and
remove the basket. Change the position
of the wheels, then reinstall the basket
to the rail, making sure to close the Rail
Stop Clips.When the upper basket is in the
higher position, large items such as pans
can be placed on the lower basket.

The height adjustable racks enable glasses
and cups to be placed on or under the
racks. The racks can be adjusted to 2

also be placed on the racks horizontally.
1
2




Incorrect loading can cause poor washing
and drying performance. Please follow the
manufacturers recommendations for a
good performans result.

• Cigarette ashes, candle leftovers, polish,
paint, chemical substances, iron-alloy
materials.
• Forks, spoons and knives with wooden,
bone, ivory or nacrecoated handles;
glued items, items soiled with abrasive,
acidic or base chemicals.
• Temperature-sensitive plastics, copper or
tincoated containers.
• Aluminium and silver objects.
• Some delicate glasses, ornamental
printed porcelains; some crystal items,
adhered cutlery, lead crystal glasses,

• Absorbent items such as sponges or
kitchen rugs.
 In future, purchase
dishwasher-proof kitchenware.

For detailed information required for tests
according to EN normatives and a softcopy
of the manual, please send the model name
and serial number to the following address:

EN - 19
EN - 20

P1 P2 P3 P4 P5 P6
Program
Name: Eco Intensive 65°C Hygiene 70°C Super 50’ Quick 30’ Prewash
Type of Soil:
Standard
program for
normally soiled
daily using
dishes with
reduced energy
and water
consumptions.
Suitable for
heavily soiled
dishes.
Suitable
for heavily
soiled dishes
requiring
hygienic
washing.
Suitable for
normally
soiled daily
dishes
with faster
program.
Suitable for
lightly soiled
dishes and
quick wash.
Suitable
to rinse
dishes that
you plan to
wash later.
Level of Soil: Medium Heavy Heavy Medium Light Light
Amount of
Detergent:
A: 25 cm3
B: 15 cm3”
A AAAA-
Program
Duration
(h:min)
03:25 01:57 02:07 00:50 00:30 00:15
Electiricity
consumption

0.923 1.700 1.900 1.100 0.740 0.020
Water
consumption

12.0 17.2 16.0 12.0 12.4 4.5
The program duration may change according to the amount of dishes, the water
temperature, the ambient temperature and selected additional functions.
Values given for programmes other than the eco programme are indicative only
Eco programme is suitable to clean normally soiled tableware, that for this use, it is the

that it is used to assess compliance with the EU ecodesign legislation.
Washing tableware in a household dishwasher usually consumes less energy and
water in the use phase than hand dishwashing when the household dishwasher is used
according to the manufacturers instructions.
Only use powder detergent for short programs.
Short programs do not include drying.
To assist drying, we recommend slightly opening the door after a cycle is complete.
You can access the product database where the model information is stored by reading
the QR code on the energy label.



  • Page 1 1
  • Page 2 2
  • Page 3 3
  • Page 4 4
  • Page 5 5
  • Page 6 6
  • Page 7 7
  • Page 8 8
  • Page 9 9
  • Page 10 10
  • Page 11 11
  • Page 12 12
  • Page 13 13
  • Page 14 14
  • Page 15 15
  • Page 16 16
  • Page 17 17
  • Page 18 18
  • Page 19 19
  • Page 20 20
  • Page 21 21
  • Page 22 22
  • Page 23 23
  • Page 24 24
  • Page 25 25
  • Page 26 26
  • Page 27 27
  • Page 28 28
  • Page 29 29
  • Page 30 30

Aspes ALVI600 User manual

Category
Dishwashers
Type
User manual
This manual is also suitable for

Ask a question and I''ll find the answer in the document

Finding information in a document is now easier with AI