Page is loading ...

Quadratec® Baja HD Fender Flares
Installation Manual: for 2020-Current Jeep Gladiator (JT) #12510.5231
INSTALLATION PICTURES IN THIS INSTRUCTION SHEET SHOW A FOUR DOOR JLU
WRANGLER. INSTALLATION OF THIS PRODUCT ON A JT GLADIATOR IS EXACTLY THE
SAME.
NOTICE

A FEW WORDS ABOUT PRODUCT SAFETY:
Your Quadratec Baja HD Fender Flares are intended to enhance the utility and enjoyment of your off-road capable
vehicle. Follow safety information and installation recommendations. Throughout these instructions are important
safety information that is generally preceded by one of three signal words indicating the relative risk of injury, property
damage or adverse consequence.
The signal words mean:
A HAZARDOUS SITUATION WHICH, IF NOT AVOIDED, COULD RESULT IN DEATH OR
SERIOUS INJURY. YOU CAN BE KILLED OR SERIOUSLY HURT IF YOU DON'T FOLLOW
INSTRUCTIONS.
CAREFUL ATTENTION IS REQUIRED TO THIS INSTRUCTION OR OPERATION BUT DOES
GENERALLY NOT RELATE TO PERSONAL INJURY. DAMAGE TO YOUR QUADRATEC®
PRODUCT OR OTHER PROPERTY MAY RESULT IF YOU DON'T FOLLOW INSTRUCTIONS.
A HAZARDOUS SITUATION WHICH, IF NOT AVOIDED, COULD RESULT IN A MINOR OR
MODERATE INJURY. YOU CAN BE MODERATELY HURT AND ALSO MAY SUFFER PROPERTY
DAMAGE IF YOU DON'T FOLLOW INSTRUCTIONS.
BEFORE YOU BEGIN INSTALLATION:
Congratulations on your purchase of Quadratec® Fender Flares for your Jeep® Wrangler JT. These custom fit fender
flares have been designed for protection, long life, and great looks. When unpacking, check to make sure all parts are
included and not damaged due to shipping. If any part is missing or broken, please call Customer Service at 800-745-
6037 as soon as possible. Thank you again for your purchase and let’s start the installation process.
READ ALL SAFETY MESSAGES AND ALWAYS WEAR SAFETY GLASSES WHEN WORKING
WITH TOOLS.
THIS PRODUCT IS INSTALLED ON THE SIDE THE VEHICLE AND REQUIRES ACCESS TO THE
WHEEL WELLS. WE RECOMMEND USING A VEHICLE LIFT SUCH AS THOSE FOUND IN MOST
REPAIR SHOPS TO ACCESS THIS PART OF THE VEHICLE. ALWAYS USE CAUTION WHEN
WORKING AROUND YOUR VEHICLE.
WE ALSO RECOMMEND THAT YOU HAVE A HELPER NEARBY AS SOME OF THE STEPS
OUTLINED BELOW WILL BE MUCH EASIER WITH THE HELP OF ANOTHER SET OF HANDS.
IF THERE IS ANY INTERFERENCE, ADJUST THE FENDER FLARES ACCORDINGLY TO MAKE
SURE ALL COMPONENTS ARE NOT TOUCHING. FAILURE TO DO THIS STEP MAY CAUSE
DAMAGE TO THE VEHICLE.
TO REDUCE RISK OF SERIOUS INJURY OR PROPERTY DAMAGE:
READ ALL SAFETY MESSAGES AND UNDERSTAND ALL INSTRUCTIONS AND PROCEDURE
NOTICES BEFORE ATTEMPTING TO INSTALL OR USE THIS PRODUCT.
FENDER FLARES ADD EXTRA PROTECTION ON THE TRAIL, BUT IT CAN NOT GUARANTEE
AGAINST ALL POSSIBLE DAMAGE FROM LARGE OBJECTS YOU MAY ENCOUNTER. ALWAYS
DRIVE WITH RESPECT FOR OBJECTS AND TERRAIN THAT COULD DAMAGE SENSITIVE
PARTS OF THE VEHICLE.
RISK OF EYE INJURY! SAFETY GLASSES MUST BE WORN AT ALL TIMES WHILE INSTALLING
OR MAINTAINING THIS PRODUCT. TORQUE AND RECHECK FASTENERS AFTER 250 MILES
AND FREQUENTLY THEREAFTER. DO NOT USE IF DAMAGED.
NOTICE
NOTICE
NOTICE
NOTICE
2

G.
"U" Clip (6) Truss Screw (6) Plastic Retainer (44)
H.
3
A.
B.
E.
C.
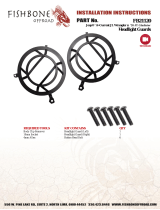
KIT CONTENT LIST:
A. Front Flare - L (1)
B. Front Flare - R (1)
C.Front Bracket - L (1)
D. Front Bracket - R (1)
E. Rear Flare - L (1)
F. Rear Flare - R (1)
G. "U" Clip (6)
H. Truss Screw (6)
I. Plastic Retainer (44)
REQUIRED TOOLS:
Safety Glasses
Gloves
10mm Socket
T-30 TORX Driver
Ratchet
Phillips Screwdriver
Plastic Pry Tool
Awl
Cut-off Wheel or Dremel or Snips
Sanding Disc or Sandpaper
PARTS & REQUIRED TOOLS
F.
D.
I.

4
Put on safety glasses and gloves. On front factory flare, use an awl to pop the eight factory retainers in center of each
retainer to disengage. Arrows point to the location of factory retainers.
Using a plastic pry tool, remove each retainer popped in Step 1 and discard. To remove wheel well liner, first use a pry
tool to remove 6 factory retainers from liner as shown by the arrows and discard. (Liner is shown removed from wheel
well to make it easier to view.)
STEP 1 - FACTORY FRONT FLARE REMOVAL
STEP 2 - FACTORY FRONT FLARE AND WHEEL WELL REMOVAL
FRONT BUMPER

5
Using a 10mm socket, remove the three factory bolts from locations marked by arrows. Remove and discard wheel
well liner. Remove two bolts from the light housing but retain those for use in Step 17.
Disconnect the light wire harness (in the circle) by pushing the red tab out to unlock. Push in the release tab and pull
the harness out. To remove lower bracket, use pliers behind bracket and sheet metal to disengage two white factory
retainers and discard.
STEP 4 - FACTORY FRONT FLARE REMOVAL
FRONT BUMPER
STEP 3 - FACTORY FRONT FLARE REMOVAL

6
Disengage the nine white factory retainers that are holding the factory flare onto vehicle. These are spaced along the
wheel well. All but one bracket is accessible by pliers. If you wish to preserve the paint finish (which will be covered by
flare), use a plastic pry tool to help remove retainers. Pull factory flare from vehicle. Pry any white retainers from the
sheet metal and discard. These holes must be clear for installation. Retain factory flare to remove light housing in the
next steps.
Turn the removed flare on its back on a work surface. Using a Phillips screwdriver, remove the factory fastener from
the light housing as shown. Using a T-30 Torx driver, remove the four factory fasteners as shown. Retain ALL factory
fasteners as most will be reused in Steps 9 and 13.
STEP 5 - FACTORY FRONT FLARE REMOVAL
STEP 6 - LIGHT HOUSING REMOVAL

7
Lift the housing flap up to remove four more fasteners underneath it as shown using the T-30 Torx driver. Remove the
wiring harness from light housing routing using your hands or pliers. Do not cut the electrical tape. Gently pry from
contact points. Disconnect light bulb connector. Remove the light from the factory flare.
Slide the side marker light from the housing. Light is taped to the factory flare. Gently pry the housing from flare to
disengage tape.
STEP 7 - LIGHT HOUSING REMOVAL
STEP 8 - LIGHT HOUSING REMOVAL

8
Reinstall the side marker light using the short factory
specialty plastic fastener (removed at Step 6 as shown).
Using a cutoff wheel or saw, cut the four plastic tabs on light housing as shown. The yellow line denotes the
locations to cut. The goal is to remove these tabs parallel with contours of light housing as cleanly as possible. Take
precaustions to avoid cutting away too much material from light housing. Use the next pictures to help visualize where
to make cuts. Do not cut into the sealed clear lens or housing.
STEP 9 - LIGHT HOUSING REMOVAL
STEP 10 - LIGHT HOUSING MODIFICATION
READ ALL SAFETY WARNINGS, INSTRUCTIONS, ILLUSTRATIONS AND SPECIFICATOINS
PROVIDED WITH YOUR POWER TOOL. FAILURE TO FOLLOW INSTRUCTIONS PROVIDED
WITH YOUR POWER TOOL MAY RESULT IN ELECTRIC SHOCK, FIRE AND/OR SERIOUS
INJURY.
SIDE VIEW
FRONT VIEW

9
Using a sanding disc or sandpaper, sand down any remaining tab vestiges. Tab vestiges must be as flush as possible
for proper installation.
Install a supplied “U” Clip over hole in bottom bracket of modified light housing, centering the hole in clip over the hole
in the bracket. Reconnect harness and/or light bulbs if you removed them. The wire harness will need to be routed in
the groove in the housing and ultimately to the connector in the engine compartment when installing new flares.
STEP 11 - LIGHT HOUSING MODIFICATION
STEP 12 - LIGHT HOUSING REASSEMBLY

10
Assemble the modified light housing with supplied front bracket. Start three factory fasteners (removed at Step 6)
through supplied Front Bracket and into modified light housing, but do not tighten. Using an awl, make sure “U” clip
installed previously is still centered over hole in bracket.
Start a supplied Truss screw into clip. Screws will not be
tightened until after the light housing is installed in new
flare.
STEP 13 - LIGHT HOUSING REASSEMBLY
STEP 14 - LIGHT HOUSING REASSEMBLY

11
Slide the two supplied “U” clips onto the front flare inner bracket as shown. Holding the flare on the fender, install
two supplied plastic retainers through the flare holes located at the arrows. Push each retainer in to engage. The
remaining plastic retainers will be installed in later steps.
Holding the flare on the fender, install two supplied plastic retainers through the holes at bottom rear of flare, under
flare corner bracket feature, and into holes in fender. Push each retainer in to engage. Fit assembled light housing
bracket into inside of flare, as shown.
STEP 15 - FRONT FLARE INSTALLATION
STEP 16 - FRONT FLARE INSTALLATION

12
Using a 10mm socket, start two factory bolts (removed at Step 3) through sheet metal brackets and into t-nuts
present on light housing bracket. Do not tighten.
Using a Phillips screwdriver, start two supplied Truss screws through clip holes in the bracket and into the flare inner
structure. Do not tighten. Check fit of light inside light pocket and adjust screws incrementally as needed to ensure
even spacing between light and flare. Slowly tighten ALL screws and bolts in light housing and bracket. It is intentional
that parts of the light lenses will be obscured by the flare.
STEP 17 - FRONT FLARE INSTALLATION
STEP 18 - FRONT FLARE INSTALLATION

13
Route wiring harness from light housing over the first of the metal fender brackets and toward the channel molded
into flare. Tuck wiring harness up into channel in flare and route into engine compartment (connector is located near
washer fluid reservoir). Connect wiring harness to connector.
Install the seven remaining plastic fasteners. Repeat instructions to this point for the other side of the vehicle.
STEP 19 - FRONT FLARE INSTALLATION
STEP 20 - FRONT FLARE INSTALLATION
On the rear factory flare, use an awl to pop eight factory retainers in center of each retainer to disengage. Arrows
point to factory retainer locations. Note: The images in this section are of a 4 Door JLU Wrangler. installation on
your JT Gladiator is exactly the same.
STEP 21 - REAR FACTORY FLARE REMOVAL

14
Using a plastic pry tool, pry each plastic retainer from vehicle and discard. To remove wheel well liner, first use a pry
tool to remove four factory retainers from outer edge of wheel well liner and discard. The removed liner shows the
locations of the four fasteners.
STEP 22 - REAR FACTORY FLARE REMOVAL
Using a pry tool, remove four more factory retainers from liner area behind wheel and discard retainers. Remove wheel
well liner. Use pliers and pry tool to disengage the twelve white factory retainers. Unlike the front flare retainers, the
rear retainers cannot be released from behind. Force is required to remove the factory flare and some retainers will
break apart. Discard these factory retainers.
STEP 23 - REAR FACTORY FLARE AND WHEEL WELL LINER REMOVAL

15
Pull factory flare from vehicle. Pry any white retainers from sheet metal and discard – holes must be clear for
installation. Discard factory flare. While holding the flare on the fender, install the eleven supplied plastic retainers
through holes in flare and into holes in fender. Push each retainer to engage. NOTE: One plastic fastener will be placed
in the factory hole at the lower front
without
engaging the flare.
STEP 24 - REAR FACTORY FLARE REMOVAL
Plastic Fastener locations. NOTE: Fastener in lower front goes directly into sheet metal. Repeat instructions from Step
21 to this point for the other side of the vehicle.

Your Quadratec® branded accessories are covered by the following Limited Warranty provided exclusively by
Quadratec, Inc., 1028 Saunders Lane, West Chester PA 19380.
This Limited Warranty is the only warranty made in connection with your purchase. Quadratec neither assumes nor
authorizes any vendor, retailer or other person or entity to assume for it any other obligation or liability in connection
with this product or Limited Warranty. This Limited Warranty does not apply and is not cumulative to any accessory or
part distributed by Quadratec for which the Manufacturer provides a separate written warranty.
What is Covered:
Subject to the terms, exclusions and limitations herein and with respect only to Quadratec branded accessories first
sold in the United States, Quadratec warrants to the initial retail purchaser only that your Quadratec accessory shall be
free of defects in material and workmanship: for a period of three (3) years from date of retail purchase.
This Limited Warranty is not assignable and shall terminate upon sale of the vehicle upon which the Quadratec
accessory is installed or other transfer to third persons.
All other warranties are hereby disclaimed, except to the extent prohibited by applicable law in which case any implied
warranty of merchantability or fitness for a particular purpose on this product is limited to three (3) years from date
of initial retail sale. Quadratec reserves the rights to: (a.) require invoice or other proof your accessory is within the
terms of this Limited Warranty as a condition of warranty service and, (b.) make future revisions to this product and
Limited Warranty without prior notice or obligation to upgrade your product.
What is Not Covered:
Your Quadratec Limited Warranty does not cover products or parts Quadratec determines to have been damaged by
or subjected to: (a.) installation damage, alteration, modification, combination with other parts, failure to maintain or
improper repair or service, (b.) normal wear & tear, cosmetic damage or damage from moisture or water immersion,
(c.) Acts of God, accidents, misuse, negligence, inadequate mounting or impact with vehicle(s), obstacles or other
aspects of the environment, (d.) theft, vandalism or other intentional damage.
Remedy Limited to Repair/Replacement:
The exclusive remedy provided hereunder shall, upon Quadratec inspection and at our option, be either repair or
replacement of product or parts (new or refurbished) covered under this Limited Warranty. Customers requesting
warranty consideration should first contact Quadratec to obtain a RGA number (610-701-3336). All labor, removal,
shipping and installation costs are customer’s responsibility.
Other Limitations - Exclusion of Damages - Your Rights Under State Law:
In consideration of the purchase price paid, neither Quadratec nor any independent Quadratec distributor/licensee are
responsible for any time loss, rental costs, or for any incidental, consequential, punitive or other damages you may
have or incur in connection with any part or product purchased. Your exclusive remedy hereunder for covered parts is
repair/replacement as described above.
This Limited Warranty gives you specific rights. You may also have other rights that vary from state to state.
For example, some states do not allow limitations of how long an implied warranty lasts and /or do not allow the
exclusion or limitation of incidental or consequential damages, so the limitations and exclusions herein may not apply
to you.
©Quadratec, Inc. 2021. All Rights Reserved.
A4 Version 1/4/2022
Instructions Part #12999.3218
Quadratec® Exclusive Three Year Limited Warranty
/