Sheffield PLA0520
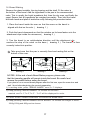
Below you will find brief product information for Sheffield PLA0520. This versatile microwave oven offers a range of cooking options to suit your needs. With a generous 30L capacity, you can cook large meals or family-sized portions with ease. The 900W microwave power ensures fast and efficient cooking, while the 1100W grill function allows you to brown and crisp your food to perfection. Additionally, the 2300W convection function provides even heat distribution for thorough cooking and baking.
Sheffield PLA0520
Below you will find brief product information for Sheffield PLA0520. This versatile microwave oven offers a range of cooking options to suit your needs. With a generous 30L capacity, you can cook large meals or family-sized portions with ease. The 900W microwave power ensures fast and efficient cooking, while the 1100W grill function allows you to brown and crisp your food to perfection. Additionally, the 2300W convection function provides even heat distribution for thorough cooking and baking.


-
 1
1
-
 2
2
-
 3
3
-
 4
4
-
 5
5
-
 6
6
-
 7
7
-
 8
8
-
 9
9
-
 10
10
-
 11
11
-
 12
12
-
 13
13
-
 14
14
-
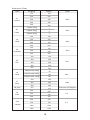 15
15
-
 16
16
-
 17
17
-
 18
18
-
 19
19
-
 20
20
-
 21
21


Sheffield PLA0520
Below you will find brief product information for Sheffield PLA0520. This versatile microwave oven offers a range of cooking options to suit your needs. With a generous 30L capacity, you can cook large meals or family-sized portions with ease. The 900W microwave power ensures fast and efficient cooking, while the 1100W grill function allows you to brown and crisp your food to perfection. Additionally, the 2300W convection function provides even heat distribution for thorough cooking and baking.
Ask a question and I''ll find the answer in the document
Finding information in a document is now easier with AI
Other documents
-
Indesit F102858 User manual
-
-
Whirlpool MWI 222.2 X UK User guide
-
RAMTONS RM/327 User manual
-
De'Longhi D90N30ESLRIII-XC User manual
-
 Prima Appliance Care LCTM 25 User manual
-
Whirlpool AMW 630/1 SL User guide
-
Candy CMBG 02S Owner's manual
-
Midea MMWBI25SS User manual
-
Neff HNF7004 Owner's manual
