VOLTCRAFT Gamma Check Pro Operating Instructions Manual
- Category
- Measuring & layout tools
- Type
- Operating Instructions Manual

VERSION 10/15
GEIGERZÄHLER „Gamma Check Pro“
BEDIENUNGSANLEITUNG SEITE 2 - 29
GEIGER COUNTER „Gamma Check Pro“
OPERATING INSTRUCTIONS PAGE 30 - 57
COMPTEUR GEIGER « Gamma Check Pro »
NOTICE D’EMPLOI PAGE 58 - 85
GEIGERTELLER „Gamma Check Pro“
GEBRUIKSAANWIJZING PAGINA 86 - 113
Best.-Nr. / Item No. /
N° de commande / Bestelnr.:
1377508
Page is loading ...
Page is loading ...
Page is loading ...
Page is loading ...
Page is loading ...
Page is loading ...
Page is loading ...
Page is loading ...
Page is loading ...
Page is loading ...
Page is loading ...
Page is loading ...
Page is loading ...
Page is loading ...
Page is loading ...
Page is loading ...
Page is loading ...
Page is loading ...
Page is loading ...
Page is loading ...
Page is loading ...
Page is loading ...
Page is loading ...
Page is loading ...
Page is loading ...
Page is loading ...
Page is loading ...
Page is loading ...

30
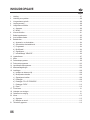
TABLE OF CONTENTS
Page
1. Introduction ........................................................................................................................................................31
2. Explanation of Symbols .....................................................................................................................................32
3. Intended Use .....................................................................................................................................................32
4. Scope of Delivery ...............................................................................................................................................32
5. Safety Notes ......................................................................................................................................................33
a) General ........................................................................................................................................................33
b) Operation .....................................................................................................................................................34
6. Rechargeable Battery Notes ..............................................................................................................................35
7. Operating Elements ...........................................................................................................................................36
8. Inserting/Charging the Rechargeable Battery ....................................................................................................37
9. Basic Functions .................................................................................................................................................38
a) Switching the Device On/Off ........................................................................................................................38
b) Automatic Deactivation Function .................................................................................................................38
c) Programmes ................................................................................................................................................38
d) Operating Modes .........................................................................................................................................38
e) Signal Encoders ..........................................................................................................................................39
f) Display "SENSOR" ......................................................................................................................................40
10. Commissioning ..................................................................................................................................................41
11. Menu ..................................................................................................................................................................42
12. Dosimeter Programme .......................................................................................................................................43
13. Pulse Counter Programme ................................................................................................................................46
14. Pulse Rate Programme .....................................................................................................................................48
15. Measured Value Storage ...................................................................................................................................50
16. Settings ..............................................................................................................................................................52
a) Setting Time and Date .................................................................................................................................52
b) Setting Operating Mode ...............................................................................................................................53
c) Setting the Signal Encoder ..........................................................................................................................53
d) Data Logger .................................................................................................................................................53
e) Data Logger "FILLUP"/"ENDLESS" .............................................................................................................54
f) Data Logger "DATA" ....................................................................................................................................54
g) Reset ...........................................................................................................................................................54
17. PC-Software ......................................................................................................................................................55
18. Troubleshooting .................................................................................................................................................55
19. Maintenance and Cleaning ................................................................................................................................55
20. Disposal .............................................................................................................................................................56
a) General ........................................................................................................................................................56
b) Batteries and Rechargeable Batteries .........................................................................................................56
21. Technical Data ...................................................................................................................................................57

31
1. INTRODUCTION
Dear Customer,
Thank you for making the excellent decision to purchase a Voltcraft
®
product.
Voltcraft
®
This name stands for above-average quality products in the areas of measuring, charging and grid technol-
ogy, characterised by technical competence, extraordinary performance and permanent innovation.
Whether you are an ambitious electronics enthusiasts or a professional user - a product of the Voltcraft
®
brand
family will provide you with the best solution for even the most sophisticated of tasks. Special features: We offer
the sophisticated technology and reliable quality of our Voltcraft® products at a near-unbeatable price/performance
ratio. We lay the groundwork for long, good and successful cooperation.
Enjoy your new Voltcraft
®
product!
All company names and product names are trademarks of their respective owners. All rights reserved.
If there are any technical questions, please contact:
International: www.conrad.com/contact
United Kingdom: www.conrad-electronic.co.uk/contact

32
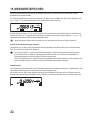
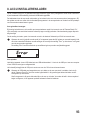
2. EXPLANATION OF SYMBOLS
This symbol is used when your health is at risk, e.g. from an electric shock.
An exclamation mark in a triangle indicates important notes in these operating instructions that must be
strictly observed.
The "arrow" symbol indicates that special advice and notes on operation are provided.
3. INTENDED USE
The Geiger counter "Gamma Check Pro" is used for quick indication of radioactive contamination. The device
detects the radiation dosage to permit an estimation of possible radioactive contamination of foods, devices and
building materials as compared to the natural environmental radiation.
Generally, observe that the device is correctly aligned with the sample to be measured without touching it.
To prevent particle contamination of the device itself, a protection sleeve (poly bag or similar) may be needed.
The device is supplied with voltage via a replaceable rechargeable lithium battery.
Read the operating instructions precisely and keep them. Only pass the product on to any third parties together with
the operating instructions. The safety notes and all other information in these operating instructions always have to
be observed!
Any use other than that described above can damage the product and may involve additional risks such as short
circuit, re, electric shock, etc.
This product complies with the statutory national and European requirements.
4. SCOPE OF DELIVERY
• Geiger counter "Gamma Check Pro"
• Lithium rechargeable battery
• USB cable
• Operating instructions

33
5. SAFETY NOTES
The guarantee/warranty will expire if damage is incurred resulting from non-compliance with
these operating instructions. We do not assume any liability for consequential damage!
We do not assume any liability for damage to property or personal injury caused by improper use
or the failure to observe the safety instructions! In such cases the warranty/guarantee is voided.
Use the required care when handling radioactivity and comply with the radiation protection regu-
lations.
For more information on the subject, see, e.g.: http://www.bmu.de/strahlenschutz or comparable
websites of the authorities of your country.
The counting tube in the device works with high voltage. Improper use of the device or opening of
the housing may cause danger to life from electric shock!
The device must not be used as a full person dosimeter! It only totals up the arising dosage out-
put per time into a total dosage in dosimeter operation; this does not comply with the calculation
HP (0.07) or HP (10)! The device is not suitable for dosage output measurement in tissues, people
or animals!
a) General Information
• For safety and licensing (CE) reasons, unauthorised conversion and/or modications to the product are
not permitted.
• The product is not a toy and must be kept out of the reach of children!
• Maintenance, adjustments and repair work may only be carried out by a specialist/specialised
workshop. The device contains no parts that require servicing or adjusting by you. The counting tube
working with high voltage poses danger to life from electric shock!
• In schools, training centres, hobby and self-help workshops, the use of the product must be supervised
by responsible trained personnel.
• In commercial institutions, the accident prevention regulations of the Employer's Liability Insurance
Associations for Electrical Systems and Operating Materials are to be observed.
• Do not leave packaging material lying around carelessly. It might become a dangerous toy for children!
• Handle the product with care. It can be damaged by impact, blows or when dropped even from a low
height.
• If you are not sure about the correct operation or if questions arise which are not covered by the operat-
ing instructions, please do not hesitate to contact us or another specialist.

34
b) Operation
• The product must not become damp or wet. Avoid direct sun irradiation, strong heat or cold. Keep the
product away from dust and dirt. Do not subject the product to heavy mechanical stress.
• Avoid operation in direct proximity of strong magnetic or electromagnetic elds, transmitter aerials or
HF generators. This can affect the control electronics.
• For voltage/power supply, the device must only be operated via the enclosed lithium battery.
• Only operate the product in a moderate climate, never in a tropical climate. For more information on
acceptable environmental conditions, see the chapter "Technical Data".
• Never operate the device immediately after it was taken from a cold room to a warm room. The result-
ing condensation may lead to malfunctions or damage!
Let the product reach room temperature before taking it into operation again. This may take several
hours!
• Do not use the product inside of rooms or in bad ambient conditions where ammable gases, vapours
or explosive dust may be or are present! There is a danger of explosion!
• If it can be assumed that safe operation is no longer possible, the device must be turned off and
precautions are to be taken to ensure that it is not used unintentionally.
Do not use the product any more after this, but take it to a specialised workshop or dispose of it in an
environmentally compatible manner.
• It can be assumed that operation without danger is no longer possible if the device has any visible dam-
age, the device no longer works, after extended storage under unsuitable conditions, or after difcult
transport conditions.
• Keep the entire product at a dry, clean site that is not accessible to children.

35
6. RECHARGEABLE BATTERY NOTES
The product is operated via a lithium battery (for type, see chapter "Technical Data"). Please note the
following information and notes:
• The rechargeable battery is not a toy and does not belong in the hands of children. Always keep
rechargeable battery out of the reach of children.
• Do not leave the rechargeable battery lying around openly. There is a risk of it being swallowed by
children or pets. If swallowed, consult a doctor immediately.
• The rechargeable battery must not become damp or wet.
• Never damage the exterior cover of a battery. There is a risk of re and explosion!
• The rechargeable battery must never be short-circuited, disassembled or thrown into re. There is a
danger of explosion!
• Only the enclosed rechargeable battery (or a rechargeable battery of the same build) must be charged
in the product. When charging another rechargeable battery, there is a risk of re and explosion!
• Charge a at rechargeable battery as soon as possible, since a at rechargeable battery may be deep-
discharged and thus rendered useless. Otherwise, a deep-discharged rechargeable battery may leak.
• Never charge the battery unobserved.
• The rechargeable battery has a limited service life. If you nd that the operating duration of the fully
charged rechargeable battery has become very short, replace the at rechargeable battery with a new
one of the same build. Dispose of the old rechargeable battery in an environmentally compatible man-
ner; see chapter "Disposal".
• Leaking or damaged batteries/rechargeable batteries can cause chemical burns to skin when touched
without the use of adequate protective gloves.
• Liquids leaking from the rechargeable battery are chemically highly aggressive. Objects or surfaces that
come into contact with them may take severe damage. Keep the entire product at a suitable site that is
not accessible to children and pets.
• Always observe the correct polarity (plus/+ and minus/-) when inserting the rechargeable battery.

36
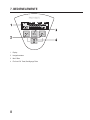
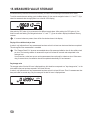
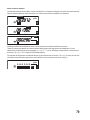
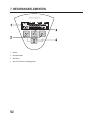
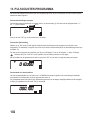
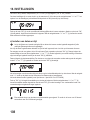
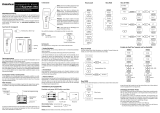
7. OPERATING ELEMENTS
1 Display
2 Navigation buttons
3 Menu button
4 On/off/OK button, conrmation button

37
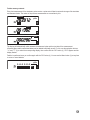
8. INSERTING/CHARGING THE RECHARGEABLE BATTERY
For operation of the "Gamma Check Pro", a lithium rechargeable battery (type 18500) is enclosed. This is automati-
cally charged if there is a USB connection present via the mini USB cable.
The charge condition of the rechargeable battery is displayed in the lower right of the display in the form of a
rechargeable battery symbol. When charging the rechargeable battery, the individual segments in the rechargeable
battery symbol will ll up from the bottom upwards to indicate charging or the current condition.
Inserting/Charging the Rechargeable Battery:
At delivery, the rechargeable battery is already in the battery compartment of the "Gamma Check Pro" for reasons of
transport protection. It is secured against premature discharge or deep discharge with a small plastic insulation strip.
To start operation, open the battery compartment, then pull out the plastic insulation strip. Close the battery compart-
ment again.
If the rechargeable battery is too weak in operation (or the device determines more than 600 pulses per
second), this leads to automatic interruption of all measurements and the message "Error" is output. In this
case, the rechargeable battery must be charged.
The "Error" message can be removed/reset with any button.
Charging the Rechargeable Battery:
Connect the device to a USB mains adapter via a USB cable. You can also use the USB port of your computer or a
USB hub with a separate mains adapter for this.
It is important that the USB port can provide a current of 500 mA.
When the USB cable has been connected for charging and the rechargeable battery is discharged very
strongly, it is possible that the "Gamma Check Pro" cannot be switched on. In this case, only the frame of the
rechargeable battery symbol will still be ashing in the display.
In this case, give the device enough time to charge the rechargeable battery. Once the bars in the recharge-
able battery symbol start ashing, the device can be operated again normally.

38
9. BASIC FUNCTIONS
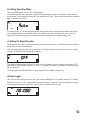
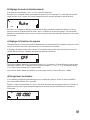
a) Switching the Device On/Off
To switch the device on, push any key. The display shows the starting screen.
You need to enter the date and time at rst commissioning (and if the rechargeable battery is not charged).
To deactivate the device, keep the "OK" button (4) pushed for approx. 2 seconds until the display goes out. The
internal clock will continue to run in the background; the date remains current as well.
b) Automatic Deactivation Function
When all selected measurements have been completed, the device will switch off automatically. This function
protects the rechargeable battery and extends the operating time.
To reactivate the device after automatic shut-down, push any key briey. All determined values of the preceding
measurements are in the measured value storage and can be requested at any time.
c) Programmes
The "Gamma Check Pro" has three different programmes:
• Dosimeter: Determination of the radiation dose across a selectable period (in "Sv")
• Pulse counter: Determination of all pulses within an adjustable time
• Pulse rate: Display of the average pulses per second
The measuring duration must be entered for each programme. The same applies to the limit that will trip an
alarm.
These three programmes can also run at the same time, each with different measuring durations and dif-
ferent limits. When all programmes are completed, the device switches off automatically, no matter which
operating mode ("Auto" or "On", see next section) has been chosen.
d) Operating Modes
The device can work in the operating modes "Auto" and "On". In the delivery condition and after resetting of the
device, the operating mode "Auto" is always active.
• Operating mode "Auto"
In this operating mode, the display is switched off automatically after approx. 30 seconds. However, the device
continues to work in the background, i.e. all started measurements are continued. To reactivate the display, just
push any key briey.
• Operating mode "On"
Here, the display is always activated and will not switch off on its own.

39
When the USB cable is connected and data exchange is possible, the display will show the USB symbol.
When no measurement is active, the display shows "IDLE". This corresponds to the operating mode "On".
The selection of the operating mode "Auto" or "On" is possible here, but will only become active after the
USB connection has been disconnected.
The USB symbol will not appear in spite of a connection being present when the device is off or the charge
condition of the rechargeable battery is too low.
The charge display is always visible when the USB connection is present.
e) Signal Encoders
The "Gamma Check Pro" has an acoustic alarm. It serves to signal exceeded thresholds, pulses (ticks), to conrm
when a button is pushed and to report the start or end of a measurement.
The integrated signal encoder can be switched on and off in the menu "Settings". The signal encoder is deactivated
at delivery.
When the signal encoder is switched off, no pulses or pushes of a button will be acoustically conrmed.
Alarms are, however, always output for reasons of safety, and cannot be switched off!
When the signal encoder has been switched on, the device will emit a brief "tick" sound at every count impulse. It
will also conrm every push of a button. Activation of this function will increase the power intake, while the operating
time reduces.
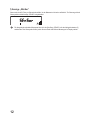
Signal output
Switching on the device Short sound
Switching off the device 2x short sound
Push of a button Short sound
Rechargeable battery weak Long sound, repeat every 5 minutes, also in the deactivated condition
Start measurement 2x long sound
Cancel measurement Sound for 1 second
Measurement ended Sound for 1 second
Pulse recognised Very short "tick" sound
Limit exceeded 3x short sound, is repeated 3x (repetition every 15 minutes, until conrmation
by any key)

40
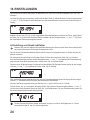
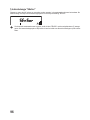
f) Display "SEnSor"
If more than 400 pulses per second arrive, the measured value is no longer reliable. For warning, a warning symbol
and the display "SEnSOr" are displayed.
For output of the current measured values, the text "SEnSOr" can be concealed with the navigation buttons
(2). The warning symbol, however, remains in the display until all active measurements are completed.
!

41
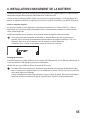
10. COMMISSIONING
As already described in chapter 8, the rechargeable battery is inserted in the battery compartment at delivery and
secured against premature discharge with a plastic insulation strip. When you remove the plastic insulation strip, the
device comes on.
The device performs a restart then. The same happens when the rechargeable battery has been completely
discharged and was then charged or replaced.
During a restart, all saved data are deleted; in short: all segments and the version of the rmware are
displayed.
Then the device will ask you to enter date and time anew.
You now have about 20 seconds for each value to change it with the navigation buttons "r" and "s" (2) and
conrm it with the "OK" button (4). If no button is pushed within 20 seconds, the input will be interrupted and
the device will display the operating mode "Auto".
Inputs that are not conrmed with the "OK" button (4) will generally not be assumed!
Proceed as follows:
• At initial commissioning, e.g. the date "01.01.15" is displayed; this means 1 January 2015. The day ashes;
change it with the navigation buttons "r" and "s" (2). Keep the respective button pressed for quick adjustment.
• Conrm the input of the day with the "OK" button (4); the month now ashes. Set it with the navigation buttons
"r" and "s" (2).
• Conrm the input of the month with the "OK" button (4); the year now ashes. Set it with the navigation buttons
"r" and "s" (2) (2015 to 2099 can be set).
Wrong inputs of the date are corrected automatically; e.g. if 31 February is entered, it is automatically changed
to 28 or 29 February.
• After input of the date, the time must be entered in 24 hour format. The setting is made as described for the date,
using the navigation buttons "r“ and "s" (2); conrm each input briey with the "OK" button (4).
• After setting the time, the operating display "Auto" will appear.
Date and time can be set subsequently in the menu. The device switches automatically between summer and
winter time; furthermore, the leap years until 2099 are pre-programmed.
12

42
11. MENU
If there is no measurement, the device will show the mode "Auto" or "On".
In the operating mode "Auto", the device is switched off automatically after approx. 30 seconds. If measurements
are conducted, only the display will switch off in the operating mode "Auto". Pushing any button activates the display
again or switches the device on.
In operating mode "On", the device and the display remains permanently on during a measurement. After comple-
tion of all measurements, the device will switch to the operating mode "Auto" and switch off to save power. The
results of the last measurements are in the measured value storage and can be requested at any time.
To activate the menu, push the Menu button (3). Then you can call the submenus individually with the navigation
buttons "r" and "s" (2).
The main menu is structured in the following submenus:
• Dosimeter
• Pulse counter
• Pulse rate
• Measured value storage
• Settings (date, time, operating mode, signal encoder)
• Data logger (measured value storage with selectable scanning rate)
• Reset (to reset to the factory settings)
When you have called the desired submenu with the navigation buttons "r" and "s" (2), push the "OK" button (4)
to conrm. A ashing display with the current status of the selection made results.
The respective possible settings can be made as usually with the navigation buttons "r" and "s" (2) and are
conrmed with the "OK" button (4).
To leave the menu, a submenu or setting, push the Menu button (3) (repeatedly if necessary). This functions as a
return by one level/position here to be able to perform corrections if necessary.
All parameters chosen last are automatically saved in the device. You will receive these values as a sugges-
tion at the next start of a measurement.
All measured values and the date of the last completed dosimeter, pulse counter or pulse rate measurements
are also saved automatically. The bar display at the lower edge always shows the current memory utilisation.
All settings and the entire memory can be deleted in the menu item "Reset" (factory settings).

43
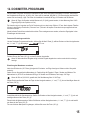
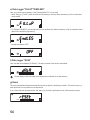
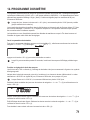
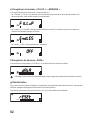
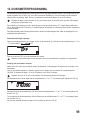
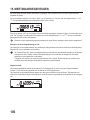
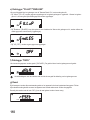
12. DOSIMETER PROGRAMME
The dosimeter programme determines the radiation dose across a specic adjustable period. The radiation dose is
displayed from "00.0001 µSv", to mSv to "999 999 Sv" at most. When the maximum value is exceeded, "High" is
displayed. The duration can be set up to 99 days, 23 hours and 59 minutes at most.
When the days, hours and minutes are set to "00" (zero), a measurement for 10000 days is possible (until the
memory is full).
The conversion of impulses per time into dosage rate is based on the isotope Caesium 137. According to own
tables, the display functions "pulse count" or "pulse rate" permit conversion of the impulses for other isotopes.
Currently recorded pulses can be acoustically perceived by the ticker if the signal encoder has been activated in the
settings.
Calling the Dosimeter Settings
To call the dosimeter settings, push the Menu button (3); then use the navigation buttons "r" and "s" (2) to select
the display " OFF".
Now push the "OK" button (4) to set the dosimeter.
If no input is made for 20 seconds, the input is interrupted and the previous input appears.
Making Settings for the Measuring Time
After the "OK" button (4) is pushed, the dosimeter and day displays will start ashing and a clock symbol will appear.
Now enter the desired measuring time. The input is made in days, hours and minutes. The maximum value is
"99.23:59" and means 99 days, 23 hours and 59 minutes, i.e. just under 100 days.
When the time is set up "00.00:00", the measurement will run for 10,000 days.
Set the desired duration of the days with the navigation buttons "r" and "s" (2) and conrm it with the "OK" button
(4).
Then the hours display ashes. Set the hours with the navigation buttons "r" and "s" (2) and conrm it with the
"OK" button (4).
Then the minutes display ashes. Set the minutes with the navigation buttons "r" and "s" (2) and conrm it with
the "OK" button (4).
To get to the next menu item, push the "OK" button (4) again.
DOSIMETER
DOSIMETER

44
Setting the limit for alarm
Here, you can set a limit value from 0.01 μSv to 9999.99 μSv. Once this limit is reached or exceeded, the device will
emit an alarm.
The limit is set from the lowest-value digit using the navigation buttons "r" and "s" (2) and conrmed with the
"OK" button (4). Each conrmation with the "OK" button (4) will cause the next digit from the left to ash for input. If
a wrong input is made, the menu button (3) permits returning to the previous position at any time.
Start Dosimeter
After conrming all six digits with the "OK" button (4), the dosimeter can be started.
For this, use the navigation buttons "r" and "s" (2) to select the ashing "On" and conrm this with the "OK"
button (4).
Then the device will emit a beep and the dosimeter will be activated. The activity of the dosimeter is illustrated by
the symbol " ".
Dosimeter Display
A change of the display of the measured radiation dose for the previous measuring duration is possible at any time
with the navigation buttons "r" and "s" (2).
If several measurements are active, all current measured values and the measuring duration can be
requested with the navigation buttons "r" and "s" (2). The respective associated symbol appears for the
values of the individual measurements (" " – " " – " ").
Query of selected parameters
Push the Menu button (3) and select the dosimeter programme with the navigation buttons "r" and "s" (2). Push
the "OK" button (4); the symbol " " and "On" ashes. Another push of the "OK" button (4) shows the
chosen measuring duration and the limit for the alarm (and additionally the symbol " ") appears.
Finally push the "OK" button (4) again. The display then shows the current value of the active measurement. Return-
ing by one level is possible here as well, as usual using the Menu button (3).
DOSIMETER
MAX
µSv
DOSIMETER

45
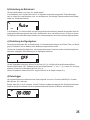
Cancelling Measurements
For this, go to the menu until the display " On" appears and push the "OK" button (4). The symbol
" " and "On" ashes.
You can activate ("On") or deactivate ("OFF") the measurement with the navigation buttons "r" and "s". Select
"OFF" (ashes) and push the "OK" button (4), to cancel the measurement.
If you push the "OK" button (4) again, you can then enter new parameters. Returning/cancelling is possible here as
well using the Menu button (3).
After the end of the set time or when cancelling the measurement, the "Gamma Check Pro" will emit a signal for one
second.
If the limit for the alarm is exceeded during the measurement, the symbol "MAX" and the symbol of the measure-
ment will ash. The "Gamma Check Pro" emits an acoustic warning. This is repeated every 15 minutes until notice is
taken by pushing any button. The symbols stop ashing.
The measured value is displayed in µSv, mSv or Sv (depending on the measured value). Once the display exceeds
999999 Sv, the display shows "HIGH", since the value can no longer be displayed.
A measured value at this amount is possible because the dosimeter can be activated for 10,000 days.

46
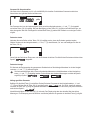
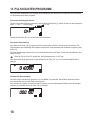
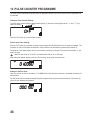
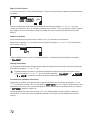
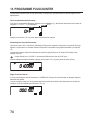
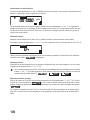
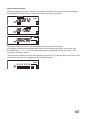
13. PULSE COUNTER PROGRAMME
The pulse counter determines all pulses within an adjustable time and can emit an alarm when the adjustable limit
is exceeded.
Calling the Pulse Counter Settings
To call the pulse counter settings, push the Menu button (3); then use the navigation buttons "r" and "s" (2) to
select the display " OFF".
Push the "OK" button (4) to set the pulse counter.
Pulse Counter Time Settings
After the "OK" button (4) is pushed, the pulse counter display will start ashing and a clock symbol will appear. The
procedure or order of the inputs corresponds to the procedure in the dosimeter programme (see chapter 12).
The duration of the measurement goes from one minute at minimum to 99 days, 23 hours and 59 minutes, i.e. just
under 100 days.
When the time is set up "00.00:00", the measurement will run for 10,000 days.
After setting the desired duration, push the "OK" button (4) to get to the next menu item.
Setting the limit for alarm
Here, you can set the limit for the alarm of 1 to 999999 ticks. Once this limit is reached or exceeded, the device will
emit an alarm.
The limit is set from the lowest-value digit using the navigation buttons (2) and conrmed with the "OK" button (4)
(just as for the dosimeter programme).
- COUNT
- COUNT
- COUNT
MAX

47
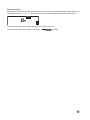
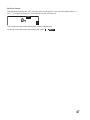
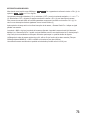
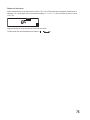
Start Pulse Counter
After conrming all six digits with "OK", the pulse counter can be started. For this, use the navigation buttons "r"
and "s" (2) to select the setting "On" and conrm this with the "OK" button (4).
Then the device will emit a beep and the pulse counter will be activated.
The activity of the pulse counter is illustrated by the symbol " ".
- COUNT

48
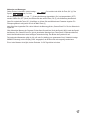
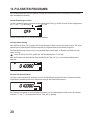
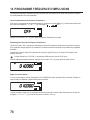
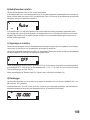
14. PULSE RATE PROGRAMME
The pulse rate determines all pulses per second within an adjustable duration and emits an alarm when an adjust-
able limit is exceeded.
Calling the Pulse Rate Settings
To call the pulse rate settings, push the Menu button (3); then use the navigation buttons "r" and "s" (2) to select
the display " OFF".
Push the "OK" button (4) to set the pulse rate.
Pulse Rate Time Settings
After the "OK" button (4) is pushed, the pulse rate display will start ashing and a clock symbol will appear. The
procedure or order of the inputs corresponds to the procedure in the dosimeter programme.
The duration of the measurement goes from one minute at minimum to 99 days, 23 hours and 59 minutes, i.e. just
under 100 days.
When the time is set up "00.00:00", the measurement will run for 10,000 days.
After setting the desired duration, push the "OK" button (4) to get to the next menu item.
Setting the limit for alarm
Here, you can set the limit for the alarm of 0.001 to 399.999 ticks per second (i.e. just under 400). Once this limit is
reached or exceeded, the device will emit an alarm.
The limit is set from the lowest-value digit using the navigation buttons "r" and "s" (2) and conrmed with the
"OK" button (4) (just as for the dosimeter programme).
- RATE
- RATE
- RATE
MAX
1
s
Page is loading ...
Page is loading ...
Page is loading ...
Page is loading ...
Page is loading ...
Page is loading ...
Page is loading ...
Page is loading ...
Page is loading ...
Page is loading ...
Page is loading ...
Page is loading ...
Page is loading ...
Page is loading ...
Page is loading ...
Page is loading ...
Page is loading ...
Page is loading ...
Page is loading ...
Page is loading ...
Page is loading ...
Page is loading ...
Page is loading ...
Page is loading ...
Page is loading ...
Page is loading ...
Page is loading ...
Page is loading ...
Page is loading ...
Page is loading ...
Page is loading ...
Page is loading ...
Page is loading ...
Page is loading ...
Page is loading ...
Page is loading ...
Page is loading ...
Page is loading ...
Page is loading ...
Page is loading ...
Page is loading ...
Page is loading ...
Page is loading ...
Page is loading ...
Page is loading ...
Page is loading ...
Page is loading ...
Page is loading ...
Page is loading ...
Page is loading ...
Page is loading ...
Page is loading ...
Page is loading ...
Page is loading ...
Page is loading ...
Page is loading ...
Page is loading ...
Page is loading ...
Page is loading ...
Page is loading ...
Page is loading ...
Page is loading ...
Page is loading ...
Page is loading ...
Page is loading ...
Page is loading ...
Page is loading ...
Page is loading ...
-
 1
1
-
 2
2
-
 3
3
-
 4
4
-
 5
5
-
 6
6
-
 7
7
-
 8
8
-
 9
9
-
 10
10
-
 11
11
-
 12
12
-
 13
13
-
 14
14
-
 15
15
-
 16
16
-
 17
17
-
 18
18
-
 19
19
-
 20
20
-
 21
21
-
 22
22
-
 23
23
-
 24
24
-
 25
25
-
 26
26
-
 27
27
-
 28
28
-
 29
29
-
 30
30
-
 31
31
-
 32
32
-
 33
33
-
 34
34
-
 35
35
-
 36
36
-
 37
37
-
 38
38
-
 39
39
-
 40
40
-
 41
41
-
 42
42
-
 43
43
-
 44
44
-
 45
45
-
 46
46
-
 47
47
-
 48
48
-
 49
49
-
 50
50
-
 51
51
-
 52
52
-
 53
53
-
 54
54
-
 55
55
-
 56
56
-
 57
57
-
 58
58
-
 59
59
-
 60
60
-
 61
61
-
 62
62
-
 63
63
-
 64
64
-
 65
65
-
 66
66
-
 67
67
-
 68
68
-
 69
69
-
 70
70
-
 71
71
-
 72
72
-
 73
73
-
 74
74
-
 75
75
-
 76
76
-
 77
77
-
 78
78
-
 79
79
-
 80
80
-
 81
81
-
 82
82
-
 83
83
-
 84
84
-
 85
85
-
 86
86
-
 87
87
-
 88
88
-
 89
89
-
 90
90
-
 91
91
-
 92
92
-
 93
93
-
 94
94
-
 95
95
-
 96
96
-
 97
97
-
 98
98
-
 99
99
-
 100
100
-
 101
101
-
 102
102
-
 103
103
-
 104
104
-
 105
105
-
 106
106
-
 107
107
-
 108
108
-
 109
109
-
 110
110
-
 111
111
-
 112
112
-
 113
113
-
 114
114
-
 115
115
-
 116
116


VOLTCRAFT Gamma Check Pro Operating Instructions Manual
- Category
- Measuring & layout tools
- Type
- Operating Instructions Manual
Ask a question and I''ll find the answer in the document
Finding information in a document is now easier with AI
in other languages
- français: VOLTCRAFT Gamma Check Pro
- Deutsch: VOLTCRAFT Gamma Check Pro
- Nederlands: VOLTCRAFT Gamma Check Pro
Related papers
-
VOLTCRAFT 1034097 Operating Instructions Manual
-
-
-
-
-
VOLTCRAFT DL-151AN Anometer Operating Instructions Manual
-
-
-
-
VOLTCRAFT SEM4500 Operating instructions
Other documents
-
Renkforce EMT2500ET Owner's manual
-
Renkforce GP-102 Owner's manual
-
Renkforce 2347403 User manual
-
PeakTech 8005 Operating instructions
-
Loctite EQ CL32 LED Spot 365nm Operating instructions
-
Doza DKG-05D Operating instructions
-
 Rotronic HygroPalm AW1 Owner's manual
-
-
Shure ADX1M User guide
-
