Page is loading ...

1High Tank Pull Chain Water Closet Installation
HIGH TANK PULL CHAIN WATER CLOSET
INSTALLATION INSTRUCTIONS
Before installing, read entire High Tank Pull Chain Water Closet Installation Instructions. Observe all local building and
safety codes.
Unpack and inspect the product for any shipping damages. If you nd damages, do not install. Contact Customer
Service at 1.866.855.2284. If you need assistance or have questions while installing your water closet, contact Customer
Service.
Do not install if you are unfamiliar with installing bathroom xtures. Signature Hardware accepts no liability for any
damage to the oor, walls, plumbing or for personal injury during installation.
TOOLS AND MATERIALS:
IMPORTANT
The water closet tank should be anchored to two wall studs. If the studs in the bathroom do not line up to the mounting
location for the water closet tank, wood blocking can be installed between the studs using standard 2 x 4’s. Wood
blocking needs to be installed behind the nished wall; we recommend consulting a professional if you are unfamiliar
with this type of installation.
Because wall construction and materials vary from home to home, Signature Hardware does not provide mounting
hardware for our high tank water closets. The appropriate mounting hardware can be purchased from your local
hardware store.
For the following installation instructions for your new water closet it is assumed that any old xtures have been removed
and any repairs to the water supply and/or toilet ange have been completed.
STANDARD BOWL INSTALLATION
1. To install the toilet bowl, press the new wax ring into place on the toilet ange on the oor with the at side down and
the tapered edge up. Apply enough pressure to hold the ring in place during installation, but be careful not to press it
out of shape.
2. Install the anchor bolts through the toilet ange. The anchor bolts should be pointing upwards so that when the toilet
is placed the bolts will project through the mounting holes on the base of the toilet.
3. When the wax ring and bolts are attached, lift the toilet and align the mounting holes with the anchor bolts on the
oor for proper placement. Set the toilet down on the oor and press in place to form a tight seal with the wax ring.
Do not move the toilet after placement; this could break the watertight seal and cause leakage.
4. Thread the washers and nuts onto the anchor bolts. Before tightening washers and nuts, verify that your toilet is
level. If the toilet is not level, place a shim under the base of the toilet and adjust as necessary.
Hacksaw Phillips Screwdriver Level
Drill Adjustable Wrench
Mounting Hardware
Wooden Shim
Pencil Tubing Cutter

2High Tank Pull Chain Water Closet Installation
5. When the toilet is properly aligned, nish tightening the washers and nuts onto the anchor bolts with an adjustable
wrench. Do this gradually, alternating from one bolt to the other until both are tight. Be sure not to over tighten, as
this could cause cracks and
damage the base of the toilet.
6. Place the bolt caps over the anchor bolts on the base of the toilet. If the anchor bolts extend too far over the top of
the washers and nuts, use a hacksaw to trim to the correct length.
7. Proceed to the Trim Kit and Tank Installation section.
REAR OUTLET BOWL INSTALLATION
1. Before installation, place the toilet in the location where it will be installed.
2. Measure the distance from the back of the waste outlet on the toilet to the wall hub tting to determine the length of
the p-trap connector. The connector should extend approximately 1-1/2" into the hub tting.
3. Trim the p-trap adapter with a hacksaw to the appropriate length as necessary.
4. Mark the location of the pre-drilled mounting holes using the holes in the base of the toilet as a template.
5. Remove the toilet from the work area and drill mounting holes in the locations designated in the previous step.
6. Apply PVC or ABS glue around the p-trap connector and place inside the hub tting.
7. Slide the toilet into place and press the waste outlet into the p-trap connector.
8. Once the toilet is securely in place, insert anchor bolts and washers through the mounting holes in the base of the
toilet and tighten into the pre-drilled holes created in step 6.
9. Place caps over the anchor bolts on the base of the toilet.
10. Connect the water supply tubes at the bottom of the tank. Turn on the water supply and ush the toilet several
times to check for any leaks around the back or base.
11. Attach the toilet seat.
12. Finish your installation by applying latex caulk or tile grout around the base of the toilet. This will nish the joint
between your oor and toilet bowl and divert water away from the base of the toilet.

3High Tank Pull Chain Water Closet Installation
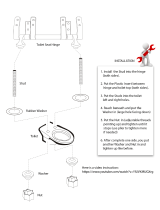
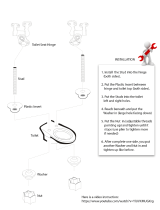
TRIM KIT AND TANK INSTALLATION
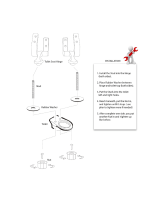
1. Because the trim kit arrives assembled, it is necessary to remove
the wing nuts and metal washers from the bolts on the bottom of
the kit (A2). Insert the bolts through the holes in the back of the
toilet bowl to fasten the trim kit to the top of the toilet bowl. Thread
the washers and wing nuts onto the bolts from underneath the
toilet (A2) and tighten to secure.
2. Remove the decorative nut and washer from the top of the trim kit
(A1).
3. Slide the decorative nut (B1) and tapered washer onto bottom
end of the ush pipe (C1). (The tapered end of the washer should
be facing down.) Insert the ush pipe (C1) into the opening in the
back of the toilet bowl.
4. Remove the nuts and washers from the water closet tank. Slide
the ush pipe nut (B2) and tapered washer onto the top of the
ush pipe (C1).
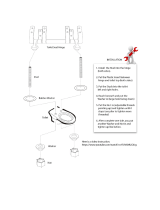
5. Place the tank (with wall bracket attached) onto the ush pipe (C1)
and place in the desired mounting location. Verify that the tank is
level, and mark the outline of the wall bracket on the wall with a
pencil. We recommend using two people to complete this step.
6. Remove the tank and disconnect the wall bracket. Place the
bracket on the outline created in the previous step and mark the
location of the mounting holes.
7. Drill four mounting holes and fasten the wall bracket to the wall
using the appropriate hardware for the installation type.
8. Secure the water closet tank to the wall bracket with the metal
L-brackets.
9. Make sure that the ush pipe sealing gasket (D2) and decorative
escutcheon (D1) are attached to the bottom of the tank.
10. Attach the ush pipe (C1) to the tank outlet. Tighten the decorative
nuts to secure the ush pipe to the tank and toilet bowl.
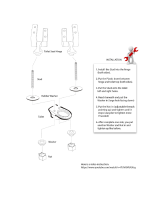
11. Slide a tapered washer onto the ared end of the water line pipe
(C2). Slide the nut (B3) onto the bottom end of the water line pipe
and move it up to meet the tapered washer.
12. Use the pipe nipple (E4) to connect the shut off valve (E5) to the
main water supply.
A1
B1
B2
B3
C1 C2
D2D1
A2

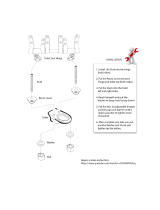
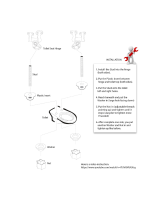
4High Tank Pull Chain Water Closet Installation
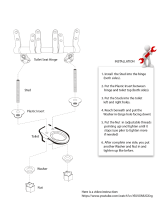
13. Connect the exible water supply tube (E1) to the shut
off valve (E5).
14. Connect the water line pipe (C2) to the exible water
supply tube (E1) with the compression tube tting
(E2).
15. Insert the water line pipe (C2) into the tank and tighten
the nut (B3) to secure. Trim the pipe to the appropriate
length if necessary.
16. In the desired location, install the water line brackets
(F) over the water line pipe to hold the pipe in place
after installation.
17. Connect the chain and ush handle to the brass ush
arm on the top of the tank. Adjust the length of the
chain on the apper as needed.
18. Finish your installation by attaching the toilet seat
according to the included seat installation instructions.
E2
E3
E4
E5
E1
E2
E1
E3
E4
E5
F
/