Page is loading ...

For the installer
ecoTEC plus 612
ecoTEC plus 615
ecoTEC plus 618
ecoTEC plus 624
ecoTEC plus 630
ecoTEC plus 824
ecoTEC plus 831
ecoTEC pro 28
Instructions for installation and servicing
ecoTEC
Wall hung room sealed fan assisted condensing boiler
GB

2
Contents
Instructions for installation and servicing ecoTEC
Contents
1 Introduction. . . . . . . . . . . . . . . . . . . . . . . . . . 4
1.1 Notes on the documentation . . . . . . . . . . . . . . . 4
1.1.1 Applicable documents. . . . . . . . . . . . . . . . . . . . . 4
1.1.2 Preservation of documents . . . . . . . . . . . . . . . . 4
1.1.3 Safety instructions and symbols. . . . . . . . . . . . 4
1.2 Introduction . . . . . . . . . . . . . . . . . . . . . . . . . . . . . 4
1.3 General Notes . . . . . . . . . . . . . . . . . . . . . . . . . . . . 4
1.4 CE marking . . . . . . . . . . . . . . . . . . . . . . . . . . . . . . 5
2 Boiler specifications . . . . . . . . . . . . . . . . . . . 6
2.1 Technical data. . . . . . . . . . . . . . . . . . . . . . . . . . . . 6
2.2 Dimensions . . . . . . . . . . . . . . . . . . . . . . . . . . . . . . 8
2.4 Installation. . . . . . . . . . . . . . . . . . . . . . . . . . . . . . . 9
2.5 Type plate . . . . . . . . . . . . . . . . . . . . . . . . . . . . . . . 10
3 General requirements . . . . . . . . . . . . . . . . . . 10
3.1 Preliminary remarks . . . . . . . . . . . . . . . . . . . . . . 10
3.2 Related documents . . . . . . . . . . . . . . . . . . . . . . . 10
3.3 Scope of delivery and accessories . . . . . . . . . . 10
3.4 Installation site. . . . . . . . . . . . . . . . . . . . . . . . . . . 12
3.5 Gas supply . . . . . . . . . . . . . . . . . . . . . . . . . . . . . . . 13
3.6 Flue pipe . . . . . . . . . . . . . . . . . . . . . . . . . . . . . . . . 13
3.6.1 Standard 100 mm flue system . . . . . . . . . . . . . . 13
3.6.2 Optional 125 mm flue system . . . . . . . . . . . . . . . 13
3.7 Flue termination. . . . . . . . . . . . . . . . . . . . . . . . . . 14
3.8 Air supply . . . . . . . . . . . . . . . . . . . . . . . . . . . . . . . 14
3.9 Electrical supply. . . . . . . . . . . . . . . . . . . . . . . . . . 15
3.10 Guide to system requirements. . . . . . . . . . . . . . 15
3.10.1 Water circulation system . . . . . . . . . . . . . . . . . . 15
3.10.2 Filling and preparing heating system. . . . . . . . 15
3.10.3 Pressure relief valve . . . . . . . . . . . . . . . . . . . . . . 15
3.10.4 Pressure gauge. . . . . . . . . . . . . . . . . . . . . . . . . . . 15
3.10.5 Expansion vessel . . . . . . . . . . . . . . . . . . . . . . . . . 15
3.11 Pump specifications . . . . . . . . . . . . . . . . . . . . . . 16
3.11.1 Circulating pump . . . . . . . . . . . . . . . . . . . . . . . . . 16
3.11.2 System by-pass. . . . . . . . . . . . . . . . . . . . . . . . . . . 16
3.11.3 Venting. . . . . . . . . . . . . . . . . . . . . . . . . . . . . . . . . . 16
3.12 Condensate trap. . . . . . . . . . . . . . . . . . . . . . . . . . 16
4 Boiler installation sequence. . . . . . . . . . . . . 16
4.1 Required minimum distances/assembly
clearances . . . . . . . . . . . . . . . . . . . . . . . . . . . . . . . 16
4.1.1 Select position for boiler . . . . . . . . . . . . . . . . . . 17
4.1.2 Unpack the boiler. . . . . . . . . . . . . . . . . . . . . . . . . 17
4.1.3 Using boiler template . . . . . . . . . . . . . . . . . . . . . 17
4.2 Flue exit . . . . . . . . . . . . . . . . . . . . . . . . . . . . . . . . . 18
4.3 Fitting the boiler hanging bracket . . . . . . . . . . 18
4.4 Installing flue system. . . . . . . . . . . . . . . . . . . . . . 18
4.5 Fitting the boiler . . . . . . . . . . . . . . . . . . . . . . . . . 18
4.6 Removing the front case . . . . . . . . . . . . . . . . . . 18
4.7 General instructions for heating system . . . . . 18
4.8 Gas connection. . . . . . . . . . . . . . . . . . . . . . . . . . . 19
4.9 Cold water mains inlet and hot water outlet
(ecoTEC plus 800 and pro only) . . . . . . . . . . . . 19
4.10 Heating connection . . . . . . . . . . . . . . . . . . . . . . 20
4.10.1 Heating flow and return connection. . . . . . . . . 20
4.10.2 Pressure Relief Valve. . . . . . . . . . . . . . . . . . . . . . 21
4.11 Condensate drain pipe . . . . . . . . . . . . . . . . . . . . 22
4.12 Connecting the flue system to the boiler . . . . 22
4.13 Electrical connection. . . . . . . . . . . . . . . . . . . . . . 22
4.13.1 General requirements . . . . . . . . . . . . . . . . . . . . . 22
4.13.2 Connection to the main supply . . . . . . . . . . . . . 23
4.13.3 Electric board layout . . . . . . . . . . . . . . . . . . . . . . 24
4.13.4 Connection of programmable thermostats . . . 27
4.14 Controls (ecoTEC plus 800 and pro only) . . . . 27
4.14.1 External electrical controls . . . . . . . . . . . . . . . . 27
4.14.2 Connection of external controls . . . . . . . . . . . . 27
4.14.3 Connection details for programmable room
thermostats. . . . . . . . . . . . . . . . . . . . . . . . . . . . . . 27
4.14.4 Connection of time switches . . . . . . . . . . . . . . . 28
4.14.5 Connection details for external time switches
and boiler terminal strip. . . . . . . . . . . . . . . . . . . 29
4.14.6 Vaillant optional plug in timer accessories . . . 29
4.15 Controls (600 series) . . . . . . . . . . . . . . . . . . . . . 29
4.15.1 External electrical controls . . . . . . . . . . . . . . . . 29
4.15.2 Connection of external electrical controls . . . 29
4.15.3 Connection details using an external wiring
centre. . . . . . . . . . . . . . . . . . . . . . . . . . . . . . . . . . . 29
4.16 Thermostatic radiator valves. . . . . . . . . . . . . . . 29
4.17 Frost protection . . . . . . . . . . . . . . . . . . . . . . . . . . 29
4.18 Circulating pump . . . . . . . . . . . . . . . . . . . . . . . . . 29
4.19 Anticycling ‘economiser’ control. . . . . . . . . . . . 29
4.20 Automatic pump spin control (APS). . . . . . . . . 29
5 Commissioning Part I . . . . . . . . . . . . . . . . . . 32
5.1 Preliminary electrical checks. . . . . . . . . . . . . . . 32
5.2 Gas supply. . . . . . . . . . . . . . . . . . . . . . . . . . . . . . . 32
5.3 Cold water supply (only 800 series). . . . . . . . . 32
5.4 Filling the heating system . . . . . . . . . . . . . . . . . 32
5.4.1 Checking the filling pressure of the heating
system . . . . . . . . . . . . . . . . . . . . . . . . . . . . . . . . . . 32
5.4.2 ecoTEC plus filling loop (800 series) . . . . . . . . 32
5.4.3 Filling the heating system in ecoTEC pro and
ecoTEC plus (600 series) . . . . . . . . . . . . . . . . . . 33
5.4.4 Filling the heating system for the first time . . 33
5.5 Initial system flush (“cold”) . . . . . . . . . . . . . . . . 33
5.6 Filling the condensation water siphon . . . . . . . 34
5.7 Adjusting the pumping capacity . . . . . . . . . . . . 34
5.8 Adjusting the by-pass . . . . . . . . . . . . . . . . . . . . . 34
5.9 Checking the gas supply. . . . . . . . . . . . . . . . . . . 35
5.9.1 Factory settings . . . . . . . . . . . . . . . . . . . . . . . . . . 35
5.9.2 Gas inlet working pressure. . . . . . . . . . . . . . . . . 35
5.9.3 Checking the gas rate . . . . . . . . . . . . . . . . . . . . . 35
5.10 Refitting the case. . . . . . . . . . . . . . . . . . . . . . . . . 36
5.11 Adjusting the central heating output (range
rating). . . . . . . . . . . . . . . . . . . . . . . . . . . . . . . . . . . 36
5.12 Gas changeover . . . . . . . . . . . . . . . . . . . . . . . . . . 36
6 Functional checks (commissioning part II) . 36
6.1 Functional checks. . . . . . . . . . . . . . . . . . . . . . . . . 36
6.1.1 Procedure . . . . . . . . . . . . . . . . . . . . . . . . . . . . . . . 36
6.1.2 Heating. . . . . . . . . . . . . . . . . . . . . . . . . . . . . . . . . . 37
6.1.3 Water heating (only 800 series) . . . . . . . . . . . . 37
6.1.4 Final flush of the heating system (“hot”) . . . . 37
6.2 Handing over to the user . . . . . . . . . . . . . . . . . . 38

3Instructions for installation and servicing ecoTEC
Contents
7 Inspection and maintenance . . . . . . . . . . . . 38
7.1 Initial inspection. . . . . . . . . . . . . . . . . . . . . . . . . . 38
7.1.2 Safety instructions. . . . . . . . . . . . . . . . . . . . . . . . 38
7.1.3 Maintenance . . . . . . . . . . . . . . . . . . . . . . . . . . . . . 39
7.1.4 Overview of the maintenance tasks . . . . . . . . . 39
7.1.5 Functional check of boiler operation . . . . . . . . 39
7.2 Servicing the compact thermal module. . . . . . 40
7.2.1 Removing the compact thermal module . . . . . 40
7.2.2 Cleaning the integral condensation heat
exchanger . . . . . . . . . . . . . . . . . . . . . . . . . . . . . . . 41
7.2.3 Checking the burner . . . . . . . . . . . . . . . . . . . . . . 41
7.2.4 Refitting the compact thermal module . . . . . . 41
7.3 Cleaning the condensation water siphon . . . . 42
7.4 Checking the expansion vessel . . . . . . . . . . . . . 43
7.5 Recommissioning the boiler. . . . . . . . . . . . . . . . 43
7.6 Test operation. . . . . . . . . . . . . . . . . . . . . . . . . . . . 43
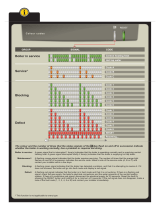
8 Troubleshooting. . . . . . . . . . . . . . . . . . . . . . . 44
8.1 Logical fault finding procedure . . . . . . . . . . . . . 44
8.1.1 Status codes . . . . . . . . . . . . . . . . . . . . . . . . . . . . . 44
8.1.2 Diagnosis codes . . . . . . . . . . . . . . . . . . . . . . . . . . 45
8.1.3 Fault codes . . . . . . . . . . . . . . . . . . . . . . . . . . . . . . 47
8.1.4 Fault memory . . . . . . . . . . . . . . . . . . . . . . . . . . . . 47
8.4 Test programs. . . . . . . . . . . . . . . . . . . . . . . . . . . . 49
8.5 Resetting parameter to factory settings . . . . . 49
9 Parts replacement. . . . . . . . . . . . . . . . . . . . . 49
9.1 Safety instructions. . . . . . . . . . . . . . . . . . . . . . . . 49
9.2 Replacing burner . . . . . . . . . . . . . . . . . . . . . . . . . 49
9.3 Replacing fan or gas valve . . . . . . . . . . . . . . . . . 50
9.4 Replacing expansion vessel . . . . . . . . . . . . . . . . 50
9.5 Replacing primary heat exchanger. . . . . . . . . . 51
9.6 Replacing electronics and display. . . . . . . . . . . 52
9.7 Check CO
2
content and if necessary set
(air-ratio adjustment) . . . . . . . . . . . . . . . . . . . . . 53
10 Recycling and disposal . . . . . . . . . . . . . . . . . 54
10.1 Appliance. . . . . . . . . . . . . . . . . . . . . . . . . . . . . . . . 54
10.2 Packaging . . . . . . . . . . . . . . . . . . . . . . . . . . . . . . . 54

4 Instructions for installation and servicing ecoTEC
1 Introduction
1 Introduction
1.1 Notes on the documentation
The following information is intended to help you
throughout the entire documentation.
Further documents apply in combination with this instal-
lation and maintenance manual.
We assume no liability for any damage caused by
non-observance of these manuals.
1.1.1 Applicable documents
The following additional documents are provided with
the appliance:
For the owner of the system:
Brief users instructions
(only ecoTEC plus) no. 838404
Benchmark logbook no. 800371
Warranty card with return envelope no. 802922
For the qualified technician:
Installation and maintenance manual no. 839592
Assembly manual for flue accessories no. 835296
The manuals for any accessories and controllers used
also apply.
1.1.2 Preservation of documents
Please pass on this installation manual to the owner of
the system. The owner shall preserve the manuals so
that they are available when required.
1.1.3 Safety instructions and symbols
Please observe the safety instructions in this manual for
the installation of the appliance!
Symbols used in the manual are explained below:
Danger!
Immediate danger to life and limb!
Caution!
Potentially dangerous situation for the product
and environment!
Note
Useful information and instructions.
• Symbol for a necessary task
- List for function descriptions or general list
1.2 Introduction
Note
This boiler must be installed and serviced by a
competent person in accordance with the Gas
Safety (Installation and Use) Regulations 1998.
In the UK ‘CORGI’ registered installers under-
take the work in compliance with safe and sat-
isfactory standard.
ecoTEC 800 and pro range
The ecoTEC 800 and pro range is a fully automatic, wall
mounted, room sealed condensing (high efficiency) com-
bination boiler for central heating and domestic hot
water.
Domestic hot water is supplied directly from the boiler,
without requiring a copper cylinder, cold water tank,
feed and expansion vessel and associated pipework.
Domestic hot water has priority over central heating.
The ecoTEC 800 range consists of 2 models with out-
puts of 23 kW and 31 kW for domestic hot water and a
pro version with an output of 28 kW for domestic hot
water.
All versions are available in natural gas. The ecoTEC plus
831 is also available in LPG.
ecoTEC combination boilers incorporate a warm start
facility that keeps the domestic hot water heat exchang-
er hot, providing an instantaneous delivery of domestic
hot water. The temperature in the domestic hot water
heat exchanger is limited by the boiler control system
and it is not necessary to install a scale reducer on the
cold mains to the boiler. However, in areas that get
exceptionally hard water, a scale reducer may be fitted
to prevent scale formation in the hot water system
pipes. The heating system can be filled using the built–in
filling loop contained within the boiler.
ecoTEC plus 600 range
The ecoTEC plus 600 range is a fully automatic, wall
mounted, room sealed condensing (high efficiency) sys-
tem boiler for central heating and domestic hot water
(where a separate indirect hot water storage cylinder is
also incorporated in the system). The ecoTEC 600 range
consists of models with outputs of 12, 15, 18, 24 and 30
kW. All ecoTEC 600 range boilers are available in Natural
Gas. The ecoTEC plus 618 and 630 are also available in
LPG.
1.3 General Notes
The boilers have been designed for use with a sealed
central heating system, and come fully tested and
assembled with a built in circulating pump, expansion
vessel and diverter valve (ecoTEC plus 800 and pro).
The boilers are easily mounted on any internal wall and
can be installed with either a horizontal or vertical RSF
(room sealed fan assisted) flue.
The boilers use a standard flue system (100 mm or
125 mm outside diameter). Flue extensions and addition-
al bends and elbows are available for the flue system to
increase the flexibility. If desired, an inhibitor may be
used in the system. Guidance on the use of inhibitors is
contained in these instructions.
All boilers have a built in diagnostic system which indi-
cates the operational status of the boiler. This feature
provides key information to aid commissioning and fault
finding. The data badge is fitted to the underside of the
boiler. See text of General Requirements for installation
requirements or notes.

5Instructions for installation and servicing ecoTEC
The Valliant ecoTEC are state-of-the-art appliances
which have been constructed in accordance with recog-
nised safety regulations. Nevertheless, danger to the life
and limb of the user or third parties can still occur or
the appliance or other material assets be impaired in the
event of improper use.
The appliance is designed to generate heat for connect-
ing to hot water central heating systems and for instan-
taneous hot water supply (ecoTEC 800 and pro only).
Any other use or extended use is considered to be use
other than intended. The manufacturer/supplier is not
liable for any resulting damage.
Intended use includes the observance of the operating
and installation manual and the adherence to the inspec-
tion and maintenance conditions.
Danger!
Any incorrect use is forbidden.
The appliances must be installed by a qualified engineer,
who is responsible for adhering to the existing regula-
tions, rules and guidelines.
1.4 CE marking
The CE marking shows that the appliances comply
with the basic requirements of the following direc-
tives:
- Gas appliances directive (90/396/EEC)
- Electromagnetic compatibility directive with threshold
class B (89/336/EEC)
- Low voltage directive (73/23/EEC)
The appliances satisfy the basic requirements of the effi-
ciency directive (92/42/EEC) as condensing appliance.
- The Gas Applaince (Safety) Regulations 1992
- The boiler (Efficiency) Regulations 1993
Vaillant Ltd. supports the Benchmark initiative.
In the information pack, you will find a
Benchmark Logbook. It is very important that
this is completed correctly at the time of
installation, commissioning and hand over to
the user.
Introduction 1

6 Instructions for installation and servicing ecoTEC
2 Boiler specifications
2.1 Technical data
Technical data
ecoTEC plus
ecoTEC pro
28
Units
824 831
CH heat output range
80 °C flow/60 °C return
60 °C flow/40 °C return
50 °C flow/30 °C return
40 °C flow/30 °C return
6.0 – 18.0
6.1 – 18.6
6.3 – 19.1
6.5 – 19.5
8.7 – 24.0
9.0 – 24.7
9.3 – 25.5
9.4 – 26.0
8.7 – 24.0
9.0 – 24.7
9.3 – 25.5
9.4 – 26.0
kW
kW
kW
kW
Drinking water capacity 23.0 31.0 28.0 kW
Maximum DHW output 23.5 31.6 28.6 kW
Maximum output for heating 18.4 24.5 24.5 kW
Minimum output 6.1 8.9 8.9 kW
Category II
2H3P
SEDBUK Band A A A Band
Inlet gas working pressure required (G20, natural gas) 20 mbar
Inlet gas working pressure required (G31, Propane) 37 mbar
Connected load (if needed, related to stored charge/
water heating) at 15 °C and 1013 mbar
G20: 1.9
G31: 1.43
G20: 3.3
G31: 2.45
G20: 3.0
G31: 2.22
m
3
/h
kg/h
Exhaust mass rate
at minimum thermal load (40 °C flow/30 °C return)
at maximum thermal load (80 °C flow/60 °C return)
2.8
8.3
4.1
14.2
4.1
12.9
g/s
g/s
Exhaust temperature
at minimum thermal load (40 °C flow/30 °C return)
at maximum thermal load (80 °C flow/60 °C return)
40
70
°C
°C
NOx class 5
Protection class IP X4D
max. flow temperature 85 °C
Adjustable flow temperature
Default setting: max. 75 °C
40 – 85 °C
Permitted total overpressure 3.0 bar
Circulation water volume (∆T=20 K)
774 1032 1032 l/h
Approx. condensation volume
at 40 °C flow/30 °C return heating
1.7 2.2 2.2 l/h
Pump delivery height 250 mbar
Minimum DHW volume 1.5 1.5 1.5 l/min
Hot water volume (∆T=30 K)
11.0 14.8 13.4 l/min
Permitted overpressure 10 bar
Required connecting pressure 0.35 bar
Hot water discharge temperature range 35 – 65 °C
Exhaust flue 60/100 mm
10 l expansion vessel pre-charge pressure 0.75 0.75 0.75 bar
Maximum CH system pressure 2.5 2.5 2.5 bar
Connections heating flow/return 3/4“ 3/4“ 3/4“
Gas inlet 15 15 15 mm
Pressure relief discharge pipework (min.) 15 15 15 mm
Condensate drain (min. internal drain) 19 19 19 mm
Weight (boiler only) 36 37 37 kg
Primary water content 1.9 2.3 2.1 l
Electrical supply voltage 230/50 230/50 230/50 V ~/Hz
Internal fuse (slow) main voltage 2 A
Power input min.
max.
at 30 % efficiency
70
130
65
W
W
W
Table 2.1 Technical data plus 800 and pro series
2 Boiler specifications

7Instructions for installation and servicing ecoTEC
Technical data
ecoTEC plus
Units
612 615 618 624 630
CH heat output range
80 °C flow/60 °C return
60 °C flow/40 °C return
50 °C flow/30 °C return
40 °C flow/30 °C return
4.0 – 12.0
4.1 – 12.3
4.3 – 12.7
4.4 – 12.9
4.0 – 15.0
4.1 – 15.5
4.3 – 15.9
4.4 – 16.2
6.0 – 18.0
6.1 – 18.6
6.3 – 19.1
6.5 – 19.5
8.7 – 24.0
9.0 – 24.7
9.3 – 25.5
9.4 – 26.0
10.0 – 30.0
10.3 – 30.9
10.6 –31.8
10.8 – 32.4
kW
kW
kW
kW
Memory charging capacity 12.0 15.0 18.0 24.0 30.0 kW
Maximum output during memory charging 12.2 15.3 18.4 24.5 30.6 kW
Maximum output for heating 12.2 15.3 18.4 24.5 30.6 kW
Minimum output 4.1 4.1 6.1 8.9 10.2 kW
Category II
2H3P
SEDBUK Band AAAAABand
Inlet gas working pressure required (G20, natural gas) 20 mbar
Inlet gas working pressure required (G31, Propane) 37 mbar
Connected load (if needed, related to stored charge/
water heating) at 15 °C and 1013 mbar
G20: 1.3
G31: 0.95
G20: 1.6
G31: 1.19
G20: 1.9
G31: 1.43
G20: 4.1
G31: 1.90
G20: 3.2
G31: 2.38
m
3
/h
kg/h
Exhaust mass rate
at minimum thermal load (40 °C flow/30 °C return
at maximum thermal load (80 °C flow/60 °C return)
1.9
5.5
1.9
6.9
2.8
8.3
4.1
11.1
4.7
13.8
g/s
g/s
Exhaust temperature
at minimum thermal load (40 °C flow/30 °C return)
at maximum thermal load (80 °C flow/60 °C return)
40
70
°C
°C
NOx class 5
Protection class IP X4D
max. flow temperature 85 °C
Adjustable flow temperature
Default setting: max. 75 °C
40 – 85 °C
Permitted total overpressure 3.0 bar
Circulating water volume (∆T=20 K)
516 645 774 1032 1290 l/h
Approx. condensation volume
at 40 °C flow/30 °C return heating
1.1 1.4 1.7 2.2 2.7 l/h
Pump delivery height 250 mbar
Adjustable storage target value (15 °C at left stop,
spare adjusting range 40 – 70 °C
15 – 70 °C
Exhaust flue 60/100 mm
10 l expansion vessel pre-charge pressure 0.75 0.75 0.75 0.75 0.75 bar
Maximum CH system pressure 2.5 2.5 2.5 2.5 2.5 bar
Connections heating flow/return 3/4“ 3/4“ 3/4“ 3/4“ 3/4“
Gas inlet 15 15 15 15 15 mm
Pressure relief discharge pipework (min.) 15 15 15 15 15 mm
Condensate drain (min. internal drain) 19 19 19 19 19 mm
Weight (boiler only) 36 36 36 37 39 kg
Primary water content 1.9 1.9 1.9 2.1 2.3 l
Electrical supply voltage 230/50 230/50 230/50 230/50 230/50 V ~/Hz
Internal fuse (slow) main voltage 2 A
Power input min.
max.
at 30 % efficiency
70
130
65
W
W
W
Table 2.2 Technical data 600 series
Boiler specifications 2

8 Instructions for installation and servicing ecoTEC
2.2 Dimensions
241
20
642
720
883
125
100100
440
35 35
130
180
300
175
190
65
8
6
4
3
2
1
5
7
9
10
12345
Fig. 2.1 Dimensions in mm
Legend:
1 Heating return pipe Ø 22 mm
2 Cold water connection Ø 15 mm (only 800 series)
3 Gas connection Ø 15 mm
4 Hot water connection Ø 15 mm (only 800 series)
5 Heating flow pipe Ø 22 mm
6 Hanging bracket
7 Flue hole - flue system 60/100
8 Flue hole - flue system 80/125
9 Flue pipe connection
10 Spacer frame accessory (Art. No.: 308 650)
Note
With the spacer frame (Art. No 308 650), the
pipes can be run behind the boiler. The distance
of the appliance from the wall thus increases by
65 mm.
2 Boiler specifications

9Instructions for installation and servicing ecoTEC
2.4 Installation
1
2
3
4
6
5
7
8
9
14
13
12
10
11
Fig. 2.2 Function elements of 800 series
Legend:
1 Expansion vessel
2 Air intake pipe
3 Compact thermal module
4 Ignition electrode
5 Fan
6 Diverter valve with by-pass
7 Pump
8 Aqua-Sensor
9 Electronics box
10 Pressure sensor
11 Hot water heat exchanger
12 Gas valve
13 Heat exchanger
14 Flue pipe connection
1
2
3
4
5
7
9
14
13
12
10
Fig. 2.3 Function elements of 600 series
Legend:
1 Expansion vessel
2 Air intake pipe
3 Compact thermal module
4 Ignition electrode
5 Fan
7 Pump
9 Electronics box
10 Pressure sensor
12 Gas valve
13 Heat exchanger
14 Flue pipe connection
Boiler specifications 2

10 Instructions for installation and servicing ecoTEC
2.5 Type plate
The type plate of the Valliant ecoTEC is attached to the
bottom of the appliance at the factory.
Fig. 2.4 Type plate (example)
3 General requirements
3.1 Preliminary remarks
This appliance shall only be installed in conjunction with
a Vaillant flue system. Install the flue system as detailed
in the separate flue installation instructions supplied
with this boiler.
3.2 Related documents
ecoTEC appliances satisfy the Gas Appliance (Safety)
Regulations 1992 and the Boiler (Efficiency) Regulations
1993.
The installation of the boiler must be in accordance with
the relevant requirements of Gas Safety (Installation and
Use) Regulations 1998, Health and Safety Document No.
635 (The Electricity at Work Regulations 1989), BS7671
(IEE Wiring Regulations) and the Water Supply (Water
Fitting) Regulations 1999, or The Water Bylaws 2000
(Scotland). It should also be in accordance with the rele-
vant requirements of the Local Authority, Building
Regulations, including amendments to the Approved
Documents Part L and J 2002, The Building Regulations
(Scotland). The Building Regulations (Northern Ireland)
and the relevant recommendations of the following
British Standards and regulations:
BS 5440: Flues and ventilation of gas fired boilers not
exceeding 70 kW net:
– Part 1: Flues
– Part 2: Ventilation
BS 5449: Specification for forced circulation hot water
for domestic premises.
BS 5546: Specification for gas hot water supplies for
domestic premises.
BS 6700: Services supplying water for domestic use
within buildings and their curtilages.
BS 6798: Specification for installation of gas fired boil-
ers not exceeding 60 kW input.
BS 6891: Specification for installation of low pressure
gas pipework up to 28 mm (R1) in domestic premises
(2nd family gas).
BS 7593: Treatment of water in domestic hot water cen-
tral heating systems.
Institute of Gas Engineers Publication IGE/UP/7/1998:
“Guide for gas installations in timber framed housing”
European installation directive
Important:
The appliance must be installed and serviced by
a competent person as stated in the Gas Safety
(Installation and Use) Regulations 1998. In IE,
the installation must be in accordance with the
current edition of I.S.813 ‘Domestic Gas
Installations’, the current Building Regulations
and reference should be made to the current
ETCI rules for electrical installation.
Important:
When tightening or slackening screwed connec-
tions always use suitable open-ended spanners
(not pipe wrench, or extensions, etc.).
Incorrect use and/or unsuitable tools can lead
to damage being caused (e.g. gas or water leak-
age)!
3.3 Scope of delivery and accessories
The Vaillant ecoTEC is delivered pre-mounted in a pack-
age unit. Check that all the parts have been delivered
intact (see Fig. 3.1 and Table 3.1, Fig. 3.2 and Table 3.2
and Fig. 3.3 and Table 3.3).
2 Boiler specifications
3 General requirements

11Instructions for installation and servicing ecoTEC
1
2
3
4
8
9
7
6
5
Fig. 3.1 Scope of delivery for ecoTEC plus 600 series
DO NOT remove the boiler from the polystyrene base at
this stage.
Item Quantity Description
1 1 Hanging bracket
2 1 Appliance
3 1 Bottom cover
4 4 Connecting pipes (gas, heating, safety valve)
5 3 Isolating cocks
6 1 Template
7 1 Benchmark logbook
83
User, installation and maintenance and flue
assembly manuals
9 2 Bag with small items
2
For LPG appliances, extra: 1 sticker each for
tank and ventilation (above Fig.)
Table 3.1 Scope of delivery for ecoTEC plus 600 series
1
2
3
4
6
5
8
9
7
Fig. 3.2 Scope of delivery for ecoTEC plus 800 series
DO NOT remove the boiler from the polystyrene base at
this stage.
Item Quantity Description
1 1 Hanging bracket
2 1 Appliance
3 1 Bottom cover
46
Connecting pipes (gas, heating, water, safety
valve)
5 4 Isolating cocks
6 1 Template
7 1 Benchmark logbook
83
User, installation and maintenance and flue
assembly manuals
9 2 Bag with small items
2
For LPG appliances, extra: 1 sticker each for
tank and ventilation (above Fig.)
Table 3.2 Scope of delivery for ecoTEC plus 800 series
General requirements 3

12 Instructions for installation and servicing ecoTEC
b
a
r
i
F
P
1
2
3
8
7
6
5
4
Fig. 3.3 Scope of delivery for ecoTEC pro
DO NOT remove the boiler from the polystyrene base at
this stage.
Item Quantity Description
1 1 Hanging bracket
2 1 Appliance
32
Connecting pipes (hot water, heating safety
valve)
4 4 Isolating cocks
5 1 Template
6 1 Benchmark logbook
71
User, installation and maintenance and flue
assembly manuals
8 2 Bag with small items
Table 3.3 Scope of delivery for ecoTEC pro
3.4 Installation site
The location chosen for the boiler must permit the provi-
sion of a satisfactory flue termination. The location must
also provide adequate space for servicing and air circu-
lation around the boiler. The boiler may be installed in
any room, although particular attention is drawn to the
requirements of BS7671 (IEE Regulations), the electrical
provisions of the Building Standards (Scotland)
Regulations, and in IE the current edition of IS813 and
the current ETCI rules, in respect of the installation of a
boiler in a room containing a bath or shower.
Note
If a room sealed boiler is installed in a room
with a bath or shower, electrical switches or
boiler controls using the mains power supply
must be placed at locations that cannot be
reached by the person in the bath or shower.
If the boiler is installed in an unusual location, special
procedures may be necessary and BS 5546 and BS 6798
give detailed guidance on this aspect. The boiler must be
mounted on a flat, vertical wall, which must be suffi-
ciently robust to take the weight of the boiler. The boiler
may be installed on a combustible wall, subject to the
requirements of the Local Authorities and Building
Regulations.
A compartment used to enclose the boiler must be
designed and constructed specifically for this purpose.
(An existing cupboard or compartment may be used pro-
vided that it is modified for the purpose). Details of
essential features of cupboard/compartment design
including airing cupboard installations are given in BS
6798. If the boiler is to be fitted in a timber framed
building, it should be fitted in accordance with Institute
of Gas Engineers Publication IGE/UP/7/1998 “Guide for
Gas Installation in Timber Framed Housing”.
Please note the safety instructions below before decid-
ing where to install the boiler:
Caution!
Do not install the appliance in rooms prone to
frost. In rooms with aggressive steam or dust,
the appliance must be operated independent of
the ambient air.
When choosing the place of installation and while oper-
ating the appliance, make sure that the combustion air
is technically free of chemical substances containing flu-
orine, chlorine, sulphur etc. Sprays, solvents and clean-
ing agents, paints, adhesives etc. contain this kind of
substances that can lead to corrosion even in the
exhaust system when the appliance is operated depend-
ing on the ambient air in the worst case scenario.
Particularly in hair-cutting salons, lacquering and finish-
ing, cleaning facilities, the appliance must be operated
independent of the ambient air! Otherwise, a separate
installation room is required to guarantee that the com-
3 General requirements

13Instructions for installation and servicing ecoTEC
bustion air supply is technical free of the above men-
tioned substances.
3.5 Gas supply
The gas supplier should ensure the availability of an
adequate supply of gas. A gas meter may only be con-
nected to the service pipe by the supplier of gas or their
contractor. An existing meter should be checked to
ensure that it is capable of passing the rate of gas sup-
ply required.
Installation pipes should be fitted in accordance with
BS 6891. In IE the current edition of IS 813. Pipework
from the meter to the boiler must be of an adequate
size. Do not use pipes of a smaller size than the boiler
gas connection (15 mm). The complete installation must
be checked for leaks and purged as described in
BS 6891.
3.6 Flue pipe
Danger!
Vaillant appliances are certified only for use
with genuine Vaillant flue pipes. Only use genu-
ine Vaillant flue pipes. Malfunctions can occur if
you use other accessories. These may result in
damage and injury. You will find a list of genuine
flue pipes in the Vaillant installation manual for
flue pipes.
The CE mark is valid only if the appliance is
operated with Vaillant flue pipes.
3.6.1 Standard 100 mm flue system
600
65.5
30
74
48
Fig. 3.4 Art. No. 303 933
The standard 100 mm flue system (Art. No. 303 933) is
suitable for installations up to 666 mm measured from
the centre of the boiler flue outlet to the outside face of
the wall.
Flue extensions are available to extend this length up to
8 m. Both 90° bends and 45° elbows are also available
to increase siting flexibility.
70
1435
10
550
Fig. 3.5 Art. No. 303 900
3.6.2 Optional 125 mm flue system
A concentric flue system of 125 mm outside diameter is
available and can be used to achieve flue lengths up to
25 m.
A vertical flue system is also available. Refer to flue sys-
tem installation instructions for full details.
70
1103
70
15
Fig. 3.6 Art. No. 303 209
1530
880
70
Fig. 3.7 Art. No. 303 200
General requirements 3

14 Instructions for installation and servicing ecoTEC
3.7 Flue termination
The following details refer to both flue systems.
a. The terminal must be located where the combustible
substances can escape freely at all times.
b. A plume of water vapour will sometimes be visible
from the flue terminal. Positions where this could be
a nuisance should be avoided.
c. If the terminal is fitted less than 2 m above a balcony,
above ground or above a flat roof to which people
have access then a suitable terminal guard must be
provided and fitted (made by Tower Flue
Components, Tonbridge, TN9 1TB, Model K3, plastic
coated).
A
BCD
A
G
H, I
F
J
B
F
M
L
L
K
K
G
G
F
F
E
A
A
Fig. 3.8 Flue termination
Note
Vertical flues must not terminate within
600 mm of an openable window, air vent or any
other ventilation opening.
The flue assembly shall be so placed or shielded as to
prevent ignition or damage to any part of the building.
Terminal position mm
A
Directly below an opening, above an opening or hori-
zontal to an opening, air brick, opening window, etc.
300
B Below gutters, soil pipes or drain pipes 75
C Below eaves 200
D Below balconies 200
E From vertical drain pipes and soil pipes 25
F From internal or external corners 300
G Above ground, roof or balcony 300
H From a surface facing a terminal 600
I From a terminal facing a terminal 1200
J
From an opening in the car port (e.g. door, window)
into the dwelling
1200
K Vertically from a terminal on the same wall 1500
L Horizontally from a terminal on the same wall 300
M Distance from adjacent for vertical Flue 500
Table 3.4 Terminal position for a fan assisted concentric flue
Note
In addition, the terminal should not be nearer
than 150 mm to an opening in the building fab-
ric formed for the purpose of accommodating a
built-in element such as a window.
BS 5440–1: It is recommended that the fanned flue ter-
minal should be positioned as follows:
a) at least 2 m from an opening in the building directly
opposite, and
b) so that the products of combustion are not directed
to discharge across a boundary.
1) Dimensions B, C and D:
These clearances may be reduced to 25 mm without
affecting the performance of the boiler. In order to
ensure that the condensate plume does not affect
adjacent surfaces the terminal should be extended as
shown in Fig. 3.9.
2) Dimension F:
This clearance may be reduced to 25 mm without
affecting the performance of the boiler. However, in
order to ensure that the condensate plume does not
affect adjacent surfaces a clearance of 300 mm is
preferred. For IE, recommendations are given in the
current edition of IS 813.
Fig. 3.9 Flue termination under balcony/eaves
3.8 Air supply
Detailed recommendations for air supply are given in
BS 5440: Part 2.
It is not necessary to have an air vent in the room or
internal space in which the boiler is installed.
Cupboard or compartment ventilation
The boilers are very high efficiency appliances. As a con-
sequence the heat loss from the appliance casing during
operation is very low. For cupboard or compartment
installations it is therefore not necessary to provide any
high or low level permanent air vents for cooling purpos-
es.
3 General requirements

15Instructions for installation and servicing ecoTEC
3.9 Electrical supply
A 230 V, ~ 50 Hz single phase electricity supply fused to
3 Amp. must be provided in accordance with the latest
edition of BS 7671 (IEE Wiring Regulations) and any
other local regulations that may apply. In IE reference
should be made to the current edition of the ETCI rules.
The method of connection to the mains electricity sup-
ply must provide a means of completely isolating the
boiler and its ancillary controls. Isolation is preferably by
the use of a fused three pin plug and unswitched shut-
tered socket outlet, both complying with the require-
ments of BS 1363. Alternatively, a 3 Amp. fused double
pole switch with a 3 mm contact separation on both
poles may be used.
Danger!
This appliance must be earthed.
3.10 Guide to system requirements
3.10.1 Water circulation system
Detailed recommendations for the water circulation sys-
tem are given in BS 6798 and BS 5449: Part 1 (for small
bore and micro bore central heating systems). Pipework
not forming part of the useful heating surface should be
insulated to help prevent heat loss and possible freezing,
particularly where pipes are run through roof spaces
and ventilated underfloor spaces. Draining taps must be
located in accessible positions which permit the draining
of the whole system including the boiler and the hot
water system. Draining taps should be at least 1/2 in.
BSP nominal size and be in accordance with BS 2879.
The boiler is suitable for use with minibore or microbore
systems. Copper tubing to BS 2871: Part 1 should be used
for water carrying pipework. All capillary joints in all
DHW pipework must be made with lead free solder.
Particularly where a new boiler is to be fitted to an exist-
ing system, it is good practice that the system is thor-
oughly cleansed. This cleansing should take place prior
to the fitting of the new boiler and be in accordance with
BS 7593. For advice on the application of system cleans-
ers contact Sentinel, Betz Dearborn Ltd. Widnes,
Cheshire, WA8 8UD. Tel: 0151 420 9595, or Fernox, Alpha
Fry Technologies, Tandem House, Marlow Way, Croydon,
CR0 4XS. Tel 0870 8700362.
3.10.2 Filling and preparing heating system
The system can be filled using the built in filling loop
(ecoTEC plus 800 series only) or via a separate filling
point fitted at a convenient position on the heating cir-
cuit. The connection must be removed when filling is
completed. Where local Water Authority regulation does
not allow temporary connection, a sealed system filler
pump with break tank must be used. The heating system
will not be filled automatically from the domestic hot
water side. (Alternative methods of filling sealed sys-
tems are given in BS 5449).
3.10.3 Pressure relief valve
A pressure relief valve is provided with the boiler. This
safety device is required on all sealed C.H. systems and
is preset at 3 bar and provided with a 15 mm compres-
sion connection for a discharge pipe, which must be of
no less than 15 mm in diameter. The pressure relief valve
must not be used for draining purposes.
3.10.4 Pressure gauge
This is factory fitted to the boiler and indicates the pri-
mary circuit pressure to facilitate filling and testing.
3.10.5 Expansion vessel
ecoTEC boilers incorporate a 10 litre expansion vessel
which is suitable for a sealed heating system with a max-
imum water content of 100 litres.
If the nominal capacity of the built in expansion vessel is
not sufficient for the heating system (for instance in
case of modernisation of old open systems) an addition-
al expansion vessel can be installed external to the boil-
er. It should be fitted in the return pipe as close as possi-
ble to the boiler in accordance with BS 5449: Part 1.
Guidance on the sizing of an additional expansion vessel
is given in Table 3.5.
Vessel Volume [L]
Initial system pressure (bar) 1.0 1.5
Pressure relief valve setting (bar) 3.0
Total water content of system litres
25 2.7 3.9
50 5.4 7.8
100 10.9 15.6
125 13.6 19.5
150 16.3 23.4
175 19.1 27.3
200 21.8 31.2
225 24.5 35.1
250 27.2 39.0
275 30.0 42.9
300 32.7 46.8
325 35.7 50.7
350 38.1 54.6
375 40.9 58.5
400 43.6 62.4
425 46.3 66.3
450 49.0 70.2
475 51.8 74.1
500 54.5 78.0
For system volumes other than those given
above, multiply the system volume by the
factor across
0.109 0.156
Table 3.5 Sizing of additional expansion vessel
General requirements 3

16 Instructions for installation and servicing ecoTEC
3.11 Pump specifications
3.11.1 Circulating pump
only ecoTEC plus:
The circulating pump is included in the boiler. The resid-
ual pump discharge height depending on the by-pass
valve is shown in Fig. 3.10.
The operating mode of the 2-step pump can be adjusted
below the diagnosis point d.19, see Section 8.1.2.
400
300
200
100
0
0 200 400 600 800 1000 1200 1600
Lift
[
mbar
]
Volumeflow
[
l/h
]
1800
1400
2. Step1. Step
Fig. 3.10 Pump specifications ecoTEC plus
only ecoTEC pro:
The circulating pump is included in the boiler. The eco-
TEC pro appliances are fitted with a single-stage pump.
The residual pump discharge height depending on the
by-pass valve is shown in Fig. 3.11.
400
300
200
100
0
0 200 400 600 800 1000 1200 1600
Lift
[
mbar
]
Volumeflow
[
l/h
]
1800
1400
Fig. 3.11 Pump specifications ecoTEC pro
3.11.2 System by-pass
An automatic system by-pass is provided in the boiler.
The boiler is suitable for use in systems with thermostat-
ic radiator valves and no additional by-pass is required.
The by-pass valve is adjustable, see Section 5.8.
3.11.3 Venting
The boiler is fitted with an automatic air vent. Additional
provision should be made to enable the heating system
to be vented during filling and commissioning either by
automatic air vents or manually.
3.12 Condensate trap
The boiler is fitted with a siphonic condensate discharge
(ecoTEC plus) or a condensate trap (ecoTEC pro) incor-
porating a water trap of 140 mm.
4 Boiler installation sequence
4.1 Required minimum distances/assembly clear-
ances
min
min 5
min 5
min 500**
min 180
165/246*
Fig. 4.1 Distances during installation (dimensions in mm)
The boiler should be mounted on a flat and vertical area
of wall of sufficient area for the boiler plus the required
clearances for installation and servicing (fig. 4.1). These
are shown on the installation template supplied with the
boiler and are:
– 5 mm either side of the boiler
– 180 mm below the boiler
– 165 mm* above the boiler when utilising the 100 mm
outside diameter flue
– 246 mm* above the boiler when utilising the 125 mm
outside diameter flue
– 500 mm in front of the boiler to enable easy access
for servicing (may be provided by an opening door)
Note
If the boiler is to be fitted in a timber framed
building, it should be fitted in accordance with
British Gas publication DM2 ‘Guide for gas
installations in timber framed housing’.
3 General requirements
4 Boiler installation sequence

17Instructions for installation and servicing ecoTEC
4.1.1 Select position for boiler
Refer to section ‘Boiler location’ for information regard-
ing the appliance location. In general the boiler must be
positioned such that:
• There is adequate space around the boiler for service
and maintenance
• The boiler can be correctly flued, i.e. the flue terminal
position is located in accordance with these instruc-
tions and the air/flue duct can be installed in accord-
ance with the flue installation instructions supplied.
• All necessary pipework can be connected, including
the pressure relief valve and condensate drain.
4.1.2 Unpack the boiler
To unpack the boiler, cut both plastic carton straps, open
box and lift out the polystyrene top packing. Lift the
cardboard box upwards.
Note
Care should be taken not to scratch the white
surface of the boiler casing
4.1.3 Using boiler template
• Fix the paper template to the wall ensure that the
template is vertical.
The template shows:
– The position of the fixing holes for the boiler mounting
bracket.
– The position of the connections.
– The position of the flue exit hole.
• Mark the position of the hanging bracket fixing holes.
• Drill 2 holes Ø 8 mm for the hanging bracket.
Note
Use alternative fixing holes where necessary.
60/100
256723_01 11 2004
5
95
165
25
180
20
175
5
45°
A
A
A
A
A
1065
450
Fig. 4.2 Assembly template
Boiler installation sequence 4

18 Instructions for installation and servicing ecoTEC
4.2 Flue exit
• If using rear flue mark the position of the air/flue duct
and its circumference.
Other flue options
Flue instructions for other flue systems such as vertical
RSF flues, flues run to the side of the boiler and the use
of additional bends etc. are detailed in the flue installa-
tion instructions provided with the boiler.
• Remove the template from the wall and plug the
drilled holes using the wallplugs supplied.
4.3 Fitting the boiler hanging bracket
1
3
2
Fig. 4.3 Appliance with hanging bracket
• Fix the hanging bracket to the wall using the plugs and
screws provided with the appliance.
Note
Use alternative fixing holes where necessary.
Note
If the boiler is to be fitted in a timber framed
building ensure that the bracket is secured to a
substantial part of the timber frame capable of
taking the weight of the boiler.
4.4 Installing flue system
• Install the flue system (refer to the seperate air/flue
duct installation instructions).
4.5 Fitting the boiler
• Lift the boiler (3) up to the wall so that it is slightly
above the hanging bracket (1).
Note
Lift the boiler from either side at the bottom
edge
• Lower the boiler slowly onto the hanging bracket so
that the cross member at the rear of the boiler fully
engages onto the hanging bracket.
4.6 Removing the front case
1
2
Fig. 4.4 Removing/fixing the front case
To remove the front section of the case, proceed as fol-
lows:
• Loosen the screw (1) on the bottom of the unit.
• Push in the two retaining clips (2) on the bottom of
the appliance until the case is released.
• Grasp the front case by its bottom edge, pull it towards
the front and remove it by lifting it off the unit.
4.7 General instructions for heating system
Caution!
Thoroughly cleanse the heating system before
connecting the appliance!
By doing that, residue such as welds, cinder,
hemp, putty, rust, rough dust and similar sub-
stances are removed from the pipes. Otherwise
such substances can be deposited in the appli-
ance and cause damage.
- The appliance is fitted with an expansion vessel (10 l/
0.75 bar). Before assembling the appliance check if
this volume is adequate. If not, an extra expansion ves-
sel must be provided by the plant, see Section 3.9.5.
4 Boiler installation sequence

19Instructions for installation and servicing ecoTEC
4.8 Gas connection
Note
With the spacer frame (Art. No 308 650), the
pipes can be laid in front of the wall upwards
behind the appliance. The distance of the appli-
ance from the wall thus increases by 65 mm.
Danger!
The gas installation may only be established by
an authorised technician.
The legal directives and the local regulations
for gas supply companies must be observed.
Caution!
Ensure a stress-relief assembly of the gas pipes
to avoid leakages!
Caution!
The gas regulating block may be tested for leak-
age only with a maximum pressure of 150 mbar!
Higher testing pressures can damage the gas
fitting.
Caution!
When making final connection to the boiler, if
using soldered fittings, extra care should be
taken to avoid damage to isolation valves
through heat transfer.
2
6
7
3
5
4
1
Fig. 4.5 Fitting the gas connection (example ecoTEC plus, 800
series)
• Insert the union nut (2) and the pinching ring (3) on
the gas connection pipe (1) to the heater.
• Insert the union nut (6) and the pinching ring (5) on
the conduit arc provided with ecoTEC plus appliances
(7).
• Insert the maintenance tap (4) until the stopper on
the gas connection pipe and the conduit arc until the
stopper in the maintenance tap. Tighten both union
nuts in this position of the maintenance tap.
• The diameter of the conduit (7) is 15 mm. Connect a
gas supply pipe of not less than 15 mm diameter to the
copper tail.
Note
Ensure the gas supply pipework is adequately
sized so that a 20 mbar gas pressure is availa-
ble at the boiler inlet at full flow rate.
• Tighten all connections.
• Check the gas connection with leak indicator spray for
leakage.
4.9 Cold water mains inlet and hot water outlet
(ecoTEC plus 800 and pro only)
Caution!
When making final connection to the boiler, if
using soldered fittings, extra care should be
taken to avoid damage to isolation valves
through heat transfer.
1
2
3
4
5
6
7
Fig. 4.6 Installing the hot and cold water connection (ecoTEC
plus, 800 series)
Boiler installation sequence 4

20 Instructions for installation and servicing ecoTEC
ba
r
1
2
3
4
5
6
7
Fig. 4.7 Installing the hot and cold water connection (ecoTEC
pro)
Note
Flush all foreign matter from the mains supply
before connecting to the boiler.
• Insert the seal (1) and screw in the maintenance tap
(2) at the appliance cold water connection.
• Insert the union nut (4) and the pinching ring (3) on
the conduit arc provided with ecoTEC plus appliances
(5). The diameter of the conduit is 15 mm.
• Insert the conduit arc until the stopper in the mainte-
nance tap. Tighten the union nuts in this position.
• Insert the seal (7) and screw in the conduit (6) on the
appliance hot water connection. The diameter of the
conduit is 15 mm.
• Mount the handle for the fill-up valve with a counter-
sunk screw on the maintenance tap (2).
4.10 Heating connection
Caution!
When making final connection to the boiler, if
using soldered fittings, extra care should be
taken to avoid damage to isolation valves
through heat transfer.
4.10.1 Heating flow and return connection
Note
Before connecting the heating circuit to the
boiler, all pipework and radiators must be thor-
oughly flushed to remove any installation
debris.
ecoTEC plus, 800 series
10
11
12
13
9
8
7
6
1
2
3
4
5
Fig. 4.8 Installing the heating flow and return connection for
ecoTEC plus, 800 series
• Insert the seal (1) and screw in the maintenance tap
(2) at the return connection of the appliance.
• Insert the seal (10) and screw in the maintenance tap
(9) at the flow connection of the appliance.
• Install the O-ring seal (12) on the return valve (11).
Note
Lay the filling conduit (13) above the conduit
elbows.
• Insert the union nuts (4) and (7) as well as the pinch-
ing rings (3) and (8) on the conduit elbows (5) and
(6). The diameter of the conduits is 22 mm.
• Insert the conduit elbows until the stopper in the
maintenance taps. Tighten the union nuts in this posi-
tion.
• Mount the handle for the fill-up valve with a counter-
sunk screw on the maintenance tap (9).
4 Boiler installation sequence
/