Dometic B29G, B68G, B162S, B195S, C20G, C50G, C101G, C125G, E7FG, E16FG, E18FGB, E28FG, E40FGD, E45FG, E49FGB, E91FG, E115FG Operating instructions
- Category
- Drink coolers
- Type
- Operating instructions

REFRIGERATION
WINE REFRIGERATORS
EN
Wine refrigerators
Installation and Operating Manual
SV
Vinkyl
Monterings- och bruksanvisning
DE
Weinkühlschrank
Montage- und Bedienungsanleitung
NO
Vinkjøleskap
Monterings- og bruksanvisning
FR
Cave de vieillissement
Instructions de montage et de service
FI
Viinijäähdytin
Asennus- ja käyttöohje
ES
Cava de vinos
Manual de instalación y uso
RU
Винный холодильник
Руководство по эксплуатации и монтажу
PT
Armário climatizado para vinhos
Manual de montagem e operação
PL
Chłodziarka dowina
Instrukcja montażu i obsługi
IT
Cantina climatizzata per vini
Istruzioni di montaggio e d’uso
SK
Vínna chladnička
Návod na montáž a obsluhu
NL
Wijnkoelkast
Montage- en gebruiksaanwijzing
CS
Chladnička navíno
Návod kmontáži aobsluze
DA
Vinkøleskab
Monterings- og betjeningsvejledning
HU
Borklimatizáló szekrény
Szerelési és kezelési útmutató
B29G, B68G, B162S, B195S, C20G, C50G, C101G, C125G
E7FG, E16FG, E18FGB, E28FG, E40FGD, E45FG, E49FGB, E91FG, E115FG
Page is loading ...
Page is loading ...
Page is loading ...
Page is loading ...
Page is loading ...
Page is loading ...
Page is loading ...
Page is loading ...
Page is loading ...
Page is loading ...
Page is loading ...

4445103123 13
Wine Refrigerators
EN
Please read this manual carefully before starting the device. Keep it in a safe place for future reference. If the
device is passed on to another person, this manual must be handed over to the user along with it.
The manufacturer cannot be held liable for damage resulting from improper usage or incorrect operation.
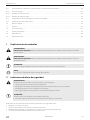
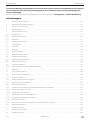
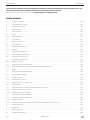
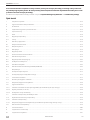
Table of contents
Table of contents
1 Explanation of symbols ............................................................................................................................... 14
2 General Safety Instructions .......................................................................................................................... 14
3 Scope of delivery ....................................................................................................................................... 15
4 Intended use ............................................................................................................................................. 15
5 Technical description ................................................................................................................................. 15
5.1 Shelves .................................................................................................................................................... 16
5.2 Temperature setting ................................................................................................................................... 16
5.3 Features ................................................................................................................................................... 16
6 Mounting and connecting .......................................................................................................................... 17
6.1 Installation site ........................................................................................................................................... 17
6.2 Unpacking ................................................................................................................................................ 17
6.3 Ventilation ................................................................................................................................................ 17
6.4 Adjusting the feet ...................................................................................................................................... 17
6.5 Reversing the door..................................................................................................................................... 17
6.6 Mounting the door handle .......................................................................................................................... 17
6.7 Adjusting the ventilation grille ..................................................................................................................... 18
6.8 Electrical connection .................................................................................................................................. 18
6.9 Integrating appliances ................................................................................................................................ 18
6.10 Installing built-in models (E18FGB, E49FGB) ................................................................................................. 18
7 Operation ................................................................................................................................................. 19
7.1 Beforerstuse ........................................................................................................................................... 19
7.2 Energy saving tipps .................................................................................................................................... 19
7.3 Positioning the bottles ................................................................................................................................ 19
7.4 Operating elements and displays ................................................................................................................. 20
7.5 Switchingtheapplianceonando ..............................................................................................................20
7.6 General settings ........................................................................................................................................20
7.6.1 Setting the LED interior lighting (standard mode or vitrine mode) .....................................................................20
7.6.2 Setting the unit (°C or °F) ............................................................................................................................20
7.6.3 Switching to Sabbath mode ........................................................................................................................20
7.7 Settings for each temperature zone .............................................................................................................. 21
7.7.1 Displaying the set temperature .................................................................................................................... 21
7.7.2 Setting the temperature .............................................................................................................................. 21
7.7.3 Switchingthefanon/o(dynamiccoolingmodeorsilentmode) ..................................................................... 21
7.8 Temperature monitoring ............................................................................................................................. 21
8 Troubleshooting ........................................................................................................................................22
9 Cleaning and maintenance .........................................................................................................................23
9.1 Cleaning the appliance ..............................................................................................................................23

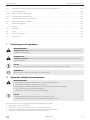
14 4445103123
Explanation of symbols Wine Refrigerators
EN
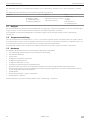
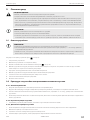
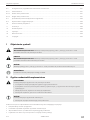
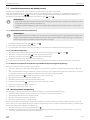
1 Explanation of symbols
WARNING!
Safety instruction: Indicates a hazardous situation that, if not avoided, could result in death or serious injury.
CAUTION!
Safety instruction: Indicates a hazardous situation that, if not avoided, could result in minor or moderate injury.
NOTICE!
Indicates a situation that, if not avoided, can result in property damage.
NOTE:
Supplementary information for operating the product.
2 General Safety Instructions
WARNING!
Instructions pertaining to the risk of death or serious injury!
• Only use the appliance as intended.
• Do not store any explosive substances, such as spray cans with propellants, in the appliance.
• Supervise children to ensure that they do not play with the appliance.
• Do not operate the appliance if it is visibly damaged.
NOTICE!
Instructions pertaining to the risk of material damage!
• Do not use accessories that have not been recommended by the manufacturer.
The manufacturer accepts no liability for damage in the following cases:
• Faulty assembly and connection
• Damagetotheproductresultingfrommechanicalinuences
• Alterations to the product without express permission from the manufacturer
• Use for purposes other than those described in the operating manual
9.2 Procedure in the event of a power failure or if absent ......................................................................................23
9.2.1 Power Failure ............................................................................................................................................23
9.2.2 Short periods of absence ............................................................................................................................ 23
9.2.3 Long periods of absence ............................................................................................................................23
9.3 Checking the water level (humidity control) ................................................................................................... 24
9.4 Replacingtheactivecharcoallter ...............................................................................................................24
10 Moving the appliance ................................................................................................................................24
11 Warranty ...................................................................................................................................................24
12 Storage ....................................................................................................................................................24
13 Disposal ...................................................................................................................................................24
14 Technical data ...........................................................................................................................................25
15 Copyright .................................................................................................................................................28

4445103123 15
Wine Refrigerators Scope of delivery
EN
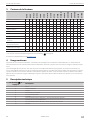
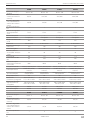
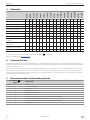
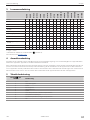
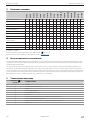
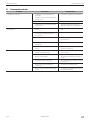
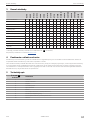
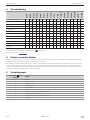
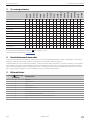
3 Scope of delivery
B29G
B68G
B162S
B195S
C20G
C50G
C101G
C125G
E7FG
E16FG
E18FGB
E28FG
E40FGD
E45FG
E49FGB
E91FG
E115FG
Wine refrigerator x x x x x x x x x x x x x x x x x
Water tank + + x x x x x x x x x x x x x x x
Keys x x x x x x
Label set x x x x x x x x
Carbon Filter x x x x x x x x x x x x
Sliding shelf + + + + x x x x x x x x x x x x
Serving shelf + + + + + x x
Presentation shelf + + + + + x + +
Metal beverage shelf + + + + + + + + +
Doorleupperhinge x x x x x x x x x x x x x x
Installation material x x x x x x x x x x x x x x x x x
Manual* x x x x x x x x x x x x x x x x x
x: included, +: optional
*ManualscanbedownloadedviaQRcode(g.
, on page 3).
Additional accessories under dometic.com.
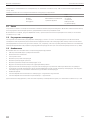
4 Intended use
The appliance is a wine refrigerator. It is intended for the storage and temperature control of wine. Only closed and still sealed
bottles may be stored in the appliance. The appliance is intended for indoor use only.
This appliance can be used by children aged 8 years and older, as well as by persons with diminished physical, sensory or
mental capacities or with a lack of experience and knowledge, providing they are supervised, or have been taught how to use
the appliance safely and are aware of the resulting risks. Children aged from 3 to 8 years are allowed to load and unload the
appliance. Children must be supervised to ensure that they do not play with the appliance.
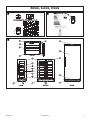
5 Technical description
No in fig. , on
page 3
Description
1 Foot
2 Ventilation grille
3 Door
4 Control panel
5 Temperature zone
6 Shelf
7 Uppertemperaturezone/Letemperaturezone
8 Temperature zone divider
9 Lower temperature zone / Right temperature zone
10 Lock

16 4445103123
Technical description Wine Refrigerators
EN
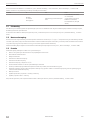
The wine refrigerator comes in 17 models, see “Scope of delivery”, on page 15 and “Technical data”, on page 25.
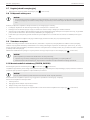
The model name of the wine refrigerator includes the following information:
Example: E 49 FGB
B: Basic
C: Classic
E: Elegance
Maximum number of bottles
to be stored in
F: Frameless
G: Glass
S: Solid
B: Built-in
D: Double door
5.1 Shelves
Theapplianceisfactoryttedwithdetachableshelvesforstoringthebottles.Youcanincreasethecapacitybyusingtheoption-
al accessory of reinforced storage shelves.
Depending on the model sliding shelves, presentation shelves and service shelves are available (see “Scope of delivery”, on
page 15).
5.2 Temperature setting
The temperature can be set in steps of 1 °C or 1 °F using sensor buttons. The temperature zones are chilled or heated automat-
ically to reach or maintain the temperature that is set. A fan can be used for maintaining a constant inner climate, such as in a
wine cellar (dynamic cooling mode).
Some models have two separate adjustable temperature zones (see “Technical data”, on page 25).
5.3 Features
All models of the wine refrigerator are equipped with:
• UV impervious door with a reversable hinge
• Automatic defrosting
• Sensor buttons
• Setting temperature display
• Storing temperature display
• °C/°F temperature display
• LED interior lighting with two operating modes
• Temperaturememoryfunction:Thesettemperatureissavedwhentheunitisswitchedo.
• Temperaturemonitor:Awarningsignalsoundsandthetemperaturedisplayashesiftheinteriortemperaturenoticeably
deviates from the one set
• Sabbath mode
• Temperature alarm system - visual and audible
• Door alarm system - audible
Foradditionalequipmentsuchasalockandanactivecarbonltersee”Scopeofdelivery”,onpage15.

4445103123 17
Wine Refrigerators Mounting and connecting
EN
6 Mounting and connecting
WARNING!
Instructions pertaining to the risk of death or serious injury!
• Move and set up the appliance by at least two people.
NOTICE!
Instructions pertaining to the risk of material damage!
• Do not place the appliance in direct sunlight or in the vicinity of strong heat sources (heating appliances, ovens,
etc.).
• Only locate the appliance indoors, never outside.
• Checkthatthevoltagespecicationonthetypeplateisthesameasthatofthepowersupply.
6.1 Installation site
When selecting the location, observe the following instructions:
• The appliance should stand in the coldest part of the room, away from heat sources (ovens, heating devices or radiators).
• The location must not be damp or wet.
• The appliance must not be exposed to direct sunlight. This can damage the acrylic coating and lead to higher power con-
sumption.
• Thegroundmustbelevelandsucientlystabletobeartheapplianceatfullcapacity.
• Theappliancemustbesucientlyventilated.Theventilationslotsonthefrontoftheappliancemustnotbeobstructed.
• Observe the installation dimensions, see technical data.
6.2 Unpacking
1. Remove all the inner and outer packaging materials before setting up.
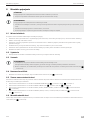
6.3 Ventilation
NOTICE!
• Ensure that the ventilation slots remain clear during the installation.
Obstructed ventilation slots lead to increased power consumption and can damage the appliance.
• NotethatmodelE7FGneedsatleast30mmspaceontherearsideforventilation(g.
, on page 5).
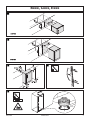
6.4 Adjusting the feet
1. Makesuretheapplianceislevelbyadjustingthefeet(g. , on page 5).
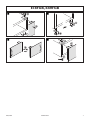
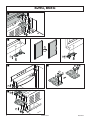
6.5 Reversing the door
Youcanchangethehingeofthedoor,sothatitopenstotheleratherthantheright.Forreversingthedoorfollowthestepsin
thementionedgures:
• ReversingthedooratE18FGBandE49FGB(g.
,onpage7tog. , on page 7)
• ReversingthedooratB29GandB68G(g.
,onpage8tog. , on page 8)
• ReversingthedooratE7FG,E16FG,E28FG,E45FG,C20GandC50G(g.
,onpage9tog. , on page 9)
• ReversingthedooratB162S,B195S,C101G,C125G,E91FG,E115FG(g.
,onpage10tog. , on page 11)
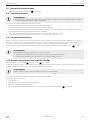
6.6 Mounting the door handle
Mountthedoorhandleonthesideoppositetothehinge.Togetaccesstotheborespartlyliothesealingattheinsideofthe
door(g. , on page 5).

18 4445103123
Mounting and connecting Wine Refrigerators
EN
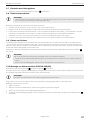
6.7 Adjusting the ventilation grille
1. Adjusttheheightoftheventilationgrill(g. , on page 6).
6.8 Electrical connection
NOTICE!
• Leavetheappliancetostanduprightforabout2hoursaertransporting,beforeyouconnectittothepower
supply. Otherwise this could cause faults in the cooling system.
Observe the following when connecting the appliance:
• Connect the appliance to a circuit that is protected with 15 A.
• Checkthatthevoltagespecicationonthetypeplateisthesameasthatofthepowersupply.
• Havethesocketandpowercircuitcheckedbyaqualiedelectriciantoensurethatthesocketisearthedcorrectly.Donot
use an extension cable or a multiple power socket.
• The cable must rest securely behind the appliance and not be allowed to lie or hang unprotected.
• Ensure that the power cable is not jammed when pushing the appliance into place.
6.9 Integrating appliances
All free-standing models may as well be integrated either under a worktop between 820 mm and 890 mm in height or be-
tween other cabinets. If you integrate your wine refrigerator, observe the installation dimensions and ensure the door will open
and close properly in the chosen location. Make sure your installation does not block the front ventilation grille.
NotethatmodelE7FGneedsatleast30mmspaceontherearsideforventilation(g.
, on page 5).
NOTICE!
If the appliance is fully integrated behind a skirting board:
• Ensure that the ventilation openings in the skirting board have a cross-section of at least 300 cm
2
.
• Remove the ventilation grilles, so that warm air can disperse unhindered.
6.10 Installing built-in models (E18FGB, E49FGB)
Observetheinstallationdimensions(g. ,onpage5andg. , on page 5).
The appliance is equipped with an integrated ventilation system to disperse the warm air automatically. Air intake is provided
underneath the appliance door and the air escapes at the top of the door.
NOTICE!
The air inlet and outlet must not be covered or blocked in any way.
Aerinstallationmakesurethattheappliancedooropensandclosesproperly.
Secure the appliance inside the cabinet:
1. Open the door.
2. Pop out the two cover caps on the opposite side of the hinge.
3. Tighten the screws through the attachment bracket.
4. Screwtheattachmentbrackettotheinsideofthecabinettosecuretheapplianceintheniche(g.
, on page 6).

4445103123 19
Wine Refrigerators Operation
EN
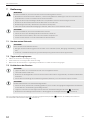
7 Operation
WARNING!
Instructions pertaining to the risk of death or serious injury!
• Neverusetheapplianceinroomswhereammablematerialsarestoredorammablegaseshavebuiltup.
Sparks from the motor could ignite them.
• Do not store any explosive substances, such as spray cans with propellants, in the appliance.
• Keep the keys out of the reach of children.
• Supervise children to ensure that they do not play with the appliance.
• Do not operate the appliance if it is visibly damaged.
NOTICE!
Instructions pertaining to the risk of material damage!
• Do not place any electrical devices inside the refrigerator.
• Do not use accessories that have not been recommended by the manufacturer.
• Never pull the plug out of the socket by the connection cable.
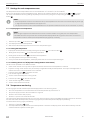
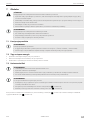
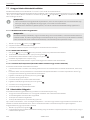
7.1 Before rst use
NOTICE!
Beforeyouusetheapplianceforthersttime:
• Clean the appliance inside and outside for hygienic reasons (see “Cleaning and maintenance”, on page 23).
• Check that the operating voltage matches the mains voltage (see type plate).
7.2 Energy saving tipps
• Donotopentheappliancemoreoenthannecessary.
• Do not leave the door open for longer than necessary.
• Clean dust and dirt from the condenser at regular intervals.
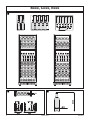
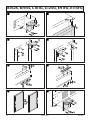
7.3 Positioning the bottles
NOTICE!
• Only store wine in closed and still sealed bottles.
• Do not overload the appliance.
• Do not cover the shelves with aluminium foil or any other objects, as this obstructs the air circulation.
• Be sure to use reinforced storage shelves (accessory) if you want to stack bottles.
NOTICE!
For wine refrigerators with sliding shelves:
• Make sure that the door is fully open when you pull out the shelves on roller-bearings. Otherwise the door seal
can be damaged.
• Donotputmorethantwolayersofbottlesonaslidingshelf(g.
, on page 4).
• Observetheallowednumberofbottlesdependingontheshelf-width(g.
, on page 4).
Forspace-ecientstoragenotethegivenexample(g.
, on page 4). The example refers to standard Bordeaux type
bottles(g. , on page 4).

20 4445103123
Operation Wine Refrigerators
EN
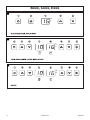
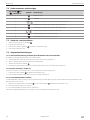
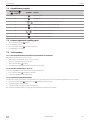
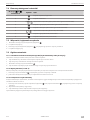
7.4 Operating elements and displays
No in fig. to ,
on page 12
Symbol Description
1
On/Obutton
2
Light button
3
– /
/
Temperaturedisplay(onlyzone/toporlezone)
4
Upbutton(onlyzone/toporlezone)
5
Downbutton(onlyzone/toporlezone)
6
/
Temperature display (bottom or right zone)
7
Up button (bottom or right zone)
8
Down button (bottom or right zone)
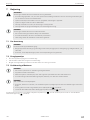
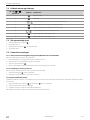
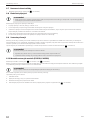
7.5 Switching the appliance on and o
1. Presstheon/obutton briey.
9
The appliance is switched on.
2. Presstheon/obutton
foratleast5seconds.
9
Theapplianceisswitchedo.
7.6 General settings
7.6.1 Setting the LED interior lighting (standard mode or vitrine mode)
TheLEDinteriorlightinghastwodierentmodes:
• Standard mode: The interior is illuminated when the door is opened.
• Vitrine mode: The interior is illuminated constantly.
1. Press the light button
briey.
9
The lighting mode changes from standard mode to vitrine mode or vice-versa.
7.6.2 Setting the unit (°C or °F)
YoucanselectwhetherthetemperatureisdisplayedinCelsiusorFahrenheit.
1. Press the light button
foratleast5seconds.
9
The display shows the temperature in the other unit.
7.6.3 Switching to Sabbath mode
In Sabbath mode, the display, interior lighting and warning signal for the temperature monitor are deactivated. The refrigera-
tion continues as usual.
1. Pressboththeon/obutton
and the light button for at least 5 seconds.
9
Thetemperatureindicatorashes4times.
9
The Sabbath mode is activated respectively deactivated.
WhentheSabbathmodeisactivated,itswitchesoautomaticallyaer96hours.

4445103123 21
Wine Refrigerators Operation
EN
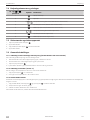
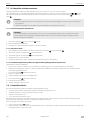
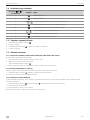
7.7 Settings for each temperature zone
The temperature of each temperature zone can be set between 5 °C and 20 °C (41 °F and 68 °F).
Ifyourwinerefrigeratorhastwotemperaturezones,thereareupanddownbuttonsforeachzone(g.
and , on page
12). In this case make the following settings seperately for each zone by using the corresponding up button and down
button .
NOTE:
• If the temperature zones are one above the other, the temperature for the lower zone must always be just as high
or higher than the temperature for the upper zone .
• Theappliancefunctionsatitsbestifthedierenceintemperaturebetweenthetwozonesisatleast4°C(39°F).
7.7.1 Displaying the set temperature
NOTE:
Whenusingtheapplianceforthersttimeorifithasnotbeenusedforalongtime,theinnertemperature
coulddierfromtheoneyouhaveset.Thetemperaturedisplayashesaslongasthisisthecase.Oncetheset
temperature has been reached, the temperature display lights up constantly.
1. Press the up button
or the down button briey.
9
The display shows the set temperature.
9
Aer5secondsthedisplayshowsthecurrentinnertemperatureagain.
7.7.2 Setting the temperature
1. Displaythesettemperaturebybrieypressingtheupbutton
or the down button .
2. Brieypresstheupbutton
to increase the temperature.
3. Brieypressthedownbutton
to decrease the temperature.
9
Thedisplayasheswhileyoumakethesetting.
9
Once you have set the temperature, the display shows the current inner temperature again.
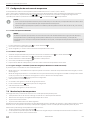
7.7.3 Switching the fan on/o (dynamic cooling mode or silent mode)
Thefancanbeoperatedintwodierentmodes:
• Silentmode:Thefanrunsonlywhenrequired.Itswitchesowhenthesettemperatureisreached.
• Dynamic cooling mode: The fan runs permanently to regulate humidity and temperature. This way an homogeneous cli-
mate for the interior of a temperature zone is reached.
1. Press the down button
foratleast5seconds.
9
Five acoustic signals are emitted.
9
The fan is switched to dynamic cooling mode.
2. Press the up button
foratleast5seconds.
9
Three acoustic signals are emitted.
9
The fan is switched to silent mode.
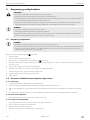
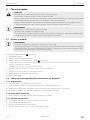
7.8 Temperature monitoring
Awarningsignalsoundsandthetemperaturedisplayashesinthefollowingcases:
• the inner temperature of a zone deviates from the set temperature by more than 5 °C
• the power supply has been disconnected for a long time
• the door has not been shut properly
• the door is open for more than 60 seconds
Thispreventsthetemperaturefromfallingorrisingtoomuchunnoticed,whichcouldaectthequalityofthewine.Oncethe
unithasreachedthesettemperature,thewarningsignalstopsandthetemperaturedisplaystopsashing.
Toswitchothewarningsignalprematurely:
1. Presstheon/obutton
briey.
9
Thetemperaturedisplayashesuntilthesettemperatureisreached.Thedisplayisthenilluminatedconstantlyandindi-
cates that the alarm system is active again.

22 4445103123
Troubleshooting Wine Refrigerators
EN
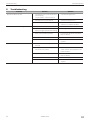
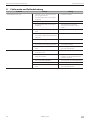
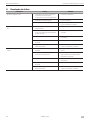
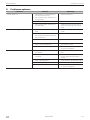
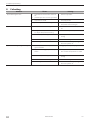
8 Troubleshooting
Problem Reason Solution
Appliance does not work • The appliance is not connected to a
power supply
• Circuit breaker or fuse has blown
• Connect the appliance
• Theapplianceisswitchedo • Switch the appliance on
• Circuit breaker or fuse has blown • Switch on the circuit breaker
• Switch on or replace the fuse
Appliance is not cold enough • Temperature is not set properly • Check the set temperature
• The ambient temperature could
require a higher temperature setting
• Set a higher temperature
• Door was opened frequently • Donotopenthedoormoreoen
than necessary
• Door was not closed properly • Close door properly
• Door is not hermetically sealed • Check the door seal and clean or
replace
Applianceswitchesitselfonando • Room temperature is higher than
average
• Put the appliance in a cooler place
• The appliance was recently replen-
ished with new bottles
• Leave the appliance to work for a
while until the set temperature has
been reached
• Door was opened frequently • Donotopenthedoormoreoen
than necessary
• Door was not closed properly • Close door properly
• Door is not hermetically sealed • Check the door seal and clean or
replace

4445103123 23
Wine Refrigerators Cleaning and maintenance
EN
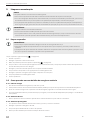
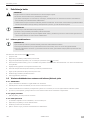
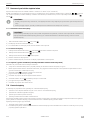
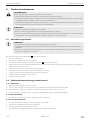
9 Cleaning and maintenance
WARNING!
Instructions pertaining to the risk of death or serious injury!
• Disconnect the appliance from the mains before cleaning and maintenance.
• If this appliance’s connection cable is damaged, it must be replaced by the manufacturer, customer service or a
similarlyqualiedpersoninordertopreventsafetyhazards.
• Thisappliancemayonlyberepairedbyqualiedpersonnel.Inadequaterepairsmaycauseserioushazards.
Should your appliance need to be repaired, please contact customer services.
NOTICE!
Instructions pertaining to the risk of material damage!
• Never pull the plug out of the socket by the connection cable.
• Clean the appliance and disconnect it from the mains if it is empty and you will not need to use it for some time.
Leave the door of the disconnected appliance open to avoid mould.
9.1 Cleaning the appliance
NOTICE!
• Never clean the appliance under running water or in dishwater.
• Do not use abrasive cleaning agents or hard objects during cleaning as these can damage the appliance.
• Make sure that the air inlet and outlet vents on the unit are free of any dirt, so that heat from the interior can be
released and the unit is not damaged.
Regularlycleantheappliance(g.
, on page 6).
1. Empty the appliance.
2. Switchotheapplianceanddisconnecttheplug.
3. Removetheshelvesforoptimumcleaning(g.
, on page 6).
4. Wash the inside with a solution of warm water and baking powder. This should be about two tablespoons of baking pow-
der to half a litre of water.
5. Only wipe the control panel with a slightly damp cloth
6. Wash the outside of the appliance with warm water and a mild detergent.
7. Wipe it down with clean water and dry the surface with a cloth.
8. Clean the shelves with mild detergent.
9. Insert the shelves.
9.2 Procedure in the event of a power failure or if absent
9.2.1 Power Failure
1. In case of a brief power failure avoid opening the door.
9
Theinnertemperaturewillnotbeundulyaected,aslongasthedoorisnotopenedtoofrequently.
2. Aerapowercutoriftheappliancehasbeenswitchedo,wait3to5minutesbeforeswitchingontheapplianceagain.
3. Ifthepowerisoforalongtime,carryouttheappropriateactiontoprotectthecontentsofyourappliance.
9.2.2 Short periods of absence
1. Leave the appliance operating if you are absent for less than 3 weeks.
9.2.3 Long periods of absence
1. If you leave the appliance unused for several months, remove the contents.
2. Switchotheunitanddisconnectitfromthepowersupply.
3. Clean and dry the insides thoroughly.
4. Leave the door ajar to prevent odours and mould from forming.

24 4445103123
Moving the appliance Wine Refrigerators
EN
9.3 Checking the water level (humidity control)
Ifyourapplianceisequippedwithawatertank,regularlycheckthewaterlevelandchangethewater(g. , on page 6).
1. Take out the water tank.
2. Empty the water tank and clean it.
3. Fill the water tank 2/3 full with water and place it on the grid on the top shelf.
4. Make sure that the water tank is securely positioned on the grid so that it cannot tip over.
9.4 Replacing the active charcoal lter
Ifyourapplianceisequippedwithanactivecharcoallter,replaceitwithanewoneonceayear(g. , on page 6):
1. Turnthelterby90°clockwiseoranti-clockwiseandremoveit.
2. Insertanewlter.
3. Turnthelter90°clockwiseoranti-clockwiseuntilitclicksintoposition.
10 Moving the appliance
WARNING!
Instructions pertaining to the risk of death or serious injury!
• Move and set up the appliance by at least two people.
11 Warranty
The statutory warranty period applies. If the product is defective, please contact your retailer or the manufacturer’s branch in
your country (dometic.com/dealer).
For repair and warranty processing, please include the following documents when you send in the device:
• a copy of the receipt with the purchasing date
• a reason for the claim or description of the fault
The warranty covers manufacturing defects, materials and parts. The warranty does not cover fading of the cover and wear and
tear due to UV radiation, misuse, accidental damage, storm damage, or permanent, semi-permanent or commercial use. It
doesnotcoveranyresultingdamage.Pleasecontactyourdealerforclaims.Thisdoesnotaectyourstatutoryrights.
12 Storage
NOTICE!
Material damage!
• Store the wine refrigerator in a dry place when not in use.
• Do not store the wine refrigerator damp or wet.
• Leave the door open ajar.
• Always ensure good ventilation to avoid moisture.
13 Disposal
Place the packaging material in the appropriate recycling waste bins wherever possible.
Ifyouwishtonallydisposetheproduct,askyourlocalrecyclingcentreorspecialistdealerfordetailsabout
how to do this in accordance with the applicable disposal regulations.
Protect the environment!
Do not dispose of any batteries with general household waste.
Return defective or used batteries to your retailer or dispose of them at collection points.

4445103123 25
Wine Refrigerators Technical data
EN
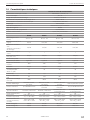
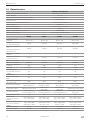
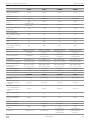
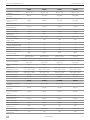
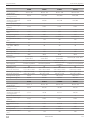
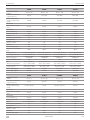
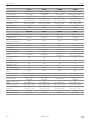
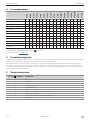
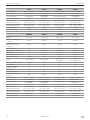
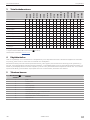
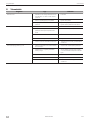
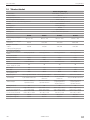
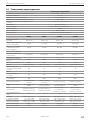
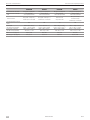
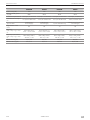
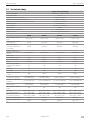
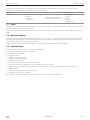
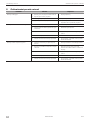
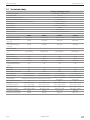
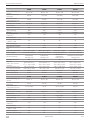
14 Technical data
All Wine Refrigerators
Rated Power Supply 220-240V~ / 50Hz / 1P
Climate Class SN - ST
Storage Temperature Range 5-20°C / 41-68°F
Wine Storage Compartment Humidity 50% - 80%
Compressor or Thermoelectric System Compressor (Reciprocating)
Defrosting Automatic
Cooling Type Fan Cooling
Refrigerant Type R600a
Foaming Agent of Polyurethane Cyclopentane
Power Cord 1.8 m, Black, Schuko Plug
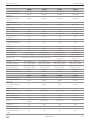
B29G B68G B162S B185S
Size (width - bottles) 30 cm - 20 60 cm - 54 60 cm - 100 60 cm - 125
Total Gross/Storing
Volume (l)
62/57 152/134 310/262 380/335
Max. Bottles with
Sliding/Storage
Shelves
20/29 52/68 102/162 126/195
Number of Compart-
ment
1 1 1 1
Wine Conditioning
System
Single Single Single Single
Number of Doors 1 1 1 1
Default Opening Le Le Le Le
Door Opening Angle 180° 180° 110° 110°
Shelves 2 Fixed 2 Fixed 3 Fixed 4 Fixed
Sound Power Level
(LWA - db(A) re 1 pW)
40 42 42 42
Current (A) 0.6 1.2 1.4 1.4
Power Input (W) 85 100 160 160
Heater Winter System
(W)
≤80 ≤120 ≤120 ≤120
Display Position Outside Top Front Outside Top Front Inside Behind Door Inside Behind Door
Interior Light 0.15 W LED White 2x 0.15 W LED White 2x 0.15 W LED White 2x 0.15 W LED White
Installation Type
Built-Under/
Freestanding
Built-Under/
Freestanding
Built-In/Recessed/
Freestanding
Built-In/Recessed/
Freestanding
Adjustable Feet (mm) 80 80 80 80
Dimensions
(WxHxD mm/Inches)
295 x 863 x 615 /
11
5
/
8
x 34 x 24¼
595 x 863 x 615 /
23
½
x 34 x 24¼
595 x 1476 x 615 /
23
½
x 58
1
/
8
x 24¼
595 x 1768 x 615 /
23
½
x 69
5
/
8
x 24¼
Carton Dimensions
(WxHxD mm/Inches)
326 x 920 x 628
12¾ x 36¼ x 24¾
660 x 935 x 660
26 x 36
7
/
8
x 26
660 x 1566 x 660
26 x 61
5
/
8
x 26
660 x 2002 x 628
26 x 78
7
/
8
x 24¾
Net Weight (kg/lb) 26/57 42/92 56.5/125 68/150
Gross Weight (kg/lb) 28/62 46/101 62/137 79.5/175

26 4445103123
Technical data Wine Refrigerators
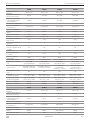
EN
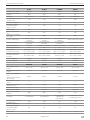
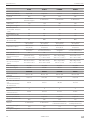
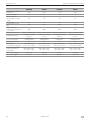
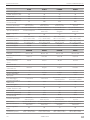
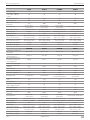
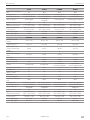
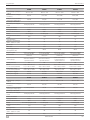
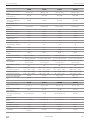
C20G C50G C101G C125G
Size (width - bottles) 30 cm - 20 60 cm - 54 60 cm - 100 60 cm - 125
Total Gross/Storing
Volume (l)
62/57 152/134 315/286 390/350
Max. Bottles with
Sliding/Storage
Shelves
20/26 50/66 101/149 125/182
Number of Compart-
ment
1 1 1 1
Wine Conditioning
System
Single Single Single Single
Number of Doors 1 1 1 1
Default Opening Le Le Le Le
Door Opening Angle 180° 180° 110° 110°
Shelves 4 Sliding 4 Sliding 6 Sliding 8 Sliding
Energy Consumption
(kWh/year)
102 145 160 165
Energy Class A+ A A A
Sound Power Level
(LWA - db(A) re 1 pW)
40 42 42 42
Current (A) 0.6 1.2 1.4 1.4
Power Input (W) 85 100 160 160
Heater Winter System
(W)
≤80 ≤120 ≤120 ≤120
Display Position Inside Behind Door Inside Behind Door Inside Behind Door Inside Behind Door
Interior Light 6x 0.05 W LED White 6x 0.05 W LED White 12x 0.05 W LED White 15x 0.05 W LED White
Installation Type
Built-Under/
Freestanding
Built-Under/
Freestanding
Built-In/Recessed/
Freestanding
Built-In/Recessed/
Freestanding
Adjustable Feet (mm) 80 80 80 80
Dimensions
(WxHxD mm/Inches)
295 x 820x 615 /
11
5
/
8
x 32¼ x 24¼
595 x 820x 615 /
23
½
x 32¼ x 24¼
595 x 1476 x 615 /
23
½
x 58
1
/
8
x 24¼
595 x 1768 x 615 /
23
½
x 69
5
/
8
x 24¼
Carton Dimensions
(WxHxD mm/Inches)
326 x 875 x 628
12¾ x 34½ x 24¾
660 x 885 x 660
26 x 34
7
/
8
x 26
660 x 1566 x 660
26 x 61
5
/
8
x 26
660 x 2002 x 628
26 x 78
7
/
8
x 24¾
Net Weight (kg/lb) 26/57 41/90 69.5/153 78.5/173
Gross Weight (kg/lb) 28/62 45/99 75/165 90/198
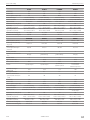
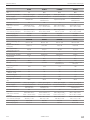
E7FG E16FG E18FGB E28FG
Size (width - bottles) 15 cm - 7 30 cm - 20 60 cm - 18 40 cm - 28
Total Gross/Storing
Volume (l)
22/19 62/52 52/46 90/75
Max. Bottles with
Sliding/Storage
Shelves
7/N.A. 16/19 18/N.A. 28/33
Number of Compart-
ment
1 2 1 2
Wine Conditioning
System
Single Single Single Single
Number of Doors 1 1 1 1
Default Opening Le Le Vertical Le
Door Opening Angle 180° 180° 105° 180°
Shelves 6 Black Column Racks 5 Sliding 2 Sliding 5 Sliding
Energy Consumption
(kWh/year)
135 139 106 108
Energy Class A A A+ A+
Sound Power Level
(LWA - db(A) re 1 pW)
39 40 37 42
Current (A) 0.4 0.6 0.6 1.2

4445103123 27
Wine Refrigerators Technical data
EN
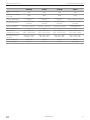
E7FG E16FG E18FGB E28FG
Power Input (W) 60 85 85 100
Heater Winter System
(W)
30
≤80 ≤50 ≤80
Display Position Inside Behind Door Inside Behind Door Inside Behind Door Inside Behind Door
Interior Light 3x 0.05 W LED White 12x 0.05 W LED White 6x 0.05 W LED White 12x 0.05 W LED White
Installation Type Built-Under
Built-Under/
Freestanding
Fully Integrated Built-Under/Freestanding
Adjustable Feet (mm) 80 80 10 80
Dimensions
(WxHxD mm/Inches)
148x 820x 570 /
5
7
/
8
x 32¼ x 22½
295 x 820x 615 /
11
5
/
8
x 32¼ x 24¼
590 x 455 x 600 /
23¼ x 17
7
/
8
x 23
5
/
8
395 x 820 x 615 /
15½ x 32¼ x 24¼
Carton Dimensions
(WxHxD mm/Inches)
190 x 875 x 570 /
7½ x 34½ x 22½
326 x 865 x 628 /
12¾ x 34¼ x 24¾
660 x 550 x 660 /
26 x 21
5
/
8
x 26
460 x 880 x 628 /
18
1
/
8
x 34
5
/
8
x 24¾
Net Weight (kg/lb) 18.5/40 31.5/69 30.5/67 36.5/80
Gross Weight (kg/lb) 20/44 39/86 35/77 39/86
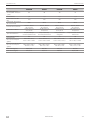
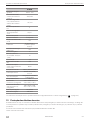
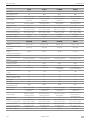
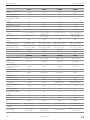
E40FGD E45FG E49FGB E91FG
Size (width - bottles) 60 cm - 40 60 cm - 54 60 cm - 49 60 cm - 100
Total Gross/Storing
Volume (l)
124/115 152/125 142/116 315/275
Max. Bottles with
Sliding/Storage
Shelves
40/55 45/61 49/49 91/123
Number of Compart-
ment
2 2 2 2
Wine Conditioning
System
Twin Single Single Twin
Number of Doors 2 1 1 1
Default Opening - Le Le Le
Door Opening Angle 180° 180° 105° 110°
Shelves 11 Sliding 5 Sliding
4 Sliding,
1DisplayShelf
7 Sliding, 1 Serving
Drawer Shelf
Energy Consumption
(kWh/year)
109 109 112 158
Energy Class A+ A+ A+ A
Sound Power Level
(LWA - db(A) re 1 pW)
42 42 42 41
Current (A) 1.2 1.2 1.2 1.4
Power Input (W) 100 100 100 160
Heater Winter System
(W)
≤80 ≤120 ≤120 ≤120
Display Position Inside Behind Door Inside Behind Door Inside Behind Door Inside Behind Door
Interior Light 12x 0.05 W LED White 12x 0.05 W LED White 10x 0.05 W LED White 24x 0.05 W LED White
Installation Type
Built-Under/
Freestanding
Built-Under/
Freestanding
Fully Integrated
Built-In/Recessed/
Freestanding
Adjustable Feet (mm) 80 80 10 80
Dimensions
(WxHxD mm/Inches)
595x 820x 615 /
23½
x 32¼ x 24¼
595 x 820x 615 /
23½ x 32¼ x 24¼
590 x 885 x 600 /
23¼ x 34
7
/
8
x 23
5
/
8
595 x 1476 x 615 /
23½ x 58
1
/
8
x 24¼
Carton Dimensions
(WxHxD mm/Inches)
660 x 885 x 660 /
26x 34
7
/
8
x 26
660 x 885 x 660 /
26x 34
7
/
8
x 26
660 x 980 x 660/
26x 38
5
/
8
x 26
660 x 1566 x 660 /
26
1
/
8
x 61
5
/
8
x 26
Net Weight (kg/lb) 46.5/102 48/106 50/110 82/181
Gross Weight (kg/lb) 50.5/111 52/115 56/123 87.5/193

28 4445103123
Copyright Wine Refrigerators
EN
E115FG
Size (width - bottles) 60 cm - 125
Total Gross/Storing
Volume (l)
390/338
Max. Bottles with
Sliding/Storage
Shelves
115/155
Number of Compart-
ment
2
Wine Conditioning
System
Twin
Number of Doors 1
Default Opening Le
Door Opening Angle 110°
Shelves
10 Sliding, 1 Serving
Drawer Shelf
Energy Consumption
(kWh/year)
165
Energy Class A
Sound Power Level
(LWA - db(A) re 1 pW)
41
Current (A) 1.4
Power Input (W) 160
Heater Winter System
(W)
≤120
Display Position Inside Behind Door
Interior Light 30x 0.05 W LED White
Installation Type
Built-In/Recessed/
Freestanding
Adjustable Feet (mm) 80
Dimensions
(WxHxD mm/Inches)
595 x 1768 x 615 /
23½ x 69
5
/
8
x 24¼
Carton Dimensions
(WxHxD mm/Inches)
660 x 2002 x 628
26
1
/
8
x 78
7
/
8
x 24¾
Net Weight (kg/lb) 92.5/204
Gross Weight (kg/lb) 104/229
FurtherproductinformationcanbeaccessedviaQRcodeontheenergylabel(g.
, on page 3).
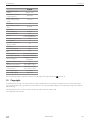
15 Copyright
© 2020 Dometic Group. The visual appearance of the contents of this manual is protected by copyright and design law. The
underlying technical design and the products contained herein may be protected by design, patent or be patent pending.
The trademarks mentioned in this manual belong to Dometic Sweden AB.
All rights are reserved.
Page is loading ...
Page is loading ...
Page is loading ...
Page is loading ...
Page is loading ...
Page is loading ...
Page is loading ...
Page is loading ...
Page is loading ...
Page is loading ...
Page is loading ...
Page is loading ...
Page is loading ...
Page is loading ...
Page is loading ...
Page is loading ...
Page is loading ...
Page is loading ...
Page is loading ...
Page is loading ...
Page is loading ...
Page is loading ...
Page is loading ...
Page is loading ...
Page is loading ...
Page is loading ...
Page is loading ...
Page is loading ...
Page is loading ...
Page is loading ...
Page is loading ...
Page is loading ...
Page is loading ...
Page is loading ...
Page is loading ...
Page is loading ...
Page is loading ...
Page is loading ...
Page is loading ...
Page is loading ...
Page is loading ...
Page is loading ...
Page is loading ...
Page is loading ...
Page is loading ...
Page is loading ...
Page is loading ...
Page is loading ...
Page is loading ...
Page is loading ...
Page is loading ...
Page is loading ...
Page is loading ...
Page is loading ...
Page is loading ...
Page is loading ...
Page is loading ...
Page is loading ...
Page is loading ...
Page is loading ...
Page is loading ...
Page is loading ...
Page is loading ...
Page is loading ...
Page is loading ...
Page is loading ...
Page is loading ...
Page is loading ...
Page is loading ...
Page is loading ...
Page is loading ...
Page is loading ...
Page is loading ...
Page is loading ...
Page is loading ...
Page is loading ...
Page is loading ...
Page is loading ...
Page is loading ...
Page is loading ...
Page is loading ...
Page is loading ...
Page is loading ...
Page is loading ...
Page is loading ...
Page is loading ...
Page is loading ...
Page is loading ...
Page is loading ...
Page is loading ...
Page is loading ...
Page is loading ...
Page is loading ...
Page is loading ...
Page is loading ...
Page is loading ...
Page is loading ...
Page is loading ...
Page is loading ...
Page is loading ...
Page is loading ...
Page is loading ...
Page is loading ...
Page is loading ...
Page is loading ...
Page is loading ...
Page is loading ...
Page is loading ...
Page is loading ...
Page is loading ...
Page is loading ...
Page is loading ...
Page is loading ...
Page is loading ...
Page is loading ...
Page is loading ...
Page is loading ...
Page is loading ...
Page is loading ...
Page is loading ...
Page is loading ...
Page is loading ...
Page is loading ...
Page is loading ...
Page is loading ...
Page is loading ...
Page is loading ...
Page is loading ...
Page is loading ...
Page is loading ...
Page is loading ...
Page is loading ...
Page is loading ...
Page is loading ...
Page is loading ...
Page is loading ...
Page is loading ...
Page is loading ...
Page is loading ...
Page is loading ...
Page is loading ...
Page is loading ...
Page is loading ...
Page is loading ...
Page is loading ...
Page is loading ...
Page is loading ...
Page is loading ...
Page is loading ...
Page is loading ...
Page is loading ...
Page is loading ...
Page is loading ...
Page is loading ...
Page is loading ...
Page is loading ...
Page is loading ...
Page is loading ...
Page is loading ...
Page is loading ...
Page is loading ...
Page is loading ...
Page is loading ...
Page is loading ...
Page is loading ...
Page is loading ...
Page is loading ...
Page is loading ...
Page is loading ...
Page is loading ...
Page is loading ...
Page is loading ...
Page is loading ...
Page is loading ...
Page is loading ...
Page is loading ...
Page is loading ...
Page is loading ...
Page is loading ...
Page is loading ...
Page is loading ...
Page is loading ...
Page is loading ...
Page is loading ...
Page is loading ...
Page is loading ...
Page is loading ...
Page is loading ...
Page is loading ...
Page is loading ...
Page is loading ...
Page is loading ...
Page is loading ...
Page is loading ...
Page is loading ...
Page is loading ...
Page is loading ...
Page is loading ...
Page is loading ...
Page is loading ...
Page is loading ...
Page is loading ...
Page is loading ...
Page is loading ...
Page is loading ...
Page is loading ...
Page is loading ...
Page is loading ...
Page is loading ...
Page is loading ...
Page is loading ...
Page is loading ...
Page is loading ...
Page is loading ...
Page is loading ...
Page is loading ...
Page is loading ...
Page is loading ...
Page is loading ...
Page is loading ...
Page is loading ...
Page is loading ...
Page is loading ...
Page is loading ...
Page is loading ...
Page is loading ...
Page is loading ...
Page is loading ...
Page is loading ...
Page is loading ...
Page is loading ...
Page is loading ...
Page is loading ...
Page is loading ...
Page is loading ...
Page is loading ...
Page is loading ...
Page is loading ...
Page is loading ...
Page is loading ...
Page is loading ...
Page is loading ...
Page is loading ...
Page is loading ...
Page is loading ...
Page is loading ...

YOUR LOCAL
SALES OFFICE
dometic.com/sales-offices
YOUR LOCAL
DEALER
dometic.com/dealer
YOUR LOCAL
SUPPORT
dometic.com/contact
dometic.com
A complete list of Dometic companies, which comprise the Dometic Group, can be found in the public filings of:
DOMETIC GROUP AB • Hemvärnsgatan 15 • SE-17154 Solna • Sweden
4445103123 | 08/2020
-
 1
1
-
 2
2
-
 3
3
-
 4
4
-
 5
5
-
 6
6
-
 7
7
-
 8
8
-
 9
9
-
 10
10
-
 11
11
-
 12
12
-
 13
13
-
 14
14
-
 15
15
-
 16
16
-
 17
17
-
 18
18
-
 19
19
-
 20
20
-
 21
21
-
 22
22
-
 23
23
-
 24
24
-
 25
25
-
 26
26
-
 27
27
-
 28
28
-
 29
29
-
 30
30
-
 31
31
-
 32
32
-
 33
33
-
 34
34
-
 35
35
-
 36
36
-
 37
37
-
 38
38
-
 39
39
-
 40
40
-
 41
41
-
 42
42
-
 43
43
-
 44
44
-
 45
45
-
 46
46
-
 47
47
-
 48
48
-
 49
49
-
 50
50
-
 51
51
-
 52
52
-
 53
53
-
 54
54
-
 55
55
-
 56
56
-
 57
57
-
 58
58
-
 59
59
-
 60
60
-
 61
61
-
 62
62
-
 63
63
-
 64
64
-
 65
65
-
 66
66
-
 67
67
-
 68
68
-
 69
69
-
 70
70
-
 71
71
-
 72
72
-
 73
73
-
 74
74
-
 75
75
-
 76
76
-
 77
77
-
 78
78
-
 79
79
-
 80
80
-
 81
81
-
 82
82
-
 83
83
-
 84
84
-
 85
85
-
 86
86
-
 87
87
-
 88
88
-
 89
89
-
 90
90
-
 91
91
-
 92
92
-
 93
93
-
 94
94
-
 95
95
-
 96
96
-
 97
97
-
 98
98
-
 99
99
-
 100
100
-
 101
101
-
 102
102
-
 103
103
-
 104
104
-
 105
105
-
 106
106
-
 107
107
-
 108
108
-
 109
109
-
 110
110
-
 111
111
-
 112
112
-
 113
113
-
 114
114
-
 115
115
-
 116
116
-
 117
117
-
 118
118
-
 119
119
-
 120
120
-
 121
121
-
 122
122
-
 123
123
-
 124
124
-
 125
125
-
 126
126
-
 127
127
-
 128
128
-
 129
129
-
 130
130
-
 131
131
-
 132
132
-
 133
133
-
 134
134
-
 135
135
-
 136
136
-
 137
137
-
 138
138
-
 139
139
-
 140
140
-
 141
141
-
 142
142
-
 143
143
-
 144
144
-
 145
145
-
 146
146
-
 147
147
-
 148
148
-
 149
149
-
 150
150
-
 151
151
-
 152
152
-
 153
153
-
 154
154
-
 155
155
-
 156
156
-
 157
157
-
 158
158
-
 159
159
-
 160
160
-
 161
161
-
 162
162
-
 163
163
-
 164
164
-
 165
165
-
 166
166
-
 167
167
-
 168
168
-
 169
169
-
 170
170
-
 171
171
-
 172
172
-
 173
173
-
 174
174
-
 175
175
-
 176
176
-
 177
177
-
 178
178
-
 179
179
-
 180
180
-
 181
181
-
 182
182
-
 183
183
-
 184
184
-
 185
185
-
 186
186
-
 187
187
-
 188
188
-
 189
189
-
 190
190
-
 191
191
-
 192
192
-
 193
193
-
 194
194
-
 195
195
-
 196
196
-
 197
197
-
 198
198
-
 199
199
-
 200
200
-
 201
201
-
 202
202
-
 203
203
-
 204
204
-
 205
205
-
 206
206
-
 207
207
-
 208
208
-
 209
209
-
 210
210
-
 211
211
-
 212
212
-
 213
213
-
 214
214
-
 215
215
-
 216
216
-
 217
217
-
 218
218
-
 219
219
-
 220
220
-
 221
221
-
 222
222
-
 223
223
-
 224
224
-
 225
225
-
 226
226
-
 227
227
-
 228
228
-
 229
229
-
 230
230
-
 231
231
-
 232
232
-
 233
233
-
 234
234
-
 235
235
-
 236
236
-
 237
237
-
 238
238
-
 239
239
-
 240
240
-
 241
241
-
 242
242
-
 243
243
-
 244
244
-
 245
245
-
 246
246
-
 247
247
-
 248
248
-
 249
249
-
 250
250
-
 251
251
-
 252
252
-
 253
253
-
 254
254
-
 255
255
-
 256
256
-
 257
257
-
 258
258
-
 259
259
-
 260
260
-
 261
261
-
 262
262
-
 263
263
-
 264
264
-
 265
265
-
 266
266
-
 267
267
-
 268
268
-
 269
269
-
 270
270
-
 271
271
-
 272
272
-
 273
273
-
 274
274
-
 275
275


Dometic B29G, B68G, B162S, B195S, C20G, C50G, C101G, C125G, E7FG, E16FG, E18FGB, E28FG, E40FGD, E45FG, E49FGB, E91FG, E115FG Operating instructions
- Category
- Drink coolers
- Type
- Operating instructions
Ask a question and I''ll find the answer in the document
Finding information in a document is now easier with AI
in other languages
- italiano: Dometic B29G, B68G, B162S, B195S, C20G, C50G, C101G, C125G, E7FG, E16FG, E18FGB, E28FG, E40FGD, E45FG, E49FGB, E91FG, E115FG Istruzioni per l'uso
- français: Dometic B29G, B68G, B162S, B195S, C20G, C50G, C101G, C125G, E7FG, E16FG, E18FGB, E28FG, E40FGD, E45FG, E49FGB, E91FG, E115FG Mode d'emploi
- español: Dometic B29G, B68G, B162S, B195S, C20G, C50G, C101G, C125G, E7FG, E16FG, E18FGB, E28FG, E40FGD, E45FG, E49FGB, E91FG, E115FG Instrucciones de operación
- Deutsch: Dometic B29G, B68G, B162S, B195S, C20G, C50G, C101G, C125G, E7FG, E16FG, E18FGB, E28FG, E40FGD, E45FG, E49FGB, E91FG, E115FG Bedienungsanleitung
- русский: Dometic B29G, B68G, B162S, B195S, C20G, C50G, C101G, C125G, E7FG, E16FG, E18FGB, E28FG, E40FGD, E45FG, E49FGB, E91FG, E115FG Инструкция по эксплуатации
- Nederlands: Dometic B29G, B68G, B162S, B195S, C20G, C50G, C101G, C125G, E7FG, E16FG, E18FGB, E28FG, E40FGD, E45FG, E49FGB, E91FG, E115FG Handleiding
- português: Dometic B29G, B68G, B162S, B195S, C20G, C50G, C101G, C125G, E7FG, E16FG, E18FGB, E28FG, E40FGD, E45FG, E49FGB, E91FG, E115FG Instruções de operação
- slovenčina: Dometic B29G, B68G, B162S, B195S, C20G, C50G, C101G, C125G, E7FG, E16FG, E18FGB, E28FG, E40FGD, E45FG, E49FGB, E91FG, E115FG Návod na používanie
- dansk: Dometic B29G, B68G, B162S, B195S, C20G, C50G, C101G, C125G, E7FG, E16FG, E18FGB, E28FG, E40FGD, E45FG, E49FGB, E91FG, E115FG Betjeningsvejledning
- polski: Dometic B29G, B68G, B162S, B195S, C20G, C50G, C101G, C125G, E7FG, E16FG, E18FGB, E28FG, E40FGD, E45FG, E49FGB, E91FG, E115FG Instrukcja obsługi
- čeština: Dometic B29G, B68G, B162S, B195S, C20G, C50G, C101G, C125G, E7FG, E16FG, E18FGB, E28FG, E40FGD, E45FG, E49FGB, E91FG, E115FG Operativní instrukce
- svenska: Dometic B29G, B68G, B162S, B195S, C20G, C50G, C101G, C125G, E7FG, E16FG, E18FGB, E28FG, E40FGD, E45FG, E49FGB, E91FG, E115FG Bruksanvisningar
- suomi: Dometic B29G, B68G, B162S, B195S, C20G, C50G, C101G, C125G, E7FG, E16FG, E18FGB, E28FG, E40FGD, E45FG, E49FGB, E91FG, E115FG Käyttö ohjeet
Related papers
-
Dometic E91FG Operating instructions
-
Dometic CS52DV User manual
-
-
-
-
-
-
-
-
Other documents
-
Projecta Solo 9000 Specification
-
Amica WK 341 210 S Weinklimaschrank User manual
-
Electrolux ERW085XAMB User manual
-
-
Haier WS25GA Wine Cooler Owner's manual
-
Teka RV 250 B User manual
-
Whynter BWR-281DZ User manual
-
Fagor WC46DZ User's Manual (1.59 MB)
-
-
 Leibherr USA WFI1061 User manual
