Page is loading ...
Page is loading ...
Page is loading ...
Page is loading ...
Page is loading ...
Page is loading ...
Page is loading ...
Page is loading ...
Page is loading ...

– 1
Please read and comply with
these original instructions prior
to the initial operation of your appliance and
store them for later use or subsequent own-
ers.
– Before first start-up it is definitely nec-
essary to read the safety indications Nr.
5.956-249!
– The non-compliance of the operating
and safety instructions may lead to
damages of the appliance and to dan-
gers for the operator and other persons.
– In case of transport damage inform ven-
dor immediately
– When unpacking the product, make
sure that no accessories are missing
and that none of the package contents
have been damaged.
Notes about the ingredients (REACH)
You will find current information about the
ingredients at:
www.kaercher.com/REACH
DANGER
Immediate danger that can cause severe
injury or even death.
몇 WARNING
Possible hazardous situation that could
lead to severe injury or even death.
몇 CAUTION
Pointer to a possibly dangerous situation,
which can lead to minor injuries.
ATTENTION
Pointer to a possibly dangerous situation,
which can lead to property damage.
몇 WARNING
The appliance is not suitable for vacuuming
dust which endangers health.
ATTENTION
This unit is only to be used indoors.
– This carpet vacuum cleaner is intended
for dry cleaning of floor and wall surfac-
es.
– The appliance is not suitable for the use
on hard floors.
– This appliance is suited for the commer-
cial use, e.g. in hotels, schools, hospi-
tals, factories, shops, offices, and rental
companies.
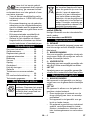
Contents
Environmental protection . . . . EN 1
Danger or hazard levels . . . . . EN 1
Proper use . . . . . . . . . . . . . . . EN 1
Device elements . . . . . . . . . . . EN 2
Operation . . . . . . . . . . . . . . . . EN 2
Transport. . . . . . . . . . . . . . . . . EN 2
Storage . . . . . . . . . . . . . . . . . . EN 2
Maintenance and care . . . . . . EN 2
Troubleshooting . . . . . . . . . . . EN 3
Warranty . . . . . . . . . . . . . . . . . EN 4
Accessories and Spare Parts . EN 4
EC Declaration of Conformity . EN 4
Technical specifications . . . . . EN 5
Environmental protection
The packaging material can be
recycled. Please do not throw
the packaging material into
household waste; please send it
for recycling.
Old appliances contain valuable
materials that can be recycled;
these should be sent for recy-
cling. Batteries, oil, and similar
substances must not enter the
environment. Please dispose of
your old appliances using appro-
priate collection systems.
Danger or hazard levels
Proper use
10 EN

– 2
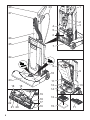
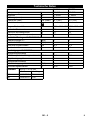
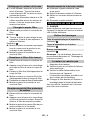
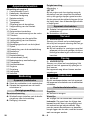
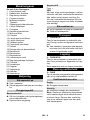
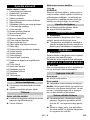
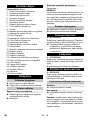
Illustration on Page 2
1 Indicator lamp (red)
2 Cable hook, rotating
3 Handle adjustment
4 Crevice nozzle
5 Upholstery nozzle
6 Nameplate
7 Suction hose on the brush head
8 Locking mechanism of the filter bag
9 Filter bag
10 Unlocking brush head
11 Motor protection filter
12 Filter casing
13 Locking mechanism of the motor pro-
tection filter
14 Locking mechanism of the filter casing
15 Exhaust filter
16 Fastening screw of the side part
17 Side part
18 Turn-lock fastener of the brush cover
19 Brush head
20 Brush roller
21 Brush cover
22 Indicator bundle (red)
23 Pile height adjustment knob
24 Filter cover
25 Main switch
26 Suction tube
27 Suction hose
28 Handle
29 Power cord
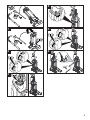
Plug in the mains plug.
Switch on the appliance at the main
switch.
Set the pile height via the adjustment
knob of the brush head.
Perform the cleaning operation.
Illustration
ATTENTION
When sucking with the vacuum wand, the
brush head with the rotating brush roller
may not be placed on a long pile carpet.
Longer contact with the rotating brush roller
could damage or destroy the carpet.
Switch off the appliance at the main
switch.
Pull out the mains plug.
몇 CAUTION
Risk of injury and damage! Observe the
weight of the appliance when you transport
it.
When transporting in vehicles, secure
the appliance according to the guide-
lines from slipping and tipping over.
몇 CAUTION
Risk of injury and damage! Note the weight
of the appliance in case of storage.
This appliance must only be stored in inte-
rior rooms.
DANGER
First pull out the plug from the mains before
carrying out any tasks on the machine.
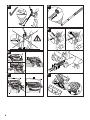
Clean the brush roller.
Check the wear of the brush roller.
Note: The degree of the wear is shown by
a comparison with the indicator bundle of a
different colour. When the black bristles are
at the same height as the red ones, replace
the brush roller.
Device elements
Operation
Turning on the Appliance
Cleaning operations
Brush roller operation
Suction pipe operation
Turn off the appliance
Transport
Storage
Maintenance and care
Maintenance intervals
Daily
Weekly
11EN

– 3
Dismount the brush cover if necessary:
Turn the turn-lock fasteners by 90° and
remove the brush cover.
Cut hair and threads that have got
wound on the brush roller using a pair of
scissors or just remove them.
Unlock and remove the filter cover.
Illustration
Turn the locking mechanism of the filter
bag towards the right. Close, remove,
and dispose of the filter bag.
Illustration
Insert a new filter bag and turn the lock-
ing mechanism of the filter bag towards
the left.
Insert and lock filter cover.
Unlock and remove the filter cover.
Push the locking mechanism of the filter
casing upwards and remove the filter
casing.
Remove the exhaust filter from the filter
housing.
Insert new exhaust filter into filter hous-
ing.
Insert and click the filter housing into its
place.
Insert and lock filter cover.
Unlock and remove the filter cover.
Push the locking mechanism of the mo-
tor protection filter upwards. Remove
and dispose of the motor protection fil-
ter.
Install and lock the new motor protec-
tion filter.
Insert and lock filter cover.
Dismount the side part by means of a
coin.
Pull out the brush roller and dispose of.
Insert a new brush roller.
Reinstall side part.
DANGER
First pull out the plug from the mains before
carrying out any tasks on the machine.
Illustration
Illustration
Illustration
Note: If necessary, dismount brush cover
(refer to "Cleaning of the brush roller").
– No electrical voltage.
Check the receptacle and the fuse of
the power supply.
Check the power cable and the power
plug of the device.
– Thermostat switched off the motor be-
cause of overheating
Replace blocked filters or remove
blockages from the suction hose.
The unit is operational again after it has
cooled down.
Note: The brush roller is equipped with a
slip clutch that disengages when oversized
or blocking objects are sucked in.
Note: The clutch is re-engaged after the
unit is switched off. This produces a loud
rattling sound.
Check the brush roller for obstructing
objects and remove them if necessary.
The noise can not be heard when the unit is
switched back on.
Check the brush roller for obstructing
objects and remove them if necessary.
Remove obstructions from brush head,
suction pipe and suction hose.
Replace the filter bag.
Replace exhaust air filter or motor pro-
tection filter.
Cleaning the brush roller
Replacing the filter bag
Replace exhaust filter
Replace motor protection filter
Replacing the brush roller
Troubleshooting
Remove blockings
Suction pipe/suction hose
Suction hose on the brush head
Brush roller/brush head
Motor does not run
Rattling noise when switched off
Unsatisfying suction result
12 EN

– 4
Check the pile height adjustment knob
for correct adjustment.
Replace the brush roller.
Remove obstructions from brush head,
suction pipe and suction hose.
Replace the filter bag.
If malfunction can not be fixed, the de-
vice must be checked by customer ser-
vice.
The warranty terms published by the rele-
vant sales company are applicable in each
country. We will repair potential failures of
your appliance within the warranty period
free of charge, provided that such failure is
caused by faulty material or defects in man-
ufacturing. In the event of a warranty claim
please contact your dealer or the nearest
authorized Customer Service centre.
Please submit the proof of purchase.
– Only use accessories and spare parts
which have been approved by the man-
ufacturer. The exclusive use of original
accessories and original spare parts
ensures that the appliance can be oper-
ated safely and trouble free.
– At the end of the operating instructions
you will find a selected list of spare parts
that are often required.
– For additional information about spare
parts, please go to the Service section
at www.kaercher.com.
We hereby declare that the machine de-
scribed below complies with the relevant
basic safety and health requirements of the
EU Directives, both in its basic design and
construction as well as in the version put
into circulation by us. This declaration shall
cease to be valid if the machine is modified
without our prior approval.
5.957-726
The undersigned act on behalf and under
the power of attorney of the company man-
agement.
Authorised Documentation Representative
S. Reiser
Alfred Kärcher GmbH Co. KG
Alfred-Kärcher-Str. 28 - 40
71364 Winnenden (Germany)
Phone: +49 7195 14-0
Fax: +49 7195 14-2212
Winnenden, 2014/02/01
The red indicator lamp is ON
Customer Service
Warranty
Accessories and Spare Parts
EC Declaration of Conformity
Product: Dry vacuum cleaner
Type: 1.023-xxx
Type: 1.435-xxx
Relevant EU Directives
2006/42/EC (+2009/127/EC)
2004/108/EC
2011/65/EU
2009/125/EC
Applied harmonized standards
EN 55014–1: 2006+A1: 2009+A2: 2011
EN 55014–2: 1997+A1: 2001+A2: 2008
EN 60335–1
EN 60335–2–69
EN 61000–3–2: 2006+A1: 2009+A2: 2009
EN 61000–3–3: 2013
EN 62233: 2008
EN 50581
EN 60312: 2013
Applied national standards
-
Applied regulations
666/2013
CEO
Head of Approbation
13EN

– 5
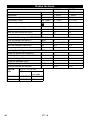
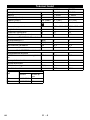
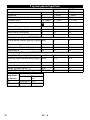
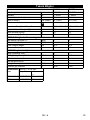
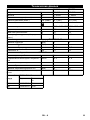
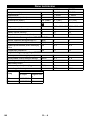
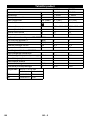
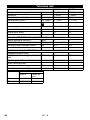
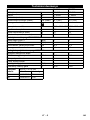
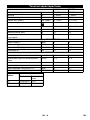
Technical specifications
CV 30/1 CV 38/1
Mains voltage V 220-240 220-240
Frequency Hz 1~ 50/60 1~ 50/60
Air volume (max.) l/s 48 48
Negative pressure (max.) kPa (mbar) 20,7 (207) 20,7 (207)
Protective class II II
Length x width x height mm 1220 x 310 x 320 1220 x 390 x 320
Width of the brush roller mm 300 380
Typical operating weight kg 8,6 9,2
Max. ambient temperature °C +40 +40
Values determined to EN 60335-2-69
Sound pressure level L
pA
dB(A) 67 67
Uncertainty K
pA
dB(A) 2 2
Hand-arm vibration value m/s
2
<2,5 <2,5
Uncertainty K m/s
2
0,2 0,2
Eco design as per 666/2013
Energy efficiency category -- D C
Indicative annual energy consumption kWh/a 42,4 37,8
Carpet cleaning class -- D D
Dust emission class -- F F
Sound power level L
WA,
dB(A) 80 80
Rated power input W 1000 1000
Power cord H05VV-F 2x1,0 mm
2
Part no.: Cable length
EU 4.649-002.0 12 m
GB 4.649-003.0 12 m
14 EN
Page is loading ...
Page is loading ...
Page is loading ...
Page is loading ...
Page is loading ...
Page is loading ...
Page is loading ...
Page is loading ...
Page is loading ...
Page is loading ...
Page is loading ...
Page is loading ...
Page is loading ...
Page is loading ...
Page is loading ...
Page is loading ...
Page is loading ...
Page is loading ...
Page is loading ...
Page is loading ...
Page is loading ...
Page is loading ...
Page is loading ...
Page is loading ...
Page is loading ...
Page is loading ...
Page is loading ...
Page is loading ...
Page is loading ...
Page is loading ...
Page is loading ...
Page is loading ...
Page is loading ...
Page is loading ...
Page is loading ...
Page is loading ...
Page is loading ...
Page is loading ...
Page is loading ...
Page is loading ...
Page is loading ...
Page is loading ...
Page is loading ...
Page is loading ...
Page is loading ...
Page is loading ...
Page is loading ...
Page is loading ...
Page is loading ...
Page is loading ...
Page is loading ...
Page is loading ...
Page is loading ...
Page is loading ...
Page is loading ...
Page is loading ...
Page is loading ...
Page is loading ...
Page is loading ...
Page is loading ...
Page is loading ...
Page is loading ...
Page is loading ...
Page is loading ...
Page is loading ...
Page is loading ...
Page is loading ...
Page is loading ...
Page is loading ...
Page is loading ...
Page is loading ...
Page is loading ...
Page is loading ...
Page is loading ...
Page is loading ...
Page is loading ...
Page is loading ...
Page is loading ...
Page is loading ...
Page is loading ...
Page is loading ...
Page is loading ...
Page is loading ...
Page is loading ...
Page is loading ...
Page is loading ...
Page is loading ...
Page is loading ...
Page is loading ...
Page is loading ...
Page is loading ...
Page is loading ...
Page is loading ...
Page is loading ...
Page is loading ...
Page is loading ...
Page is loading ...
Page is loading ...
Page is loading ...
Page is loading ...
Page is loading ...
Page is loading ...
Page is loading ...
Page is loading ...
Page is loading ...
Page is loading ...
Page is loading ...
Page is loading ...
Page is loading ...
Page is loading ...
Page is loading ...
Page is loading ...
Page is loading ...
Page is loading ...
Page is loading ...
Page is loading ...
Page is loading ...
Page is loading ...
Page is loading ...
Page is loading ...
Page is loading ...
Page is loading ...
Page is loading ...
Page is loading ...
Page is loading ...
Page is loading ...
Page is loading ...
Page is loading ...
Page is loading ...
Page is loading ...
Page is loading ...
Page is loading ...
Page is loading ...
Page is loading ...
Page is loading ...
Page is loading ...
Page is loading ...

http://www.kaercher.com/dealersearch
-
 1
1
-
 2
2
-
 3
3
-
 4
4
-
 5
5
-
 6
6
-
 7
7
-
 8
8
-
 9
9
-
 10
10
-
 11
11
-
 12
12
-
 13
13
-
 14
14
-
 15
15
-
 16
16
-
 17
17
-
 18
18
-
 19
19
-
 20
20
-
 21
21
-
 22
22
-
 23
23
-
 24
24
-
 25
25
-
 26
26
-
 27
27
-
 28
28
-
 29
29
-
 30
30
-
 31
31
-
 32
32
-
 33
33
-
 34
34
-
 35
35
-
 36
36
-
 37
37
-
 38
38
-
 39
39
-
 40
40
-
 41
41
-
 42
42
-
 43
43
-
 44
44
-
 45
45
-
 46
46
-
 47
47
-
 48
48
-
 49
49
-
 50
50
-
 51
51
-
 52
52
-
 53
53
-
 54
54
-
 55
55
-
 56
56
-
 57
57
-
 58
58
-
 59
59
-
 60
60
-
 61
61
-
 62
62
-
 63
63
-
 64
64
-
 65
65
-
 66
66
-
 67
67
-
 68
68
-
 69
69
-
 70
70
-
 71
71
-
 72
72
-
 73
73
-
 74
74
-
 75
75
-
 76
76
-
 77
77
-
 78
78
-
 79
79
-
 80
80
-
 81
81
-
 82
82
-
 83
83
-
 84
84
-
 85
85
-
 86
86
-
 87
87
-
 88
88
-
 89
89
-
 90
90
-
 91
91
-
 92
92
-
 93
93
-
 94
94
-
 95
95
-
 96
96
-
 97
97
-
 98
98
-
 99
99
-
 100
100
-
 101
101
-
 102
102
-
 103
103
-
 104
104
-
 105
105
-
 106
106
-
 107
107
-
 108
108
-
 109
109
-
 110
110
-
 111
111
-
 112
112
-
 113
113
-
 114
114
-
 115
115
-
 116
116
-
 117
117
-
 118
118
-
 119
119
-
 120
120
-
 121
121
-
 122
122
-
 123
123
-
 124
124
-
 125
125
-
 126
126
-
 127
127
-
 128
128
-
 129
129
-
 130
130
-
 131
131
-
 132
132
-
 133
133
-
 134
134
-
 135
135
-
 136
136
-
 137
137
-
 138
138
-
 139
139
-
 140
140
-
 141
141
-
 142
142
-
 143
143
-
 144
144
-
 145
145
-
 146
146
-
 147
147
-
 148
148
-
 149
149
-
 150
150
-
 151
151
-
 152
152


Ask a question and I''ll find the answer in the document
Finding information in a document is now easier with AI
in other languages
- italiano: Kärcher CV 38/1 Manuale utente
- français: Kärcher CV 38/1 Manuel utilisateur
- español: Kärcher CV 38/1 Manual de usuario
- Deutsch: Kärcher CV 38/1 Benutzerhandbuch
- русский: Kärcher CV 38/1 Руководство пользователя
- Nederlands: Kärcher CV 38/1 Handleiding
- português: Kärcher CV 38/1 Manual do usuário
- slovenčina: Kärcher CV 38/1 Používateľská príručka
- dansk: Kärcher CV 38/1 Brugermanual
- polski: Kärcher CV 38/1 Instrukcja obsługi
- čeština: Kärcher CV 38/1 Uživatelský manuál
- Türkçe: Kärcher CV 38/1 Kullanım kılavuzu
- eesti: Kärcher CV 38/1 Kasutusjuhend
- svenska: Kärcher CV 38/1 Användarmanual
- suomi: Kärcher CV 38/1 Ohjekirja
- română: Kärcher CV 38/1 Manual de utilizare
Related papers
-
Kärcher CV 38/1 Original Instructions Manual
-
-
-
-
-
-
-
-
-
Other documents
-
Sebo Vacuum Cleaner BS 46 User manual
-
-
Sebo 91603GB Owner's manual
-
Columbus BS 461 eco User manual
-
-
-
K RCHER WV 5 Plus N User manual
-
-
Sebo Airbelt K3 Premium 1200 User manual
-
Fakir combi | Combi 17-30 Owner's manual