
2
IMPORTANT SAFEGUARDS
When using electrical appliances, basic safety precautions should always be
followed, including the following.
■ Read all instructions.
■ To protect against risk of electrical shock, do not put base, cord, or plug in
water or other liquid.
■ Close supervision is necessary when any appliance is used by or near
children.
■ Turn unit off and unplug from outlet when not in use, before putting on or
taking off parts, and before cleaning. To disconnect, grasp plug, and pull
from wall outlet. Never yank on cord.
■ Avoid contacting moving parts.
■ Do not operate any appliance with a damaged cord or plug or after the
appliance malfunctions or is dropped or damaged in any manner. Return the
appliance to the nearest authorized service facility for examination, repair, or
electrical or mechanical adjustment. Or, call the appropriate toll-free number
listed on the cover of this manual.
■ The use of attachments not recommended or sold by the appliance
manufacturer may cause fire, electric shock, or injury.
■ Do not use outdoors.
■ Do not let cord hang over edge of table or counter or touch hot surfaces.
■ Keep hands and utensils away from moving blades or Discs while
processing food to prevent the possibility of severe personal injury or
damage to the food processor. A scraper may be used, but it must be used
only when the food processor is not running.
■ Blades are sharp. Handle carefully.
■ Be sure to insert or remove Chopping Blade and Slice/Shred Disc by using
hubs to avoid injury.
■ To avoid injury, never place Chopping Blade or Slice/Shred Disc on Base
without first putting Bowl properly in place. Make sure motor, Disc, and/or
Chopping Blade have stopped completely before removing cover.
■ Be certain cover is securely locked in place before operating appliance.
Never feed food into Chute by hand. Always use Food Pusher.
■ Do not attempt to defeat the cover interlock mechanism.
■ Do not operate this appliance in the presence of explosive and/or flammable
fumes.
■ This appliance is intended for household use only, not for commercial or
industrial use. Use for anything other than intended will void the warranty.
SAVE THESE INSTRUCTIONS
Séries MFP100-MFP200 Series
SAVE THIS USE AND CARE BOOK
LEASE ESTE INSTRUCTIVO ANTES DE USAR EL PRODUCTO
CONSERVER CE GUIDE D’ENTRETIEN ET D’UTILISATION
*
?
U.S.A./CANADA 1-800-231-9786
MEXICO 01-800-714-2499
http://www.applicaconsumerproductsinc.com
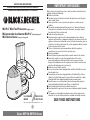
MiniPro
™
Mini Food Processors (English, page 2)
Miniprocesador de alimentos MiniPro
™
(Español, página 9)
Minirobot culinaire (Français, à la page 16)

4
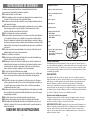
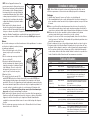
Using The Food Processor
IMPORTANT: For your protection this unit has
an Interlock System. When you slip the Bowl
over the post, turn it towards the Base so that
it locks into place. Be sure to turn the Cover
(or Chopping Lid, depending on use) towards
the Lock position so that the Tab locks into
the slot on the Base (A). This unit will not
operate unless the Cover (or Chopping Lid) is
locked into place.
How To Slice Or Shred
1. Slip the Bowl over the center Post and twist
it toward the Base so that the Bowl locks
into place.
2. Carefully grasp the Slice/Shred Disc by the
Hub or its edges with the desired side (Slice or Shred) up, and push it down onto the
top of the Discharge Disc. Slip the Discharge Disc (with Slice/Shred Disc) over the
center Post.
3. Place the Cover with Continuous Flow Chute onto the Bowl and twist it toward the
Base ( ) until you hear it click into place (A). Position a large, low
serving/preparation bowl under the Continuous Flow Chute to catch food and spatter.
Rimless bowls work better than bowls with a lip.
4. Plug the cord into an electrical outlet.
5. Use the Food Guide to help you prepare food for slicing or shredding. Fill the Food
Chute and position the Food Pusher over the food.
6. Push down with a light but steady pressure
on the Food Pusher while pressing the
desired speed: Hi, Low (MFP200) or On
(MFP100) (B), depending on your model.
Press and hold the Pulse position for short
processing tasks, such as slicing a
cucumber. The unit will stop when you
release the Pulse button. Use the Hi, Low,
(MFP200) or On (MFP100) position for
continuous, longer processing tasks, such
as shredding cabbage or carrots.
NOTE: Let the Processor do the work.
Heavy pressure will not speed up operation.
Do not use the Processor continuously for
more than 3 minutes at a time. Occasionally
turn the serving bowl during processing to prevent food build up in the Continuous
Flow Chute that could fall out of the bowl. Be sure the processor and bowl are far
enough back on the counter to prevent bits from falling on the floor.
7. After processing food, turn the unit “off” by pressing on the elevated end of the
rocker “lever” so that it will be even with the top of the unit in the “Off” position or
release the Pulse button. Allow the Disc to stop spinning completely before you
remove the Cover with Continuous Flow Chute by turning it toward the ( )
position and lifting it off.
UNLOCK
LOCK
A
B
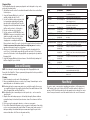
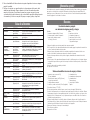
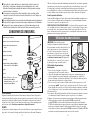
3
Food Pusher
Cover with Continuous Flow Chute
Slice/Shred Disc with Hub
Discharge Disc
Chopping Lid
Chopping Blade
2-Cup (480 ml) Bowl (MFP200)
1
1
⁄2-Cup (360 ml) Bowl (MFP100)
Post
Base
High/Low/Off/Pulse Control (MFP200)
Off/On/Pulse Control (MFP100)
POLARIZED PLUG
This appliance has a polarized plug — one blade is wider than the other. To reduce the
risk of electric shock, this plug will fit into a polarized outlet only one way. If the plug
does not fit fully into the outlet, reverse it. If it still does not fit, contact an electrician.
Do not attempt to defeat this safety feature by modifying the plug in any way.
ELECTRICAL CORD
The cord length of this appliance was selected to reduce hazards that may occur with a
longer cord. If more cord length is needed, an extension cord with a polarized plug may
be used. It should be rated not less than 10 amperes, 120 Volts, and have Underwriters
Laboratories or appropriate agency-approved listing. When using a longer cord, be sure
it does not drape over a working area or dangle where it could be pulled on or tripped
over. Handle cord carefully for longer life; avoid jerking or straining it at outlet and
appliance connections.
Before First Use
When unpacking the product and removing packing material, handle the Chopping
Blade and Slice/Shred Disc carefully; they are very sharp. Wash all parts except the
Base before first use.
NOTE ABOUT USAGE: Do not attempt to chop ice in this food processor; it will damage
the Bowl and dull the Chopping Blade. This unit will not whip cream, beat egg whites to
a desirable volume, grind coffee beans or spices with a high oil content, or slice/shred
raw meat, marshmallows or soft cheeses.

6
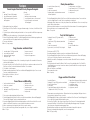
Food Guide
FOOD ATTACHMENT COMMENTS
APPLES Disc, Slicing Side Stack 2 quarters horizontally in chute.
Use moderate pressure.
BANANAS Disc, Slicing Side Peel and cut in half; use light pressure.
CABBAGE Disc, Shredding Side Cut to fit chute; shred into bowl. Add slaw ingredients
(mayo, vinegar, salt, etc.)
CARROTS Disc, Slicing Side Cut into 4” (10.2 cm) lengths and pack in chute,
(Sliced, shredded) alternating thick and thin ends.
Shredding Side Position in chute & shred.
CELERY, CHOPPED Chopping Blade Up to 1 cup cut into
1
⁄2” (1.27 cm) lengths. Pulse to
Chopping Lid desired texture.
CUCUMBER Disc, Slicing Side Cut to fit chute; use light pressure.
CHEESE, PARMESAN Chopping Blade Cut into
1
⁄2” (1.27 cm) cubes and pulse up to
1
⁄2 cup
Chopping Lid at a time.
CHEESE, CHEDDAR Disc, Shredding Side Cut chilled cheese to fit chute/shred.
EGGS (HARD COOKED) Chopping Blade Quarter up to 3 eggs and pulse to desired texture. Add
Chopping Lid mayo, salt, and seasoning for egg salad.
NUTS, CHOPPED Chopping Blade Add up to 1 cup; pulse to desired fineness.
Chopping Lid
ONIONS Chopping Blade Quarter or cut large onions into 8 pieces. Add to bowl.
Chopping Lid Pulse. For even, coarse results, only chop 2 quarters
at a time.
BREAD Chopping Blade Use up to 2 slices/broken into pieces. Pulse speed.
Chopping Lid
PARSLEY, OTHER Chopping Blade Add up to 1 cup; pulse to desired fineness.
HERBS Chopping Lid
PEPPERONI Disc, Slicing Side Cut into 4” (10 cm) lengths. Slice 1 piece at a time
using firm pressure.
POTATOES Disc, Shredding Side Cut to fit chute. After shredding, place in cold water
to prevent darkening before frying.
SQUASH (SHREDDED) Disc, Shredding Side Cut to fit chute; shred, salt and drain. Fries well in
butter or oil.
Need Help?
For service, repair, or any questions regarding your appliance, call the appropriate
“800” number on the cover of this book. Do NOT return the product to the place of
purchase. Do NOT mail the product back to the manufacturer nor bring it to a service
center. You may also want to consult the website listed on the cover of this manual.
5
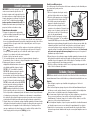
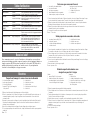
Chopping Blade
The Chopping Blade speeds up many everyday tasks and is designed to chop, crumb,
grind, mince and mix quickly.
1. Slip the Bowl over the center Post and twist it toward the Base to be sure the Bowl
locks into place.
2. Grasp the Chopping Blade by its center hub
and slide it down onto the Post (C).
3. Use the Food Guide to help you prepare food
for chopping/mincing/mixing and crumbing,
then place the food into the Bowl. Place the
Chopping Lid onto the Bowl and twist it toward
the Base until you hear it click into place.
4. Plug the cord into an electrical outlet.
5. Use the continuous On (MFP100), Hi or Low
(MFP200) for longer processing tasks to make
salad dressing, dips, or baby food. Use the
Pulse position for short processing like
chopping nuts or crumbing bread. Hold the
Pulse position for about 2-3 seconds: check results; repeat for desired consistency. It
is better to use several short pulses rather than a single long one unless mixing
ingredients that require longer processing times.
6. After processing food, turn the unit “off” by pressing on the elevated end of the
rocker “lever” so that it will be even with the top of the unit in the “Off” position or
release the Pulse button. Let the Chopping Blade stop spinning before you twist the
Chopping Lid off.
7. Grasp the Chopping Blade by its hub and remove. Unlock the Bowl by twisting it off
the Base. Empty the processed food.
Care and Cleaning
NOTE: Do not attempt to sharpen the cutting edges of the Chopping Blade or the
Reversible Slice/Shred Disc. They are permanently sharpened at the factory and will be
ruined by attempted sharpening.
Cleaning
1. Before cleaning, be sure the unit is Off and unplugged.
2. Rinse parts immediately after processing for easy cleanup. Removable parts can be
washed by hand or in a dishwasher, top rack.
■ If washing by hand, use warm soapy water, rinse, and dry thoroughly. If necessary,
use a small bristle brush to thoroughly clean the Bowl, Cover with Continuous Flow
Chute, Chopping Blade, and Slice/Shred Disc.
■ In a dishwasher, place removable parts on the top rack only — not in or near the
utensil basket.
3. Wipe the Base with a damp sponge or cloth and dry thoroughly. Remove stubborn
spots with a damp cloth and a mild, non-abrasive cleaner. Do not immerse the Base
in liquid.
4. Do not use rough scouring pads, abrasives, or cleansers on any parts.
5. Do not fill the Bowl with boiling water or place any parts in boiling water. Some foods,
such as carrots, may temporarily stain the Bowl. To remove stains, make a paste of 1
tablespoon baking soda and two tablespoons warm water. Apply the paste to the
stains and rub with a cloth. Rinse in sudsy water and dry.
C

8
Chunky Avocado Salsa
1
⁄2 cup fresh cilantro (leaves only) 1 medium tomato, cut in 8 pieces
1
⁄4 cup walnuts 1 small avocado, cut in 1” (2.54 cm) pieces
1 small onion, quartered 2 tablespoons lemon juice
1 jalapeno pepper, seeds/membranes removed
1
⁄4 teaspoon salt
and each quartered
1. Position Chopping Blade in Bowl of Food Processor. Add cilantro, walnuts and onion. Process until nuts
are finely chopped, about 5 seconds. Transfer to medium-size serving bowl.
2. Add pepper to Bowl, and process to finely chop. Remove Cover, and add tomato. Process to coarsely chop
tomato. Add to cilantro mixture.
3. Add avocado to Bowl and process to coarsely chop. Add to cilantro mixture. Stir in remaining ingredients.
4. Serve with chips or as an accompaniment with chicken.
Makes: 1
2
⁄3 cups salsa.
Tasty Hot Crab Appetizer
1 package (8 ounces/227 g) cream cheese, 1 tablespoon milk
softened 2 teaspoons horseradish
1 can (6 ounces/170 g) crab meat, drained and
1
⁄2 teaspoon salt
flaked Dash pepper
1 small onion, quartered 2 ounces Cheddar cheese
2 green onions, cut in 1-inch (2.54 cm) lengths Paprika
1. Preheat oven at 350°F (177°C).
2. In medium mixing bowl, combine cream cheese and crab meat. Mix to blend well.
3. Position Chopping Blade in Bowl of Food Processor. Add onion and green onions. Cover with Chopping
Lid. Process to finely chop. Transfer to cream cheese mixture.
4. Add milk, horseradish, salt and pepper to cream cheese mixture. Blend well. Transfer to decorative
baking dish.
5. Position decorative dish under Exit Chute of Food Processor. Using shredding side of Slice/Shred Disc,
shred Cheddar cheese over top of cream cheese mixture. Spread shredded cheese evenly over top and
sprinkle with paprika.
6. Bake for 20 minutes, or until bubbly.
7. Serve warm with crackers.
Makes: 2 cups dip.
Pepper and Basil Pasta Salad
1 pound fusilli pasta 2 large yellow bell peppers, halved, seeded, and
1 package (5.3 ounce/150 g) goat cheese with herbs cut lengthwise into
1
⁄2-inch (1.27 cm) strips
2 cups fresh basil leaves
2
⁄3 cup balsamic vinegar
2 cloves garlic
1
⁄3 cup white wine vinegar
2 large red bell peppers, halved, seeded, and cut
1
⁄2 cup pine nuts, toasted
lengthwise into
1
⁄2-inch (1.27 cm) strips
1. Prepare pasta as per package instructions. Drain and transfer to large mixing bowl. Add goat cheese to
hot pasta and stir gently until cheese is melted.
2. With Chopping Blade in place, add basil and garlic to the Bowl of Food Processor. Position Chopping Lid.
Process until finely chopped. Add basil mixture to pasta.
3. Position Slice/Shred Disc, with slicing side up, in Bowl of Food Processor. Position mixing bowl with
pasta under Exit Chute. Pack Food Chute of Slicing/Shredding Lid with pepper strips. Slice peppers
directly into pasta. Repeat with remaining pepper strips.
4. Combine balsamic and white wine vinegar; add to pasta mixture, along with the pine nuts.
5. Stir gently to thoroughly blend ingredients; serve at room temperature.
Makes: 14 (1-cup) servings.
7
Recipes
Tomato Arugula Salad with Parsley Oregano Vinaigrette
Salad: Dressing:
1 package (10 ounce/296 g) arugula
1
⁄3 cup olive oil
2 ripe, medium tomatoes, quartered 3 tablespoons red wine vinegar
1 English cucumber, halved crosswise
1
⁄2 cup fresh parsley leaves, stems removed
and lengthwise
1
⁄4 cup fresh oregano, stems removed
Salt and pepper
1. Add arugula to large, low salad bowl.
2. With slicing side of Slice/Shred Disc facing up, add tomato wedges, 2 at a time, to Food Chute of Food
Processor.
3. Slice directly into salad bowl, making sure that bowl is as close as possible to Exit Chute to prevent any
spillage.
4. Repeat process with cucumber pieces, slicing them directly into salad bowl.
5. Remove Slicing/Shredding Lid and Disc. Position Chopping Blade in Bowl. Add dressing ingredients and
process until herbs are finely chopped and dressing is well blended.
6. Pour over salad and toss.
Makes: 6 (1
1
⁄4 cup) servings.
Tangy Cucumber and Radish Salad
1 cucumber, about
3
⁄4 (340 g) pound total 1 teaspoon sesame oil
6 ounces radishes, trimmed 1 teaspoon soy sauce
1 tablespoon Balsamic vinegar
1
⁄4 teaspoon hot pepper sauce
1 tablespoon sugar
1. Run tines of fork lengthwise down all sides of cucumber, piercing skin. Cut cucumber in half crosswise,
and then in half lengthwise.
2. Using the slicing side of the Slice/Shred Disc of the Food Processor, position cucumber sections in Food
Chute, one at a time. Position salad bowl under Exit Chute. Slice cucumbers.
3. Slice radishes in similar manner.
4. Combine remaining ingredients in Food Processor Bowl with Chopping Blade in place. Process to mix.
Pour over cucumber mixture and toss.
5. Garnish with red leaf lettuce, if desired.
Makes: 6 (
3
⁄4-cup) servings.
Cream Cheese and Walnut Dip
1
⁄2 cup frozen whole kernel corn 2 tablespoons milk
1
⁄2 small onion, quartered 2 tablespoons lime juice
1
⁄2 cup walnuts 2 teaspoons cumin
1 package (8 ounces/227g) cream cheese, 1 teaspoon dried crushed pepper
softened
1
⁄4 teaspoon salt
1. Place corn in medium mixing bowl and allow to thaw.
2. Position Chopping Blade in Bowl of Food Processor. Add onion and walnuts; Cover with Chopping Lid.
Pulse until finely chopped. Transfer to mixing bowl with corn.
3. Re-position Chopping Blade. Add all the remaining ingredients to Food Processor Bowl. Process until
mixture is well blended. It may be necessary to stop and stir mixture once or twice.
4. Add to corn mixture and stir together by hand. Store in covered container.
5. Use as a dip for tortilla chips, pita bread, raw vegetable sticks, or as a filling for sandwiches.
Makes: 1
1
⁄2 cups.
Page is loading ...
Page is loading ...
Page is loading ...
Page is loading ...
Page is loading ...
Page is loading ...
Page is loading ...

Copyright © 2000-2001 Applica Consumer Products, Inc.
Pub. No. 177094-00-RV02
Product made in People’s Republic of China
Printed in People’s Republic of China
Producto hecho en la República Popular China
Impreso en la República Popular China
Produit fabriqué en République populaire de Chine
Imprimé en République populaire de Chine
*
is a trademark of The Black & Decker Corporation, Towson, Maryland, USA
*Marca registrada de The Black & Decker Corporation, Towson, Maryland, E.U.
*Marque de commerce déposée de la société The Black & Decker Corporation, Towson, Maryland, É.-U.
24
FULL ONE-YEAR WARRANTY
Applica warrants this product against any defects that are due to faulty material or workmanship
for a one-year period after the original date of consumer purchase. This warranty does not
include damage to the product resulting from accident, misuse, or repairs performed by
unauthorized personnel. If the product should become defective within the warranty period, or
you have questions regarding warranty or service, call Consumer Assistance and Information toll
free at: 1-800-231-9786. This warranty gives you specific legal rights and you may also have other
rights which vary from state to state or province to province.
Product may vary slightly from what is illustrated.
El producto puede variar ligeramente del ilustrado.
Le produit peut différer légèrement de celui illustré.
GARANTIE COMPLÈTE DE UN AN
Applica garantit le produit pour un an à compter de la date d’achat, contre tout vice de matière
ou de fabrication. La garantie ne couvre pas les dommages causés par un accident, une
mauvaise utilisation ou des réparations effectuées par des personnes non autorisées. Advenant
le fonctionnement irrégulier du produit dans les délais prescrits, ou pour toute question relative à
la garantie ou au service, communiquer sans frais avec le service à la clientèle au numéro
suivant : 1 800 231-9786. Les modalités de la présente garantie donnent des droits légaux
spécifiques. L’utilisateur peut également se prévaloir d’autres droits selon l’état ou la province
qu’il habite.
UN AÑO COMPLETO DE GARANTIA
Applica garantiza este producto contra cualquier defecto originado por fallas en los materiales o
en la mano de obra por un período de un año a partir de la fecha original de compra. Esta
garantía no es válida cuando: a) el producto se hubiese utilizado en condiciones distintas a las
normales, b) el producto no hubiese sido operado conforme al instructivo de uso y cuidado que le
acompaña, c) el producto hubiese sido alterado o reparado por personas no autorizadas. Si el
producto resulta con defectos dentro del período de garantía, se le reparará o reemplazará de
ser necesario, sin cargo alguno. Para que esta garantía sea válida debe presentar el producto
con su recibo de compra y/o la tarjeta de registro correspondiente.
Esta garantía le otorga derechos específicos, y usted podría tener otros que pueden variar en su
país. Si tiene alguna pregunta, comuníquese con una sucursal o centro de servicio más cercano
autorizado por Black & Decker.
NOTA: Usted podrá encontrar partes, componentes, consumibles y accesorios en los centros de
servicio autorizados. Esta garantía incluye los gastos de transportación que se deriven de su
cumplimiento dentro de su red de servicio.
23
Délicieux amuse-gueule chauds au crabe
1 paquet (227 g/8 oz) de fromage à la crème, ramolli 1 c. à table de lait
crème, ramolli 2 c. à thé de raifort
1boîte (170 g/6 oz) de chair de crabe,
1
⁄2 c. à thé de sel
égouttée et émiettée une pincée de poivre
1 petit oignon en quartiers 2 oz de fromage suisse
2 oignons verts, coupés en longueurs du paprika
de 2,54 cm (1 po)
1. Réchauffer le four à 177 °C (350 °F).
2. Dans un bol de mélange moyen, verser le fromage à la crème et la chair de crabe. Bien mélanger.
3. Placer le couteau dans le bol du robot. Y déposer l’oignon et les oignons verts. Couvrir et hacher
finement. Verser sur le mélange de fromage à la crème.
4. Verser le lait, le raifort, le sel et le poivre sur le mélange de fromage à la crème. Bien mélanger et verser
dans un plat de cuisson décoratif.
5. Placer le plat de cuisson décoratif sous l’orifice du robot. Déchiqueter le fromage suisse à l’aide du
disque et l’éjecter sur le mélange. Étendre uniformément le fromage déchiqueté sur le mélange et
saupoudrer de paprika.
6. Faire cuire pendant 20 minutes et jusqu’à ce que le mélange bouillonne.
7. Servir chaud avec des craquelins.
Donne : 2 t de trempette.
Salade de pâtes aux poivrons et au basilic
1 lb de pâtes fusili 2 gros poivrons jaunes doux, coupés en deux et
1 paquet (150 g/5,3 oz) de fromage de en bandes de 1,27 cm (
1
⁄2 po), évidés
chèvre aux herbes
1
⁄3 t de vinaigre balsamique
2 t de feuilles de basilic fraîches
1
⁄2 t de vinaigre blanc
2 gousses d’ail
1
⁄2 t de pignons grillés
2 gros poivrons rouges doux, coupés
en deux et en bandes de 1,27 cm
1. Préparer les pâtes selon le mode de cuisson du paquet. Égoutter et verser dans un grand bol de mélange.
Ajouter le fromage de chèvre aux pâtes chaudes et brasser doucement jusqu’à ce que le fromage fonde.
2. Placer le basilic et l’ail dans le bol du robot muni du couteau. Mettre le couvercle en place. Hacher
finement. Verser sur les pâtes.
3. Placer le disque avec la face àémincer vers le haut. Placer le bol de mélange contenant les pâtes sous
l’orifice du robot. Remplir l’entonnoir de tranches de poivron. Trancher directement sur les pâtes. Répéter
avec tout le poivron.
4. Mélanger les vinaigres et les verser sur les pâtes avec les pignons.
5. Brasser délicatement afin de bien mélanger les ingrédients; servir à la température ambiante.
Donne : 14 portions de 1 t.
-
 1
1
-
 2
2
-
 3
3
-
 4
4
-
 5
5
-
 6
6
-
 7
7
-
 8
8
-
 9
9
-
 10
10
-
 11
11
-
 12
12


Ask a question and I''ll find the answer in the document
Finding information in a document is now easier with AI
in other languages
- français: Applica MFP100 Manuel utilisateur
- español: Applica MFP100 Manual de usuario
Related papers
Other documents
-
Black & Decker HMP60 User manual
-
-
-
-
 Black and Decker Appliances FP2650S User guide
-
BLACK DECKER Power Pro FP2500S Owner's manual
-
-
-
-
