
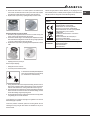
English
Operating Instructions
HOB
Français
Mode d’emploi
TABLE DE CUISSON
Español
Manual de instrucciones
ENCIMERA
Portuges
Instruções para a utilização
PLANO
Contents
Operating Instructions,1
Warnings,3
Assistance,7
Description of the appliance,9
Installation,19
Start-up and use,23
Precautions and tips,23
Maintenance and care,24
Troubleshooting,24
Sommaire
Mode d’emploi,1
Avertissements,4
Assistance,7
Description de l’appareil,10
Installation,25
Mise en marche et utilisation,29
Précautions et conseils,29
Nettoyage et entretien,30
Anomalies et remèdes,30
Sumario
Manual de instrucciones,1
Advertencias,4
Asistencia,7
Descripción del aparato,10
Instalación,32
Puesta en funcionamiento y uso,36
Precauciones y consejos,36
Mantenimiento y cuidados,37
Anomalías y soluciones,37
Índice
Instruções para a utilização,1
Advertências,5
Assistência,7
Descrição do aparelho,11
Instalação,38
Início e utilização,42
Precauções e conselhos,42
Manutenção e cuidados,43
Anomalias e soluções,43
PC 631 X
PC 631 N X
PC 640 X
PC 640 N X
PC 640 N (WH)
PC 640 N (BK)
PC 640 N T GH
PC 640 T X
PC 640 T (WH)
PC 640 T GH
PC 720 RT X
PC 730 RT GH
PC 730 RT X
PC 750 T X
PC 750 T GH
1
5
6
9
41
45
44
44
44
Page is loading ...

3
Warnings
WARNING: The appliance and its accessible parts
become hot during use. Care should be taken to
avoid touching heating elements. Children less than 8
years of age shall be kept away unless continuously
supervised. This appliance can be used by children
aged from 8 years and above and persons with
reduced physical, sensory or mental capabilities or
lack of experience and knowledge if they have been
given supervision or instruction concerning use of the
appliance in a safe way and understand the hazards
involved. Children shall not play with the appliance.
Cleaning and user maintenance shall not be made
by children without supervision.
WARNING: Unattended cooking on a hob with fat or
cooking surfaces.
Never use steam cleaners or pressure cleaners on
the appliance.
Remove any liquid from the lid before opening it. Do
not close the glass cover (if present) when the gas
burners or electric hotplates are still hot.
The appliance is not intended to be operated by
means of an external timer or separate remote
control system.
CAUTION: the use of inappropriate hob guards can
cause accidents.
Avertissements
accessibles deviennent très chauds pendant leur
fonctionnement. Il faut faire attention à ne pas toucher
les éléments chauffants. Ne pas faire approcher les
enfants de moins de 8 ans à moins qu’ils ne soient
sous surveillance constante. Le présent appareil peut
être utilisé par des enfants de plus de 8 ans et par
des personnes présentant des capacités physiques,
sensorielles ou mentales réduites ou n’ayant pas
l’expérience ou les connaissances indispensables,
à condition qu’ils soient sous bonne surveillance ou
qu’ils aient reçu les instructions nécessaires pour une
utilisation de l’appareil en toute sécurité et à condition
qu’ils se rendent compte des dangers encourus. Les
enfants ne doivent pas jouer avec l’appareil. Les
opérations de nettoyage et d’entretien ne doivent pas
être effectuées par des enfants non surveillés.
de l’huile ou de la graisse sur un foyer est dangereux
et risque d’entraîner un incendie. Il ne faut JAMAIS
essayer d’éteindre une flamme ou un incendie
avec de l’eau ! Il faut éteindre l’appareil et couvrir la
couverture anti-feu.
d’objets sur les surfaces de cuisson.
Ne jamais nettoyer l’appareil avec des nettoyeurs
vapeur ou haute pression.
couvercle avant de l’ouvrir. Ne pas abaisser le
couvercle en verre (s’il y en a un) tant que les brûleurs
gaz ou la plaque électrique sont chauds.
Cet appareil ne peut pas être allumé au moyen
d’un temporisateur extérieur ou d’un système de
commande à distance séparé.
inappropriées peut causer des incendies.
Page is loading ...
Page is loading ...

6
Assistance
Communicating:
This information is found on the data plate located on the appliance and/or
on the packaging.
! Never use unauthorised technicians and never accept replacement parts
which are not original.
Assistance
Indiquez-lui :
appareil et/ou sur son emballage.
! Ne faites jamais appel à des techniciens non agréés et refusez toujours
l’installation de pièces détachées non originales.
Asistencia
Comunique:
aparato y/o en el embalaje.
! No recurra nunca a técnicos no autorizados y rechace siempre la instalación
de repuestos no originales.
La siguiente información es válida solo para España.
Para otros países de habla hispana consulte a su vendedor.
Ampliación de garantía
Llame al 902.363.539 y le informaremos sobre el fantástico plan de ampliación
de garantía hasta 5 años.
Consiga una cobertura total adicional de
Y NO PAGUE AVERIAS NUNCA MAS
Servicio de asistencia técnica (SAT)
Llame al 902.133.133 y nuestros técnicos intervendrán con rapidez y
funcionamiento.
la limpieza y mantenimiento de su electrodoméstico a precios competitivos.
ESTAMOS A SU SERVICIO
Assistência
Comunique:
no aparelho e/ou na embalagem.
! Nunca recorra a técnicos não autorizados e sempre recuse a instalação de
peças de reposição não originais.
.(Mod.
.(S/N
!
帮助
通信:
• 遇到的问题类型。
• 该器具型号 (Mod.)。
• 序列号 (S/N)。
此信息可在位于该器具和/或包装的数据标牌上找到。
! 切勿采用未经授权的技术人员,切勿接受非原装的替换部件。
.(Mod.
.(S/N
!

7
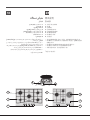
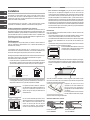
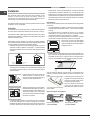
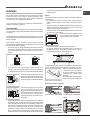
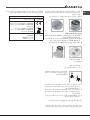
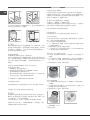
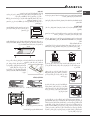
Description of the appliance
Overall view
1. Support Grid for COOKWARE
2. GAS BURNERS
3. ELECTRIC HOTPLATE*
4. Indicator light for ELECTRIC HOTPLATE*
5. Control Knobs for ELECTRIC HOTPLATE*
6. Control Knobs for GAS BURNERS
7. Ignition for GAS BURNERS*
8. SAFETY DEVICES*
INDICATOR LIGHT FOR ELECTRIC HOTPLATE* switches on
whenever the selector knob is moved from the ‘off’ position.
GAS BURNERS differ in size and power. Use the diameter of the cookware
to choose the most appropriate burner to cook with.
GAS BURNERS and ELECTRIC HOTPLATE* adjust
GAS BURNER IGNITION*
SAFETY DEVICE* stops the gas flow if the flame is accidentally
extinguished.
* Only available on certain models.
Description de l’appareil
Vue d’ensemble
1. Grilles support de CASSEROLES
2. BRÛLEURS À GAZ
3. PLAQUE ÉLECTRIQUE*
4. PLAQUE ÉLECTRIQUE*
5. Manettes de commande des PLAQUE ÉLECTRIQUE*
6. Manettes de commande des BRÛLEURS GAZ
7. Bougie d’allumage des BRÛLEURS GAZ*
8. DISPOSITIF DE SÉCURITÉ*
PLAQUE ÉLECTRIQUE* il s’allume dès que la manette n’est
plus sur la position éteint.
BRÛLEURS GAZ ils ont plusieurs dimensions et puissances. Choisissez
celui qui correspond le mieux au diamètre de votre casserole.
BRÛLEURS GAZ et de la PLAQUE
ÉLECTRIQUE*
BRÛLEURS GAZ* permet l’allumage
automatique du brûleur sélectionné.
DISPOSITIF DE SÉCURITÉ*
coupez immédiatement l’arrivée du gaz.
* N’existe que sur certains modèles.
1
1
4
5
2
2
6
8
7
3
6
Page is loading ...
Page is loading ...
Page is loading ...

GB
11
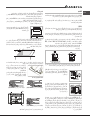
Installation
! Before operating your new appliance please read this instruction booklet
carefully. It contains important information for safe use, installation and care
of the appliance.
! Please keep these operating instructions for future reference. Pass them on
to possible new owners of the appliance.
Positioning
! Keep packaging material out of the reach of children. It can become a choking
or suffocation hazard (see Precautions and tips).
!
instructions provided. Incorrect installation may cause harm to people and
animals or may damage property.
! This unit may be installed and used only in permanently ventilated rooms
in accordance with current national regulations. The following requirements
must be observed:
any combustion fumes. This may consist of a hood or an electric fan that
automatically starts each time the appliance is switched on.
In a chimney stack or branched flue.
(exclusively for cooking appliances)
Directly to
the Outside
3
/h
per kW of installed power.
The air circulation system may take air directly
from the outside by means of a pipe with an
inner cross section of at least 100 cm
2
; the
opening must not be vulnerable to any type
of blockages.
The system can also provide the air needed for
combustion indirectly, i.e. from adjacent rooms
above. However, these rooms must not be
communal rooms, bedrooms or rooms that
rooms containing LPG cylinders must also be equipped with vents to allow
gas to escape in the event of a leak. As a result LPG cylinders, whether
partially or completely full, must not be installed or stored in rooms or
storage areas that are below ground level (cellars, etc.). It is advisable to
keep only the cylinder being used in the room, positioned so that it is not
etc. ) which could raise the temperature of the cylinder above 50°C.
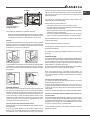
A
Examples of
ventilation holes
for comburant air.
Enlarging the ventilation slot
between window and floor.
Adjacent
Room
Room to be
Vented
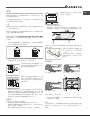
Fitting the appliance
The following precautions must be taken when installing the hob:
hob must be at least 200 mm from the edge of the hob.
If the hob is installed beneath a wall cabinet,
the latter must be situated at a minimum of 700
mm above the hob.
Fastening hooks are provided, allowing you to fasten the hob to tops that
are between 20 and 40 mm thick. To ensure the hob is securely fastened
to the top, we recommend you use all the hooks provided.
555 mm
55 mm
475 mm
Before the installation remove the grids and burners from the hob and turn it
upside down, making sure you don’t damage the thermocouples and spark
plugs.
Apply the seals that come with the
appliance along the outer edges of
the hob to prevent any passage of air,
humidity and water (see Figure).
For proper application make sure the
surfaces to be sealed are clean, dry and
free of any grease/oil.
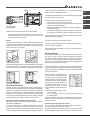
Hook fastening diagram
Hooking position for top H=20mm Hooking position for top H=30mm
Front
Hooking position for top H=40mm Back
!
600mm min.
420mm min.
650mm min.

12
GB
be installed as insulation. This must be placed at a minimum distance of
20 mm from the lower part of the hob.
Ventilation
To ensure adequate ventilation, the back panel of the cabinet must be
removed. It is advisable to install the oven so that it rests on two strips of
mm (see diagrams).
560 mm.
45 mm.
Where a hob is installed above an oven without a forced ventilation cooling
system, adequate ventilation must be provided inside the cabinet by means
Electrical connection
Hobs equipped with a three-pole power supply cable are designed to operate
with alternating current at the voltage and frequency indicated on the data
plate (this is located on the lower part of the appliance). The earth wire in the
cable has a green and yellow cover. If the appliance is to be installed above
a built-in electric oven, the electrical connection of the hob and the oven must
be carried out separately, both for electrical safety purposes and to make
extracting the oven easier.
Connecting the supply cable to the mains
Install a standardised plug corresponding to the load indicated on the data
plate.
The appliance must be directly connected to the mains using an omnipolar
circuit-breaker with a minimum contact opening of 3 mm installed between
the appliance and the mains.
The circuit-breaker must be suitable for the charge indicated and must comply
with current electrical regulations (the earthing wire must not be interrupted
by the circuit-breaker). The supply cable must not come into contact with
surfaces with temperatures higher than 50°C.
! The installer must ensure that the correct electrical connection has been
made and that it is compliant with safety regulations.
Before connecting to the power supply, make sure that:
indicated on the data plate.
incompatible with the plug, ask an authorised technician to replace it. Do
not use extension cords or multiple sockets.
! Once the appliance has been installed, the power supply cable and the
electrical socket must be easily accessible.
! The cable must not be bent or compressed.
! The cable must be checked regularly and replaced by authorised technicians
only (see Assistance).
! The manufacturer declines any liability should these safety measures not
be observed.
Gas connection
The appliance should be connected to the main gas supply or to a gas
cylinder in compliance with current national regulations. Before carrying out
the connection, make sure the cooker is compatible with the gas supply you
wish to use. If this is not the case, follow the instructions indicated in the
When using liquid gas from a cylinder, install a pressure regulator which
complies with current national regulations.
! Check that the pressure of the gas supply is consistent with the values
energy consumption.
Connection with a rigid pipe (copper or steel)
! Connection to the gas system must be carried out in such a way as not to
place any strain of any kind on the appliance.
Connecting a flexible jointless stainless steel pipe to a threaded
attachment
These pipes must be installed so that they are never longer than 2000 mm
when fully extended. Once connection has been carried out, make sure that
! Only use pipes and seals that comply with current national regulations.
Checking the tightness of the connection
!
Adapting to different types of gas
To adapt the hob to a different type of gas other than default type (indicated
on the rating plate at the base of the hob or on the packaging), the burner
nozzles should be replaced as follows:
1. Remove the hob grids and slide the burners off their seats.
2. Unscrew the nozzles using a 7 mm socket spanner, and replace them
with nozzles for the new type of gas (see table 1 “Burner and nozzle
3. Reassemble the parts following the above procedure in the reverse order.
indicating the new type of gas used. Sticker are available from any of our
Service Centres.
1. Remove the grids and slide the burners from their housings. The burner

GB
13
2. Unscrew the burers with a 7 mm wrench spanner. The internal burner
has a nozzle, the external burner has two (of the same size). Replace
the nozzle with models suited to the new type of gas (see table 1).
3. Replace all the components by repeating the steps in reverse order.
Replacing the Triple ring burner nozzles
1. Remove the pan supports and lift the burners out of their housing. The
burner consists of two separate parts (see pictures).
2. Unscrew the nozzles using a 7 mm socket spanner. Replace the nozzles
1). The two nozzles have the same hole diameter.
3. Replace all the components by completing the above operations in reverse
order.
Does not require adjusting.
2. Remove the knob and adjust the adjustment
screw, which is positioned in or next to the tap
alight, quickly change the position of the knob from minimum to maximum
5. Once the adjustment has been made, replace the seals on the by-passes
using sealing wax or a similar substance.
! If the appliance is connected to liquid gas, the regulation screw must be
fastened as tightly as possible.
!
indicating the new type of gas used. Stickers are available from any of our
Service Centres.
! Should the gas pressure used be different (or vary slightly) from the
inlet pipe (in order to comply with current national regulations).
Collegamenti
elettrici
TARGHETTA CARATTERISTICHE
vedi targhetta caratteristiche
Questa apparecchiatura è conforme alle
seguenti Direttive Comunitarie:
- 2006/95/CE del 12/12/06 (Bassa
Tensione) e successive modificazioni
- 2004/108/CE del 15/12/04 (Compatibilità
Elettromagnetica) e successive
modificazioni
- 93/68/CEE del 22/07/93 e successive
modificazioni.
- 2009/142/CE del 30/11/09 (Gas) e
successive modificazioni.
- 2012/19/UE e successive modificazioni.
Regolamento (EU) No 66/2014 che integra la
Direttiva 2009/125/EC.
Norma EN 60350-2
Norma EN 30-2-1
ECODESIGN

14
GB
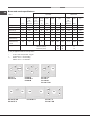
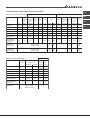
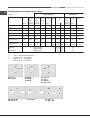
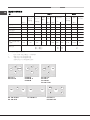
Table 1 Liquid Gas Natural Gas
Burner Diameter Thermal Thermal By-pass By-pass Nozzle Flow* Thermal Nozzle Flow*
power power 1/100 1/100 1/100 (g/h) power 1/100 (l/h)
kW kW (mm) kW
(p.c.s.*) (p.c.s.*) (p.c.s.*)
(mm) Reduced Nominal (1) (mm) (mm) *** ** Nominal (mm)
Supply pressures Nominal (mbar)
Minimum (mbar)
Maximum (mbar)
28-30
20
35
37
25
45
20
17
25
Fast (R)
Reduced Fast (RR)
Semi Fast (S)
Auxiliary (A)
Triple Crown (TC)
Double Flame
(DCDR Internal)
Double Flame
(DCDR External)
2 nozzle
100
100
75
55
130
36
130
0.70
0.70
0.40
0.40
1.50
0.40
1.50
3.00
2.60
1.65
1.00
3.30
0.90
4.10
39
39
28
28
61
28
61
86
80
64
50
65x2
44
70x2
218
189
120
73
240
65
298
214
186
118
71
236
64
293
3.00
2.60
1.65
1.00
3.60
0.90
4.10
132 (H)
122 (H)
96
79 (6)
103x2
74
110x2
286
248
157
95
343
86
390
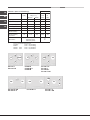
Burner and nozzle specifications
* At 15°C and 1013,25 mbar - dry gas
** Propane P.C.S. = 50.37 MJ/Kg
*** Butane P. C.S. = 49.47 MJ/Kg
Natural P.C.S. = 37.78 MJ/m³
41
41
30
30
57
-
-
(1) Only for appliances with the security device.
PC 631
X
PC 631 N
X
R
Ø145
S
PC 640 X
PC 640 N X
PC 640 N
R
S
S
AA
PC 640 T X
PC 640 T
PC 640 N T
PC 640 T GH
RR
TC
S
A
PC 730 RT GH
PC 730 RT X
PC 720 RT X PC 750 T X
PC 750 T GH
S
RR
TC
S
S
A
DC
TC
DC
TC

GB
15
Start-up and use
! The position of the corresponding gas burner or electric hotplate* is shown
on every knob.
Gas burners
corresponding control knob:
Maximum
Minimum
To light one of the burners, hold a lit match or lighter near the burner and, at
the same time, press down and turn the corresponding knob anti-clockwise
to the maximum setting.
for approximately 2-3 seconds to allow the automatic device keeping the
When using models with an ignition button, light the desired burner pressing
down the corresponding knob as far as possible and turning it anticlockwise
towards the maximum setting.
!
at least 1 minute before trying to relight it.
To switch off the burner, turn the knob in a clockwise direction until it stops
This burner consists of two concentric burners which can operate either
together or separately.
which reduces cooking times with respect to conventional burners.
on the bottom of the pan, when using both burners on minimum.
never set the inside ring to minimum and the outside ring to maximum
at the same time.
Pots and pans of all sizes can be used. In the case of the smaller pots and pans
we recommend the use of only the internal burner.
burners.
The knob marked by the symbol operates the external burner;
The knob marked by the symbol operates the internal burner.
To turn on one of the rings, press the relative knob in all the way and turn it
anti-clockwise to the high setting .
the knob is pressed in.
Since the burner is equipped with a safety device, after lighting the burner
keep the knob pressed in for about 2-3 seconds to allow the device which
The selected burner can be regulated using the corresponding knob, as
follows:
Maximum
Minimum
To switch off the burner, turn the knob in a clockwise direction until it stops
Practical advice on using the burners
do not extend beyond the bottom of the cookware.
Rapid (R)
Reduced Rapid (RR)
Semi Rapid (S)
Auxiliary (A)
Triple Crown (TC)
Ø Cookware Diameter (cm)
24 - 26
24 - 26
16 - 20
10 - 14
24 - 26
Burner
Pans to be used on 60 cm hobs
Reduced Rapid (RR)
Semi-Rapid (S)
Auxiliary (A)
Triple Crown (TC)
Double Flame (DCDR internal)
Double Flame (DCDR external)
24 - 26
16 - 20
10 - 14
24 - 26
10 - 14
26 - 28
Burner
Pans to be used on 75 cm hobs
Ø Cookware diameter (cm)
! On the models supplied with a reducer shelf, remember that this should be
casserole dishes with a diameter under 12 cm.
To identify the type of burner, refer to the designs in the section entitled, “Burner
Electric hotplates*
The corresponding knob may be turned clockwise or anti-clockwise and set
to six different positions:
Normal or Fast PlateSetting
Off
Minimum power
Intermediate powers
Maximum power
0
1
2-5
6
When the selector knob is in any position other than the off position, the ‘on’
light comes on.
Practical advice on using the electric hotplates
whose diameter is no less than that of the hotplate itself.
* Only available on certain models.

16
GB
Setting
0
1
2
3
4
5
6
Normal or Fast Plate
Off
Cooking vegetables, fish
Cooking patatoes (using steam) soups,
chickpeas, beans.
Continuing the cooking of large quantities of
food, minestrone.
For roasting (average)
For roasting (above average)
For browning and reaching a boil in a short time
!
temperature for approximately 4 minutes, without placing any pans on them.
During this initial stage, their protective coating hardens and reaches its
maximum resistance.
Precautions and tips
! This appliance has been designed and manufactured in compliance with
international safety standards. The following warnings are provided for safety
reasons and must be read carefully.
General safety
appear in the manual and on the serial number plate.
not intended for commercial or industrial use.
extremely dangerous to leave the appliance exposed to rain and storms.
feet.
in accordance with the instructions outlined in this booklet. Any other
use of the appliance (e.g. for heating the room) constitutes improper
use and is dangerous. The manufacturer may not be held liable for
use of the appliance.
covered.
is not in use.
do not pull on the cable.
the plug from the mains.
the appliance yourself. Repairs carried out by inexperienced persons may
cause injury or further malfunctioning of the appliance. Contact a Service
Centre (see Assistance).
hob in order to avoid accidental burns.
hotplates are still hot.
with reduced physical, sensory or mental capacities, by inexperienced
individuals or by anyone who is not familiar with the product. These
individuals should, at the very least, be supervised by someone who
assumes responsibility for their safety or receive preliminary instructions
relating to the operation of the appliance.
timer or separate remote-control system.
Disposal
the packaging may be reused.
not be disposed of in the normal unsorted municipal waste stream. Old
appliances must be collected separately in order to optimise the recovery
and recycling of the materials they contain and reduce the impact on
on the product reminds you of your obligation, that when you dispose of
the appliance it must be separately collected.
Consumers should contact their local authority or retailer for information
concerning the correct disposal of their old appliance.
Respecting and conserving the environment
plates 10 minutes before the end of your cooking time and glass ceramic
hot plates 5 minutes before the end of cooking time.
precious energy will be wasted and pots that boil over leave encrusted
water as possible. Cooking with the lid off will greatly increase energy
consumption.
.
pressure cooker, which is twice as fast and saves a third of the energy.
Maintenance and care
Switching the appliance off
Disconnect your appliance from the electricity supply before carrying out
any work on it.
Cleaning the appliance
! Do not use abrasive or corrosive detergents such as stain removers, anti-rust
products, powder detergents or sponges with abrasive surfaces: these may
scratch the surface beyond repair.
! Never use steam cleaners or pressure cleaners on the appliance.
absorbent kitchen roll.
warm water and soap and any burnt-on substances removed.

GB
17
lighting devices should be cleaned frequently and the gas outlet holes
should be checked for blockages.
with a little oil while still warm.
surface for a long time, or by aggressive detergents containing phosphorus.
After cleaning, rinse and dry any remaining drops of water.
Gas tap maintenance
the tap must be replaced.
!
by the manufacturer.
Troubleshooting
It may happen that the appliance does not function properly or at all. Before
calling the service centre for assistance, check if anything can be done. First,
check to see that there are no interruptions in the gas and electrical supplies,
and, in particular, that the gas valves for the mains are open.
Check whether:
Check to make sure that:
device.
The burner does not remain lit when set to minimum.
Check to make sure that:
The cookware is unstable.
Check to make sure that:
Page is loading ...
Page is loading ...
Page is loading ...
Page is loading ...
Page is loading ...
Page is loading ...
Page is loading ...
Page is loading ...
Page is loading ...
Page is loading ...
Page is loading ...
Page is loading ...
Page is loading ...
Page is loading ...
Page is loading ...
Page is loading ...
Page is loading ...
Page is loading ...
Page is loading ...
Page is loading ...
Page is loading ...
Page is loading ...
Page is loading ...
Page is loading ...
Page is loading ...
Page is loading ...
Page is loading ...
Page is loading ...
Page is loading ...
Page is loading ...
Page is loading ...
Page is loading ...
Page is loading ...
Page is loading ...
Page is loading ...
Page is loading ...
Page is loading ...
Page is loading ...
Page is loading ...
Page is loading ...
Page is loading ...
Page is loading ...

60
AR
195125757.00
08/2014 - XEROX FABRIANO
Indesit Company S.p.A.
V
iale Aristide Merloni,47
60044 Fabriano (AN)
www.hotpoint-ariston.com
-
 1
1
-
 2
2
-
 3
3
-
 4
4
-
 5
5
-
 6
6
-
 7
7
-
 8
8
-
 9
9
-
 10
10
-
 11
11
-
 12
12
-
 13
13
-
 14
14
-
 15
15
-
 16
16
-
 17
17
-
 18
18
-
 19
19
-
 20
20
-
 21
21
-
 22
22
-
 23
23
-
 24
24
-
 25
25
-
 26
26
-
 27
27
-
 28
28
-
 29
29
-
 30
30
-
 31
31
-
 32
32
-
 33
33
-
 34
34
-
 35
35
-
 36
36
-
 37
37
-
 38
38
-
 39
39
-
 40
40
-
 41
41
-
 42
42
-
 43
43
-
 44
44
-
 45
45
-
 46
46
-
 47
47
-
 48
48
-
 49
49
-
 50
50
-
 51
51
-
 52
52
-
 53
53
-
 54
54
-
 55
55
-
 56
56
-
 57
57
-
 58
58
-
 59
59
-
 60
60


Ask a question and I''ll find the answer in the document
Finding information in a document is now easier with AI
in other languages
- français: Indesit PC 640 T X Mode d'emploi
- español: Indesit PC 640 T X Guía del usuario
- português: Indesit PC 640 T X Guia de usuario
Related papers
-
Ariston PC 730 RT X User guide
-
-
Indesit PC 640 N (WH) User guide
-
Indesit PH 741 RQO GH CN User guide
-
-
-
-
Indesit TD 640 S (BK) GH User guide
-
-
Other documents
-
-
Whirlpool PK 741 RQO GH User guide
-
-
Whirlpool PCN 642 IX/A Owner's manual
-
-
-
-
-
Whirlpool PCN 731 T/D2/IX/A Owner's manual
-