Page is loading ...

EN
Full Weather Station with Radio Controlled Clock,
Projection and AM/FM Radio
(Model #: PS-L06 / PS-L06U)
User Manual
PS-L06_GB-final.p65 8/8/03, 12:02 PM1

EN
PS-L06_GB-final.p65 8/8/03, 12:02 PM2

EN
TABLE OF CONTENTS
About this guide ........................................................ 2
Product overview ....................................................... 3
Getting started .......................................................... 8
Batteries .............................................................. 8
AC power adapter ............................................... 8
Switch between modes ....................................... 9
Change settings .................................................. 9
Remote unit setup ...................................................... 9
Clock ...................................................................... 10
Alarm ...................................................................... 11
Calendar ................................................................. 12
Moon phase ............................................................ 13
Barometer ............................................................... 13
Weather forecast ..................................................... 15
Temperature & humidity ........................................... 15
Radio ...................................................................... 18
Backlight ................................................................. 19
Projector ................................................................. 20
Reset system ........................................................... 21
Safety and care ....................................................... 21
Warnings ................................................................. 22
Troubleshooting ....................................................... 22
Specifications .......................................................... 24
Additional resources ................................................ 27
1
PS-L06_GB-final.p65 8/8/03, 12:02 PM3

EN
ABOUT THIS GUIDE
Congratulations on your selection of the Philippe
Starck with Oregon Scientific Full Weather Station with
Radio-Controlled Projection Clock and AM/FM Radio
(PS-L06 / PS-L06U). This powerful device bundles time
keeping, alarm, indoor and wireless outdoor tempera-
ture and humidity monitoring, weather forecasting,
projection, and digital AM/FM radio into a single tool
you can use from the convenience of your home.
Keep this manual handy as you use your new product.
It contains practical step-by-step instructions, as well as
technical specifications and warnings you should know.
In this box, you will find:
• Main unit
• Remote sensor
• Batteries
• AC/DC power adapter
2
PS-L06_GB-final.p65 8/8/03, 12:02 PM4

EN
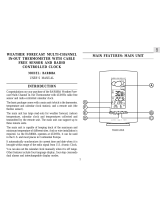
PRODUCT OVERVIEW
TOP VIEW
DESCRIPTIONS
1. Snooze / Light button (→ 12, 19)
2. Light sensor (→ 19)
3. Projection lens (→ 20)
1
2
3
3
PS-L06_GB-final.p65 8/8/03, 12:02 PM5

EN
LCD DISPLAY
DESCRIPTIONS
1. Low batteries icon (→ 8)
2. Clock (→ 10)
3. Barometer (→ 13)
4. Weather forecast (→ 15)
5. Moon phase (→ 13)
6. Calendar (→ 12)
7. Temperature and humidity (→ 15)
8. Alarm (→ 11)
9. Radio (→ 18)
1
2
3
4
69
8
7
5
4
PS-L06_GB-final.p65 8/8/03, 12:02 PM6

EN
BACK VIEW BUTTON DESCRIPTIONS
1. Focus – focus projector (→ 20)
2. Select – switch modes / change settings
3. Rotation – rotate projector (→ 20)
4. Up – increase setting / activate auto-synch (→ 11)
5. Down – decrease setting / deactivate
auto-synch (→ 11)
6. Alarm –activate / deactivate alarm (→ 12)
7. Channel – switch remote unit (→ 16)
8. Radio – turn radio or radio alarm on/off (→ 12, 18)
9. Station –select a preset station (→ 18)
10. Tuning – select AM/FM band (→ 18)
11. Sleep – activate Sleep Timer (→ 19)
2
3
4
5
1
7
6
8
10
11
9
5
PS-L06_GB-final.p65 8/8/03, 12:02 PM7

EN
BOTTOM VIEW DESCRIPTIONS
1. Battery compartment (→ 8)
2. Light sensitivity knob (→ 20)
3. Reset button (→ 8, 21)
4. Antenna (→ 18)
5. Headphone jack (→ 19)
6. DC power input jack (→ 8)
7. Backlight switch (→ 19)
NOTE
AC power adapter not shown.
6
3214
5
6
7
PS-L06_GB-final.p65 8/8/03, 12:02 PM8

EN
REMOTE UNIT DESCRIPTIONS
1. Temperature / Trend display
2. Low battery icon
3. Humidity / Trend / Comfort Level display
4. °C / °F switches
5. Channel switches
6. Reset button
7. Battery compartment
8. Wall-mount hole
9. Battery compartment lid
7
7
9
2
3
6
4
1
5
8
PS-L06_GB-final.p65 8/8/03, 12:02 PM9

EN
GETTING STARTED
BATTERIES
Batteries for the remote and main units are supplied
with this product. Replace them whenever the low
battery signal ( ) displays. Remove the battery
compartment lid on the bottom of the main unit, and
insert the batteries. Use a small Phillips screwdriver to
remove the remote unit compartment lid. Be sure to
match the correct polarity, as shown in the battery
compartment. Before you close the lid, press the
RESET button with the point of a blunt object (such as
a ball point pen).
NOTE
Insert the batteries in the remote unit before you
set up the main unit. Do not use rechargeable
batteries.
AC POWER ADAPTER
An AC power adapter is supplied for use with the main
unit. You must connect the power adapter if you wish
to use the continuous projection or backlight features.
The jack is located in the battery compartment.
NOTE
If the AC power becomes unavailable, the unit
will automatically switch to battery power.
8
PS-L06_GB-final.p65 8/8/03, 12:02 PM10

EN
SWITCH BETWEEN MODES
Press SELECT. The select mode will flash. The display
will stop flashing if no key is pressed within 5 seconds.
CHANGE SETTINGS
Press and hold SELECT for 2 seconds. Then, press
UP or DOWN to change each setting. Press SELECT
to switch options.
REMOTE UNIT SET UP
Up to 3 remote units can be used with this product to
monitor outdoor temperature and humidity. The
measurement unit (°C or °F) and channel number (1, 2,
or 3) switches are located in the battery compartment,
and should be set prior to installation.
NOTE
Additional remote units sold separately. If you
are using more than one remote unit, be sure to select a
different channel number for each unit.
INSTALLATION
Mount the remote unit on a flat surface using the recess
holes on the back of the unit.
For best results:
• Before you insert the batteries, select the
measurement unit and channel number first.
• Place the unit out of direct sunlight and moisture.
• Do not place the remote unit more than 20 – 30
meters (60 – 90 feet) from the main (indoor) unit.
9
PS-L06_GB-final.p65 8/8/03, 12:02 PM11

EN
• Position the unit so that it faces the main (indoor)
unit. Minimize obstructions such as doors, walls,
and furniture.
You may need to experiment with various locations to
get the best reception.
CLOCK
This product can automatically synchronize the date and
time with official time-keeping organizations in Frankfurt,
Germany (PS-L06) or Rugby, England (PS-L06U).
When the unit is within 1500 km (932 miles) of a RF
signal, the reception icon will blink during reception.
RECEPTION
Reception takes 2 – 10 minutes to complete. Once
complete, the icon will stop blinking.
NOTE
For best results, place the unit away from metal
or electrical objects, and near a window with a clear
view to the sky.
Strong signal Weak signal No signal
10
PS-L06_GB-final.p65 8/8/03, 12:02 PM12

EN
TO DISABLE OR ENABLE AUTO-
SYNCHRONIZATION
In Clock mode, Press DOWN for 2 seconds to disable
the auto-synchronization. The unit will not respond to
radio signals until you reactivate the synchronization.
To enable auto-reception, press UP for 2 seconds.
SET OR CHANGE THE CLOCK
1. Press SELECT to switch to the Clock Mode.
The time will flash.
2. Press and hold SELECT for 2 seconds to enter
the setting mode.
3. Select the 12/24-hour format, hour, and minute.
Press UP or DOWN to change the setting.
Press SELECT to confirm.
ALARM
When activated, the Melody Alarm starts quietly, then
gradually becomes louder. It shuts off after two minutes.
The LCD display lights up for the first 8 seconds.
The Radio alarm turns on the Radio automatically. It will
turn off after 2 hours.
SET ALARM
1. Press SELECT several times until the Alarm area
flashes.
2. Press and hold SELECT for 2 seconds to enter
the setting mode.
3. Select the hour, minute, and alarm type ( for
Melody Alarm or for Radio Alarm). Press
UP or DOWN to change the setting. Press
11
PS-L06_GB-final.p65 8/8/03, 12:02 PM13

EN
SELECT to confirm.
If you choose , also select the melody (1 – 7)
and volume level (Lo or Hi).
If you choose , use the radio control
buttons to select the AM/FM band, radio station
and volume level (→ 18).
4. Press SELECT again when you are finished.
SNOOZE
Press the SNOOZE/LIGHT button the top of the unit
to temporarily disable the alarm for 8 minutes. The
alarm icon will blink while Snooze is activated.
TO TURN THE ALARM OFF OR ON
Press RADIO to turn the radio alarm off. Press any
other button to turn the melody alarm off.
To turn the alarm off completely (deactivate it for the next
day), press ALARM.
CALENDAR
SET DATE
Clock auto-synchronization must be deactivated before
you manually set the date. (→ 11)
1. Press SELECT several times until the calendar
area flashes.
2. Press and hold SELECT for 2 seconds to enter
the calendar setting mode.
12
PS-L06_GB-final.p65 8/8/03, 12:02 PM14

EN
3. Select the year, month, date, and language. Press
UP or DOWN to change the setting. Press
SELECT to confirm.
NOTE
The language options are (E) English, (F)
French, (D) German, (I) Italian, and (S) Spanish.
MOON PHASE
Press SELECT until the Calendar Area flashes. Then,
press UP or DOWN to change the date and view the
corresponding moon phase.
BAROMETER
This product tracks barometric pressure changes over
the past 24 hours to provide the weather forecast
(→ 15) and a trend line showing the direction of
barometric change. Barometric changes are measured
by the main (indoor) unit.
13
PS-L06_GB-final.p65 8/8/03, 12:02 PM15

EN
BAROMETRIC TREND
The barometric trend arrow for the last 30 minutes is
always displayed.
VIEW THE LAST 24 HOURS
Press SELECT 2 times until the Barometer Area
flashes. Then, press UP or DOWN to view the last 24
hours history.
SET UNIT AND ALTITUDE
You can set the unit of measurement (mb/hPa or inHg)
and altitude. Setting the altitude allows the product to
take more accurate barometric measurements.
1. Press SELECT 2 times until the Barometer Area
flashes.
2. Press and hold SELECT for 2 seconds.
3. Select altitude (-100 meters to 2500 meters in
increments of 10) and the unit of measurement
(mb/hPa or inHg). Press UP or DOWN to
change the setting. Press SELECT to confirm.
14
Trend
Description Pressure change
(mb/hPa)
Rising +3
Steady Steady
Failing -3
1 hr 6 hr
+1
Steady
-1
PS-L06_GB-final.p65 8/8/03, 12:02 PM16

EN
WEATHER FORECAST
This product forecasts the next 12 to 24 hours of
weather within a 30 to 50 km (19 - 31 mile) radius with
70 to 75 percent accuracy. The weather forecast is
always displayed.
TEMPERATURE AND HUMIDITY
With the press of a button, you can check the current
indoor or outdoor temperature, humidity percentage,
comfort level, trend, and record measurements.
Outdoor measurements are collected by the remote
unit.
Temperature is give at the top; humidity is below.
VIEW MIN / MAX / CURRENT MEASUREMENTS
Press SELECT 3 times until the Temperature and
Humidity Areas flash. Press UP or DOWN to scan the
readings.
CLEAR MIN / MAX MEASUREMENTS
While viewing Min/Max measurements, press and hold
UP or DOWN for 2 seconds until a beep sounds. This
15
Clear
Partly
Cloudy
Cloudy
Rainy
PS-L06_GB-final.p65 8/8/03, 12:02 PM17

EN
clears the previous measurements from the memory.
SELECT REMOTE UNIT CHANNEL
While in the Temperature / Humidity Mode, press
CHANNEL to switch between CH 1, 2, or 3, or press
and hold CHANNEL for 2 seconds to enter Auto scan
mode. If only 1 remote unit is in use, you will not be
able to change channels or Auto scan. If you select
“Auto”, the channel will change every 3 seconds. To
deactivate, press and hold CHANNEL for 2 seconds
again.
SENSOR SEARCHING
If there is no remote unit signal, the temperature and
humidity measurement will be blank. Check the remote
unit batteries, or press and hold UP and DOWN for 2
seconds to search for the remote unit(s).
NOTE
Signals from household electrical appliances
such as doorbells and home security systems can cause
temporary reception failures between the indoor and
outdoor units. This is normal and does not affect the
general performance of the product. Reception will
automatically resume once the interference ends.
16
Searchin No sensor Sensor found
PS-L06_GB-final.p65 8/8/03, 12:02 PM18

EN
COMFORT ZONE
The indoor and outdoor comfort zones are shown for
the following conditions.
TRENDS
The trend arrow for the last 30 minutes always displays.
Indoor and outdoor temperature and humidity trends are
shown separately.
17
Zone
Temperature
Relative Humidity
Wet
Dry
Comfort
Any
20 – 25 ° C
(68 - 77 ° F)
>70%
<40%
40 – 70%
Any
Trend
Temperature
Temperature Relative Humidity
+0.5 °C +3%
Steady Steady
-0.5 °C -3%
PS-L06_GB-final.p65 8/8/03, 12:02 PM19

EN
SET UNIT
While in Temperature / Humidity Mode, press SELECT
for 2 seconds. Press UP or DOWN to switch between
°C and °F. Press SELECT to confirm.
RADIO
You can listen to PLL digital radio broadcasts with this
product.
ANTENNA
The antenna wire is located in the battery compartment.
Position it for the best reception.
TURN THE RADIO ON OR OFF
Press the RADIO button.
VOLUME
Press UP or DOWN. There are 8 volume levels.
SWITCH AM/FM BAND
Press TUNING to enable auto-tuning. Press again to
switch AM/FM band.
SELECT STATION
Press STATION. There are 16 preset channels: 8 for
FM and 8 for AM.
TUNING
Press TUNING.Then, press UP or DOWN to scan the
available frequencies. Press and hold UP or DOWN for
2 seconds to auto-scan. The scanning will stop when
an available frequency is found.
18
PS-L06_GB-final.p65 8/8/03, 12:03 PM20
/