Page is loading ...

User’s manual
TL7100
Handset lifter
for use with AT&T models
TL7610/TL7611

Congratulations
on your purchase of this AT&T product. Before using this AT&T
product, please read the Important safety information section
on pages 21-22 of this manual. Please thoroughly read this
user’s manual for all the feature operations and troubleshooting
information necessary to install and operate your new AT&T
product. You can also visit our website at
www.telephones.att.com or call 1 (800) 222-3111.
In Canada, dial 1 (866) 288-4268.
Model number: TL7100
Type: Handset lifter
Serial number:
(found on the bottom of the handset lifter)
Purchase date:
Place of purchase:
Save your sales receipt and original packaging in case it is necessary
to return this product for warranty service.
© 2010-2011 Advanced American Telephones. All Rights Reserved. AT&T and
the AT&T logo are trademarks of AT&T Intellectual Property licensed to
Advanced American Telephones, San Antonio, TX 78219. Printed in China.

Handset lifterlifter
Parts checklist
Check to make sure the handset lifter package includes the
following items. Save your sales receipt and original packaging in
the event warranty service is necessary.
Large lifter padlifter pad pad
Auxiliary ring detector
Anti-slip pad
User's manual
User’s manual
TL7100
Handset lifter
for use with AT&T models
TL7610/TL7611
TL7610/TL7611 base adapter

User’s manual
TL7100
Handset lifter
for use with AT&T models
TL7610/TL7611
Table of contents
Getting started
Quick reference guide - handset lifter ...................................................1
Handset lifter installation ..............................................................................3
Connect the TL7610/TL7611 headset base ....................................3
Installation preparation ..............................................................................4
TL7610/TL7611 headset base installation .......................................5
Adjust the corded handset audio ..........................................................6
Attach the lifter .............................................................................................. 7
Adjust the switch hook presser position ...........................................8
Adjust the height of the lifter arm .......................................................8
Lifter adjustments and testing ................................................................9
Installation of large lifter pad (optional) ........................................ 10
Installation of anti-slip pad (optional) ............................................. 10
About internal and auxiliary ring detectors ...................................... 11
Install the auxiliary ring detector ....................................................... 11
Ring detector on/off ................................................................................. 12
Adjust the sensitivity level ..................................................................... 12
STATUS light .................................................................................................. 13

Handset lifter operation
Make and answer calls ................................................................................ 14
Make a call with the corded handset ............................................... 14
Make and answer a call with the handset lifter and
cordless headset......................................................................................... 15
Make and answer a call with a multi-line telephone and
the handset lifter........................................................................................ 16
Appendix
Troubleshooting .............................................................................................. 17
Maintenance...................................................................................................... 20
Important safety information ................................................................... 21
Safety information...................................................................................... 21
FCC Part 15 ....................................................................................................... 23
Limited warranty ............................................................................................. 24
Index
Index ..................................................................................................................... 28

1
Lifter control cable
This cable is hard wired into the lifter
and plugs into the LIFTER jack on the
headset base via the TL7610/TL7611
base adapter.
RING DETECT jack
Plug in the auxiliary ring
detector (page 11).
ADJUST LIFTER knob
Adjusts the height of the lifter arm (page 8).
Lifter arm
Holds the corded telephone handset.
Quick reference guide - handset lifter
Getting started
SENSOR ADJ knob
Adjusts the sensitivity of the ring detector (page 12).
Switch hook presser
When
the headset base is set to
LIFTER MODE
, pressing ON/OFF on
the headset rises or lowers the switch
hook presser.

2
Small lifter pad
Holds the earpiece of the corded telephone
handset.
Adhesive tape
Remove the protective strips before
attaching the lifter to the telephone base.
STATUS light
On in red when the ring detector is off (page 13).
On in blue when the ring detector is on and
the headset not in use (page 13).
Flashes in blue four times every three seconds
when the ring detector detects an incoming
call (page 13).
Flashes in blue slowly when the switch
hook presser is raised and you are on a call
(page 13).
Switch hook presser adjustment knob
Adjusts the position of the switch hook presser
(page 8).
Quick reference guide - handset lifter
Getting started
RING ON/OFF
Press to turn the ring detector on or off. When the ring detector is
off, the cordless headset does not ring (page 12).
Internal ring detector
Detects the telephone ringer and sends a
ring tone to the headset earpiece.

Handset lifter installation
Getting started
The TL7100 lifter works with the TL7610/TL7611 DECT 6.0 cord-
less headset by using the TL7610/TL7611 base adapter to pro-
vide a complete communication solution for most corded tele-
phones. The lifter raises and lowers its switch hook presser to
answer, make and end phone calls. The ring detector provides an
incoming call indication through the cordless headset, so you can
answer calls even if you are away from the telephone base.
3
Connect the TL7610/TL7611 headset base
The cords have colored labels that guide you to plug them into
the correct headset base jacks. The back of the headset base
has color-coded dots above the jacks and the names of the jacks
on the rear bottom piece that correspond to the colored labels
on the cords.
If you subscribe to high-speed Internet service (DSL - digital
subscriber line) through your telephone line, you must install a
DSL filter between the telephone line cord and telephone wall
jack. The filter prevents noise and caller ID problems caused by
DSL interference. Contact your DSL service provider for more
information about DSL filters.
Power adapter
jack (green dot)
Curly handset
cord jack (light
blue dot)
Handset
lifter jack
(blue dot)
Wall jack
(red dot)
Base handset
jack (orange dot)

Handset lifter installation
Getting started
4
Installation preparation
Before installing the headset base, remove the rear bottom piece
of the headset base by pushing it away from the base.
Install the headset base as shown on page 5.
After completing installation, slide the rear bottom piece towards
the headset base until it clicks into place.

5
TL7610/TL7611 headset base installation
1. Unplug the curly handset cord from the telephone and plug
it into the CURLY CORD jack (light blue dot) on the
headset base.
2. Plug one end of the telephone line cord (provided with the
headset base) into the base handset jack on the telephone
where the curly handset cord was plugged in.
3. Plug the other end of the line cord into the BASE JACK
(orange dot) on the headset base.
4. Plug the lifter control cable into the jack of the TL7610/
TL7611 base adapter.
5. Plug the other end of the TL7610/TL7611 base adapter into
the LIFTER jack (blue dot) on the headset base.
Adjust the corded handset audio (see page 6) before you install
the handset lifter to your telephone.
Handset lifter installation
Getting started
Telephone
wall jack
1
2
3
A DSL filter (not included)
is required if you have DSL
high-speed Internet service.
Telephone
line cord
Plug the small end of the
headset base power adapter
to the POWER jack (green dot)
on the headset base.
Plug the large end of the
headset base power adapter
into a power outlet not
controlled by a wall switch.
5
4

Adjust the corded handset audio
1. Make sure that LIFTER MODE light on
the headset base is on. Press the MODE
button on the headset base to change
the mode.
2. Lift the corded handset to release
the switch hook. Place the corded
handset aside.
3. Place the headset earpiece (AT&T model TL7610/
TL7611) on your ear.
4. Press ON/OFF on the headset to listen for a dial
tone. If there is no dial tone or the dial tone is
unclear, slide the LIFTER AUDIO ADJUST switch
on the side of the headset base from A to G until
the dial tone is clear.
6
Handset lifter installation
Getting started

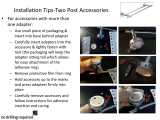
Attach the lifter
1. To choose where to install the lifter
on your telephone, look at the space
underneath the corded handset. If there
is a speaker, the lifter should be centered
over the speaker. If there is no speaker,
the lifter should be centered within the
space. Make sure the lifter arm is raised
above the switch hook of the telephone base.
2. Peel off the protective strips from the
adhesive tape at the bottom of the lifter.
3. Carefully place the lifter in the desired
position and press down.
Handset lifter installation
Getting started
7
Adhesive tape
Switch hook

Handset lifter installation
Getting started
8
Adjust the height of the lifter arm
Turn the ADJUST LIFTER knob to change the height of the lifter
arm. When in the raised position, the arm should release the
switch hook so you can hear a dial tone. When lowered, the arm
should hold the switch hook down so you cannot hear a dial tone.
Adjust the switch hook presser position
Turn the knob to move the switch hook presser until it is lined
up with your telephone switch hook.

Lifter adjustments and testing
1. Make sure that the headset base is set to
LIFTER MODE and the
LIFTER AUDIO ADJUST setting is correct.
2. Turn the switch hook presser adjustment
knob until the switch hook presser is just
above the switch hook (see page 8).
3. Lower the lifter arm until the switch hook
presser holds the switch hook down.
4. Place the corded handset on the lifter.
5. Press ON/OFF on the headset. The switch
hook presser should rise and release the
switch hook on your telephone base. Make
sure you hear a dial tone through your
headset earpiece.
6. If the switch hook is not fully released, turn
the ADJUST LIFTER knob (see page 8) while
the corded handset is on the lifter. When
the switch hook is fully released, you will
hear a dial tone from the headset.
It may take some adjustments and testing to
find the right position for the lifter. For the
lifter to work properly, the switch hook must
release completely when you press ON/OFF
to turn the headset on. The switch hook must
also be held down completely when you press
ON/OFF to turn the headset off.
Handset lifter installation
Getting started
9

10
Handset lifter installation
Getting started
Installation of large lifter pad (optional)
If the small lifter pad cannot hold the corded handset steadily, you
can attach a large lifter pad (provided) to enlarge the contact area.
1. Hold the large lifter pad in front of the small lifter pad as
shown below.
2. Insert the large lifter pad into the two front gaps of the small
lifter pad.
Installation of anti-slip pad (optional)
The anti-slip pad (provided) helps prevent your corded handset
from slipping from the lifter.
1. Position the anti-slip pad above the small lifter pad.
2. Peel off the protective strip from the anti-slip pad.
3. Carefully return the anti-slip pad to the predetermined position
and replace the corded handset on the lifter.
Adhesive tape
Protective strip

11
Install the auxiliary ring detector
1. Insert the auxiliary ring detector plug into the RING DETECT
jack on the lifter.
2. Remove the protective strip from the adhesive tape on the
auxiliary ring detector.
3. Stick the auxiliary ring detector to the center of the corded
phone speaker.
The internal or auxiliary ring detector detects the telephone
ringer and sends a ring tone to the headset earpiece.
If you installed the TL7100 lifter over the top of the corded
phone speaker, the internal ring detector will recognize when the
phone rings. However, if your corded phone speaker is located
elsewhere on the phone, stick the auxiliary ring detector to the
speaker as shown below.
About internal and auxiliary ring detectors
Getting started
Adhesive tape
Auxiliary ring
detector plug
Auxiliary ring detector
Speaker
RING DETECT jack
RING DETECT jack

Adjust the sensitivity level
The default setting of the ring detector works with most corded
telephones. However, the ring detector might need some
adjustments to recognize less common telephone ring tones.
To adjust the ring detector sensitivity while the telephone
is ringing:
Turn the SENSOR ADJ knob clockwise
to increase the sensitivity.
Turn the SENSOR ADJ knob
counterclockwise to decrease
the sensitivity.
When the ring detector detects the
telephone ringer correctly:
The STATUS light on the lifter flashes quickly when the
telephone rings.
The detector sends the ring tone to the headset earpiece.
•
•
•
•
12
Ring detector on/off
When the ring detector detects an incoming call, it sends a ring
tone to the headset earpiece.
Press the RING ON/OFF button on the
lifter to turn the ring detector on or
off. The STATUS light is blue when the
ring detector is turned on. The STATUS
light is red when the ring detector is
turned off.
When the ring detector is turned off,
it does not send a ring tone to the
headset.
NOTE: When you are using the speakerphone
of your telephone, the ring detector may send
a ring tone to the headset. If you do not want
the headset to ring, press the RING ON/OFF
button to turn the ring detector off. After the call, you can press the
RING ON/OFF button again to turn the ring detector back on.
•
•
About internal and auxiliary ring detectors
Getting started

STATUS light
13
About internal and auxiliary ring detectors
Getting started
Red On when the headset is not in use and the ring detector
is turned off.
Flashes slowly when the headset is in use and the ring
detector is turned off.
•
•
Blue On when the headset is not in use and the ring
detector is turned on.
Flashes four times every three seconds when the
ring detector detects an incoming call.
Flashes slowly when the headset is in use and the
ring detector is turned on.
•
•
•
Off The headset base does not have power.
The lifter control cable is not plugged into the
LIFTER jack on the headset base via the TL7610/
TL7611 base adapter.
•
•

14
Make a call with the corded handset
As indicated below, lifting the handset causes the lifter arm to
rise and release the switch hook.
When you hear a dial tone through the handset, you can dial
normally using the dial pad.
Released
switch
hook
Make and answer calls
Handset lifter operation

15
Make and answer a call with the handset lifter and
cordless headset
You can use the cordless headset to make, answer and end calls
without using the corded handset.
Make a call:
1. Press ON/OFF on the headset.
The switch hook presser rises and
releases the switch hook. You hear a
dial tone in the headset earpiece.
2. Dial the telephone number using
the dialing keys.
Answer a call:
• Press ON/OFF on the headset to answer an
incoming call. The switch hook presser rises and
releases the switch hook. You hear the caller
through the headset earpiece.
End a call:
• Press ON/OFF on the headset to end a call. The
switch hook presser pushes down the
switch hook and ends the call.
Make and answer calls
Handset lifter operation
/