Page is loading ...

SnugRide®
Click Connect™30
©2013 Graco PD261473A 10/13 US

2
1.0 Warning to Parents and Other Users .........................................4-5
2.0 Registration Information ..............................................................6-7
2.1 Register Your Infant Restraint ...................................................6
2.2 For Recall Information ...............................................................6
2.3 If You Need Help .......................................................................7
2.4 Child Restraint/Base Useful Life ................................................7
3.0 Important Information ................................................................8-12
3.1 Warnings for Use as an Infant Restraint ..............................8-10
3.2 Warnings for Use With a Stroller .............................................10
3.3 Additional Warnings for Use as a Carrier ................................11
3.4 Height and Weight Limits ........................................................12
4.0 Choosing an Appropriate Vehicle Seat Location ..................13-19
4.1 Vehicle Seat Requirements ................................................13-14
4.2 Vehicle Seat Belt Requirements ..............................................14
4.2.1 UNSAFE Vehicle Belt Systems ......................................15
4.2.2 SAFE Vehicle Belt Systems ......................................16-18
4.3 LATCH Locations ....................................................................19

3
5.0 Features and Components ......................................................20-25
5.1 Adjusting Handle .....................................................................23
5.2 Removing and Attaching Infant Restraint ................................23
5.3 Harness Covers (on certain models) .......................................24
5.4 Canopy Attachment .................................................................24
5.5 Head Support and Body Support (on certain models) ............25
6.0 How to Install the Infant Restraint/Base ................................26-34
6.1 Installing the Infant Restraint Without Base
Using Vehicle Belt ..............................................................26-27
6.2 Installing the Infant Restraint and Base
Using Vehicle Belt ..............................................................28-29
6.3 Using LATCH to Install Base .............................................30-31
6.4 Reclining Infant Restraint/Base ..........................................32-34
7.0 Using Infant Restraint .........................................................................35-41
7.1 Positioning Harness Straps ................................................35-37
7.2 Changing the Crotch Strap Position ...........................................38
7.3 Securing Child in the Infant Restraint .................................39-42
8.0 Additional Information .............................................................43-46
8.1 Airplane Use ............................................................................43
8.2 Storing LATCH ........................................................................43
8.3 Cleaning and Maintenance .................................................44-45
8.4 Buckle Cleaning Process .........................................................46
9.0 Replacement Parts ..........................................................................48

4
DO NOT PLACE THIS INFANT RESTRAINT IN
A VEHICLE SEATING LOCATION THAT HAS A
FRONT AIR BAG. If the air bag inflates, it can hit
the infant restraint with great force and cause serious
injury or death of your child. Check vehicle owner’s
manual for information about side air bags and infant
restraint installation. No infant restraint can guarantee
protection from injury in every situation. However, proper use of this
infant restraint reduces the risk of serious injury or death to your child.
1.0 Warnings to Parents and Other Users

5
Failure to properly use this infant restraint increases the risk of serious
injury or death in a sharp turn, sudden stop or crash. Your child’s safety
depends on you installing and using this infant restraint correctly on
every ride.
Even if using this infant restraint seems easy to figure out on your own, it
is very important to FOLLOW THE OWNER’S MANUAL.
The manual is located in the base.
You also must read your vehicle owner’s manual.
Your child’s safety depends on:
1. Choosing a suitable location in your vehicle. Some seating
positions, such as those equipped with air bags, may not be safe
locations for this infant restraint.
2. Inserting the harness straps in the proper slots for your child.
3. Properly securing your child in the infant restraint.
4. Placing infant restraint/base in a rear-facing position.
5. Properly routing the vehicle seat belt or LATCH.
6. Properly reclining the infant restraint.
7. Properly securing the infant restraint in the vehicle using a seat
belt designed to restrain an infant restraint or by using LATCH. Many
seat belts are NOT safe to use with infant restraints, even though they
can easily be threaded through the infant restraint!

6
2.2 For Recall Information
2.1 Register Your Infant Restraint
Model Number:
Date of Manufacture:
Purchase Date:
Please fill in the above information. The model number and date of
manufacture can be found on a label on the bottom of your infant
restraint. Fill out the prepaid registration postcard attached to the seat
pad and mail it today.
Child restraints could be recalled for safety reasons. You must register
this restraint to be reached in a recall. Send your name, address and
the restraints’ model number and date of manufacture to:
Graco Children’s Products Inc.
Attn: Customer Service
3 Glenlake Parkway
Atlanta, GA 30328
or call 1-800-345-4109
or register online at:
http://www.gracobaby.com/carseatregistration
Call the U.S. Government’s Vehicle Safety Hotline at 1-888-327-4236
(TTY:1-800-424-9153), or go to http://www.NHTSA.gov
Graco: 1-800-345-4109 or www.gracobaby.com
2.0 Registration Information

7
STOP using this child restraint or base and throw it away 7 years after
the date of manufacture.
Look for this sticker on rear of infant restraint or on the base:
In the U.S.A, please contact our Customer Service Department with any
questions you may have concerning parts, use, or maintenance. When
you contact us, please have your product’s model number and date of
manufacture ready so that we may help you quickly. These numbers can
be found on a sticker on the underside of your infant restraint.
1-800-345-4109 or www.gracobaby.com
www.cpsc.gov
www.NHTSA.gov
www.seatcheck.org
2.3 If You Need Help
2.4 Child Restraint/Base Useful Life
MODEL
Date of Manufacture
GRACO CHILDREN'S PRODUCTS, INC.
ATLANTA, GA 30328 1-800-345-4109
Made in China
PD206938A
NAME
year month day

8
DO NOT INSTALL OR USE THIS INFANT RESTRAINT AND
BASE UNTIL YOU READ AND UNDERSTAND THE
INSTRUCTIONS IN THIS MANUAL AND IN YOUR VEHICLE
OWNER’S MANUAL. DO NOT let others install or use the
infant restraint unless they understand how to use it.
FAILURE TO PROPERLY USE THIS INFANT RESTRAINT
AND BASE INCREASES THE RISK OF SERIOUS INJURY OR
DEATH IN A SUDDEN STOP OR CRASH. Your child can be
injured in a vehicle even if you are not in a crash. Sudden
braking and sharp turns can injure your child if the infant restraint
is not properly installed or if your child is not properly secured in
the infant restraint.
PLACE THIS INFANT RESTRAINT ONLY IN A REAR-FACING
POSITION when using it in the vehicle.
SOME CHILDREN WITH SPECIAL NEEDS, such as pre-term
babies or those who have tested positive for positional apnea,
may be at increased risk of suffering breathing or other
difficulties in an infant restraint. If your child has special needs,
we recommend that you have your physician or hospital staff
evaluate your child and recommend the proper infant restraint or
car bed before using this product.
3.1 Warnings for Use as an Infant Restraint
3.0 Important Information

9
According to crash statistics, CHILDREN ARE SAFER
WHEN PROPERLY RESTRAINED IN REAR VEHICLE SEATING
POSITIONS, RATHER THAN FRONT SEATING POSITIONS. For a
vehicle with a front passenger air bag, refer to your vehicle owner’s
manual as well as these instructions for infant restraint installation.
NEVER LEAVE YOUR CHILD UNATTENDED.
NEVER LEAVE AN INFANT RESTRAINT AND BASE UNSECURED
IN YOUR VEHICLE. An unsecured infant restraint or base can be
thrown around and may injure occupants in a sharp turn, sudden
stop or crash. Remove it or make sure that it is securely belted in
the vehicle. If not using LATCH, make sure unsecured LATCH
connectors are properly stored in base.
REPLACE THE INFANT RESTRAINT AND BASE AFTER A
CRASH OF ANY KIND EVEN IF INFANT RESTRAINT WAS
UNOCCUPIED. A crash can cause damage to the infant restraint that
you may not be able to see.
DO NOT MODIFY YOUR INFANT RESTRAINT AND BASE or use
any accessories or parts supplied by other manufacturers.
NEVER USE INFANT RESTRAINT AND BASE IF IT HAS
DAMAGED OR MISSING PARTS. DO NOT use a cut, frayed or
damaged infant restraint harness, vehicle seat belt or LATCH belt.
THE INFANT RESTRAINT CAN BECOME VERY HOT IF LEFT IN
THE SUN. Always touch the surface of any metal or plastic parts
before putting your child in the infant restraint.
THIS INFANT RESTRAINT CONFORMS to all applicable Federal
Motor Vehicle Safety Standards and is certified for use in motor
vehicles and aircraft.

10
3.2 Warnings for Use With a Stroller
USE ONLY WITH STROLLERS THAT ARE
PART OF THE GRACO CLICK CONNECT
TM
TRAVEL SYSTEM. Refer to stroller owner’s
manual for details about how to attach the infant
restraint to your stroller. If you do not have an
owner’s manual, please call toll-free,
1-800-345-4109 to obtain one, or visit our
website at www.gracobaby.com.
Never use a Graco infant restraint with other manufacturer’s strollers,
as this may result in serious injury or death.
NEVER give this infant restraint and base to someone else without also
giving them this manual.
NEVER use a second-hand infant restraint and base or an infant
restraint whose history you do not know.

11
FALL HAZARD: Child’s movements also can move carrier.
NEVER place carrier on edges of countertops, tables or other
high surfaces. Always stay within arms reach whenever carrier is
not on floor/ground.
BE SURE handle locks into position before lifting carrier.
NEVER place carrier on the top of a shopping cart.
SUFFOCATION HAZARD: Infant carrier can roll over on soft
surfaces and suffocate child. Never place carrier on beds, sofas
or other soft surfaces.
STRANGULATION HAZARD: Children have STRANGLED in loose
or partially buckled harness straps. Fully restrain the child even when
carrier is used outside the vehicle.
KEEP STRINGS AND CORDS AWAY FROM CHILD. Strings and
cords can cause strangulation.
DO NOT place carrier near a window where cords from blinds or
drapes can strangle a child.
DO NOT hang strings on or over the carrier.
DO NOT place items with a string around a child’s neck, such as
hood strings, pacifier cords, etc.
DO NOT attach strings to toys.
3.3 Additional Warnings for Use as a Carrier

12
Your child MUST meet the following requirements:
WEIGHT: 4-30 lbs. (1.8 kg-13.6 kg)
AND
HEIGHT: 30 inches (76.2 cm) or less in height.
IMPORTANT: MAKE SURE the
top of the childs' head is at least 1"
below the top of the infant restraint.
TO AVOID SERIOUS INJURY OR DEATH, DO NOT USE THE
INFANT RESTRAINT WITH A CHILD LARGER OR SMALLER
THAN THE WEIGHT AND HEIGHT RANGE LISTED BELOW.
3.4 Height and Weight Limits

13
IMPROPER PLACEMENT OF THE INFANT RESTRAINT
INCREASES THE RISK OF SERIOUS INJURY OR DEATH. Some
seating positions in your vehicle may not be safe for this infant
restraint. Some vehicles do not have any seating positions that can be
used safely with the infant restraint. If you are not sure where to place
the infant restraint in your vehicle, consult your vehicle owner’s manual
or call Graco at 1-800-345-4109.
Whenever possible, secure the infant
restraint in the center position of the
seat directly behind the front seats
. If
you want to use LATCH, check your vehicle
owner’s manual for LATCH locations.
NEVER place this infant restraint in a
vehicle seating location that has a front
air bag
. See “3.1 Warnings for Use as
an Infant Restraint”, page 8.
4.0 Choosing an Appropriate Vehicle
Seat Location
4.1 Vehicle Seat Requirements

14
The VEHICLE seat must face forward.
DO NOT use infant restraint on vehicle seats with seat backs that
will not lock in an upright position. DO NOT use seats that can fold
down without having to release a lock or latch of some kind. These
seats can fly forward and strike the child in a sudden stop or crash.
A FEW SEAT BELT SYSTEMS ARE NOT SAFE TO USE WITH
THE INFANT RESTRAINT. THE VEHICLE SEAT BELT MUST BE
DESIGNED TO HOLD THE INFANT RESTRAINT TIGHTLY AT
ALL TIMES.
Pay careful attention to these systems; some of the seat belts that are
not safe to use look very much like seat belts that are safe to use. If
you are unsure, consult your vehicle owner’s manual or call Graco
at 1-800-345-4109.
4.2 Vehicle Seat Belt Requirements

15
LATCH can be used IN PLACE OF the vehicle belt system. Please refer
to vehicle owner’s manual for LATCH locations.
DO NOT use any of the following systems to secure the child restraint.
Lap Belts with Emergency Locking Retractor (ELR)
This lap belt stays loose and can move until it locks
in a crash or sudden stop.
Combination Lap/Shoulder Belt with Retractor
Each strap has a retractor at one end and is attached to
the latch plate at the other end.
Passive Restraint - Lap Belt with
Motorized Shoulder Belt
Passive Restraint - Lap or
Shoulder Belt Mounted on Door
DO NOT use vehicle belts that
are attached to the door in any way
or that move along a track to
automatically surround the
passenger when the door is closed.
Lap Belts Forward of Seat Crease
4.2.1 UNSAFE Vehicle Belt Systems

16
THE FOLLOWING BELT SYSTEMS CAN BE USED WITH YOUR
INFANT RESTRAINT, IF the seat location meets all other requirements
of these instructions and those in your vehicle owner’s manual. LATCH
can be used in place of the vehicle belt system in designated locations.
Please refer to vehicle owner’s manual for LATCH locations.
When using infant restraint without the base, adjust the belt as
described in this section for these types of vehicle seat belts.
Some vehicle lap/shoulder seat belts have a plastic button on the belt.
Do not allow the button to interfere with the belt routing through the
vehicle belt path when installing the seat alone.
Lap Belts - Manually Adjusted
When buckled, the belt is
tightened manually by pulling on
the belt tail while pushing down
hard on the infant restraint.
4.2.2 SAFE Vehicle Belt Systems
Belt tail

17
Combination Lap/Shoulder Belt
with Locking Latch Plate
Lap Belts with Automatic
Locking Retractor (ALR)
The automatic locking
retractor will not permit the
lap belt to lengthen once it is
buckled. Tighten the belt by
feeding the belt back into the
retractor while pushing down
hard on the infant restraint.
Once it is buckled, this type of
belt has a latch plate that will not
allow the lap portion of the belt to
loosen. Belt is tightened by pulling
hard on the shoulder portion of the
vehicle belt while pushing down
hard on the infant restraint.

18
To Install Locking Clip:
1. Tighten the buckled belt by pushing down
hard on the infant restraint and pulling hard
on the shoulder belt.
2. While pushing down on the infant restraint,
pinch the two straps together behind the
buckle tongue. Unbuckle the belt
without allowing it to slip.
3. Connect lap and shoulder belts with locking clip as
shown and .
4. Rebuckle belt. Check that
lap belt does not move by
pulling and pushing hard
on the infant restraint.
If belt loosens or
lengthens, repeat
procedure.
Locking clip
Locking clip goes here,
1
/2 inch (1 cm) from the buckle
Combination Lap/Shoulder
Belt with Sliding Latch
Plate
This belt has a latch plate that slides
freely along the belt.
This belt MUST be converted to prevent
movement of the lap portion of the belt.
You must use a locking clip (provided
with the infant restraint) when using the
infant restraint without the base unless
your vehicle’s seat belt can be
converted in another way as described
in your vehicle owner’s manual.
1
/2 inch
(1 cm)

19
Newer vehicles may have one or more seating positions with LATCH
anchorage systems. If vehicle is equipped with LATCH, the vehicle lower
anchor points may be visible at the vehicle seat crease. If not visible,
they may be marked with the symbol .
See your vehicle owner’s manual for exact locations, anchor
identification, and requirements for use with an infant restraint.
Vehicle Lower
Anchor Points
Vehicle
Seat Crease
Typical seat in a passenger vehicle.
Other vehicle types may have
different LATCH locations or
different markings.
LATCH lower vehicle anchor points are defined as 11 inches from the
center of one LATCH anchor to the center of another LATCH anchor. If
allowed by your Vehicle Owners Manual, the center seating position may
be used if the anchor spacing is 11” or greater.
4.3 LATCH Locations

20
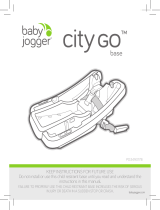
FRONT VIEW
Handle
Vehicle
belt
hook
Handle
adjustment
button
Harness
buckle tongues
Chest
clip
Harness
buckle
Harness
adjustment
button
Harness
adjustment
strap
Harness
straps
Handle
adjustment
button
Hip
slots
5.0 Features and Components
Crotch
strap slots
Harness
slots
/