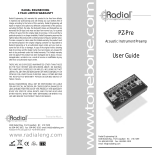
Re-amp Track
Up to 300 ft. of
balanced cable
Effect pedals
CONGRATULATIONS
on your purchase of the Radial ProRMP. Radial products are easy to use and
this short manual contains all the information you need to start using your
ProRMP right away. For more information on the ProRMP, and other Radial
products, visit our website www.radialeng.com.
OVERVIEW
The Radial ProRMP is a passive re-amplifying device that has been developed to
explore new musical sounds and spur on the creative process through alternative
recording techinques. The ProRMP allows pre-recorded instrument tracks to be
sent through effect pedals and guitar ampli ers. You will nd the ProRMP fun
and easy to use but should you have any questions regarding its functions we
acoustic track into your Marshall double stack!
USING THE ProRMP
Before making connections, con rm all equipment is turned off and volume
controls are set to zero. This will avoid any loud pops that could cause speaker
damage.
As most re-amping is performed with an electric guitar, we have chosen to
discuss the process using this as an example. The same process applies with
voice, keyboard, drums or any other instrument.
PLEASE READ BEFORE CONNECTING
Caution must be used when connecting electronic equipment to the
ProRMP. The ProRMP bridges all electronic equipment connected to it
so faulty wiring or incorrect grounding of any of the equipment may cause a
shock hazard to be present and/or damage the ProRMP or other connected
equipment. Because grounding schemes differ between manufacturers, it
is important to check for correct polarity, in particular with older ampli ers
using 2-prong ungrounded A/C cords. If the polarity is reversed on an
ungrounded ampli er there may be a potential of 120V present between
the amp chassis and ground. Radial Engineering takes no responsibility
for this or how the ProRMP is connected or used. It is the user’s full
responsibility to ensure that proper electrical polarity is maintained on all
equipment connected to the ProRMP and that proper building electrical
codes have been followed wherever the ProRMP is being used.
To reduce opportunity for shock hazard or damage to the ProRMP or
connected equipment, plug the ” connectors into the ampli er rst
and then into the ProRMP. This is especially important when using old
ampli ers that do not have 3-prong plugs as the possibility exists to touch
the chassis ground with the connector plug tip when the plug is inserted
into the jack.
ProRMP User Guide
Radial Engineering
ProRMP User Guide
Radial Engineering
ProRMP User Guide
Radial Engineering
STEP 1: Record a dry track
For re-amping, its important the source track be as clean and natural sounding
as possible. Start by recording the dry track using a high quality direct box
such as the Radial Pro48 or ProDI. A direct box allows you to to record the
direct signal before its colored by the effects and amp.
Conect your guitar to the direct box. Use the instrument thru-put to connect
your amp. Connect the balanced XLR output from the direct box to your mixing
console. Record the dry track.
STEP 2: Driving the dry signal back to the ProRMP
Connect the mixer output to the XLR input on the ProRMP. Use a good quality
balanced XLR cable or microphone snake. Note that balanced cable can be
run up to 300 feet without signal loss so you can keep the amp in the studio
while you listen in the control room. Connect the ProRMP to your ampli er
with a good quality ” cable. Effect pedals may also be inserted between the
ProRMP and ampli er. For best results, keep unbalanced ” cables short.
Play the dry track and turn up the mixer output to a nominal level. Turn the
LEVEL control on the ProRMP to its 12 o’clock position (half-way). Finally,
turn on your guitar ampli er and slowly turn up the volume. Test the setup
with a clean amp tone. If there is distortion check the recorders/mixers output
for clipping and reduce the level if nessasary. If there is hum or buzz, try
depressing the LIFT switch on the ProRMP to interrupt the ground connection
between the recording system and your amp.
STEP 3: Adjusting the level
The ProRMP is equipped with a level control to ensure the signal coming
from the dry track matches the orignal level from your guitar. Because guitar
ampli ers do not have input level meters, follow these steps to match the level
between the dry track and your guitar. Start by plugging your guitar directly
into your amp with a clean sound dialed in. Play a little and note the volume.
Now connect the ampli er to the ProRMP, play the dry track and adjust the
ProRMP’s LEVEL control until the volume matches the direct guitar.
At this point, you have recorded a dry guitar track, inserted the ProRMP
between the mixer and amp and adjusted the LEVEL control to match your
guitar. You would now play the dry track into the ProRMP to drive the guitar
amp. The amp is mic’ed and recorded to another track. The process may be
repeated as long as you have tracks to record to and ideas to try out.
You are now set to go! Have fun! Experiment!
GROUNDING OPTIONS
The Radial ProRMP is equipped with a ground LIFT switch that lifts pin-1 on
the XLR INPUT jack. When the ground LIFT switch is depressed the ProRMP
derives its ground through the ” OUTPUT connector to the ampli ers
ground. It is important that the ProRMP only be used with properly grounded
ampli ers.
USING THE ProRMP WITH GUITAR EFFECT PEDALS
You can use the ProRMP with guitar effect pedals. This is accomplished either
by driving the pedal through a guitar ampli er or by sending the output of the
effect pedal to a direct box and then to the recorder. We recommend the Radial
ProDI for this application, because the isolation transformer in the ProDI will
help eliminate noise caused by ground loops.
USING THE ProRMP WITH KEYBOARDS
Keyboards may also enjoy the bene ts of the ProRMP by following the same
procedures. There’s no better way to turn a solo synthesizer track into a ‘barn
burner’ than to pass it through a distorted tube guitar ampli er or tube distortion
pedal. Players like the legendary Jan Hammer used this trick to create those
amazing ‘guitar’ solo sounds. This is also a great way to get more ‘growl’ from
those ‘clean’ B3 sounds. Half the magic of a traditional Hammond comes from
the tube amp and Leslie being pushed to the limits. This is why Keith Emerson
also used distorted guitar amps to record and perform. Try mixing sounds
between clean and distorted keyboard tracks and have fun!
USING THE ProRMP WITH VOICE
Sometimes, vocals can be too clean and lack that ‘seasoned’ rough edge. By
driving a voice track through the ProRMP into a distortion pedal like the Radial
Tonebone Classic or through an overdriven ampli er, one can introduce some
great effects. Double the clean track with distorted track and then mix them to
suit. A subtle extra edge is often all that is needed to warm up a stale track.
USING THE ProRMP WITH DRUMS
Re-amping sampled drum sounds can add realism. Snare drum is a mid-range
instrument and can sound great through a 4x12 guitar stack. For the kick drum
try a bass amp.
Direct Signal
Up to 300 ft. of
balanced cable
Active Direct Box