NOTE: DIAGRAMS & ILLUSTRATIONS ARE NOT TO SCALE.
HEARTH PRODUCTS
KITS AND ACCESSORIES
P/N 750209M
REV. C 12/2020
TOOLS REQUIRED
Phillips Screwdriver
5/16” Socket or Nutdriver
GENERAL INFORMATION
This decorative screen door fits on the face of the appliance vent-free
fireboxes listed above.
READ ALL THE STEPS BEFORE STARTING THE INSTALLATION THE
FIREPLACE MUST BE OFF AND COLD BEFORE BEGINNING.
ALL WARNINGS, PRECAUTIONS AND INSTRUCTIONS IN THE
INSTALLATION AND OPERATION MANUAL PROVIDED WITH THE
APPLIANCE APPLY TO THESE INSTRUCTIONS.
If you encounter any problems, need clarification of these instructions
or are not qualified to properly install this kit, contact you local distribu-
tor or dealer.
If any of these parts are missing or damaged, contact your dealer or IHP.
us.com for referral information.
CAUTION
INSTALL ONLY WHEN THE APPLIANCE IS OFF AND COLD!
ARCH SCREEN
DOOR KIT
INSTALLATION INSTRUCTIONS:
1. All Models - Using a 5/16” socket or nutdriver remove screen and rod assemblies
as shown in Figure 2. Reinstall the Screen Rod Screws! The Screen
and Rod Assemblies must NOT be installed when the screen door kit
is installed! You may wish to retain the screen and rod assemblies in
case the screen door kit is ever removed in the future (read Important
Note in Figure 2).
1
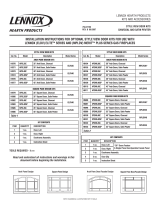
ASD SERIES DECORATIVE SCREEN DOOR KITS
[FOR USE WITH MODELS ATLAS36/42, ORION32/42, VRT2536/42, VRT3236/42 AND VRT3536/42]
* A canopy hood is required when installing these Decorative Arch Screen Door Kits (the
hood is sold separately for Atlas36/42 and VRT3536/42. A hood is a standard part for
models Orion36/42, VRT3136/42 and VRT2536/42.
Left Screen
Door
Right Screen
Door
Doorframe
Figure 1
Figure 2
Remove Screens & Rods.
A) Remove screws (see dotted lines).
Pull out rods from locating holes on
side of firebox opening.
B) IMPORTANT: Reinstall screen rod
screws into the existing holes where
removed.
IMPORTANT NOTE: If this optional
screen door kit is ever removed, the
rod and screens MUST be reinstalled
for safe operation of the appliance.
2. All Models - Remove and save the (2) two upper side frame screws as
shown in Figure 3 (on both sides of firebox). Loosen the bottom side
frame screws (do not remove). See Figure 3.
Figure 3
A) Side Frame Screws
Using a phillips screwdriver remove the
side frame screw indicated here. Loosen
the lower side frame screws but DO NOT
remove them.
B) Set aside the screws that were removed
for later use.
Remove this screw
Firebox
Do NOT
remove
this screw
3. All Models - Install Hood (see Figure 4 and follow installation instruction
in the Installation And Operation Instructions Manual).
Loosen this screw, but
do NOT remove it.
Decorative Screen Door Panel Kits*
Cat. No. Model Where Used
F3361 ASD3224-TI Orion32 and VRT3132
H1959 ASD3624-TI Orion36 and VRT2536
H1960 ASD3628-TI Atlas36 and VRT3536
H1961 ASD4228-TI Atlas42, VRT3542 & VRT2542
F3362 ASD4224-TI Orion42 and VRT3142
KIT CONTENTS
1 ea. Screen Door, Left
1 ea. Screen Door, Right
1 ea. Doorframe
1 ea. Instruction Sheet
ASD SERIES DECORATIVE
SCREEN DOOR KITS

Printed in U.S.A. © 2006 Innovative Hearth Products
P/N 750209M REV. C 12/2020
IHP reserves the right to make changes at any time, without notice, in design, materials, specifications, prices and the discontinuance of colors, styles and products. Consult your local distributor
for fireplace code information.
NOTE: DIAGRAMS & ILLUSTRATIONS ARE NOT TO SCALE.
Figure 8
2
CAUTION
ALL MODELS MUST HAVE A HOOD INSTALLED WHEN
THIS SCREEN DOOR KIT IS INSTALLED!
4. All Models - Install doorframe assembly (provided) per instructions in
Figure 5, 6a and 6b.
Firebox
Doorframe
Bottom Locating
Bracket on Door-
frame locates
over the side
frame screws
which were
loosened
The (4) four locating brackets on
doorframe hook over side frame
screws shown in Figure 3
Hook the bottom doorframe locating brackets over the (2) two bottom side
frame screws (which were loosened in Step 3) as shown below.
Figure 5
A) Rotate the top of the doorframe flush
with firebox face then secure in place by
installing the (2) two screws which were
removed in Step 3 through the doorframe
brackets into the existing holes in side
frames.
B) Tighten the (2) two loose screws though
the bottom locating brackets (shown in
Figure 5).
C) Adjust the center top and bottom
doorframe brackets as shown in Figure 6b.
Door-
frame
Figure 6a
6. All Models - Install the screen doors by aligning hinge pins on the doors
with the hinge holes on the doorframe and slide down (see Figure 7). Ensure
the hinge pins are fully seated onto the shoulders of the hinge holes.
COMPLETED
INSTALLATION
Firebox
Secure Doorframe to
Appliance and Tighten
Screws
Doorframe
Left Screen
Door Hinge Pin
Figure 7 - Install Screen Doors
7. Close Doors. Installation is complete.
Hood
Screen Door
Figure 4
Hood
Install Hood - All Models
Doorframe
Position the top and bottom doorframe brackets
as shown. Brackets should be positioned
behind the cabinet top and bottom flanges of
firebox opening.
Top Doorframe Bracket
Bottom Doorframe Bracket Figure 6b
CENTER TOP & BOTTOM
DOORFRAME BRACKETS
Use center hood screw (see Figure 4) to secure
center top bracket to firebox ceiling.
Innovative Hearth Products
1769 East Lawrence Street, Russellville, AL 35654
/