
£*.„...
;>. /:-—.>;:V^^
:_- ,'... -,7^;ai£f^
DIGITAL SEQUENCE RECORDER
ENREGISTREUR DE SEQUENCES NUMERIQUES
DIGITAL-SEQUENZER
OWNER'S MANUAL
MODE D'EMPLOI
BEDIENUNGSANLEITUNG

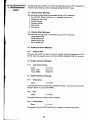
INTRODUCTION
Congratulations on your purchase of a Yamaha QX7 Digital Sequence Recorder! Your
QX7 Digital Sequence Recorder offers high-performance 2-track digital sequencing in
any MIDI -based digital music system. The QX7 is capable of recording anything you
play on any Yamaha DX synthesizer or other MIDI keyboard —complete with touch
response and function parameters such as pitch bend, modulation, etc. What you play
will be reproduced exactly. You can also write in notes in the "step" mode, letting you
create pieces that would be impossible to play live. Overdubbing capability is practically
unlimited, and you can control more than one FM tone generator —say aDX7 Digital
Programmable Algorithm Synthesizer and aTX7 FM expander —letting you sequence
more than one voice at atime. Further, arange of useful editing and other control functions
let you modify and enhance your compositions with ease. And there's acassette interface
so you can save all your hard work on astandard cassette recorder for later use.
The QX7 Digital Sequence Recorder can give you virtually unlimited capability for cre-
ative, digital music production.
IMPORTANT •*-•>,.-
This manual is organized in tutorial form. Therefore, in order to fully understand all aspects
of operating the QX7, we urge you to go through the manual and try out each operation
as it is described.

CONTENTS
PRECAUTIONS 3
CONNECTIONS 4
PANEL CONTROLS 5
BASIC RECORDING ft EDITING PROCEDURES
Real Time Recording 7
Erase '. 7
Repeat 8
Overdubbing 8
Exchange 8
Using the TRACK Buttons 8
Track Down 8
Insert 9
Delete Measure g
Chain 6
Step Recording 9
Footswitch STOP/START 10
SEQUENCING MULTIPLE TONE GENERATORS
Connecting Multiple Tone Generators 11
MIDI Channel Number 11
METRONOME/TIMING CONTROL FUNCTIONS
Beat/Measure 13
Metronome Mode 13
Clock Select 13
UTILITY FUNCTIONS
Polyphonic After Touch 15
Control Change 15
After Touch 15
Pitch Bender 15
Key Velocity 16
Echo Back 16
Quantize 16
Save Temporary Buffer 17
Cassette Save/Verify/Load 17
Memory Protect 18
Local Device Number is
Display MIDI Status 13
ERROR MESSAGES 20
SPECIFICATIONS 21
MIDI DATA FORMAT 22
n

PRECAUTIONS
Avoid placing the QX7 in locations exposed to direct sunlight or high temperatures, excessively high or low
humidity, high dust concentrations, or vibration.
Be sure to connect the QX7 to an AC power supply that meets the power supply specifications listed on the
rear of the unit.
If there is any danger of lightning occurring nearby, remove the power plug from the wall socket in advance.
Be sure to make all connections properly, as described in the "CONNECTIONS" section below.
To avoid damaging your speakers and other playback equipment, turn off the power of all related equipment
before making connections.
Do not use excessive force in handling control switches and knobs.
To avoid broken cords and short circuits, be sure to unplug all connectors by grasping the respective plugs *
-NOT the cords. t
Remove the power plug from the AC mains socket if the unit is not to be used for an extended period of time.
Remove all plugs and connections if the unit is to be transported, to prevent damage to the cords and jacks.
Do not use solvents such as benzene or paint thinner to clean the unit Do not use insecticides or other pressurized
spray products in proximity to the unit. Wipe off the exterior with soft cloth.
STORAGE OF DATA
•This unit is not equipped with aback-up function for recorded data. The re-
corded data will be cleared within afew hours when the power is turned off.
Important data should be saved using acassette tape recorder.
EFFECTS ON OTHER ELECTRONIC EQUIPMENT
•Since this unit incorporates digital circuitry, simultaneous use of other equip-
ment such as TVs, radios, etc. in close proximity may cause noise and erroneous
operation. If this occurs, separate the affected units sufficiently to eliminate i
the problem. If is also agood idea to use separate line filters on each piece
of equipment.
FOR USERS WHO WISH TO CONNECT THEIR QX7 TO ADX7 OR KX1:
•When using the 0X7 with aYamaha DX7 or KX1 manufactured before
standardization of MIDI specification, the memory of the 0X7 may become full
too soon. In order to correct this problem it will be necessary to change the
DX7/KX1 system ROM. For more details, please contact your local Yamaha
Dealer. The serial numbers of the instruments concerned are:
DX7: 1001 to 24880, and 251 25 to 26005
KX1 :1001 to 1105

CONNECTIONS
This diagram represents the most basic system. For amultiple tone generator system see "SEQUENCING MULTIPLE
TONE GENERATORS" on page 11
.
n
o
o-g
QC O
<
LU 5
tt
a>
+-» rl"S
o
to o
1-
•I-
DI=
a«HI
D1
CASSETTE RECORDER
•6ia#*
CAS ETTE THRU
&Q%mtt
IT
MIDI
IN
MIDI
nOUT
titiZ C*&t=K3
FOOTSWITCH
II'. «,,.|.jut.f -w tit 4»>V
DX SYNTHESIZER

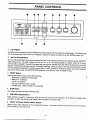
PANEL CONTROLS
1. LED Display
Indicates current measure as well as selected control functions and their selected values/modes. The flashing red
dot at the lower nght hand corner of the display indicates the tempo currently set by the TEMPO control (1 11).
2. Job List and Indicators
The Aand Bfists printed on the panel correspond to the "Job" functions which can be called using the JOB/STEP
a?d thfL?rT <6);,
6
ik'"IT :"^ t0 the "A"°r"B"Mst markin9 lights t0 indicate "^ list is ctive,
sr,JtpH m?r^T rT"9"^betWeen the "«-«0»« to indicate which job within the active list is currently
selected Note that the l.sts also contain note length markings. These are used in the step recording mode to select
the note length to be recorded. Another two job lists-C and D, printed on the QX7 top panel-are actually available
and can be called using the JOB/STEP SIZE selectors in conjunction with the RESET button.
3. RESET Button
Pressing the RESET button causes the following:
-Recording or playback is interrupted. '
-Measure 1is selected.
-Job A-1 is selected.
-The step recording mode is exited.
-Cassette save, verify and load are interrupted.
4. STEP Button
This button activates the step recording mode.
5. JOB/STEP SIZE Selectors
These buttons are used in conjunction with the job A/C-B/D list and indicators (2) to select the desired Job
(function) or select the desired note length when recording in the step mode.
6. TRACK 1ITIE and TRACK 2!REST Buttons
These buttons select playback of the corresponding tracks. They also function as the tie and rest entry buttons
when recording in the step mode.

7. -land +1 DATA/MEASURE Selectors
These buttons increment and decrement through the measures of arecorded composition to facilitate editing. They
also permit selection of values for certain control functions.
8. RECORD!LOAD Button
Activates the record mode. Also activates cassette load when the cassette job is active.
9. STOP/CONTINUE/VERIFY Button
Stops or continues recording or playback. Also activates cassette verify when the cassette job is active.
10. START/SAVE Button
Starts recording or playback. Also activates cassette save when the cassette job is active.
11. TEMPO Control
Sets the tempo for recording and playback.
H
it

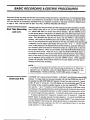
BASIC RECORDING &EDITING PROCEDURES
Real time and step recording with the QX7 are remarkably simple procedures. But before you try recording anything,
make sure that the MIDI OUT from your keyboard is connected to the QX7 MIDI IN terminal, and that the MIDI
OUT from the QX7 is connected to the MIDI IN of your keyboard, as shown in the basic connection diagram given
on page 4. Also, note that with the 0X7 YOU WILL ALWAYS RECORD ON TRACK 1.
Real Time Recording
(JobA-1)
Assuming that you are just starting and that nothing has been recorded in the 0X7,
both TRACK LEDs will be out, as will the RECORD and START LEDs, and job
A-1 (REALTIME REC) on the job lists will be selected. Set the TEMPO control
for the desired tempo—indicated by the flashing dot at the lower right-hand corner
of the digital LED display. Press the RECORD button to activate the record standby
mode. The RECORD LED should now be lit, and the TRACK 1LED should be
flashing. Now press the START button and the 0X7 will give you atwo-measure
count in: the metronome will beep 8times (if 4/4 time, the default time signature,
is selected) and the digital LED display will count from -8 to -1. All you have
to do is start playing on the keyboard from the first measure, using the metronome
as a rhythmic guide (note that the metronome beeps at ahigher pitch on the first
beat of each measure). When you're finished, press the STOP/CONTINUE button
to exit the record mode. Note that if you press the STOP/CONTINUE button in
the middle of a measure, the record mode will be exited at the end of that measure.
Now, to hear what you have just recorded, simply press the START button. Tempo
can be adjusted during playback by using the TEMPO control. When playback
finishes the playback mode will be exited and the LED display will read
dicating the end pf the recording.
-'L in-
ISIOTE:.
Erase (Job B-4)
The default time signature for real time and step recording is 4/4. Other time
signature can be selected using the Beats/Measure job described in the
METRONOME/-TIMING CONTROL FUNCTIONS section on page 13.
The ERASE "job" lets you erase all of track 1,or all track 1data following aspecified
measure. To erase what you have just recorded, first call the ERASE job (job B-4)
by pressing the JOB/STEP SIZE B/D selector 4times if you start with job A-1 active
(LEDs "B" and "4" will be lit). The LED display will now alternately read (Fs] and
the number of the currently selected measure or the end marking \J[\ .You can
now use the -1 and +1 buttons to scroll through the recording (one press moves
one measure in the specified direction, while holding one of the buttons down scrolls
continuously in the specified direction) in order to specify the measure from which
you want to begin the erase operation. To erase the entire track, scroll to measure
1. To erase everything from measure 3onwards, scroll to measure 3. Press the
START button to actually execute the erase operation. To cancel the ERASE job
without executing the ERASE operation, simply press RESET. If you erase the entire
track the TRACK 1LED will go out, indicting that there is no more data in the track.
Once ERASE has been executed, the QX7 will automatically return to the stop
mode and job A-1 will be selected.

Repeat (Job A-4)
Overdubbing
Recorded material can be automatically repeated from 1to 99 times by setting the
REPEAT Job (job A-4). First, call the REPEAT job by pressing the JOB/STEP
SIZE A/C selector 3times (LEDs "A" and "4" will be lit). The LED display will
now alternately display 0, indicating that the REPEAT job has been called, and
E£l indicating that REPEAT is OFF. Press the +1 button once to turn REPEAT
ON (\Sn\) for endless repeat. Subsequent presses on the +1 button select 2, 3,
499 repeats. The -1 button can be used to scroll backwards through the REPEAT
numbers, and turn REPEAT OFF if desired. Of course, the +1 and -1 buttons may
be held to scroll quickly through the REPEAT numbers. Once the desired number
of repeats has been set you can return to job A-1 using the JOB/STEP SIZE A/C
selector, or simply by pressing the RESET button.
Overdubbing-recording one track over another-on the QX7 is accomplished by
using two jobs: EXCHANGE and TRACK DOWN. Both functions are described
below. EXCHANGE, however, is used for the first overdub only, while TRACK
DOWN is used for all subsequent overdubs.
M> Ph/fkofi
AlthotJ 9husin9tne EXCHANGE job is the first step in overdubbing over the first
m^ CXChange (Job B-1) recorded track, it is also useful in several other situations. Basically, all EXCHANGE
does is to interchange the data on tracks 1and 2: the data from track 1is moved
to track 2, while the data on track 2is moved to track 1.For the purpose of ov-
erdubbing, the EXCHANGE job is called (press JOB/STEP SIZE B/D selector once
from job A-1 )after recording the first track on TRACK 1.When the EXCHANGE
«
Using the TRACK
Buttons
Track Down (Job B-3)
job is called the LED display will read \EC] .Execute the EXCHANGE job by pressing
the START button. You can cancel the EXCHANGE job prior to executing by
pressing RESET. The material you recorded on TRACK 1will now be on TRACK
2(the TRACK 2LED will light), and since TRACK 2was empty, TRACK 1will
now be empty and its LED will go out. If you now play the recording by pressing
the START button, you will actually be hearing TRACK 2. Now to overdub the
second track, simply follow the normal real time record process: press RECORD
and then PLAY. You will now be able to record the second track-on TRACK
1—while listening to the first track which is now on Track 2. Press STOP/CONTINUE
when you're finished. To hear both tracks played together, simply press START.
Since some operations can only be carried out on data on TRACK 1,the EXCHANG E
job is also used to swap tracks in order to perform some operation—ERASE, for
example-on the TRACK 2data. The normal track positions can then be resumed
by executing EXCHANGE again.
When atrack contains data, the corresponding TRACK button can be used to turn
that track on or off. This is handy when both tracks contain data, but you want
to listen to only the material recorded on one track or the other. Pressing the TRACK
button alternates between the ON and OFF modes: LED ON =track ON.
This job is only used when both TRACK 1and 2contain data, such as prior to
recording athird overdub. The TRACK DOWN job combines (mixes) the data on
TRACK 1and TRACK 2, and places the result on TRACK 2. TRACK 1is left empty.
Now, supposing you have recorded your first two tracks and have data on both
Track 1and TRACK 2, call the TRACK DOWN job by pressing the JOB/STEP SIZE
B/D selector three times (LEDs "B" and "3" will be lit). The LED display will read
,indicating that the TRACK DOWN job is active. Execute the job by pressing
the START button (or cancel by pressing RESET). The TRACK 1indicator will
go out, and tracks 1and 2will now be combined on TRACK 2. Verify this by playing
TRACK 2. The third overdub can now be recorded on TRACK 1in the normal
way. Subsequent overdubs are all carried out in the same fashion: using REAL
TIME REC and TRACK DOWN.
8

Insert (Job B-5)
Delete Measure
(Job 6-6;
Chain (Job B-2)
This job allows material recorded on TRACK 1to be inserted anywhere in TRACK
2, Suppose that you have recorded and overdubbed eight measures of music, and
that TRACK DOWN has been used so that all data now resides on TRACK 2. You
can now add afew bars between measures 4and 5of the TRACK 2data in the
following way:
Record the material to be inserted on TRACK 1,then call the INSERT job by pressing
the JOB/STEP SIZE B/D selector 5times (LEDs "B" and "5" will be lit). The LED
display will now alternately read Qn) indicating that the INSERT job is active, and
the currently selected measure number. Use the -1 and +1 buttons to scroll to
the measure immediately following the insert point (.e. the new material will be
inserted prior to the selected measure). Press START to execute the insert, or RESET
to cancel. The insert material recorded on TRACK 1is not erased when the INSERT
job is executed.
This job makes it possible to delete any specified measure on TRACK 1. Simply
call the DELETE job by pressing the JOB/STEP SIZE B/D selector 6times from
the stop mode (LEDs "B" and "6" on the job list will be lit). The LED display will
now alternately read J5Q indicating that the DELETE job is active, and the currently
selected measure number. Select the TRACK 1measure to be deleted using the
-1 and +1 buttons, then execute the DELETE by pressing START (or cancel by
pressing RESET).
The CHAIN job appends the data on TRACK 1onto the end of TRACK 2. Call the
CHAIN job by pressing the JOB/STEP SIZE B/D selector twice from job A-1 (LEDs
"B" and "2" will be lit). The LED display will read \[B\ indicating that the CHAIN
job, is active. Press the START button to execute the CHAIN job, or press RESET
to cancel. The data on TRACK 1is not erased.
Step Recording In the step recording mode, notes, chords and rests are input one at atime from
the recording keyboard, the note length of each being determined by the STEP
SIZE setting. Since the data is not entered in real time, this mode is ideal for entering
extremely fast or complex lines which would be impossible to play in real time.
The step recording mode is activated by pressing the STEP button. The TRACK
1indicator will light the STEP indicator will flash, and the current measure number
(or end mark) will be displayed on the digital LED display. If TRACK 1contains
no data you will automatically begin recording from the first measure. If, however,
you will begin recording from aspecific measure within or at the end of alread-
y-recorded material, use the -1 and +1 buttons at this point to locate the measure
from which you will begin recording.
The actual length of the each note entered is specified using the JOB/STEP SIZE
selectors and the note markings on the job lists. The available note lengths are:
A-1 —1/1 6note.
A-2 =1/32 note.
A-3 -1/64 note.
A-4 =1/16 note.
A-5 =1/8 note triplet.
A-6 —1/4 note triplet.
B-1 =1/8 note.
B-2 ss 1/4 note.
B-3 =1/2 note.
B-4 -1/1 6note with 100% gate time
B-5 =1/8 note with 100% gate time.
B-6 —1/4 note with 100% gate time.

NOTE:
Normal note gate time is 80%. The 100% gate time notes are used to create
legato phrasings.
or
To begin actual recording, press the RECORD button—the RECORD indicator will
light—and then the START button—the START indicator will light. The QX7 is now
waiting for you to input the first note. To record, first select the desired note
length—just as you normally select different jobs—using the JOB/STEP SIZE se-
lectors, play the appropriate note or chord on the keyboard, select the next note
length, play the next note or chord on the keyboard and so on. The measure
count will be updated as you "fill" each measure with notes, chords and rests.
All the available note lengths can be entered as rests simply by pressing the REST
button instead of playing anote or chord on the keyboard. The +1 button can
be used at any point during ameasure to fill the remainder of the measure with
rests and skip to the beginning of the next measure. If the +1 button is pressed
at the beginning of ameasure, afull measure rest will be entered. The -1 button
can be used tied to the following note or rest, of any length, using the TIE button.
Only notes of the same pitch can be tied together. For example, to tie a1/1 6note
to another 1/16 note, enter the first 1/16 note, then press the TIE button. This
effectively creates an 1/8 note (two tied 1/16 notes). A1/4 note could be tied to
an 1/8 note by first entering the 1/4 note, selecting the 1/8 note length on the job
lists, then pressing the TIE button. This will give you the equivalent of adotted
1/4 note. Naturally, notes can be tied across the measure lines. When you are
finished recording press the STOP/CONTINUE button. Press START to hear what
you have recorded.
When entering single notes in the step write mode, be sure to enter ONE NOTE
AT ATIME! If you play asecond note while the previous note is still held, both
notes will be entered as achord on the same beat.
Footswitch
STOPISTART
u
Afootswitch such as the Yamaha FC4 or FC5 plugged into the rear-panel FOOT
SWjack can be used to activate the QX7's record/play START and STOP functions.
If the footswitch is pressed while the QX7 is in the normal stop mode, playback
will begin. Press the footswitch asecond time to stop playback. If the 0X7 is in
the record standby mode (RECORD indicator ON), however, pressing the footswitch
will begin recording. Press the footswitch asecond time to stop recording.
10

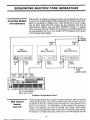
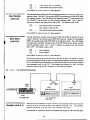
SEQUENCING MULTIPLE TONE GENERATORS
Connecting Multiple
Tone Generators
With the QX7 it is possible to sequence more than one tone generator at atime—up
to atotal of 16—by setting different MIDI recording channel numbers for each "part"
which is to be played by adifferent voice. Since the data for all voices is output
from the QX7's single MIDI OUT terminal, the tone generators used must be
"daisy-chained" together using their MIDI THROUGH terminals. Apractical
multi-voice setup using the Yamaha DX7 synthesizer (as recording keyboard and
one tone generator) and one or more Yamaha TX7 FM Expander units is shown
in the following system diagram.
*TO
>AUDIO
MIXER
*TO NEXT
TONE
.GENERATOR
DX SYNTHESIZER
(MIDI RCV CH.1)
AMultiple Tone Generator System
MIDI Channel
Number
(Job A-6)
This job sets the MIDI channel number for material recorded in either the real time
or step recording modes. The power-on default mode is that the*QX7 records on
all channels so that any material recorded will sequence atone generator set to
receive on any channel. To independently sequence different tone generators,
however, the respective parts must be recorded using specific MIDI channel
numbers, and the tone generators set to receive only on the corresponding channels.
For example, in asimple system using aDX7 and one TX7 FM expander, the DX7
11

receives only on channel 1,so the TX7 should be set to receive on channel 2. First
you might record abass line with the QX7JRECQRDING MIDI CHANNEL set to
1*, andjhen apiano part with the RECORDINGjyilDI CHANNEL set to 2. If your
DX7 Is then set to"play abass voice and thftXTa pianb voice; the respective parts
will be played by the appropriate voices when the QX7 is STARTed.
To set the QX7 RECORDING MIDI CHANNEL, first call job A-6 (you should know
how by now). The LED display will alternately read \£h\ indicating that the MIDI
job is active, and \RLJ indicating that the default "ALL CHANNELS" parameter is
selected. The -1 and +1 buttons are then used to select the desired MIDI channel
number: ALL -»1-»2-> 3-16. Press RESET to return to job A-1 one the
desired MIDI channel has been set.
Remember that the MIDI channel number set for specific part MUST match the
MIDI channel number of the corresponding tone generator.
if
H
12

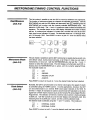
METRONOME/TIMING CONTROL FUNCTIONS
BeatlMeasure
(Job A-2)
This job makes it possible to set the 0X7 to record at different time signatures.
The number of metronome beats per measure are adjusted accordingly. Call the
BEAT/MEAS job, and the LED display will alternately read \bt] indicating that the
BEAT/MEAS job is active, and the currently selected BEAT/MEAS value. The
default is 4(4/4 time). The -1 and +1 buttons are used to select the desired time
signature. The number shown on the LED display indicates the number of beats
per bar. Anumber alone indicates 1/4 notes, and anumber with adot at its lower
right-hand corner indicates 1/8 notes. The available values are: 1/4 through 16/4,
and 1/8 through 16/8. Press RESET to return to job A-1 once the desired value
has been selected.
1/8 283/8
b'c 1
1»
3
t3''IB
1424 3'4 16/4
1
»
3
»3~~ iQ.
16/8
Metronome Mode
(Job A-3)
This job makes it possible to set the 0X7 metronome to operate during record only
(the default value), during record and play, at all times (in case you just need a
metronome), or not at all. Call the METRONOME job, and use the -1 and +1
buttons to select the desired mode. The LED display will alternately read nn in-
dicating that the METRONOME job is active, and the currently selected mode.
The available modes are:
;<c
pl
8L
OFF
RECORD
RECORD &PLAY
ALWAYS
Clock Select
(Job A-5)
Press RESET to return to the job A-1 once the desired mode has been selected.
Normally, the 0X7 is synchronized to its internal clock signal, the speed of which
is controlled using the TEMPO control. In some applications, however, the QX7
can be synchronized to an external MIDI clock signal received at the MIDI IN
terminal. It might, for example, be useful to synchronize QX7 playback to the clock
signal from aMIDI rhythm machine such as the Yamaha RX series Digital Rhythm
Programmers. The selection of internal or external clock control is made using the
CLOCK job. Call the CLOCK job and the LED display will alternately read
indicating that the CLOCK job is active, and the currently selected mode.
The desired mode is selected using the -1 and +1 buttons. The modes are:
FT] =INTERNAL CLOCK
EE =EXTERNAL CLOCK
Press RESET to return to job A-1 once the desired mode has been selected.
13

IMOTE:_„ ___
1. When the INTERNAL clock mode is selected, note resolution is 1/384
measure. When EXTERNAL is selected, note resolution is 1/96 measure.
2. The QX7 record/playback START and STOP functions can be activated
via the QX7's START and STOP buttons, afootswitch connected to the
QX7's rear- panel footswitch jack, or by an external MIDI START/STOP
signal received at the MIDI IN terminal, whether the QX7 is in the IN-
TERNAL or EXTERNAL clock mode.
i
*
14

UTILITY FUNCTIONS
All the QX7's utility functions are contained within job lists Cand D, which are not listed on the front panel but
are given on the QX7 top panel. These jobs are accessed by using the JOB/STEP SIZE selectors in conjunction
with the RESET button. For example, to call job C-3, hold the RESET button down while pressing the JOB/STEP
SIZE A/C button twice. To call job D-5, hold the RESET button while pressing the JOB/STEP SIZE button 5times
(the first press switches from the A/C list to the first job of the B/D list).
Polyphonic After
Touch (Job C-1)
This job determines whether the QX7 receives and records polyphnic after touch
data (MIDI status codes $An). Call job C-1 by holding RESET and pressing the
JOB/STEP SIZE A/C selector 6times (in order to scroll back to the first job). The
LED display will alternately read PR indicating that the POLYPHONIC AFTER-
TOUCH job is active, and the currently selected mode. The -1 and +1 buttons
are used to turn the function ON or OFF. The default mode is OFF.
>f
on
Polyphonic aftertouch data not received.
Polyphonic aftertouch data receive enabled.
Control Change
(Job C-2)
Press RESET to return to Job A-1 after selection.
This job determines whether the 0X7 receives and records control change data
(MIDI status code$Bn). CalljobC-2by holding RESET and pressing the JOB/STEP
SIZE A/C selector once. The LED display will alternately read [T7] indicating that
the CONTROL CHANGE job is active, and the currently selected mode. The -1
and +1 buttons are used to turn the function ON or OFF. The default mode is
ON.
Alter Touch
(Job C-3)
Control change data not received.
\on\ -Control change data receive enabled.
Press RESET to return to Job A-1 after selection.
Data with larger control number than 63 will be always received whether this
function is ON or OFF.
This job determines whether the 0X7 receives and records after touch data (MIDI
status code $Dn). Call job C-3 by holding RESET and pressing the JOB/STEP
SIZE A/C selector twice. The LED display will alternately read [fffcj indicating that
the AFTER TOUCH job is active, and the currently selected mode. The -1 and
+1 buttons are used to turn the function ON or OFF. The default mode is OFF.
Ql- After touch data not received.
After touch data receive enabled.
Press RESET to return to Job A-1 after selection.
Pitch Bender
(Job C-4)
This job determines whether the 0X7 receives and records pitch bender data (MIDI
status code $En). Call job C-4 by holding RESET and pressing the JOB/STEP
SIZE A/C selector 3times. The LED display will alternately read \Phi indicating
that the PITCH BENDER job is active, and the currently selected mode. The -1
and +1 buttons are used to turn the function ON or OFF. The default mode is
ON.
15

*
on
Pitch bender data not received.
Pitch bender data receive enabled.
Key Velocity
(Job C-5)
Press RESET to return to Job A-1 after selection.
This job determines whether the QX7 receives and records key velocity (initial touch
response) data. Call job C-5 by holding RESET and pressing the JOB/STEP SIZE
A/C selector 4times. The LED display will alternately read [JT] indicating that the
KEY VELOCITY job is active, and the currently selected mode. The -1 and +1
buttons are used to turn the function ON or OFF. The default mode is ON.
of
on
Key velocity data not received.
Key velocity is fixed at $40
Key velocity data receive enabled.
Echo Back
(Job C-6)
Press RESET to return to Job A-1 after selection.
This job determines whether data received at the QX7 MIDI IN terminal is to be
output ("echoed") as received via the MIDI OUT terminal. Call job C-6 by holding
RESET and pressing the JOB/STEP SIZE A/C selector 5times. The LED display
will alternately read [ffa] indicating that the ECHO BACK job is active, and the
currently selected mode. The -1 and +1 buttons are used to turn the function
ON or OFF. The default mode is OFF.
On
Echo disabled.
Echo enabled.
Press RESET to return to Job A-1 after selection.
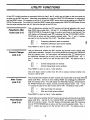
This function should be turned ON when the QX7 is used in asystem in which
the recording keyboard has no internal tone generation system—such as the Yamaha
KX1 or KX5 performance keyboards—and the output of the QX7 is driving aseparate
voice generator such as the TX7. This enables the keyboard to "play" the tone
generator directly via the 0X7 as shown in the following diagram.
KX5 -+ QX7 -TX7 SYSTEM DIAGRAM
I
MIDI
OUT
KX5
KEYBOARD
MIDI
IN OUT
QX7
SEQUENCER
mmoOQOi
QX7 ECHO BACK
must be ON.
Quantize (Job D-1) With this job it is possible to correct "off-time" notes entered in the real time record
mode by forcing all notes to fall on the nearest "quantize" unit. The available
quantize values are: 1/4, 1/6, 1/8, 1/12, 1/16 and 1/24 notes.
For example, if aphrase in which the smallest note length is 1/8 notes has been
16

entered in the real time record mode, and some of the notes are a little off-time—i.e.
the notes do not fall precisely on 1/8th measure increments—the phrase can be
quantized to 1/8 causing all the notes to fall into perfect time.
The QUANTIZE job can be used only on data which is on TRACK 1.First, call job
D-1 by holding the RESET button and pressing the JOB/STEP SIZE B/D selector
once. The LED display will alternately read \%\ indicating that the QUANTIZE job
is active, and the currently selected value. Use the -1 and +1 buttons to select
the desired value. Pressing the START button then actually executes the QUANTIZE
job, or RESET to cancel. The quantized data is left on TRACK 1.To give you a
second chance just in case quantizing ruins your recording, the data is stored in
the QX7's temporary buffer memory prior to quantizing. The data in the temporary
buffer can be recalled to TRACK 1using the SAVE TEMPORARY BUFFER job (job
D-2) described below.
NOTE:.
The selected quantize value must be equal to or smaller than the smallest note
length contained in the data to be quantized, otherwise random omission of
notes or changes in note length may occur (thus the temporary buffer save
operation!).
Save Temporary
Buffer
(Job D-2)
Cassette Savel
VerifylLoad
(Job D-3)
As we discovered in the Quantize section, above, the QX7 has atemporary buffer
memory. Executing this job swaps the contents of TRACK 1and the temporary
buffer, recalling the temporary buffer data into TRACK 1, and saving the TRACK
1data in the temporary buffer. In addition to allowing you to recall the original
data after aquantize operation, the temporary buffer is also useful in anumber of
editing situations. Suppose, for example, that you have aphrase which will occur
more than once during the course of acomposition. This phrase can be created
and saved in the temporary buffer using the SAVE TEMPORARY BUFFER job. It
can then be recalled and chained onto or inserted into the data on TRACK 2as
needed. Call job D-2 by holding the RESET button and pressing the JOB/STEP
SIZE B/D selector twice. The LED display will read {^\ and the TRACK 1indicator
will flash. Pressing the START button then actually executes the SAVE TEMPO-
RARY BUFFER job, or RESET to cancel.
This job incorporates the cassette save, verify and load functions which permit you
to save your QX7 compositions on standard cassette tape and load them whenever
they are needed. To use the cassette interface, make sure that the cassette cable !
is properly connected to the QX7's CASSETTE DIN connector and the cassette
recorder's earphone and microphone connectors (see page 4).
To perform any cassette operation, it is first necessary to call the CASSETTE TAPE
job. Call job D-3 by holding the RESET button and pressing the JOB/STEP SIZE
B/D selector 3times. The LED display will read \tP] indicating that the CASSETTE
TAPE job is active. Any of the three available cassette functions—LOAD, VERIFY
and SAVE—are then activated by pressing the corresponding button;
RECORD/LOAD, STOP/CONTINUE/VERIFY or START/SAVE. The three functions
will be covered separately below.
SAVE
This function saves the contents of the QX7 memory to cassette tape. First cat!
the CASSETTE TAPE job, start the cassette recorder running in the record mode,
then press the SAVE button. The LED display will read [£3 indicating that the
SAVE operation is being performed. When the data has been saved the QX7 will
automatically revert to job A-1
.
17

•
Memory Protect
(Job D-4)
VERIFY
This function reads the data on the cassette tape and compares it to the data in
the QX7 memory, "verifying" that the preceding SAVE operation was accomplished
with no data errors. The VERIFY function should always be used to ensure the
integrity of your saved data. First rewind the cassette tape to the beginning of
the file to be verified (the file you just saved). Call the CASSETTE TAPE job, start
the cassette recorder running in the play mode, then press the VERIFY button.
The LED display will read \JJ while the QX7 is searching for the beginning of the
file, LJ to indicate that it is reading the file, and finally either £S] if the data is
OK, or [ofr] if the cassette data does not match the 0X7 memory data. If an error
is encountered, try saving the memory contents again.
LOAD
This function lets you load apreviously SAVEd file back into the 0X7 memory from
acassette tape. First, rewind the cassette tape to the beginning of the file to be
loaded, callthe CASSETTE TAPE job, and press the LOAD button. The LED display
will read LJwhile the QX7 is searching for the beginning of the file, [TH to indicte
that it is loading thefile, and when the file has been loaded the QX7 will automatically
return to job A-1.
When ON, this job prevents alteration of data residing in the 0X7 memory (tracks
1and 2, and the temporary buffer). The default mode is OFF. Call job D-4 by
holding the RESET button while pressing the JOB/STEP SIZE B/D selector 4times.
The LED display will alternately read [HE indicating that the MEMORY PROTECT
job is active, and the currently selected mode. The -1 and +1 buttons turn MEMORY
PROTECT OFF and ON.
Memory protect ON.
Memory protect OFF.
Press RESET to return to job A-1 after selection. If you attempt to RECORD, TRACK
DOWN, CHAIN, EXCHANGE, ERASE, or perform any other memory-altering
function while MEMORY PROTECT is ON, the 0X7 will respond with \P7] ("memory
protected display) and issue awarning "beep".
uLocal Device
Number
(Job D-5)
Display MIDI status
(Job D-6J
This job specifies the MIDI channel to be used by the 0X7 for MIDI SYSTEM
EXCLUSIVE DATA communication, and permits dumping all 0X7 track memory
data via the MIDI OUT terminal. Call job D-5 by holding the RESET button while
pressing the JOB/STEP SIZE B/D selector 5times. The LED display will alternately
read [[3 indicating that the LOCAL DEVICE NUMBER job is active, and the
currently selected channel number (normally 1). Use the -1 and +1 buttons to
select the desired MIDI channel number (1 through 16). Press the START button
while in this mode to initiate abulk dump of the data contained in the currently
selected track. The LED display will read \dj\ while track 1is being dumped, and
E?J while track 2is being dumped. Press RESET to return to job A-1
.
Activating this job forces the 0X7 to function as aMIDI status monitor rather than
asequencer. In other words, MIDI data received at the MIDI IN terminal will be
displayed in hexadecimal form on the GX7's LED display. This function is paticularly
handy for monitoring MIDI signal status in aMIDI misic system, troubleshooting,
MIDI system research, etc. The default mode for this job is OFF.
Call job D-6 by holding the RESET button while pressing the JOB/STEP SIZE
B/D selector 6times. The LED display will alternately read [Sb\ indicating that the
DISPLAY MIDI STATUS job has been called, and the currently selected mode.
18

T
Use the -1 and +1 buttons to turn the function OFF and ON.
|o£] =Normal QX7 operation.
\on\ =MIDI status monitor operation.
If ON is selected, press the RESET button to clear the LED display and begin op-
eration as a MIDI status monitor. Job D-6 must be recalled and set to OFFto resume j
normal OX7 operation. If OFF is selected, pressing RESET returns to job A-1 .;
19
Page is loading ...
Page is loading ...
Page is loading ...
Page is loading ...
Page is loading ...
Page is loading ...
Page is loading ...
Page is loading ...
Page is loading ...
Page is loading ...
-
 1
1
-
 2
2
-
 3
3
-
 4
4
-
 5
5
-
 6
6
-
 7
7
-
 8
8
-
 9
9
-
 10
10
-
 11
11
-
 12
12
-
 13
13
-
 14
14
-
 15
15
-
 16
16
-
 17
17
-
 18
18
-
 19
19
-
 20
20
-
 21
21
-
 22
22
-
 23
23
-
 24
24
-
 25
25
-
 26
26
-
 27
27
-
 28
28
-
 29
29
-
 30
30


Ask a question and I''ll find the answer in the document
Finding information in a document is now easier with AI