Panasonic HMTA1GC Owner's manual
- Category
- Camcorders
- Type
- Owner's manual

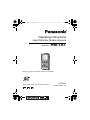
Operating Instructions
High Definition Mobile Camera
Model No. HM-TA1
Before use, please read these instructions completely.
VQT3A10
1AG6P1P6087--(S)
until
2010/08/03
Model number suffix “EB” denotes UK model.
HM-TA1EP_EB_GC-VQT3A10_mst.book 1 ページ 2010年7月14日 水曜日 午後5時5分

2 VQT3A10
Information for Your Safety
(EB/EP only)
∫ EMC Electric and magnetic compatibility
This symbol (CE) is located on the rating plate.
Use only the recommended accessories.
≥ Do not use any other AV cables and USB extension cords except the
supplied one.
≥ Keep the Memory Card out of reach of children to prevent swallowing.
WARNING:
TO REDUCE THE RISK OF FIRE OR PRODUCT DAMAGE,
≥ DO NOT EXPOSE THIS APPARATUS TO RAIN, MOISTURE,
DRIPPING OR SPLASHING AND THAT NO OBJECTS FILLED
WITH LIQUIDS, SUCH AS VASES, SHALL BE PLACED ON THE
APPARATUS.
≥ USE ONLY THE RECOMMENDED ACCESSORIES.
≥ DO NOT REMOVE THE COVER (OR BACK); THERE ARE NO
USER SERVICEABLE PARTS INSIDE. REFER SERVICING TO
QUALIFIED SERVICE PERSONNEL.
Warning
Risk of fire, explosion and burns. Do not disassemble, heat above
60 oC or incinerate.
Product Identification Marking is located on the bottom of unit.
HM-TA1EP_EB_GC-VQT3A10_mst.book 2 ページ 2010年7月14日 水曜日 午後5時5分

VQT3A10 3
-If you see this symbol-
∫ Information for Users on Collection and Disposal of
Old Equipment and used Batteries
These symbols on the products, packaging, and/or
accompanying documents mean that used electrical
and electronic products and batteries should not be
mixed with general household waste.
For proper treatment, recovery and recycling of old
products and used batteries, please take them to
applicable collection points, in accordance with your
national legislation and the Directives 2002/96/EC
and 2006/66/EC.
By disposing of these products and batteries correctly, you will help
to save valuable resources and prevent any potential negative
effects on human health and the environment which could
otherwise arise from inappropriate waste handling.
For more information about collection and recycling of old products
and batteries, please contact your local municipality, your waste
disposal service or the point of sale where you purchased the items.
Penalties may be applicable for incorrect disposal of this waste, in
accordance with national legislation.
For business users in the European Union
If you wish to discard electrical and electronic
equipment, please contact your dealer or supplier
for further information.
[Information on Disposal in other Countries
outside the European Union]
These symbols are only valid in the European Union. If you wish to
discard these items, please contact your local authorities or dealer
and ask for the correct method of disposal.
Note for the battery symbol (bottom two symbol
examples):
This symbol might be used in combination with a
chemical symbol. In this case it complies with the
requirement set by the Directive for the chemical
involved.
Cd
HM-TA1EP_EB_GC-VQT3A10_mst.book 3 ページ 2010年7月14日 水曜日 午後5時5分

4 VQT3A10
∫ Indemnity about recorded content
Panasonic does not accept any responsibility for damages directly or
indirectly due to any type of problems that result in loss of recording or
edited content, and does not guarantee any content if recording or editing
does not work properly. Likewise, the above also applies in a case where
any type of repair is made to the unit.
∫
About recording method and compatibility of this unit
This unit can record detailed high definition images based on the MP4
format (MPEG-4 AVC/H.264 codec).
≥ Since the recording method is different from the AVCHD format, the
data is not compatible.
∫ Cards that you can use with this unit
SD Memory Card, SDHC Memory Card and SDXC Memory Card
≥ 4 GB or more Memory Cards that do not have the SDHC logo or 48 GB
or more Memory Cards that do not have the SDXC logo are not based
on SD Memory Card Specifications.
≥ Refer to page 15 for more details on SD cards.
∫ For the purposes of these operating instructions
≥ SD Memory Card, SDHC Memory Card and SDXC Memory Card are
referred to as the “SD card”.
≥ Pages for reference are indicated by an arrow, for example: l 00
HM-TA1EP_EB_GC-VQT3A10_mst.book 4 ページ 2010年7月14日 水曜日 午後5時5分

VQT3A10 5
Information for Your Safety........2
Accessories.................................7
Optional accessories ................. 7
Preparation
Parts identification and
handling ...................................... 8
Battery supply .......................... 10
Inserting/removing the
battery ..................................... 10
Charging the battery................ 11
Charging and recording time... 13
Approximate operating time
and number of recordable still
pictures.................................... 14
Preparing the card ................... 15
Cards that you can use with
this unit.................................... 15
Inserting/removing an SD
card ......................................... 16
Recording/Playback
Turning the unit on/off............. 18
Setting date and time .............. 19
Recording ................................. 21
Recording motion pictures ...... 21
Recording still pictures ............ 22
Digital zoom in/out function..... 23
Recording with the LED light... 23
Effect function
(applying special effects)......... 24
Playback ................................... 25
Motion picture/Still picture
playback .................................. 25
Creating still picture from
motion picture.......................... 28
Playing back the slide show .... 29
Deleting motion pictures/
still pictures ............................. 30
Using the menu screen ........... 32
Menu list.................................. 33
Watching Motion/Still pictures
on your TV ............................... 36
With a PC
What you can do with a PC..... 38
Operating environment ........... 40
Installation................................ 44
Connecting to a PC.................. 46
About the PC display .............. 47
Starting HD Writer PE 1.0 ........ 48
Reading the operating
instructions of the software
applications ............................. 48
If using Mac .............................. 49
To use as a camera for
Skype ........................................ 50
How to connect ....................... 52
Others
Indications................................ 53
Messages/Troubleshooting .... 55
Cautions for use ...................... 59
About copyright ....................... 64
Recording modes/
approximate recordable
time ........................................... 65
Approximate number of
recordable pictures ................. 66
Specifications .......................... 67
Index .......................................... 71
Contents
HM-TA1EP_EB_GC-VQT3A10_mst.book 5 ページ 2010年7月14日 水曜日 午後5時5分

6 VQT3A10
For the United Kingdom and Republic of Ireland
customers
∫ Sales and Support Information
Customer Care Centre
≥ For customers within the UK: 0844 844 3852
≥ For customers within the Republic of lreland: 01 289 8333
≥ Visit our website for product information
www.panasonic.co.uk
≥ E-mail: customer.care@panasonic.co.uk
Technical Support for AV Software
≥ For customers within the UK: 0844 844 3869
≥ For customers within the Republic of Ireland: 01 289 8333
Direct Sales at Panasonic UK
≥ For customers: 0844 844 3856
≥ Order accessory and consumable items for your product with ease and
confidence by phoning our Customer Care Centre Monday–Thursday
9.00 a.m.–5.30 p.m., Friday 9.30 a.m.– 5.30 p.m. (Excluding public
holidays)
≥ Or go on line through our Internet Accessory ordering application at
www.pas-europe.com
.
≥ Most major credit and debit cards accepted.
≥ All enquiries transactions and distribution facilities are provided directly
by Panasonic UK Ltd.
≥ It couldn’t be simpler!
≥ Also available through our Internet is direct shopping for a wide range
of finished products, take a browse on our website for further details.
HM-TA1EP_EB_GC-VQT3A10_mst.book 6 ページ 2010年7月14日 水曜日 午後5時5分

VQT3A10 7
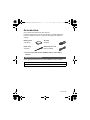
Accessories
Check the accessories before using this unit.
Keep the accessories out of reach of children to prevent swallowing.
Product numbers correct as of July 2010. These may be subject to
change.
≥ The unit comes with built-in HD Writer PE 1.0 video editing
software.
Some optional accessories may not be available in some countries.
Battery pack
VW-VBJ10
AV cable
VFA0530
Hand strap
VFC4627
USB extension cord
K2KYYYY00064
Optional accessories
Battery pack (lithium/VW-VBJ10)
SD/SDHC/SDXC Memory Card (Refer to page 15)
HM-TA1EP_EB_GC-VQT3A10_mst.book 7 ページ 2010年7月14日 水曜日 午後5時5分

8 VQT3A10
Preparation
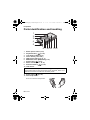
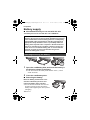
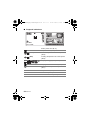
Parts identification and handling
1 Motion picture button (l 21)
2 Playback button [ ] (l 25)
3 Light button [LIGHT] (l 23)
4 Cursor button [T, W, 2, 1]
5 USB terminal slide lever (l 11)
6 MENU/SET button [MENU/SET] (l 32)
7 Delete button [ ] (l 30)
8 Status indicator (l 11, 16, 36)
9 Photoshot button [ ] (l 22)
10 LCD monitor
11 Power button [ ] (l 18)
12 Hand strap fixture
≥ Do not cover the microphones.
Due to limitations in LCD production technology, there may be some tiny
bright or dark spots on the LCD monitor screen. However, this is not a
malfunction and does not affect the recorded picture.
1
6 7 8 9 10 1112
2
3
4
5
HM-TA1EP_EB_GC-VQT3A10_mst.book 8 ページ 2010年7月14日 水曜日 午後5時5分

VQT3A10 9
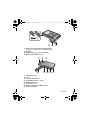
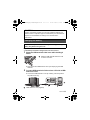
13 Audio-video output terminal [A/V] (l 36)
≥ Use the AV cable (only the supplied cable).
14 Speaker
15 USB terminal [ ] (l 11, 44, 46, 52)
16 USB terminal cover (l 11)
17 LED light (l 23)
18 Lens
19 Internal microphones
20 Card/battery door (l 10, 16)
21 Battery slot (l 10)
22 Card slot (l 16)
23 Battery release lever [BATT] (l 10)
24 Tripod receptacle
A/V
13
1514 16
20 21 22 23 24
17 18 19
HM-TA1EP_EB_GC-VQT3A10_mst.book 9 ページ 2010年7月14日 水曜日 午後5時5分

10 VQT3A10
Preparation
Battery supply
∫ About batteries that you can use with this unit
The battery that can be used with this unit is VW-VBJ10.
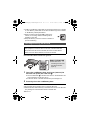
1 Open the card/battery door and insert the battery in
the direction shown in the figure.
≥ Push the centre of the battery in the direction of the # until it
“clicks” and locks.
2 Close the card/battery door.
∫ Removing the battery
Move the battery release lever in the
direction indicated by the arrow and
remove the battery when unlocked.
≥ Turn off the unit and make sure the LCD
monitor is turned off. Then remove the
battery while supporting the unit to prevent
it dropping.
It has been found that counterfeit battery packs which look very
similar to the genuine product are made available to purchase in
some markets. Some of these battery packs are not adequately
protected with internal protection to meet the requirements of
appropriate safety standards. There is a possibility that these
battery packs may lead to fire or explosion. Please be advised
that we are not liable for any accident or failure occurring as a
result of use of a counterfeit battery pack. To ensure that safe
products are used we would recommend that a genuine
Panasonic battery pack is used.
Inserting/removing the battery
HM-TA1EP_EB_GC-VQT3A10_mst.book 10 ページ 2010年7月14日 水曜日 午後5時5分

VQT3A10 11
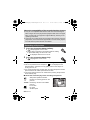
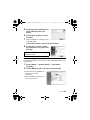
Important:
≥ The battery will not be charged if the unit is turned on.
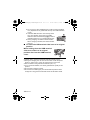
1 Slide the USB terminal slide lever while holding it
down.
≥ This pushes the USB terminal cover open deploying the USB
terminal.
2 Connect USB terminal of this unit to a PC with a USB
extension cord.
≥ Connect the USB extension cord by inserting it securely all the
way without forcing.
A USB extension cord (supplied)
CAUTION
Danger of explosion if battery is incorrectly replaced. Replace only
with the same or equivalent type recommended by the manufacturer.
Dispose of used batteries according to the manufacturer’s
instructions.
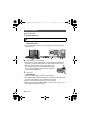
Charging the battery
When this unit is purchased, the battery is not charged. Charge the
battery fully before using this unit.
A Slide the USB terminal slide lever until
it “clicks” and locks.
HM-TA1EP_EB_GC-VQT3A10_mst.book 11 ページ 2010年7月14日 水曜日 午後5時5分

12 VQT3A10
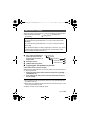
≥ Do not use any other USB extension cords except the supplied
one. (Operation is not guaranteed with any other USB extension
cords.)
≥ Insert the USB extension cord securely all the
way. (The insertion of the plug to the USB
terminal of this unit leaves the gap B.) It will not
operate properly if it is not inserted all the way.
≥ During charging, the status indicator flashes.
When charging is finished, the status indicator
turns off.
∫ To return the USB terminal slide lever to its original
position
While holding down the USB terminal
slide lever, slide it to its original
position and close the USB terminal
cover.
≥ Please refer to page 60 if the status indicator flashes quickly.
≥ During the charging, the unit can not be turned on with the power
button. In order to turn on the unit, disconnect it from the PC.
≥ We recommend using Panasonic batteries (l 7, 13).
≥ If you use other batteries, we cannot guarantee the quality of this
product.
≥ Do not heat or expose to flame.
≥ Do not leave the battery(ies) in an automobile exposed to direct
sunlight for a long period of time with doors and windows closed.
HM-TA1EP_EB_GC-VQT3A10_mst.book 12 ページ 2010年7月14日 水曜日 午後5時5分

VQT3A10 13
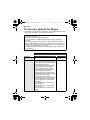
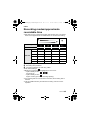
∫ Charging/Recording time
≥ Temperature: 25 oC/humidity: 60%RH
* Maximum continuously recordable time for one scene:
j
If [REC MODE] is set to //:
29min59sec
j
If [REC MODE] is set to :
Approx. 20 min (up to 4 GB recording capacity)
≥ These times are approximations.
≥
The indicated charging time is for when the battery has been
discharged completely. Charging time and recordable time vary
depending on the usage conditions such as high/low temperature.
≥ The actual recordable time refers to the recordable time when
repeatedly starting/stopping recording, turning the unit on/off, adjusting
the zoom etc.
≥ The batteries heat up after use or charging. This is not a malfunction.
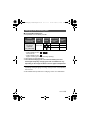
Charging and recording time
Battery model
number
[Voltage/Capacity
(minimum)]
Charging
time
Recording
mode
Maximum
continuously
recordable
time*
Actual
recordable
time
Supplied battery/
VW-VBJ10
(optional)
[3.6 V/940 mAh]
4h10min
1h20min 45min
/ 1h35min 50min
1h50min 1h
HM-TA1EP_EB_GC-VQT3A10_mst.book 13 ページ 2010年7月14日 水曜日 午後5時5分

14 VQT3A10
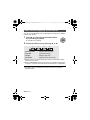
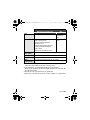
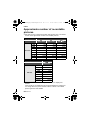
Recording conditions by CIPA standard
≥ CIPA is an abbreviation of Camera & Imaging Products Association.
≥ Using the supplied battery
≥ Using a Panasonic SD Memory Card (2 GB)
Approximate operating time and number of
recordable still pictures
Number of recordable
pictures
Approx.
230 pictures
By CIPA standard
Recording time
Approx.
115 min
Playback time Approx. 180 min
Battery capacity indication
≥ The display changes as the battery capacity reduces.
####
If the battery discharges, then will become red.
HM-TA1EP_EB_GC-VQT3A10_mst.book 14 ページ 2010年7月14日 水曜日 午後5時5分

VQT3A10 15
Preparation
Preparing the card
Use SD cards conforming to Class 4 or higher of the SD Speed
Class Rating
*
for motion picture recording.
* The SD Speed Class Rating is the speed standard for successive writes.
≥ Please confirm the latest information about SD Memory Cards/SDHC
Memory Cards/SDXC Memory Cards that can be used for motion
picture recording on the following website.
http://panasonic.jp/support/global/cs/e_cam
(This website is in English only.)
This unit (an SDXC compatible device) is compatible with SD Memory
Cards, SDHC Memory Cards and SDXC Memory Cards. When using
an SDHC memory card/SDXC memory card with other equipment,
check the equipment is compatible with these memory cards.
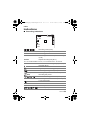
Cards that you can use with this unit
Card type Capacity
Motion picture
recording
Still picture
recording
SD
Memory
Card
8MB/
16 MB/
32 MB/
64 MB/
128 MB/
256 MB
Cannot be guaranteed
in operation.
The recording may
suddenly stop during
motion picture
recording depending
on the SD card you
use. (l 56)
Can be used.
512 MB/
1GB/2GB
Can be used.
SDHC
Memory
Card
4GB/6GB/
8GB/12GB/
16 GB/24 GB/
32 GB
SDXC
Memory
Card
48 GB/64 GB
HM-TA1EP_EB_GC-VQT3A10_mst.book 15 ページ 2010年7月14日 水曜日 午後5時5分

16 VQT3A10
≥ 4 GB or more Memory Cards that do not have the SDHC logo or 48 GB
or more Memory Cards that do not have the SDXC logo are not based
on SD Memory Card Specifications.
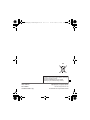
≥ When the write-protect switch A on SD card is
locked, no recording, deletion or editing will be
possible on the card.
≥ Keep the Memory Card out of reach of children to
prevent swallowing.
Caution:
Check that the status indicator has gone off.
1 Open the card/battery door and insert (remove) the
SD card into (from) the card slot B.
≥ Face the label side C in the direction shown in the illustration and
press it straight in as far as it will go.
≥ Press the centre of the SD card and then pull it straight out.
2 Securely close the card/battery door.
≥ Do not touch the terminals on the back of the SD card.
≥ Do not apply strong shocks, bend, or drop the SD card.
≥ Electrical noise, static electricity or the failure of this unit or the SD card
may damage or erase the data stored on the SD card.
Inserting/removing an SD card
When using an SD card not from Panasonic, or one previously used on
other equipment, for the first time on this unit, format the SD card.
(l 35) When the SD card is formatted, all of the recorded data is
deleted. Once the data is deleted, it cannot be restored.
32
Status indicator A
≥ When this unit is
accessing the SD card,
the status indicator
lights up.
HM-TA1EP_EB_GC-VQT3A10_mst.book 16 ページ 2010年7月14日 水曜日 午後5時5分

VQT3A10 17
≥ When the status indicator is lit, do not:
j Remove the SD card
j Turn the unit off
j Insert and remove the USB terminal
j Expose the unit to vibrations or shock
Performing the above while the lamp is on may result in damage to
data/SD card or this unit.
≥ Do not expose the terminals of the SD card to water, garbage or dust.
≥ Do not place SD cards in the following areas:
j In direct sunlight
j In very dusty or humid areas
j Near a heater
j Locations susceptible to significant difference in temperature
(condensation can occur.)
j Where static electricity or electromagnetic waves occur
≥ To protect SD cards, return them to their cases when you are not using
them.
≥ About disposing of or giving away the SD card. (l 63)
HM-TA1EP_EB_GC-VQT3A10_mst.book 17 ページ 2010年7月14日 水曜日 午後5時5分

18 VQT3A10
Recording/Playback
Turning the unit on/off
Press the power button to turn on the unit.
≥ The LCD monitor lights.
To turn off the unit
Continue pressing the power button until the LCD monitor goes off.
∫ About the screen display
Please refer to page 53 for details of the icons displayed on the screen.
∫ About the power save function
To prevent battery consumption, it will turn off the
screen and go into idle mode after approx. 2 minutes
of no operation. (The status indicator A flashes.)
The unit will be turned off automatically if no
operation is performed for a further 5 minutes
(approx.) while in idle mode.
≥ Idle mode is cancelled by pressing one of the buttons.
∫ About the high temperature warning icon
When the high temperature warning icon is displayed, the
temperature of the unit is high.
≥ It is possible to continue recording/playback when is displayed,
but it is recommended to stop operations and turn off the unit as soon
as possible.
≥ If the temperature rises further, the unit will be turned off automatically
after flashes. You will not be able to turn on the unit again until the
temperature lowers ( will flash.), so wait until the temperature
lowers before using again.
≥ A countdown until the recording is stopped will start from approx.
15 seconds during motion picture recording, and the recording will stop
when the display reaches 0 seconds.
≥ When you turn off the unit while the temperature is high ( is
displayed.), you will not be able to turn on the unit again until the
temperature lowers. ( will flash.)
HM-TA1EP_EB_GC-VQT3A10_mst.book 18 ページ 2010年7月14日 水曜日 午後5時5分

VQT3A10 19
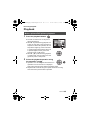
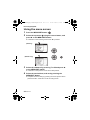
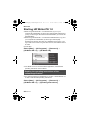
When the unit is turned on for the first time, a message asking you to set
the date and time will appear.
Press the MENU/SET button and perform steps 2 to 3 below to set the
date and time.
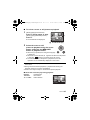
1 Select the menu. (l 32)
2 Select the items to be set using 1 and 2
on the cursor button, and set the desired
value using T and W.
≥ The year can be set between 2000 and 2039.
≥ The 24-hour system is used to display the time.
3 Press the MENU/SET button.
≥ The clock function starts at [00] seconds.
≥ Press 2 to complete the setting.
Setting date and time
: [CLOCK SET] # desired setting
[DATE]: Setting of the year/month/day
[TIME]: Setting of the hour/minute
HM-TA1EP_EB_GC-VQT3A10_mst.book 19 ページ 2010年7月14日 水曜日 午後5時5分

20 VQT3A10
≥ The clock is not set when the unit is shipped.
≥ The date and time function is driven by a built-in lithium battery.
≥ If the built-in lithium battery needs to be charged, the message “Set
date and time” appears. To recharge the built-in lithium battery,
connect USB terminal of this unit to a booted PC or attach the battery
to this unit. Leave the unit as it is for approx. 24 hours and the battery
will maintain the date and time for approx. 3 months. (The battery is
still being recharged even if the unit is off.)
≥ The date and time will be set to January 1, 2010 00:00 when recording
is performed without the date and time set.
WARNING
THE LITHIUM BATTERY IN THIS EQUIPMENT MUST ONLY BE
REPLACED BY QUALIFIED PERSONNEL. WHEN NECESSARY,
CONTACT YOUR LOCAL PANASONIC SUPPLIER.
HM-TA1EP_EB_GC-VQT3A10_mst.book 20 ページ 2010年7月14日 水曜日 午後5時5分
Page is loading ...
Page is loading ...
Page is loading ...
Page is loading ...
Page is loading ...
Page is loading ...
Page is loading ...
Page is loading ...
Page is loading ...
Page is loading ...
Page is loading ...
Page is loading ...
Page is loading ...
Page is loading ...
Page is loading ...
Page is loading ...
Page is loading ...
Page is loading ...
Page is loading ...
Page is loading ...
Page is loading ...
Page is loading ...
Page is loading ...
Page is loading ...
Page is loading ...
Page is loading ...
Page is loading ...
Page is loading ...
Page is loading ...
Page is loading ...
Page is loading ...
Page is loading ...
Page is loading ...
Page is loading ...
Page is loading ...
Page is loading ...
Page is loading ...
Page is loading ...
Page is loading ...
Page is loading ...
Page is loading ...
Page is loading ...
Page is loading ...
Page is loading ...
Page is loading ...
Page is loading ...
Page is loading ...
Page is loading ...
Page is loading ...
Page is loading ...
Page is loading ...
Page is loading ...
-
 1
1
-
 2
2
-
 3
3
-
 4
4
-
 5
5
-
 6
6
-
 7
7
-
 8
8
-
 9
9
-
 10
10
-
 11
11
-
 12
12
-
 13
13
-
 14
14
-
 15
15
-
 16
16
-
 17
17
-
 18
18
-
 19
19
-
 20
20
-
 21
21
-
 22
22
-
 23
23
-
 24
24
-
 25
25
-
 26
26
-
 27
27
-
 28
28
-
 29
29
-
 30
30
-
 31
31
-
 32
32
-
 33
33
-
 34
34
-
 35
35
-
 36
36
-
 37
37
-
 38
38
-
 39
39
-
 40
40
-
 41
41
-
 42
42
-
 43
43
-
 44
44
-
 45
45
-
 46
46
-
 47
47
-
 48
48
-
 49
49
-
 50
50
-
 51
51
-
 52
52
-
 53
53
-
 54
54
-
 55
55
-
 56
56
-
 57
57
-
 58
58
-
 59
59
-
 60
60
-
 61
61
-
 62
62
-
 63
63
-
 64
64
-
 65
65
-
 66
66
-
 67
67
-
 68
68
-
 69
69
-
 70
70
-
 71
71
-
 72
72


Panasonic HMTA1GC Owner's manual
- Category
- Camcorders
- Type
- Owner's manual
Ask a question and I''ll find the answer in the document
Finding information in a document is now easier with AI
Related papers
-
Panasonic VQT2Z95-1 User manual
-
-
Panasonic HDC-HS700 Owner's manual
-
Panasonic HDC-SD600 User guide
-
Panasonic HDCSDT750EP Quick start guide
-
-
Panasonic HDC-TM900 Owner's manual
-
-
-
Panasonic DMCFX70EB Quick start guide
Other documents
-
Leica D-LUX 5 Quick start guide
-
Leica V-LUX 2 User manual
-
Sharp MX-B380P Specification
-
Star Micronics TCP100 Series User manual
-
Max PJID143 Owner's manual
-
-
Digitus DA-70330-1 Quick start guide
-
Targus TGRMS20 User manual
-
-
Therabody WAVE-02 User manual