Page is loading ...

StrideZ Travel System
MODEL # 1963CT
Instruction Manual
04.06
Convenience through Innovation and thoughtful design
Read all instructions BEFORE assembly and USE of product.
KEEP INSTRUCTIONS FOR FUTURE USE.

WARNING: Please follow all of these instructions to ensure the
safety of your child. Keep these instructions for future reference.
WARNING: Failure to follow these instructions could result in
serious injury or death. Avoid serious injury from falling or sliding out.
Always use the seat belt and insure that the child is properly positioned
according to these instructions.
WARNING: Never leave child unattended.
* Purses, shopping bags, parcels, diaper bags or accessory items may change the balance of the stroller and
cause hazardous unstable conditions.
* The maximum weight that can be carried in the basket is 5 lbs. The maximum weight that can be carried
in the Parent Tray is 3 lbs. Excessive weight may cause a hazardous unstable condition to exist.
* Be certain the stroller is fully erect and latched in the open position before allowing the child near the
stroller.
* The maximum weight capacity of this stroller is up to 45 pounds additional weight will cause excessive wear
and stress on the stroller and may cause a hazardous unstable condition to exist.
* DO NOT use the stroller on stairways or escalators.
* Never allow your stroller to be used as a toy
* To clean use only mild household soap or detergent and warm water on a sponge or clean cloth.
* Check your stroller for loose screws, worn parts, torn material or stitching on a regular basis. Replace or
repair parts as needed
* Discontinue use of stroller should it malfunction or become damaged. Please contact our customer service
Parts Hotline to arrange for repair or obtain replacement parts.
Please: If you experience any difficulty with the use of our product or have a question regarding these instruc-
tions, please contact our Customer Service Department at (800) 328-7363 between the hours of 8:00 am and
4:30 pm Pacific Coast Time. Please do not return to the store as once it is returned it cannot be resold and the
materials and energy used to make it are wasted.
To Contact Us:
Baby Trend, Inc. Customer Service Hot Line
1567 S. Campus Ave. (800) 328-7363
Ontario, CA 91761 8:00 a.m. to 4:30 p.m. Pacific Standard Time
WARNINGS
2

* Remove stroller from box. The front wheels, rear wheels, child tray, parent
tray, foot rest need to be installed prior to use.
* To attach the front wheels, unfold stroller as described in the section
following. See figure 1.
* Lean the stroller backwards so that it rests on the handle and rear frame
tubes and the front wheel tubes are pointing upward. Position the front
wheel assembly at the front tube such that the hole in the swivel assembly
will slide onto the front tube. Please see figure 2. Push each front wheel
assembly onto the front tube being careful that wheel assembly locks onto
the front leg. Pull on the wheel assembly to ensure that it is securely
attached to the stroller. Please see figure 2.
* Lean the stroller forward to rest on the front wheels. Assemble the rear
wheels as follows:
1. Slide the rear wheel housings onto each rear stroller leg until locked
into place. The push button on the forward edge of the leg should
snap into the hole in the housing. Please see figure 3.
2. Slide the rear axle through the housings as shown in figure 4.
3. Slide each wheel onto the rear axle and secure in place with the
Locking Cap. Snap the solid cap over the Locking Cap. Snap the
Hub Cap onto the wheel. Please see figure 5. Please see figure 6 for
order assembly.
Pull on each wheel to ensure that each is firmly attached to the axle.
* Ensure that the wheels are firmly locked into place. Do Not use the stroller
if the wheels are not locked into place, but rather contact our customer
service department immediately at (800) 328-7363, between the hours of
8:00am and 4:30pm PCT, for assistance.
TO ENSURE SAFE OPERATION OF YOUR STROLLER, PLEASE FOLLOW THESE
INSTRUCTIONS CAREFULLY. RETAIN THESE INSTRUCTIONS FOR FUTURE REFERENCE.
Car Seat
Front Wheels
Figure 3.
Parent Tray
PARTS
TO ASSEMBLE STROLLER
Slide axle through
Figure 5.
Child Tray
Figure 4.
Rear Axle
Solid Cap
Locking Cap
Rear Wheels
Figure 6.
Stroller
Figure 1.
Base
Car Seat
Figure 2.
Rear Wheel Housing
Hub Cap
Front Wheels
3
Foot Rest

* To attach the front child tray, push the angled tray onto the post at the
end of right armrest, while pressing downward on the snap button, until
locked into place. Please see figure 7. Rotate the tray downward until
latched onto the left armrest. Please check that the snap button comes
through and securely latches the tray in place. Please see figure 8.
* To remove front child tray, press inward on the left side tray release
button and rotate upward on the tray. Please see figure 9. Please note
that you may remove the tray completely by depressing the snap button
on the right side as shown in figure 10 while pulling forward on the tray.
Please see figure 7.
* To attach the parent tray, align the fittings on the ends of the parent
tray with the fittings on the outsides of the handle. Push downward
on the tray until locked into place. Please see figure 11. To remove
the parent tray, pull outward on the bottom edges of the tray and lift
upward. Please see figure 12.
* To install foot rest, line up the foot rest with the stroller frame and push
onto the frame. Please see figure 12A.
* Next, slide the foot rest down onto the protruding rivets until snaps into
place. Please see figure 12B.
* The storage basket swings downward to allow easy access to the basket
contents. Lift upward on the rear tube of the basket to lock in the up
position. Please see figure 13. To lower the basket, pull rearward on
the center of the basket tube and press downward. Please see figure
14.
* Push forward on the front frame of the canopy to open. Please see
figure 15.
4
Figure 9.
Figure 7.
Figure 8.
Figure 11.
Figure 12.
Figure 13.
Figure 14.
Figure 10.
Figure 15.
Front frame
tube
Figure 12A. Figure 12B.

5
• The shoulder straps of the 5-point harness have 2 attachment positions.
Select the position that places the shoulder strap level with, or below
the top of the child's shoulder. To access the harness pull apart seat pad.
Please see figure 16.
• Carefully place the child in the stroller seat and bring the safety harness
around the child's waist and over the shoulders. Place the crotch strap
between the child's legs. Insert the male end of each shoulder/waist belt
into the buckle on the crotch strap. Tighten the harness to be snug around
the child's waist and over the child's shoulders Please see figure 17.
TO SECURE THE CHILD
Shoulder Strap
Squeeze
Crotch Strap
Waist
Strap
Adjust for a
snug fit
• To release, apply pressure to both sides of each male clip until the clip is released. See figure
18. This process requires a moderate amount of effort so as to prevent an accidental release by
your child.
WARNING: Avoid serious injury from
falling or sliding out. Always use the safety
harness.
STRANGULATION HAZARD:
Child can strangle in loose straps. Never leave
child in seat when straps are loose or undone.
Figure 16.
Figure 17.
Figure 18.

6
ATTACHMENT OF THE BABY TREND INFANT CAR SEAT
* To attach the Baby Trend Infant Car Seat, recline the seat all the way
back. Please see figure 19
* Check that the front child tray is firmly attached to the stroller
armrests. Pull rearward on the rear edge of the front child tray cover
while lifting upward on the tray cover. Please see figure 20 and 21.
Remove the tray cover and store in the stroller basket.
* Position the Infant Car Seat, facing toward the rear of the stroller, so
that the seat shell goes into the front tray and latches into place. Please
see figure 22. Check that the Infant Car Seat is firmly locked onto
the front tray before using.
* To remove the Infant Car Seat, squeeze the release handle located at the
foot-end of the seat and carefully lift upward on the seat. Please see
figure 23.
Figure 20.
Figure21.
Figure 23.
Locks
into tray
Figure 22.
WARNING: Failure to follow these
car seat attachment instructions could re-
sult in serious injury or death.
Figure 19.

7
* The cover of the child/car seat tray may be fastened in the closed position
after your child outgrows the infant car seat. This will prevent an older
child from opening the child tray. To secure the tray cover, remove the
tray from the stroller as shown in the to remove front child tray section.
Install the tray cover. Place the tray with the lid side down on a soft
flat surface. Remove the screw stored under the tray as shown in figure
24. Insert the screw into the hole in the bottom of the tray and into the
matching hole in the cover. Tighten until snug. Do not over tighten. If
you wish to use the car seat tray function at a later date (for a second
child) remove the screw and store in the tray bottom as before. Please
see figure 24.
FRONT CHILD / CAR SEAT TRAY COVER
SEAT BACK POSITIONING
WARNING: The upright position should
be used only for a child that is at least 6 months
old.
* The seat has a multiple position recline that is controlled by a cord and
spring loaded adjuster behind the seat. To recline the seat, pull back
on the loop of the adjuster. Please see figure 25. To place the seat back
in a more upright position, grab the adjuster with one hand and pull
the cord to the desired position with the other hand. See figure 26. The
cord will lock automatically.
BRAKES
WARNING: Always set brakes when the
stroller is not being pushed so that the stroller will not
roll away. Never leave stroller unattended on a hill or
incline as the stroller may slide down the hill.
* To engage brakes, apply light downward pressure to the brake lever
located on each rear wheel. The stroller may require slight forward or
rearward movement in order to line up the teeth on the brake with each
wheel brake cluster. See figure 27. Check that the stroller will not move
and that the brakes are properly applied. To release, gently lift up on the
brake lever.
Figure 25.
Figure 26.
Figure 27.
Figure 24.
Screw storage
boss-factory
installed screw
for later use
Hole in tray to lock down lid
after car seat use

Figure 28.
8
* To open the canopy, push forward on the front frame of the canopy. To
close canopy, pull the front edge toward the rear of the stroller until folded.
Always fold the canopy prior to folding the stroller frame. Please see
figure 28. The canopy may be moved forward to block the sun or wind.
CANOPY
TO REMOVE FRONT CHILD TRAY
* To remove front child tray, press inward on the tray release button on the
left armrest and pull up on the tray. Please see figure 9. Also, the tray
may be completely removed by depressing the snap button on the right
side as shown in Figure 10 while pulling forward on the tray
BASKET
* The storage basket swings downward to allow easy access to the basket
contents. Lift upward on the rear tube of the basket to lock in the up
position. Please see figure 29. To lower the basket, pull rearward on the
center of the basket tube and press downward. Please see figure 30.
The maximum weight that can be carried in the basket is 5 lbs.
Figure 29.
Figure 30.
Front frame
tube

9
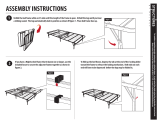
TO UNFOLD STROLLER
Figure 31.
TO FOLD STROLLER
* Close the canopy as described in the canopy section. NOTE: For an
easier fold place the seat in the furthest recline position. To fold the
stroller slide the red fold lock with your thumb while squeezing the large
red fold button in the center of the handle and push downward on the
handle. Please see figure 31. Once the stroller begins to fold, release the
red handle and push forward on the handle until the stroller is folded.
Please see figure 32. To stroller will automatically lock when folded
correctly, and will stand freely in the folded position.
Figure 33.
* To unfold the stroller slide the red fold lock with your thumb while
squeezing the large red fold button in the center of the handle and lift up
and back on the stroller handle with both hands until the stroller frame
is erect and locked in the open position. See figure 33. The stroller has
spring-loaded latches on both sides of the frame. Test that both latches are
fully engaged prior to placing your child in the stroller.
Figure 32.
CAUTION: Read the following section completely before folding your stroller!
WARNING: Failure to
follow these folding instructions
could result in serious injury or
death.
WARNING: Failure to
follow these folding instructions
could result in serious injury or
death.

CLEANING SEAT PAD
* To clean the seat pad. use warm water, soap and a sponge, and let air
dry.
IF YOU EXPERIENCE ANY DIFFICULTY IN USING THIS PRODUCT,
PLEASE CONTACT OUR CUSTOMER SERVICE DEPARTMENT AT (800) 328-7363
BETWEEN THE HOURS OF 8:00AM AND 4:30PM PACIFIC COAST TIME FOR ASSISTANCE.
STOP
10
/