Page is loading ...

Owner's manual OSP209
CAUTION: 1. Weight on this product should not exceed 150kg
2 Exercise of a strenuous nature, as is customarily done on this equipment,
Should not be undertaken without first consulting a physician.
No specific health claims are made or implied as they relate to the equipment.
Measurements made by the equipment are believed to be accurate, but only the
measurements of your physician should be relied upon.
IMPORTANT: Read all instruction carefully before using this product. Retain this product owner's
manual for future reference.
• Warranty
• Assembly
• Parts
OSP209


2

3
大 爆 图
EXPLORATION DRAWING

4
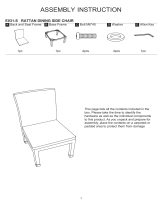
COMPLETE BIKE ASSEMBLY

5
PARTS LIST
PART NO.
DESCRIPTION
QTY
A, A-1
Computer and Screw
1PC
B
Handlebar
1PC
B-1
Foam grip for handlebar
2PCS
B-2
Cap for handlebar
2PCS
B-3
Handlebar post
1PC
B-4
End cap of handlebar post
1PC
B-5
Screw M3*14
1PC
B-6
Stopper for handlebar
1PC
B-7
Screw M3*14
1PC
B-8
Upper cap for handlebar post
1PC
B-9
Upper cable for computer
1PC
C
Rear stabilizer
1PC
C-1
End cap for rear stabilizer
2PCS
C-2
Adjustor pad for rear stabilizer
2PCS
D
Front stabilizer
1PC
D-1
End cap for front stabilizer
2PCS
D-2
Transportation wheel for front stabilizer
2PCS
D-3
Screw M8xP1.25x40L
2PCS
D-4
Flat washer φ8xφ16x1t
2PCS
D-5
Nylon nut M8
2PCS
D-6
Adjustor pad for front stabilizer
2PCS
E
Main frame
1SET
E-1
Adjusting knob for seat post
1PC
E-2
Adjusting knob for handlebar post
1PC
E-3
Screw M4x50L
5PCS
E-4
Sleeve for handlebar post holder
1PC
E-5
Sleeve for seat post holder
1PC
E-6
Screw M5x16L
4PCS
E-7
Left chain cover
1PC
E-8
Right chain cover
1PC
E-9
Front cover - Left
1PC
E-10
Front cover - Right
1PC
E-11
Screw M5x14L
4PCS
E-12
Bushing for chain cover
1PC
E-13
Belts 1320m/m
1PC
E-14
Belts 813m/m
1PC
E-15
Bearing 6004RS
2PCS
E-16
Nut M20*P1.0
1PC
E-17
Flat washerφ20.3xφ30x1t
1PC

6
E-18
Sensor holder
1PC
E-19
Sensor box
1PC
E-20
Screw M4x10L for sensor holder
1PC
E-21
DC cable
1PC
E-22
Cap for hand post holder
1PC
E-23,E-28
Gear box set
1SET
E-25
Support bar for gear box
1PC
E-26
Screw M4x12L
1PC
E-27
Hex screw M4
1PC
E-29
Left crank
1PC
E-30
Right crank
1PC
E-31
Nut M10xP1.25x10T
2PCS
E-33
Hex nut M3
1PC
E-34
Bushing for chain cover
1PC
F~F-3
Magnetic set
1SET
G
Shaft
1PC
G-1
Big pulley
1PC
G-2
Hex screw M6xP1.0*16L
3PCS
G-3
Bushingφ20*φ28*9.5L
1PC
H~H-8
Big flywheel set
1SET
J~J-7
Small flywheel set
1SET
K~K-9
Idler wheel set
1SET
L
Seat post
1PC
L-1~L-5
Slider set for seat post
1SET
M-1
Brake knob for Brake
1PC
M-2
Hex screw M8 for Brake
1PC
M-3
Plastic bushingφ10xφ22.2x15t
1PC
M-4
Brake bar for Brake
1PC
M-5
Pressing spring for Brake
1PC
M-6
U holder for Brake
1PC
M-7
Brake piece for Brake
1PC
M-8
Bushing φ9x18L for Brake
1PC
M-9
Flat washerφ10xφ14x1t for Brake
2PCS
M-10
Screw M5x8 for Brake
2PCS
N-1~N-3
Bolts & nuts pack
1SET
N-4
Pedal
1SET
N-5
Seat
1PC
N-6
Adaptor
1PC

7
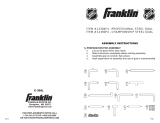
STEP 1
1. Attach the front stabilizer (D) to the main frame (E) using two flat washer (N-1) and allen
bolt (N-3).
2. Attach the rear stabilizer (C) to the main frame (E) using two flat washer (N-1) and allen
bolt (N-3)
After assembly, the Trainer can be adjusted to slightly uneven ground by adjusting the
height of the foot caps at the front and back. The pre-assembled transportation wheels in
the front allow easy moving of the Elliptical and therefore during assembly, need to be
pointing down at the front (45°).
Allen Key(1)
N-3 Allen Bolt M8 *P1.25*20mm (4)
N-1 Flat Washer ?8*?1 9*2t (4)

8
STEP 2
1. Assemble the left pedal (N-4L) to the left crank (E-29) and the right pedal (N-4R) to right
crank (E-30).
2. Assemble the seat (N-5) to the seat post (L).
3. Then choose the desired position and tighten the knob (E-1). Be sure the knob is always
tightened.
Remarks: When you have chosen a desired position, tighten the Seat Post Knob until you
hear a “click”.
Box Spanner(1)
Screwdriver (1)

9
STEP 3
3.1 : Please remove the adjusting knob (E-2) from the main frame (E).
3.2 : Release the screw from the lower sleeve and take off the sleeve from the handlebar
post but do not take the sleeve off the lower cable.
3.3 : Insert the handlebar post (B-3) into the main frame (E), then choose the desired
position and tighten the adjusting knob (E-2). Be sure the knob is always tightened.
3.4 : Attach the handlebar (B) to the handlebar post (B-3) using the four flat washers (N-1)
and four allen bolt (N-2) in each side.
3.5 : Connect the lower cable (E-28) and the upper cable (B-9) in the handlebar post.
3.6 : Double check the cables are connected correctly.
3.7 : Put the sleeve into the handlebar post.
3.8 : Set up the screw for the sleeve
Remarks: When you have chosen a desired position, tighten the handlebar post knob until
you hear a “click”.
Screwdriver (N)
Allen Key(1)
N-2 Allen Bolt M8*P1.25*12mm (4)
N-1 Flat Washer ?8*?19*2t (4)

10
STEP 4
1. Connect the upper cables (B-9) then attach the computer (A) to the computer bracket
with the enclosed Screws (A-1)
Screwdriver (N)

11
SM3720 INSTRUCTION MANUAL
BUTTON FUNCTION:
ITEM
DESCRIPTION
Up
Increase resistance level
Down
Decrease resistance level
Mode
Confirm setting or selection.
Reset
Hold on pressing for 2 seconds, computer will reboot and start from user
setting.
Reverse to main menu during presetting workout value or stop mode.
Start/ Stop
Start or Stop workout.
Recovery
Test heart rate recovery status.
Total Reset
Reset the console

12
DISPLAY FUNCTIONS :
ITEM
DESCRIPTION
TIME
.Workout time displayed during exercise.
.Range 0:00 ~ 99:59
SPEED
.Workout speed displayed during exercise.
.Range 0.0 ~ 99.9 km/hr
DISTANCE
.Workout distance displayed during exercise.
.Range 0.0 ~ 99.9 KM
CALORIES
.Burned calories during workout display.
.Range 0 ~ 999 Cals
* Calorie count on the display only serves as a general guideline. For
detail calorie consumption for each individual please consult a
physician or a nutritionist.
PULSE
.Pulse bpm displayed during exercise.
.Pulse alarm when over preset target pulse.
RPM
.Rotation per minute
.Range 0 ~ 999
WATTS
.Workout power consumption
.Range 0 ~ 350
MANUAL
.Manual mode workout.
PROGRAM
.12 PROGRAM selection.
USER
.User creates resistance level profile.
H.R.C.
.Target HR training mode.
WATT
.Watt constant training mode.

13
OPERATION:
1. POWER ON
Plug in power supply, computer will power on and display all segments on LCD for 2
seconds. After 4 minutes without pedaling or pulse input, console will enter into power
saving mode.
Press any key may wake the console up.
2. Manual Mode:
Adjust resistance during workout manually.
Press START in main menu may start workout in manual mode.
Press UP or DOWN to select workout program, choose Manual and press MODE to
enter.
Press UP or DOWN to preset TIME.DISTANCE.CALORIES.PULSE and press MODE to
confirm.
Press START/STOP keys to start workout. Press UP or DOWN to adjust load level.
Press START/STOP keys to pause workout. Press RESET to reverse to main menu.
3. Program Mode :
Choose a preset workout program.
Press UP or DOWN to select workout program, choose Program and press MODE to
enter.
Press UP or DOWN to preset workout TIME.
Press START/STOP keys to start workout. Press UP or DOWN to adjust load level.
Press START/STOP keys to pause workout. Press RESET to reverse to main menu.

14
4. User Program Mode :
Preset your own workout profile.
Press UP or DOWN to select workout program, choose User and press MODE to enter.
Press UP or DOWN to set load level of each column, and press MODE to next one.
(Total column = 20)
Hold on pressing MODE to finish or quit setting.
Press UP or DOWN to preset workout TIME.
Press START/STOP button to start workout. Press UP or DOWN to adjust load level.
Press START/STOP button to pause workout. Press RESET to reverse to main
menu.
5. H.R.C. mode :
Target a heart rate for the workout.
Press UP or DOWN to select workout program, choose H.R.C. and press MODE to
enter.
Press UP or Down to select 55%.75%.90% or TAG (TARGET H.R.) (default: 100).
Press UP or DOWN to preset workout TIME.
Press START/STOP button to start or stop workout. Press RESET to reverse to main
menu.
6. WATT Mode :
Monitor the energy output of workout
1. Press UP or DOWN to select workout program, choose WATT and press MODE to
enter.
2. Press UP or DOWN to preset WATT target. (default: 120)
3. Press UP or DOWN to preset TIME.
Press START/STOP button to start or stop workout. Press RESET to reverse to main
menu.
7. Recovery
When pulse value display on the computer (hold handgrip or wear chest strap), press
RECOVERY button.
TIME shows "0:60" (seconds) and count down.
After countdown, computer will display a numerical value between F1-F6. Using this
number you can see your heart rate recovery ability with the corresponding Chart below.

15
NOTE:
1. This computer require 9V 500ma adaptor.
2. When user stop pedaling for 4 minutes, computer will enter into power save mode, all
setting and exercise data will stored until user start exercise again.
3. When computer act abnormal, please plug out the adaptor and plug in again.


Domestic Warranty
Orbit warrants the OSP209 Spin bike to be free from defects in material and workmanship under domestic use
for One year, from date of purchase. Our goods come with guarantees that cannot be excluded under the
Australian Consumer Law. You are entitled to a replacement or refund for a major failure and for compensation
for any other reasonably foreseeable loss or damage. You are also entitled to have the goods repaired or
replaced if the goods fail to be of acceptable quality and the failure does not amount to a major failure.
WHO IS COVERED
The warranty is extended to individual or legal entity whose name appears on the warranty registration card
filed with Orbit and may not be transferred to any other individual or legal entity.
WARRANTY REGISTRATION AND PROCEDURE
Warranty commitment are valid only with a completed warranty card that is returned within 15 days from the
date of purchase that includes the product serial number (where ever applicable) and details of purchase. Proof of
purchase from Orbit authorised dealer or distributor will be required when raising a warranty claim.
To lodge a warranty claim, please contact Orbit Service department during business hours at Unit 308, 396
Scarborough Beach Road, Osborne Park, WA 6017 in person or via post, by telephone 0061-8-62413050 or by
e-mail [email protected] within the warranty period. Associated cost of warranty claim, including
labour and transport cost are to be borne by customers.
What is covered
Structural Frame : 2 year limited warranty
Mechanical parts: 1 year limited warranty
Electronic parts: 1 year limited warranty
Wear items: 1 year limited warranty
Items Not Covered
The warranty does not apply to any failure of the product, or any parts of the product, due to alterations,
modifications, misuse, abuse, accident, improper maintenance, or if the serial number on the product has been
removed, altered, or defaced. Failure to follow warning in the owners manual, or handouts given at the time of
purchase. Used in any other than residential setting unless otherwise to in the owners manual. Normal wear and
tear. Pickup and delivery of the product in question. Adequate packing must be used for returned goods to
prevent freight damage.
Maintenance
Caution – for safe operation
Always inspect hardware prior to operation. Look for loose bolts, and frayed cables. Repair or replace any
damaged or worn parts, tighten all loose hardware.
As part of Orbit’s normal installation and set-up process, all bolts must be tightened and checked after the first
1 to 2 hours of initial usage and then periodically, Untightened bolts and nuts may become loose, causing
damage, which may avoid warranty and be dangerous to the user.
After training, always wipe down your Orbit bench. Perspiration that continuously settles on the frame and pads
may cause rust or damage to the unit. Damage resulting from lack of proper maintenance will not be covered
under warranty. To clean upholstery and frame, use a mild soap and warm water. Dry with a clean towel.

Check that there is no damage to the cables prior to each workout. If the cable has come off the pulley and jams
between the pulley and the frame the wire under the plastic surface may be damaged. If this occurs the cable
must be replaced.
If any cracks appear in the frame, contact your authorized Orbit Fitness dealer.
Important Important Important ! Important !
WARRANTY CARD MUST BE COMPLETED AND RETURNED TO ORBIT WITHIN 15 DAYS OF
PURCHASE. Failure to comply may void manufacture’s warranty.
Name
Address
Email
Phone
Date of birth
Male female
Single married
Model purchased
Date of purchase / invoice number
Is this your first orbit purchase
Yes, I want to be on Orbit’s mailing list !
What other products do you have
Home gym
Weights
Bench
Treadmill
Rowing machine
Ellipticial
Stepper
Other
Environment unit placed
Home Light Commercial Hire
Mailing address
Orbit Health & Fitness Solutions
Unit 3, 470 Scarborough Beach Road
Osborne Park, Western Australia 6017

/