Page is loading ...

2723303
Owner's Manual
ELECTRIC NAILER
Model No.
836.272330
Serial No.
NOTE: Model and serial numbers may be found on the name plate
located on the tool.
You should record both numbers and retain them in a safe place.
CAUTION: Before using this Nailer, read this manual and follow all
its Safety Rules and Operating instructions.
E185030
Sears, Roebuck and Co., Hoffman Estates, IL 60179 USA

SECTION PAGE
Warranty ................................................... 2
Product Specifications ........................................ 2
Safety Instructions ........................................... 3
Accessories and Attachments .................................. 6
Know Your Brad Nailer ........................................ 7
Operation .................................................. 7
Maintenance ................................................ 8
Troubleshooting Guide ........................................ 9
Parts ..................................................... 10
FULL ONE YEAR WARRANTY ON CRAFTSMAN PROFESSIONAL
ELECTRIC NAILER
Ifthis Craftsman Nailer fails due to a defect in material or workmanship within
one year from the date of purchase, Sears will REPAIR it, free of charge.
WARRANTY SERVICE IS AVAILABLE BY SIMPLY RETURNING THE
TOOLTOTHE NEAREST SEARS STORE OR CRAFTSMAN OUTLET IN
THE UNITED STATES.
This warranty gives you specific legal rights, and you may also have other
rights which vary from state to state.
Seam, Roebuck and Co., Dept. 817 WA, Hoffman Estates,/L 60179
Power Source
Nailing Speed
Nail Size - Diameter
- Head size
- Length
Magazine Capacity
Dimensions
Weight
120V, 60Hz, 9 Amps., AC only
1 Nail per Second
.039 o .049 inch
.070 o .087 inch -
3/8 - 1-3/16 inch
100 Nails
8-1/2 inches long x 2-1/2 inches wide x 10 inches high
4.7 pounds
To avoid electrical hazards, fire hazards, or damage to the tool, use proper
circuit protection.
Your nailer is wired at the factory for 120V operation. Connect to a 120V, 15 amp
branch circuit and use a 15 amp time delay fuse or circuit breaker. To avoid shock
or fire, replace power cord immediately if it is worn, cut or damaged in any way.
Page 2

GENERAL SAFETY
INSTRUCTIONS
6. DON'T FORCETHETOOL. It will do
the job better and safer if used at
the rate for which itwas designed.
Do not attempt to operate this tool until 7.
you have read and thoroughly
understand all instructions, safety
rules, etc., contained in this manual.
Failure to comply can result in accidents
involving fire, electric shock, or serious
personal injury. Save this owner's 8.
manual and review it frequently for
continuing safe operation and instructing
possible third-party users.
READ ALL INSTRUCTIONS
1. KEEP WORK AREA CLEAN.
Cluttered work areas and benches
invite injuries.
2. GUARD AGAINST ELECTRICAL
SHOCK. Be sure your body does
not come in contact with grounded
surfaces such as pipes, radiators,
ranges, refrigerators, etc.
3. AVOID DANGEROUSWORK AREA
ENVIRONMENT. Do not use power
tools in damp or wet locations. Keep
work area well lit. Do not expose
power tools to rain, Do not use
power tools in the presence of
flammable liquids or gases.
4. KEEP CHILDREN AWAY. All visitors
should wear safety goggles or safety
glasses with side shields and be
kept a safe distance from work area.
Do not let visitors come in contact
with tool or extension cords.
5. STORE IDLE TOOLS. When not in
use, store tools in a high, dry
location that can be locked.
KEEP THEM OUT OF THE REACH
OF CHILDREN.
USETHE RIGHTTOOL Do not use
a tool for a purpose it was not
intended. For example, do not force
a small tool or attachment to do the
job of a heavy-duty tool.
ALWAYS WEAR SAFETY GOGGLES
or safety glasses with side shields
when using power tools. Also use
a face mask or dust mask if the job
is dusty.
g.
DON'T ABUSE TOOL POWER
CORD. Never carry the tool by the
cord or yank the cord to disconnect
it from the wail. Keep the cord away
from heat, oil, and sharp edges.
10.SECURE WORK. Whenever
possible, use clamps or a vise to
hold the work. It's safer than using
your hands and it frees both hands
to use _,_=_u,.
11. DON'T OVERREACH. Keep proper
footing and balance; make sure
your footing is stable.
12. KEEP TOOL WELL MAINTAINED.
Follow instructions for lubricating
and changing accessories. When
applicable, keep tool sharp and
clean. Inspect cord frequently and
have damaged parts repaired by a
Searsservice center. Keep tool
handle and housing clean, dry and
free of grease and oil. Never use
strong solvents or petroleum-based
products to clean tool.
SAVE THESE INSTRUCTIONS
Page 3
13.DISCONNECTTOOL when not in
use, before servicing and when
loading or changing accessories.
14.AVOID UNINTENTIONAL
STARTING. Never carry tool with
your finger on the switch.
15.STAY ALERT, Watch what you are
doing and use common sense. Do
not operate tool when you are tired
or under the influence of drugs,
alcohol, or medication.
16.CHECK DA;w;AGED PARTS. Before
using tool, check that all parts will
operate correctly and will perform as
designed. Any damaged parts
should be repaired or replaced by
an authorized Sears service facility.
Also, check for misalignment,
binding, and broken parts. Check
that the switch works properly and
DO NOT USETOOL IFTHE
SWITCH DOES NOTTURN THE
TOOL ON AND OFF.
17. REPLACEMENT PARTS, When
servicing, use only identical
replacement parts ordered from a
Sears service facility.
18.WEAR HEARING PROTECTION
during extended periods of
operation.
GUIDELINES FOR
EXTENSION CORDS
If you are using an extension cord
outdoors, be sure itis marked with the
suffix "vV-A" ("_/" in Canada) to indicate
that it is acceptable for outdoor use.
Be sure your extension cord is
properly wired, and in good electrical
condition. Always replace a damaged
extension cord or have it repaired by a
qualified person before using it.
Protect your extension cords from
sharp objects, excessive heat and
damp or wet areas.
(when using 120 volts only)
Ampere Rating
more than not more than
0 6
6 10
10 12
Totallengthofcordln feet
25' 50' 100' 150'
18 16 16 14
18 16 14 12
16 16 14 12
WEAR YOUR
ALWAYS WEAR EYE PROTECTION. Any Power Tool
can throw foreign objects into4he eyes which could
cause permanent eye damage. ALWAYS wear safety
Goggles (not glasses) that comply with ANSI safety
standard Z87.!. Everyday glasses have only
impact-resistant lenses...they ARE NOT safety glasses.
Safety Goggles are available at Sears.
NOTE: Glasses or goggles not in compliance with
ANSI Z87.1 could seriously hurt you when they break.
SAVE THESE INSTRUCTIONS
Page 4
SPECIFIC SAFETY INSTRUCTIONS
FOR THIS NAILER
DO NOT AIM NAILER OR SHOOT
NAILS AT A PERSON OR ANIMAL.
Released nails can cause severe injuries.
1. USE ONLYTHE NAILS INDICATED
in this manual. Use of accessories
that are not designed for this tool
could result in personal injuryand/or
damage to the tool.
2. DO NOT TOUCH metal parts of tool
during operation. Hold only plastic
handle or housing.
3. KEEP tacking speed at one nail
per second.
4. NAILER should be used only for
the purposes outlined in this manual.
It is designed for use on wood,
Do not use on hard surfaces like
rock, concrete, etc. personal injury
or damage to the tool could result.
5. When nailing thin wood, special
caution must be taken for
possible penetration of nails
through the wood.
6. When using this tool in high
locations, ,_LWAYS make sure there
is no one below that could be
injured. ALWAYS be sure you have
a firm footing when using this tool.
7. ALWAYS hold tool firmly.
8. NEVER connect tool to a DC
power source.
9. REGULAR CLEANING, inspection
and maintenance is necessary.
10.DURING OPERATION, the nailer
may feel warm to the touch. This is
normal. However, if the nailer starts
to feel hot, discontinue use until the
unit cools down,
GROUNDING INSTRUCTIONS
IN THE EVENT OF A MALFUNCTION
OR BREAKDOWN, grounding provides
a path of least resistance for electric
current to reduce the risk of electric
shock. This tool is equipped with an
electric cord having an equipment
grounding conductor and a grounding
plug. The plug must be plugged into a
matching outlet that is properly installed
and grounded in accordance with all
local codes and ordinances.
DO NOT MODIFY THE 3-PRONG
PLUG. If it will not fit the outlet, have the
proper outlet installed by a qualified
electrician. Improper connection of the
equipment-grounding conductor can
create a risk of shock. The conductor
with insulation having an outer surface
that is green (sometimes, but not always
with yellow stripes) is the equipment
grounding conductor.
REPAIR OR REPLACE DAMAGED OR
WORN CORD IMMEDIATELY, if repair
or replacement of the electric cord or
plug is ever necessary. DO NOT connect
the equipment-grounding conductor to
a live terminal,
SAVE THESE INSTRUCTIONS
Page 5
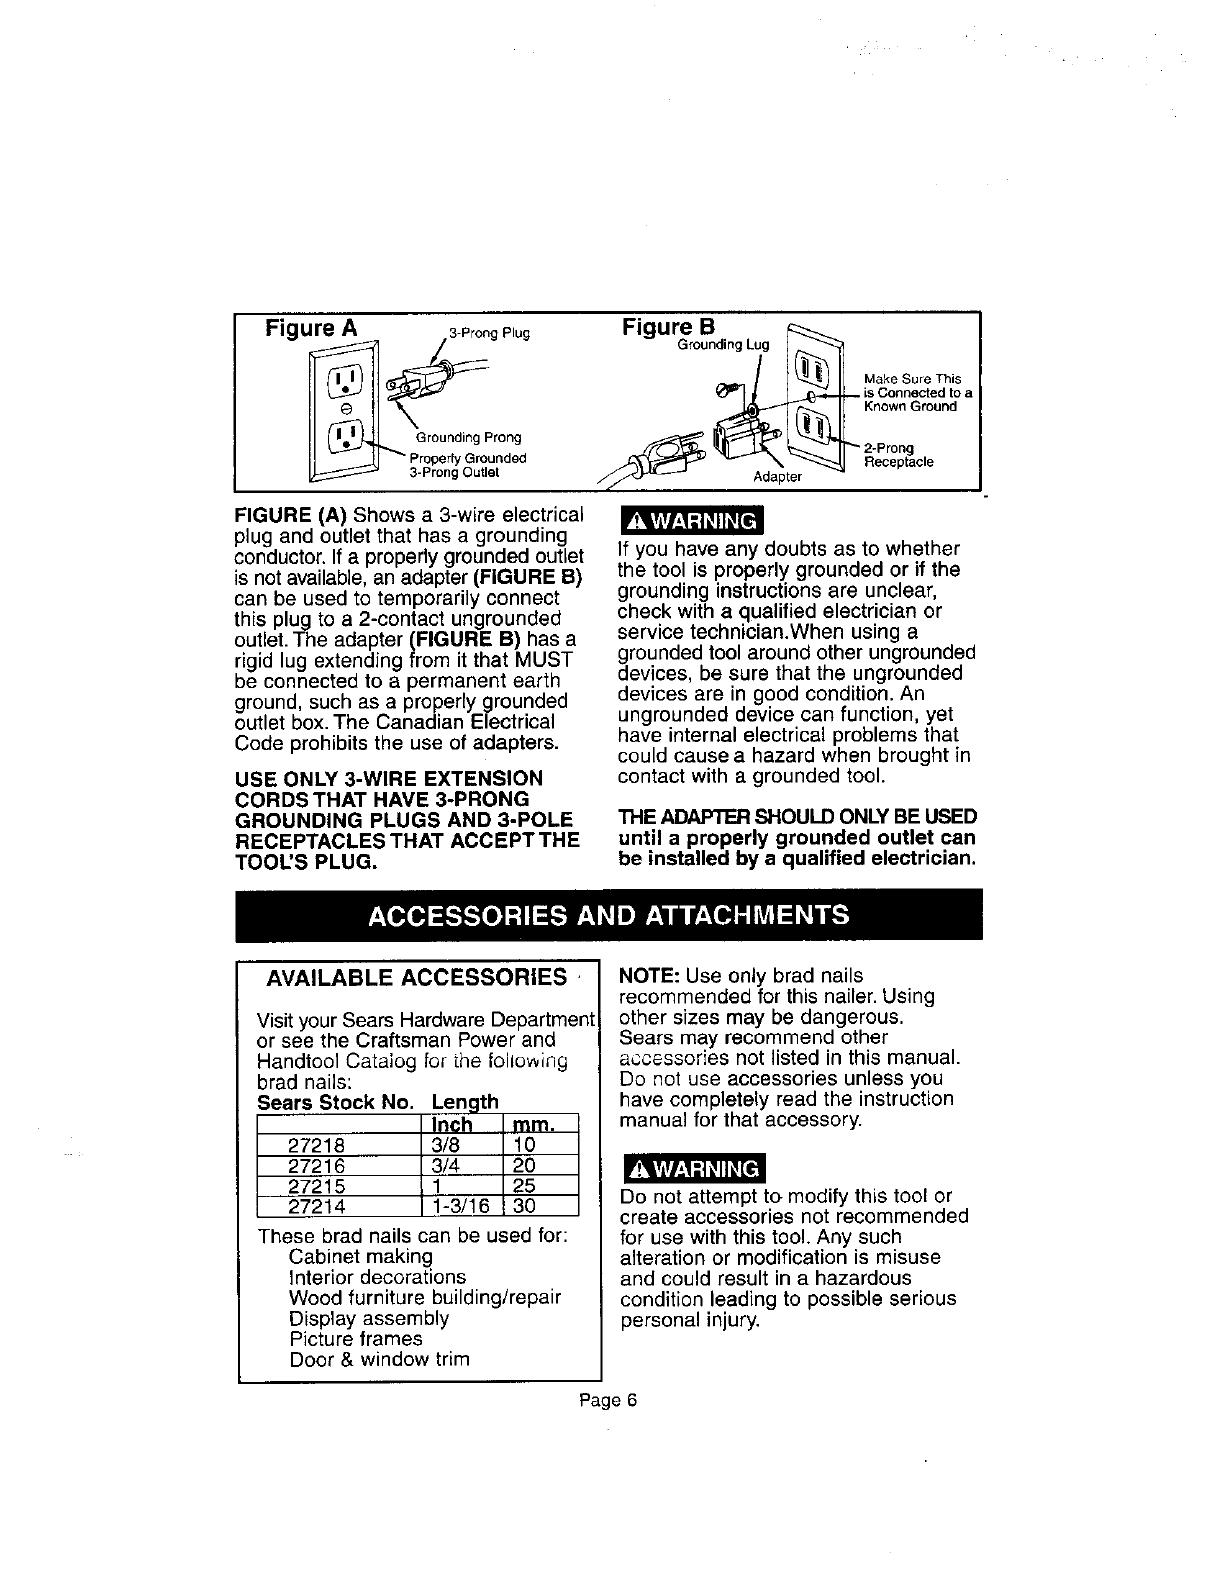
Figure A
g Plug
Grounding Prong
Properly Grounded
3-Prong Outlet
FIGURE (A) Shows a 3-wire electrical
plug and outlet that has a grounding
conductor. If a properly grounded outlet
is not available, an adapter (FIGURE B)
can be used to temporarily connect
this plug to a 2-contact ungrounded
outlet. The adapter (FIGURE B) has a
rigid lug extending from it that MUST
be connected to a permanent earth
ground, such as a properly grounded
outlet box. The Canadian Electrical
Code prohibits the use of adapters.
USE ONLY 3-WIRE EXTENSION
CORDS THAT HAVE 3-PRONG
GROUNDING PLUGS AND 3-POLE
RECEPTACLES THAT ACCEPT THE
TOOL'S PLUG.
Figure B
Grounding Lug
__ ake Sure This
is Connected to a
Known Ground
2-Prong
Receptacle
If you have any doubts as to whether
the tool is properly grounded or if the
grounding instructions are unclear,
check with a qualified electrician or
service technician.When using a
grounded tool around other ungrounded
devices, be sure that the ungrounded
devices are in good condition. An
ungrounded device can function, yet
have internal electrical problems that
could cause a hazard when brought in
contact with a grounded tool.
THE ADAPTER SHOULD ONLY BE USED
until a properly grounded outlet can
be installed by a qualified electrician.
AVAILABLE ACCESSORIES '
Visit your Sears Hardware Department
or see the Craftsman Power and
Handtcol Catalog for the fol_ov,ing
brad nails:
Sears Stock No. Lem
In_;h mm,
27218 3/8 10
27216 3/4 20
27215 1 25
27214 1-3/16 30
These brad nails can be used for:
Cabinet making
Interior decorations
Wood furniture building/repair
Display assembly
Picture frames
Door & window trim
NOTE: Use only brad nails
recommended for this nailer. Using
other sizes may be dangerous.
Sears may recommend other
accessories not listed in this manual.
Do not use accessories unless you
have completely read the instruction
manual for that accessory.
Do not attempt to modify this tool or
create accessories not recommended
for use with this tool. Any such
alteration or modification is misuse
and could result in a hazardous
condition leading to possible serious
personal injury.
Page 6
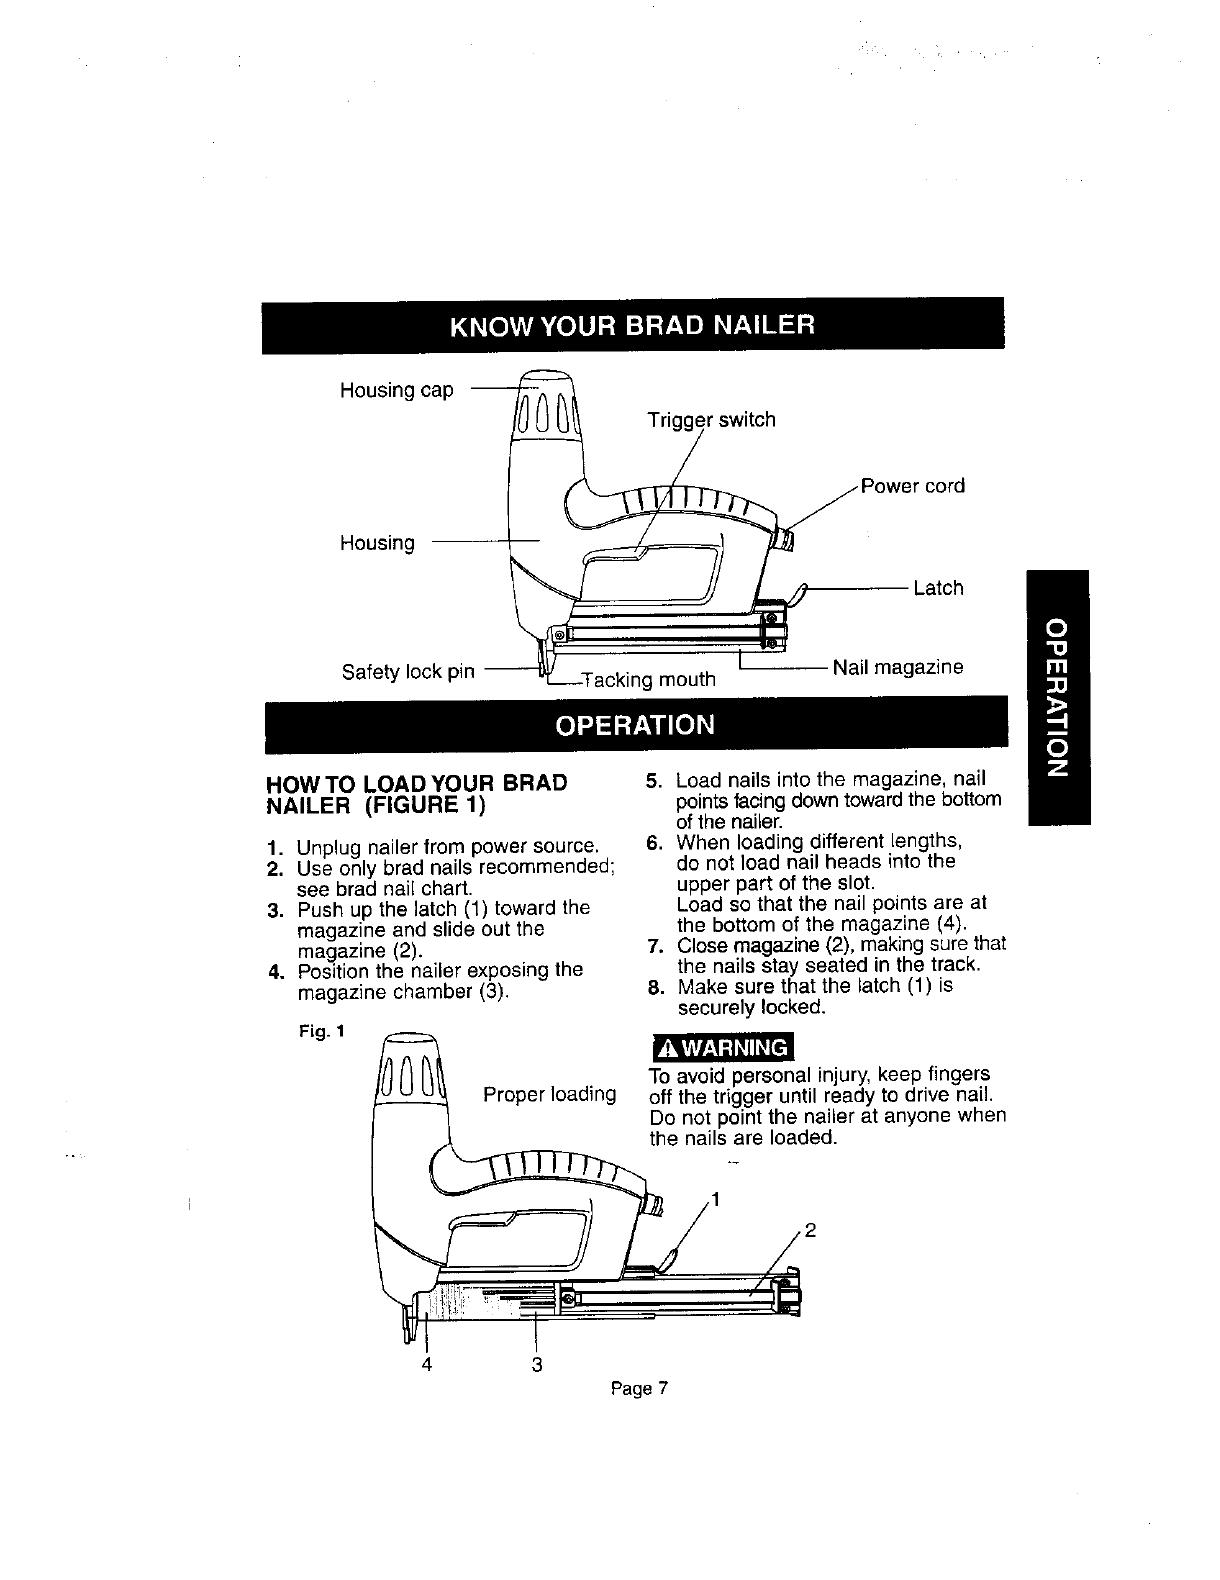
Housing cap --
Housing
Safety lock pin
Trigger switch
t
g mouth
cord
Latch
Nail magazine
HOW TO LOAD YOUR BRAD
NAILER (FIGURE 1)
1. Unplug nailer from power source.
2. Use only brad nails recommended;
see brad nail chart.
3. Push up the latch (1) toward the
magazine and slide out the
magazine (2).
4. Position the nailer exposing the
magazine chamber (3).
5. Load nails into the magazine, nail
points facing down toward the bottom
of the nailer.
6. When loading different lengths,
do not load nail heads into the
upper part of the slot.
Load se that the nail points are at
the bottom of the magazine (4).
7. Close magazine (2), making sure that
the nails stay seated in the track.
8. Make sure that the latch (1) is
securely locked.
Fig. 1
/_ To avoid personal injury, keep fingers
Proper loading off the trigger until ready to drive nail.
Do not point the nailer at anyone when
the nails are loaded.
4 3
Page 7
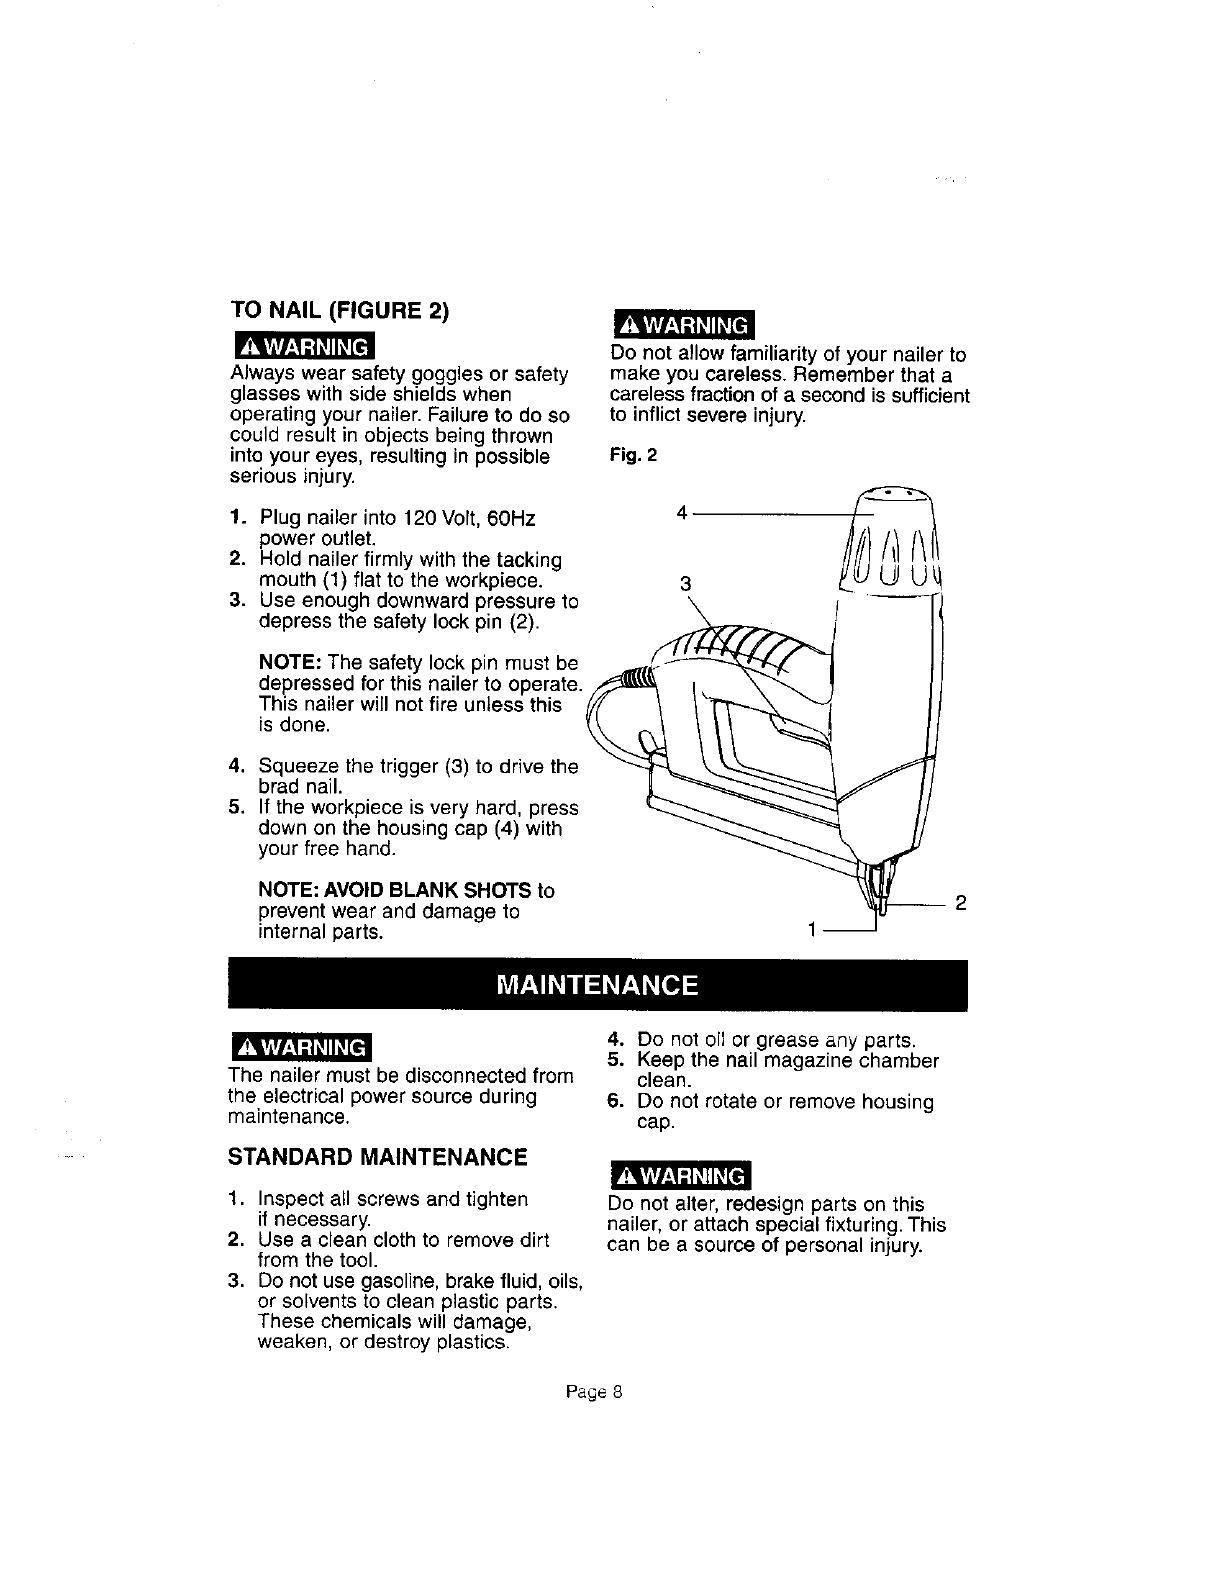
TO NAIL (FIGURE 2)
Always wear safety goggles or safety
glasses with side shields when
operating your nailer. Failure to do so
could result in objects being thrown
into your eyes, resulting in possible
serious injury.
1. Plug nailer into 120 Volt, 60Hz
power outlet,
2. Hold nailer firmly with the tacking
mouth (1) flat to the workpiece.
Do not allow familiarity of your nailer to
make you careless. Remember that a
careless fraction of a second is sufficient
to inflict severe injury.
Fig. 2
4
3
Use enough downward pressure to _/3. depress the safety lock pin (2).
NOTE: The safety lock pin must be _,,,_ _'f-_
depressed for this nailer to operate. _ _ \ _ !
This nailer will not fire uniess this f/_ / /'_--._ "'-)1
is done. _._;_ /// k_
J
4. Squeeze the trigger (3) to drive the _ k.'_......__ 1
brad nail. L ___ I
5. If the workpiece is very hard, press _ _'_" /J
down on the housing cap (4) with _ _'_ I/
your free hand. _._
NOTE: AVOID BLANK SHOTS to
prevent wear and damage to 2
internal parts. 1 J
The nailer must be disconnected from
the electrical power source during
maintenance.
STANDARD MAINTENANCE
1. Inspect all screws and tighten
if necessary.
2. Use a clean cloth to remove dirt
from the tool.
3. Do not use gasoline, brake fluid, oils,
or solvents to clean plastic parts.
These chemicals will damage,
weaken, or destroy plastics.
4. Do not oil or grease any parts,
5. Keep the nail magazine chamber
clean.
6. Do not rotate or remove housing
cap.
Do not alter, redesign parts on this
nailer, or attach special fixturing. This
can be a source of personal injury.
Page 8
CLEARING A JAMMED NAIL
(FIGURE 3)
1. Unplug the cord and remove all
brads from the magazine.
2. Remove the two screws and
washers (1) located on the tacking
mouth cover.
3. Remove the cover (2).
CAUTION: Be careful, the safety
lock pin and spring may shoot forward.
7. Replace all parts in reverse order.
8. Tighten screws.
9. Make sure that the safety lock pin is
correctly sticking out of the tacking
mouth assembly.
Fig. 3
4. Remove safety lock pin (3) and
spring (4).
NOTE: Safety lock pin (3) has a 4_.
keyed slot on the pin which is seated 3_
in the opening on the cover (2).
5. Remove the slot cover (5).
6. Remove the jammed nail. j/ _'_
t_ 5
PROBLEM PROBABLE CAUSE REMEDY
Nailer will net fire 1. Not plugged in 1, Plug in
2. Circuit breaker tripped 2. Reset circuit breaker
or fuse
3. Damaged cord 3. Have replaced by Sears
Service Center
Nail jammed 1. Dirty, rusty, or 1. Replace with new nails
deformed nails
2. Incorrect nails 2, Use recommended nail
style and size
Power loss 1. Damaged coil spring 1.Have repaired by Sears
Service Center
Page 9
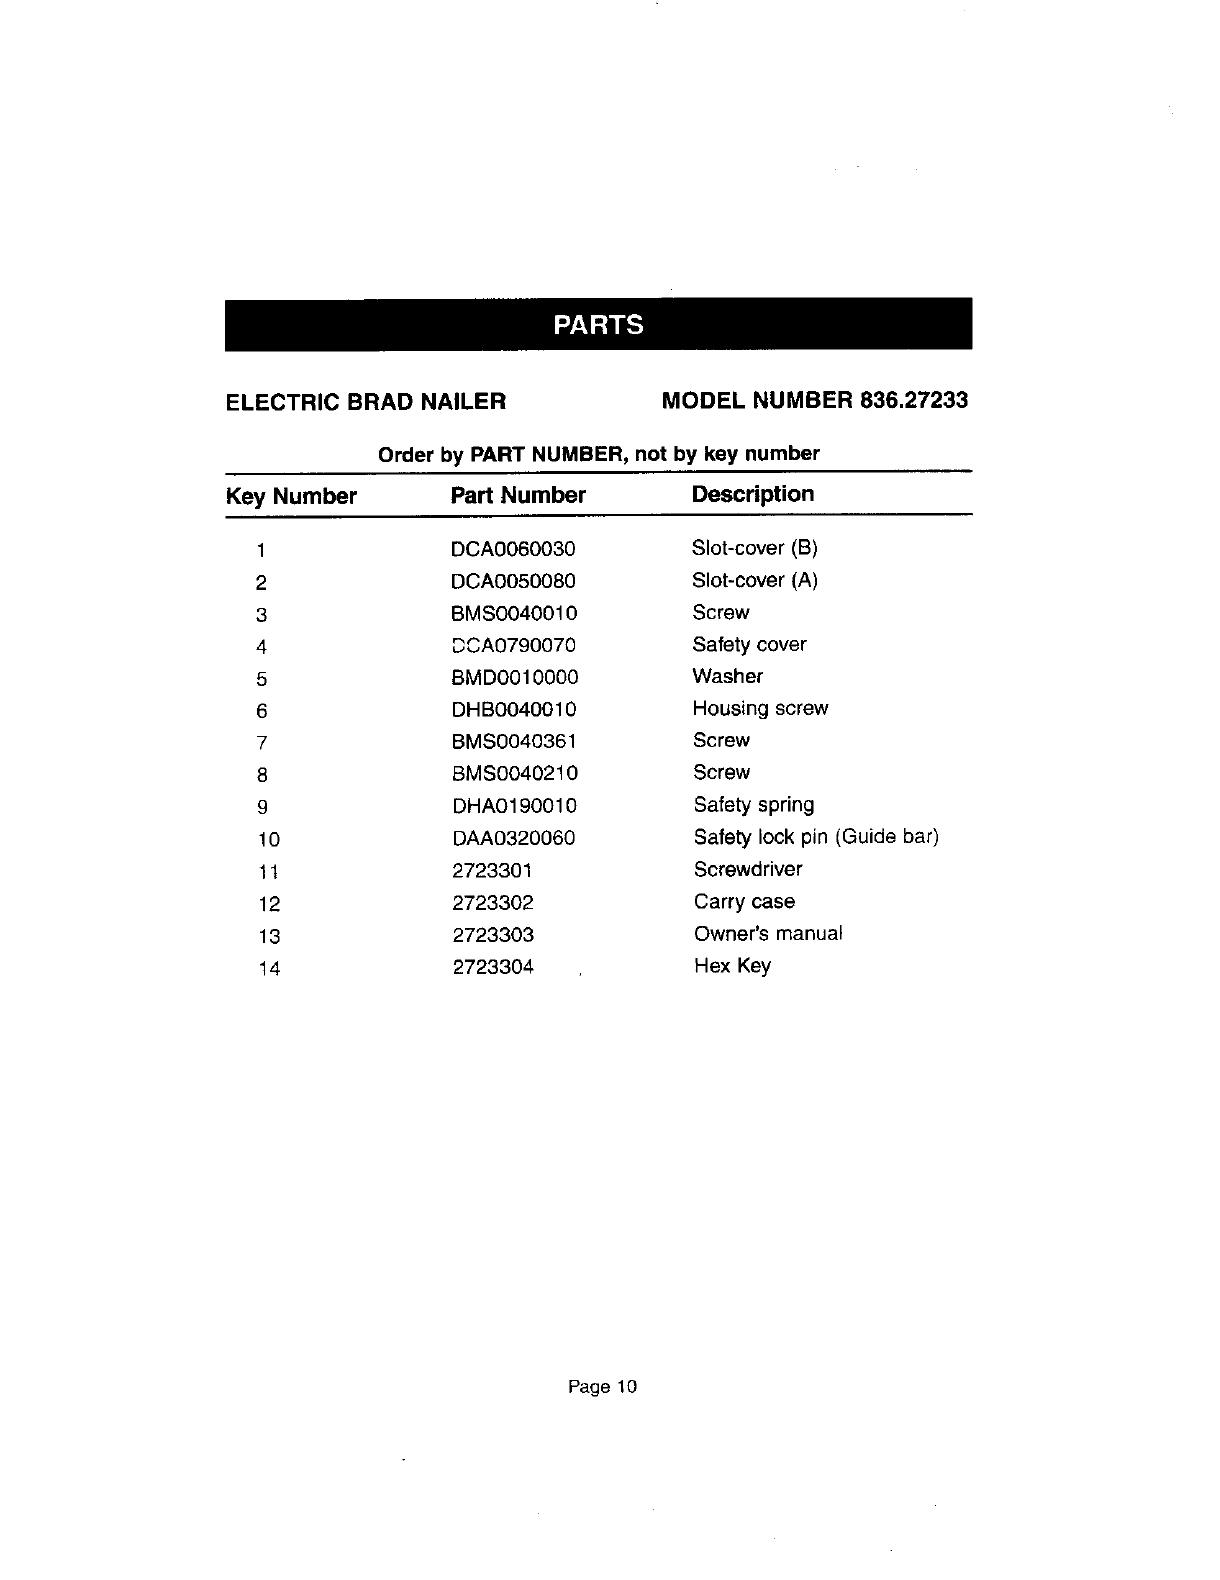
ELECTRIC BRAD NAILER
MODEL NUMBER 836,27233
Order by PART NUMBER, not by key number
Key Number Part Number Description
1 DCA0060030 Slot-cover (B)
2 DCAO050080 Slot-cover (A)
3 BMSO040010 Screw
4 DCA0790070 Safety cover
5 BMDO010000 Washer
6 DHBO040010 Housing screw
7 BMS0040361 Screw
8 BMS0040210 Screw
9 DHA0190010 Safety spring
10 DAA0320060 Safety lock pin (Guide bar)
1t 2723301 Screwdriver
12 2723302 Carry case
13 2723303 Owner's manual
14 2723304 Hex Key
Page 10

13

Forthe repair or replacement parts you need
delivered directly to yourhome
Call7 am - 7 pro, 7 days a week
1-800-366-PART
(1-800-366-7278)
Forin-home majorbrandrepairservice
Call24hoursaday,7 daysaweek
1-800-4-REPAIR
(1-800-473-7247)
Forthe locationof a
SearsPartsandRepairCenterinyourarea
Call24 hoursa day,7daysa week
1-800-488-1222
For information on purchasinga Sears
Maintenance Agreement or to inquire
aboutan existing Agreement
Call9 am - 5 pm, Monday-Saturday
1-800-827-6655
A
The model number of your product is located
on the name plate on the front of the Electric Nailer,
When requesting service or ordering parts,
always give the following information:
SE/ARS
• Product Type • Part Number
• Model Number * Part Description America's Repair Specialists
27233O3 5197
/