BACK-UP BATTERIES
When the power supply is not in use, the station will be powered by the back-up batteries. The LED
display is turned off, but time and alarm time remain stored (also in the event of a power failure).
DCF SIGNAL RECEPTION AND SIGNAL INDICATOR
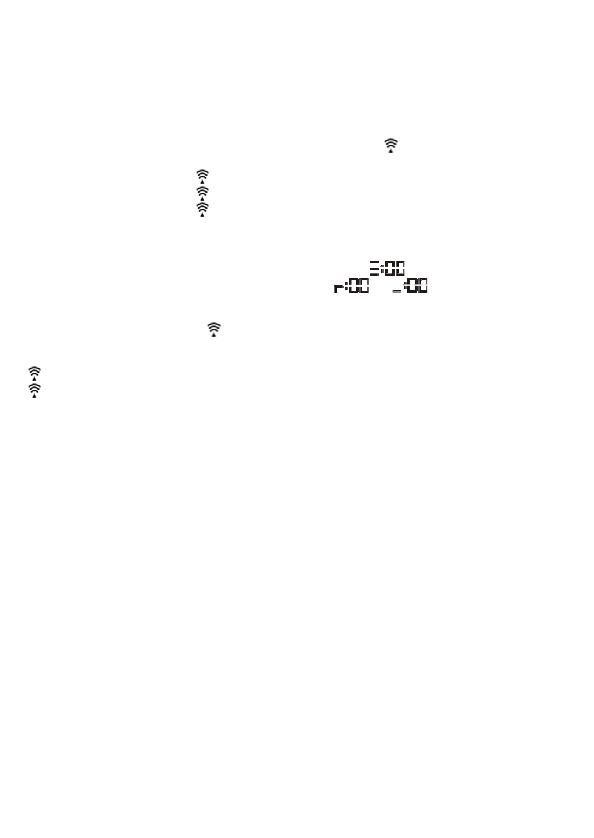
After the station is powered up, it starts to receive DCF signal. The icon flashes.
Receiving DCF signal ( Icon flashing)
Successful reception ( Icon becomes static)
Failed reception ( Icon disappear)
During reception, press the WAVE / HR button will display reception mode and signal strength
indication:
When strong DCF signal is detected, display shows with 3 bars .
When weak or no DCF signal is detected, display shows
or .
During reception, the signal strength may move from 1 bar to 2 bars to 3 bars. This is normal since
the clock is detecting DCF signal and other signals in the air at the same time. Press the TIME button
will return to the time display with
icon flashing.
Successful reception or failed reception
Icon becomes static on (stop blinking) when reception is successful.
Icon disappears when reception is failed.
Automatic reception and manual reception
The station starts automatic reception everyday at 1:00, 2:00, and 3:00. If it fails to receive the DCF
signal at 3:00, it will start reception at 4:00. If it fails again, it will start reception at 5:00. If it
fails again, it will start automatic reception at 1:00 again in the next day.
For manual reception simply press and hold the WAVE / HR button, the station starts manual
reception.
During RCC reception, it does not take temperature measurement. It will change to low brightness
and will resume to high brightness after auto reception. The temperature readings will get stable and
become more accurate after your weather station clock is powered up for around 30 minutes.
TIME SETTING
1. Press and hold TIME button and at the same time press WAVE / HR button once at a time to
set the hour.
2. Press and hold TIME button and at the same time press MINUTE button once at a time to
set the minute.
3. Press TIME and SNOOZE button together, time display changes to 01. Release SNOOZE
button and keep pressing TIME button. Then press MINUTE button to set the time zone:
“00” GMT +0 (United Kingdom)
“01” GMT +1 (Central European time)
“02” GMT +2 (Eastern European time)
Note: The time is displayed in 24-hour display format.
EN.3