
en Instruction manual
Hob
EX8..LY...

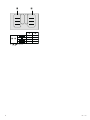
2 Ø = cm
,(&
: :
: :
: :
: :

2 Ø = cm
,(&
: :
: :
: :
: :
en
3
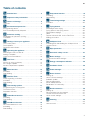
Table of contents
enI nst r uc t i on manual
8 Intended use . . . . . . . . . . . . . . . . . . . . . . . . . . . . . 4
( Important safety information . . . . . . . . . . . . . . . 5
] Causes of damage . . . . . . . . . . . . . . . . . . . . . . . . 6
Overview . . . . . . . . . . . . . . . . . . . . . . . . . . . . . . . . . . . 6
7 Environmental protection . . . . . . . . . . . . . . . . . . 7
Energy-saving advice . . . . . . . . . . . . . . . . . . . . . . . . . . 7
Environmentally-friendly disposal . . . . . . . . . . . . . . . . . 7
f Induction cooking . . . . . . . . . . . . . . . . . . . . . . . . 7
Advantages of induction cooking . . . . . . . . . . . . . . . . . 7
Cookware. . . . . . . . . . . . . . . . . . . . . . . . . . . . . . . . . . . 7
* Getting to know your appliance . . . . . . . . . . . . . 9
The control panel . . . . . . . . . . . . . . . . . . . . . . . . . . . . . 9
The hotplates . . . . . . . . . . . . . . . . . . . . . . . . . . . . . . . 10
Residual heat indicator. . . . . . . . . . . . . . . . . . . . . . . . 10
1 Operating the appliance . . . . . . . . . . . . . . . . . . 11
Switching the hob on and off . . . . . . . . . . . . . . . . . . . 11
Setting a hotplate . . . . . . . . . . . . . . . . . . . . . . . . . . . . 11
Chef's recommendations . . . . . . . . . . . . . . . . . . . . . . 12
| Flex Zone . . . . . . . . . . . . . . . . . . . . . . . . . . . . . . 14
Advice on using cookware . . . . . . . . . . . . . . . . . . . . . 14
As a single hotplate . . . . . . . . . . . . . . . . . . . . . . . . . . 14
As two independent hotplates . . . . . . . . . . . . . . . . . . 14
u Move function. . . . . . . . . . . . . . . . . . . . . . . . . . . 15
Activation . . . . . . . . . . . . . . . . . . . . . . . . . . . . . . . . . . 15
Deactivating . . . . . . . . . . . . . . . . . . . . . . . . . . . . . . . . 15
} FlexPlus Zone. . . . . . . . . . . . . . . . . . . . . . . . . . . 16
Notes regarding cookware. . . . . . . . . . . . . . . . . . . . . 16
Activation . . . . . . . . . . . . . . . . . . . . . . . . . . . . . . . . . . 16
Deactivating . . . . . . . . . . . . . . . . . . . . . . . . . . . . . . . . 16
O Time-setting options . . . . . . . . . . . . . . . . . . . . . 17
Programming the cooking time . . . . . . . . . . . . . . . . . 17
The kitchen timer . . . . . . . . . . . . . . . . . . . . . . . . . . . . 17
Stopwatch function. . . . . . . . . . . . . . . . . . . . . . . . . . . 18
v PowerBoost function . . . . . . . . . . . . . . . . . . . . . 18
Activating . . . . . . . . . . . . . . . . . . . . . . . . . . . . . . . . . . 18
Deactivating . . . . . . . . . . . . . . . . . . . . . . . . . . . . . . . . 18
x ShortBoost function . . . . . . . . . . . . . . . . . . . . . 19
Recommendations for use . . . . . . . . . . . . . . . . . . . . . 19
Activating . . . . . . . . . . . . . . . . . . . . . . . . . . . . . . . . . . 19
Deactivating . . . . . . . . . . . . . . . . . . . . . . . . . . . . . . . . 19
z Keep warm function. . . . . . . . . . . . . . . . . . . . . . 19
Activating . . . . . . . . . . . . . . . . . . . . . . . . . . . . . . . . . .19
Deactivating . . . . . . . . . . . . . . . . . . . . . . . . . . . . . . . .19
s Transferring settings . . . . . . . . . . . . . . . . . . . . . 20
Activation . . . . . . . . . . . . . . . . . . . . . . . . . . . . . . . . . .20
c Frying Sensor . . . . . . . . . . . . . . . . . . . . . . . . . . . 20
Advantages when frying . . . . . . . . . . . . . . . . . . . . . . .20
Frying pans for the frying sensor . . . . . . . . . . . . . . . .20
Temperature settings . . . . . . . . . . . . . . . . . . . . . . . . .21
Table . . . . . . . . . . . . . . . . . . . . . . . . . . . . . . . . . . . . .21
Teppan Yaki and Grill for the Flex Zone . . . . . . . . . .24
Setting procedure . . . . . . . . . . . . . . . . . . . . . . . . . . . .26
A Childproof lock. . . . . . . . . . . . . . . . . . . . . . . . . . 26
Activating and deactivating the childproof lock . . . . .26
Childproof lock . . . . . . . . . . . . . . . . . . . . . . . . . . . . . .26
k Wipe protection . . . . . . . . . . . . . . . . . . . . . . . . . 27
b Automatic safety cut-out . . . . . . . . . . . . . . . . . . 27
Q Basic settings. . . . . . . . . . . . . . . . . . . . . . . . . . . 28
To access the basic settings: . . . . . . . . . . . . . . . . . . .29
[ Energy consumption indicator . . . . . . . . . . . . . 30
t Cookware check. . . . . . . . . . . . . . . . . . . . . . . . . 30
h Power manager . . . . . . . . . . . . . . . . . . . . . . . . . 31
o Home Connect . . . . . . . . . . . . . . . . . . . . . . . . . . 31
Setting up . . . . . . . . . . . . . . . . . . . . . . . . . . . . . . . . . .31
Home Connect settings . . . . . . . . . . . . . . . . . . . . . . .33
Software update . . . . . . . . . . . . . . . . . . . . . . . . . . . . .35
Remote diagnostics . . . . . . . . . . . . . . . . . . . . . . . . . .35
About data protection . . . . . . . . . . . . . . . . . . . . . . . . .35
Declaration of Conformity . . . . . . . . . . . . . . . . . . . . . .35
e Hood connection . . . . . . . . . . . . . . . . . . . . . . . . 36
Setting up . . . . . . . . . . . . . . . . . . . . . . . . . . . . . . . . . .36
Disconnecting from the network . . . . . . . . . . . . . . . . .37
Control the hood via the hob . . . . . . . . . . . . . . . . . . .37
Hood control settings . . . . . . . . . . . . . . . . . . . . . . . . .38
D Cleaning . . . . . . . . . . . . . . . . . . . . . . . . . . . . . . . 38
Hob . . . . . . . . . . . . . . . . . . . . . . . . . . . . . . . . . . . . .38
Hob surround . . . . . . . . . . . . . . . . . . . . . . . . . . . . . . .38

en Intended use
4
{ Frequently Asked Questions (FAQ) . . . . . . . . . 39
3 Trouble shooting . . . . . . . . . . . . . . . . . . . . . . . . 41
4 Customer service. . . . . . . . . . . . . . . . . . . . . . . . 42
E number and FD number . . . . . . . . . . . . . . . . . . . . .42
E Test dishes . . . . . . . . . . . . . . . . . . . . . . . . . . . . . 43
Produktinfo
Additional information on products, accessories,
replacement parts and services can be found at
www.siemens-home.bsh-group.com and in the online
shop www.siemens-home.bsh-group.com/eshops
8Intended use
I nt ended use
Read these instructions carefully. Please keep
the instruction and installation manual, as well
as the appliance certificate, in a safe place for
later use or for subsequent owners.
Check the appliance after removing it from the
packaging. If it has suffered any damage in
transport, do not connect the appliance,
contact the Technical Assistance Service and
provide written notification of the damage
caused, otherwise you will lose your right to
any type of compensation.
Only a licensed professional may connect
appliances without plugs. Damage caused by
incorrect connection is not covered under
warranty.
This appliance must be installed according to
the installation instructions included.
This appliance is intended for private domestic
use and the household environment only. The
appliance must only be used for the
preparation of food and beverages. The
cooking process must be supervised. A short
cooking process must be supervised without
interruption. Only use the appliance in
enclosed spaces.
This appliance is intended for use up to a
maximum height of 4000 metres above sea
level.
Do not use covers. These can cause
accidents, for example due to overheating,
catching fire or materials shattering.
Only use safety devices or child protection
grilles approved by ourselves. Unsuitable
safety devices or child protection grilles may
result in accidents.
This appliance is not intended for operation
with an external clock timer or a remote
control.
This appliance may be used by children over
the age of 8 years old and by persons with
reduced physical, sensory or mental
capabilities or by persons with a lack of
experience or knowledge if they are
supervised or are instructed by a person
responsible for their safety how to use the
appliance safely and have understood the
associated hazards.
Children must not play with, on, or around the
appliance. Children must not clean the
appliance or carry out general maintenance
unless they are at least 15 years old and are
being supervised.
Keep children below the age of 8 years old at
a safe distance from the appliance and power
cable.
If you wear an active implantable medical
device (e.g. a pacemaker or defibrillator),
check with your doctor that it complies with
Council Directive 90/385/EEC of 20th June
1990, DIN EN 45502-2-1 and DIN EN 45502-
2-2, and that it has been chosen, implanted
and programmed in accordance with VDE-AR-
E 2750-10. If these conditions are satisfied,
and if, in addition, non-metal cooking utensils
and cookware with non-metal handles are
used, it is safe to use this induction hob as
intended.
Important safety information en
5
(Important safety
information
Impor t ant s af et y i nf or mat i on
:Warning – Danger of suffocation!
Packaging material is dangerous to children.
Never allow children to play with packaging
material.
:Warning – Risk of fire!
■ Hot oil and fat can ignite very quickly. Never
leave hot fat or oil unattended. Never use
water to put out burning oil or fat. Switch off
the hotplate. Extinguish flames carefully
using a lid, fire blanket or something similar.
Risk of fire!
■ The hotplates become very hot. Never
place combustible items on the hob. Never
place objects on the hob.
Risk of fire!
■ The appliance gets hot. Do not keep
combustible objects or aerosol cans in
drawers directly underneath the hob.
Risk of fire!
■ The hob switches off automatically and can
no longer be operated. It may switch on
unintentionally at a later point. Switch off the
circuit breaker in the fuse box. Contact the
after-sales service.
Risk of burns!
■ Do not use hob covers here.They can
cause accidents, for example due to
overheating, catching fire or materials
shattering.
:Warning – Risk of burns!
■ The hotplates and surrounding area
(particularly the hob surround, if fitted)
become very hot. Never touch the hot
surfaces. Keep children at a safe distance.
Risk of burns!
■ The hotplate heats up but the display does
not work. Switch off the circuit breaker in
the fuse box. Contact the after-sales
service.
Risk of burns!
■ Metal objects on the hob quickly become
very hot. Never place metal objects (such
as knives, forks, spoons and lids) on the
hob.
Risk of fire!!
■ After each use, always turn off the hob at
the main switch. Do not wait until the hob
turns off automatically after the pan is
removed.
:Warning – Risk of electric shock!
■ Incorrect repairs are dangerous. Repairs
may only be carried out and damaged
power cables replaced by one of our
trained after-sales technicians. If the
appliance is defective, unplug the appliance
from the mains or switch off the circuit
breaker in the fuse box. Contact the after-
sales service.
Risk of electric shock!
■ Do not use any high-pressure cleaners or
steam cleaners, which can result in an
electric shock.
Risk of electric shock!
■ A defective appliance may cause electric
shock. Never switch on a defective
appliance. Unplug the appliance from the
mains or switch off the circuit breaker in the
fuse box. Contact the after-sales service.
Risk of electric shock!
■ Cracks or fractures in the glass ceramic
may cause electric shocks. Switch off the
circuit breaker in the fuse box. Contact the
after-sales service.
:Warning – Risk of fault!
A fan is located on the underside of this hob. If
a drawer is located on the underside of the
hob, do not store any small or sharp objects,
paper or tea towels in it. These may be sucked
in and damage the fan or impair the cooling.
There must be a clearance of at least 2 cm
between the contents of the drawer and the
fan entry point.
:Warning – Risk of injury!
■ When cooking in a bain marie, the hob and
cooking container could shatter due to
overheating. The cooking container in the
bain marie must not directly touch the
bottom of the water-filled pot. Only use heat-
resistant cookware.
Risk of injury!
■ Saucepans may suddenly jump due to
liquid between the pan base and the
hotplate. Always keep the hotplate and
saucepan bases dry.

en Causes of damage
6
]Causes of damage
Caus es of damage
Caution!
■ Rough pan bases may scratch the hob.
■ Avoid leaving empty pots and pans on the hotplate.
Doing so may cause damage.
■ Do not place hot pans on the control panel, the
indicator area, or the hob frame. Doing so may
cause damage.
■ Hard or pointed objects dropped on the hob may
damage it.
■ Aluminium foil and plastic containers will melt if
placed on the hotplate while it is hot. The use of
laminated sheeting is not recommended on the hob.
Overview
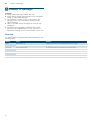
You will find the most frequently caused damage in the
following table:
Damage Cause Measure
Stains Boiled over food. Remove boiled over food immediately with a glass scraper.
Unsuitable cleaning agent. Only use cleaning agents that are suitable for this type of hob.
Scratches Salt, sugar and sand. Do not use the hob as a work surface or storage space.
Cookware with rough bases scratch the hob. Check the cookware.
Discolouration Unsuitable cleaning agent. Only use cleaning agents that are suitable for this type of hob.
Pan abrasion. Lift pots and pans when moving them.
Chips Sugar, food with a high sugar content. Remove boiled over food immediately with a glass scraper.

en Causes of damage
6
]Causes of damage
Caus es of damage
Caution!
■ Rough pan bases may scratch the hob.
■ Avoid leaving empty pots and pans on the hotplate.
Doing so may cause damage.
■ Do not place hot pans on the control panel, the
indicator area, or the hob frame. Doing so may
cause damage.
■ Hard or pointed objects dropped on the hob may
damage it.
■ Aluminium foil and plastic containers will melt if
placed on the hotplate while it is hot. The use of
laminated sheeting is not recommended on the hob.
Overview
You will find the most frequently caused damage in the
following table:
Damage Cause Measure
Stains Boiled over food. Remove boiled over food immediately with a glass scraper.
Unsuitable cleaning agent. Only use cleaning agents that are suitable for this type of hob.
Scratches Salt, sugar and sand. Do not use the hob as a work surface or storage space.
Cookware with rough bases scratch the hob. Check the cookware.
Discolouration Unsuitable cleaning agent. Only use cleaning agents that are suitable for this type of hob.
Pan abrasion. Lift pots and pans when moving them.
Chips Sugar, food with a high sugar content. Remove boiled over food immediately with a glass scraper.
Environmental protection en
7
7Environmental protection
Envi r onment al pr ot ec t i on
In this section, you can find information about saving
energy and disposing of the appliance.
Energy-saving advice
■ Always use the correct lid for each pan. Cooking
without a lid uses a lot more energy. Use a glass lid
to provide visibility and avoid having to lift the lid.
■ Use pans with flat bases. Bases that are not flat use
a lot more energy.
■ The diameter of the pan base must match the size of
the hotplate. Please note: pan manufacturers usually
provide the diameter for the top of the pan, which is
usually larger than the diameter of the pan base.
■ Use a small pan for small amounts of food. A large
pan which is not full uses a lot of energy.
■ Use little water when cooking. This saves energy and
preserves all the vitamins and minerals in
vegetables.
■ Select the lowest power level to maintain cooking. If
the power level is too high, energy is wasted.
Environmentally-friendly disposal
Dispose of packaging in an environmentally-friendly
manner.
fInduction cooking
I nduct i on cook i ng
Advantages of induction cooking
Induction cooking is very different from traditional
cooking methods, as heat builds up directly in the item
of cookware. This offers numerous advantages:
■ Saves time when boiling and frying.
■ Saves energy.
■ Easier to care for and clean. Spilled food does not
burn on as quickly.
■ Heat control and safety – the hob increases or
decreases the heat supply as soon as the user
changes the setting. The induction hotplate stops the
heat supply as soon as the cookware is removed
from the hotplate, without having to switch it off first.
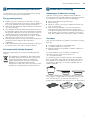
Cookware
Only use ferromagnetic cookware for induction cooking,
such as:
■ Cookware made from enamelled steel
■ Cookware made from cast iron
■ Special induction-compatible cookware made from
stainless steel.
To check whether your cookware is suitable for
induction cooking, refer to the section on
~ "Cookware check".
To achieve a good cooking result, the ferromagnetic
area on the base of the pan should match the size of
the hotplate. If a hotplate does not detect an item of
cookware, try placing it on another hotplate with a
smaller diameter.
If the only hotplate being used is the flexible cooking
zone, larger cookware that is particularly suited to this
zone can be used. You can find information on
positioning cookware in the section on ~ "Flex Zone".
This appliance is labelled in accordance with
European Directive 2012/19/EU concerning
used electrical and electronic appliances
(waste electrical and electronic equipment -
WEEE). The guideline determines the
framework for the return and recycling of used
appliances as applicable throughout the EU.
FP
FP
FP

en Induction cooking
8
Some induction cookware does not have a fully
ferromagnetic base:
■ If the base of the cookware is only partially
ferromagnetic, only the area that is ferromagnetic will
heat up. This may mean that heat will not be
distributed evenly. The non-ferromagnetic area may
not heat up to a sufficient temperature for cooking.
■ The ferromagnetic area will also be reduced if the
material from which the base of the cookware is
made contains aluminium, for example. This may
mean that the cookware will not become sufficiently
hot or even that it will not be detected.
Unsuitable pans
Never use diffuser hobs or pans made from:
■ common thin steel
■ glass
■ earthenware
■ copper
■ aluminium
Properties of the base of the cookware
The material(s) from which the base of the cookware is
made can affect the cooking result. Using pots and
pans made from materials that distribute heat evenly
through them, such as stainless-steel pans with a three-
layer base, saves time and energy.
Use cookware with a flat base; if the base of the
cookware is uneven, this may impair the heat supply.
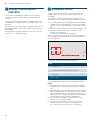
Absence of pan or unsuitable size
If no pan is placed on the selected hotplate, or if it is
made of unsuitable material or is not the correct size,
the power level displayed on the hotplate indicator will
flash. Place a suitable pan on the hotplate to stop the
flashing. If this takes more than 90 seconds, the
hotplate will switch off automatically.
Empty pans or those with a thin base
Do not heat empty pans, nor use pans with a thin base.
The hob is equipped with an internal safety system.
However, an empty pan may heat up so quickly that the
"automatic switch off" function may not have time to
react and the pan may reach very high temperatures.
The base of the pan could melt and damage the glass
on the hob. In this case, do not touch the pan and
switch the hotplate off. If it fails to work after it has
cooled down, please contact the Technical Assistance
Service.
Pan detection
Each hotplate has a lower limit for pan detection. This
depends on the diameter of the ferromagnetic area of
the cookware and the material from which its base is
made. For this reason, you should always use the
hotplate that best matches the diameter of the base of
the pan.

en Induction cooking
8
Some induction cookware does not have a fully
ferromagnetic base:
■ If the base of the cookware is only partially
ferromagnetic, only the area that is ferromagnetic will
heat up. This may mean that heat will not be
distributed evenly. The non-ferromagnetic area may
not heat up to a sufficient temperature for cooking.
■ The ferromagnetic area will also be reduced if the
material from which the base of the cookware is
made contains aluminium, for example. This may
mean that the cookware will not become sufficiently
hot or even that it will not be detected.
Unsuitable pans
Never use diffuser hobs or pans made from:
■ common thin steel
■ glass
■ earthenware
■ copper
■ aluminium
Properties of the base of the cookware
The material(s) from which the base of the cookware is
made can affect the cooking result. Using pots and
pans made from materials that distribute heat evenly
through them, such as stainless-steel pans with a three-
layer base, saves time and energy.
Use cookware with a flat base; if the base of the
cookware is uneven, this may impair the heat supply.
Absence of pan or unsuitable size
If no pan is placed on the selected hotplate, or if it is
made of unsuitable material or is not the correct size,
the power level displayed on the hotplate indicator will
flash. Place a suitable pan on the hotplate to stop the
flashing. If this takes more than 90 seconds, the
hotplate will switch off automatically.
Empty pans or those with a thin base
Do not heat empty pans, nor use pans with a thin base.
The hob is equipped with an internal safety system.
However, an empty pan may heat up so quickly that the
"automatic switch off" function may not have time to
react and the pan may reach very high temperatures.
The base of the pan could melt and damage the glass
on the hob. In this case, do not touch the pan and
switch the hotplate off. If it fails to work after it has
cooled down, please contact the Technical Assistance
Service.
Pan detection
Each hotplate has a lower limit for pan detection. This
depends on the diameter of the ferromagnetic area of
the cookware and the material from which its base is
made. For this reason, you should always use the
hotplate that best matches the diameter of the base of
the pan.
Getting to know your appliance en
9
*Getting to know your
appliance
Get t i ng to know your appl i anc e
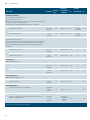
You can find information on the dimensions and power
of the hotplates in~ Page 2
Note: . Depending on the appliance model, individual
details and colours may differ.
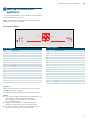
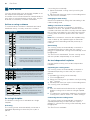
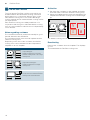
The control panel
Controls
When the hob heats up, the symbols for the controls
available at this time light up.
Touching a symbol activates the respective function.
Notes
■ The corresponding symbols for the controls light up
depending on whether they are available.
The displays for the hotplates or the selected
functions get brighter.
■ Always keep the control panel clean and dry.
Moisture can prevent it from working properly.
■ Do not place any cookware near the indicators or
sensors. The electronics could overheat.
Touch controls
#
Main switch
" / Ä
Select the cooking zone
0 IIIIIIIIIIII Settings range
&
PowerBoost and ShortBoost functions
ý
Flexible cooking zone
ÿ
Move function
Ñ
Lock the control panel for cleaning and childproof
lock
è
Keep-warm function
Õ
Frying sensor
0
Set the cooking time and kitchen timer
þ
Stopwatch function
D
Wi-Fi
I
Hood control
=
Extractor hood lighting
Indicators/symbols
‹
Operating status
‚-Š
Heat settings
•/œ
Residual heat
›
PowerBoost function
ݯ
ShortBoost function
–
Keep-warm function
£
Transfer settings
Ý
Frying sensor
ü
FlexPlus cooking zone
‹‹
Timer function
x
Set the cooking time
V
Timer
ö / ô
Time units on the timer
‚
Childproof lock
D
Wi-Fi

en Getting to know your appliance
10
The hotplates
Residual heat indicator
The hob has a residual heat indicator for each hotplate.
This indicates that a hotplate is still hot. Do not touch a
hotplate while the residual heat indicator is lit up.
The following indicators are shown depending on the
amount of residual heat:
■ Display •: High temperature
■ Display œ: Low temperature
If you remove the cookware from the hotplate during
cooking, the residual heat indicator and the selected
heat setting will flash alternately.
When the hotplate is switched off, the residual heat
indicator will light up. Even after the hob has been
switched off, the residual heat indicator will stay lit for as
long as the hotplate is still warm.
Hotplate
Û
Simple hotplate Use cookware that is a suitable size.
á
Flexible cooking zone See section ~ "Flex Zone"
à / ß
FlexPlus cooking zone The FlexPlus cooking zones always switch on in conjunction with the right- or left-hand flexible cook-
ing zone. See section ~ "FlexPlus Zone"
Only use cookware that is suitable for induction cooking; see section ~ "Induction cooking"
Operating the appliance en
11
1Operating the appliance
Oper at i ng t he appl i anc e
This chapter explains how to set a hotplate. The table
shows heat settings and cooking times for various
meals.
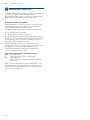
Switching the hob on and off
Use the main switch to switch the hob on and off.
When you first switch on the appliance, you will be
prompted to set up your home network. The
D symbol
will be lit dimly for a few seconds on the display panel.
To begin setting up the connection, touch the
D sensor and proceed in accordance with the
information given in the section entitled ~ "Home
Connect".To exit initial set-up, touch any sensor.
To switch the hob on and off, touch the # symbol. An
audible signal will sound. The symbols for the cooking
zones and the functions available at this time will light
up.The hob is ready to use.
To switch the hob off, touch and hold the # symbol
until all indicators go out. The residual heat indicator will
remain lit until the cooking zones have cooled down
sufficiently.
Notes
■ If the appliance has not been connected to your
home network or the connection has been broken,
network connection initial set-up will be activated
whenever you switch on the hob.
■ The hob will automatically switch itself off if the
cooking zones have been switched off for a few
seconds.
■ The settings are stored for 4 seconds after the hob
has been switched off. If you switch the hob back on
during this time, the hob will operate using the
stored settings.
Setting a hotplate
Set the desired heat setting in the settings area.
Heat setting 1 = lowest setting.
Heat setting 9 = highest setting.
Every heat setting has an intermediate setting. This is
marked with
†.
Note: The left-hand hotplates are set in the settings
area on the left and the right-hand hotplates are set in
the settings area on the right.
Notes
■ To protect the fragile parts of your appliance from
overheating and electrical overloading, the hob may
temporarily reduce the power.
■ In order to prevent the appliance from producing
excess noise, the hob may temporarily reduce the
power.
Selecting a hotplate and heat setting
The hob must be switched on.
1. Touch the " and Ä symbols for the required
hotplate.
The ‹ indicator gets brighter.
2. Swipe your finger over the relative settings area until
the required heat setting lights up.
The heat setting is set.
Changing the power level
Select the hotplate and set the desired power level in
the programming zone.
Switch off the hotplate
Select the hotplate and set it to ‹ in the programming
panel. The hotplate turns off and the residual heat
indicator appears.
Notes
■ If no pan has been placed on the hotplate, the
selected power level flashes. After a certain time has
elapsed, the hotplate switches off.
■ If a pan has been placed on the hotplate before
switching on the hob, it will be detected within
20 seconds of pressing the main switch and the
hotplate will be selected automatically. Once
detected, select the power level within the next
20 seconds or the hotplate will switch off.

en Operating the appliance
12
Chef's recommendations
Recommendations
■ When heating up puree, cream soups and thick
sauces, stir occasionally.
■ Set heat setting 8 to 9 for preheating.
■ When cooking with the lid on, turn the heat setting
down as soon as steam escapes between the lid
and the cookware. Steam does not need to escape
for a good cooking result.
■ After cooking, keep the lid on the cookware until you
serve the food.
■ To cook with the pressure cooker, observe the
manufacturer's instructions.
■ Do not cook food for too long, otherwise the
nutrients will be lost. The kitchen clock can be used
to set the optimum cooking time.
■ For a more healthy cooking result, smoking oil
should be avoided.
■ To brown food, fry small portions in succession.
■ Cookware may reach high temperatures while the
food is cooking. We recommend that you use oven
gloves.
■ You can find recommendations for energy-efficient
cooking in section ~ "Environmental protection"
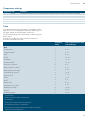
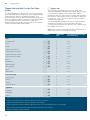
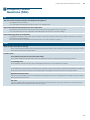
Cooking table
The table shows which heat setting is suitable for each
type of food. The cooking time may vary depending on
the type, weight, thickness and quality of the food.
Heat setting Cooking time
(mins)
Melting
Chocolate coating 1 - 1.5 -
Butter, honey, gelatine 1 - 2 -
Heating and keeping warm
Stew, e.g. lentil stew 1.5 - 2 -
Milk* 1.5 - 2.5 -
Heating sausages in water* 3 - 4 -
Defrosting and heating
Spinach, frozen 3 - 4 15 - 25
Goulash, frozen 3 - 4 35 - 55
Poaching, simmering
Potato dumplings* 4.5 - 5.5 20 - 30
Fish* 4 - 5 10 - 15
White sauces, e.g. Béchamel sauce 1 - 2 3 - 6
Whisked sauces, e.g. sauce béarnaise, hollandaise 3 - 4 8 - 12
* Without lid
** Turn several times
*** Preheat to heat setting 8 - 8.5

en Operating the appliance
12
Chef's recommendations
Recommendations
■ When heating up puree, cream soups and thick
sauces, stir occasionally.
■ Set heat setting 8 to 9 for preheating.
■ When cooking with the lid on, turn the heat setting
down as soon as steam escapes between the lid
and the cookware. Steam does not need to escape
for a good cooking result.
■ After cooking, keep the lid on the cookware until you
serve the food.
■ To cook with the pressure cooker, observe the
manufacturer's instructions.
■ Do not cook food for too long, otherwise the
nutrients will be lost. The kitchen clock can be used
to set the optimum cooking time.
■ For a more healthy cooking result, smoking oil
should be avoided.
■ To brown food, fry small portions in succession.
■ Cookware may reach high temperatures while the
food is cooking. We recommend that you use oven
gloves.
■ You can find recommendations for energy-efficient
cooking in section ~ "Environmental protection"
Cooking table
The table shows which heat setting is suitable for each
type of food. The cooking time may vary depending on
the type, weight, thickness and quality of the food.
Heat setting Cooking time
(mins)
Melting
Chocolate coating 1 - 1.5 -
Butter, honey, gelatine 1 - 2 -
Heating and keeping warm
Stew, e.g. lentil stew 1.5 - 2 -
Milk* 1.5 - 2.5 -
Heating sausages in water* 3 - 4 -
Defrosting and heating
Spinach, frozen 3 - 4 15 - 25
Goulash, frozen 3 - 4 35 - 55
Poaching, simmering
Potato dumplings* 4.5 - 5.5 20 - 30
Fish* 4 - 5 10 - 15
White sauces, e.g. Béchamel sauce 1 - 2 3 - 6
Whisked sauces, e.g. sauce béarnaise, hollandaise 3 - 4 8 - 12
* Without lid
** Turn several times
*** Preheat to heat setting 8 - 8.5
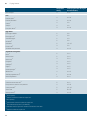
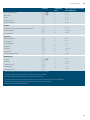
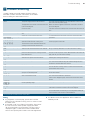
Operating the appliance en
13
Boiling, steaming, braising
Rice (with double the volume of water) 2.5 - 3.5 15 - 30
Rice pudding*** 2 - 3 30 - 40
Unpeeled boiled potatoes 4.5 - 5.5 25 - 35
Boiled potatoes 4.5 - 5.5 15 - 30
Pasta, noodles* 6 - 7 6 - 10
Stew 3.5 - 4.5 120 - 180
Soups 3.5 - 4.5 15 - 60
Vegetables 2.5 - 3.5 10 - 20
Vegetables, frozen 3.5 - 4.5 7 - 20
Cooking in a pressure cooker 4.5 - 5.5 -
Braising
Roulades 4 - 5 50 - 65
Pot roast 4 - 5 60 - 100
Goulash*** 3 - 4 50 - 60
Roasting/frying with little oil*
Escalope, plain or breaded 6 - 7 6 - 10
Escalope, frozen 6 - 7 6 - 12
Chop, plain or breaded** 6 - 7 8 - 12
Steak (3 cm thick) 7 - 8 8 - 12
Poultry breast (2 cm thick)** 5 - 6 10 - 20
Poultry breast, frozen** 5 - 6 10 - 30
Rissoles (3 cm thick)** 4.5 - 5.5 20 - 30
Hamburgers (2 cm thick)** 6 - 7 10 - 20
Fish and fish fillet, plain 5 - 6 8 - 20
Fish and fish fillet, breaded 6 - 7 8 - 20
Fish, breaded and frozen, e.g. fish fingers 6 - 7 8 - 15
Scampi, prawns 7 - 8 4 - 10
Sautéeing fresh vegetables and mushrooms 7 - 8 10 - 20
Stir-fry, vegetables, meat cut in Asian-style strips 7 - 8 15 - 20
Stir fry, frozen 6 - 7 6 - 10
Pancakes (baked in succession) 6.5 - 7.5 -
Omelette (cooked in succession) 3.5 - 4.5 3 - 10
Fried eggs 5 - 6 3 - 6
Deep-fat frying* (150-200 g per portion in 1-2 l oil, deep-fat fried in portions)
Frozen products, e.g. chips, chicken nuggets 8 - 9 -
Croquettes, frozen 7 - 8 -
Meat, e.g. chicken portions 6 - 7 -
Fish, breaded or in beer batter 6 - 7 -
Vegetables, mushrooms, breaded or battered, tempura 6 - 7 -
Small baked items, e.g. doughnuts, fruit in batter 4 - 5 -
Heat setting Cooking time
(mins)
* Without lid
** Turn several times
*** Preheat to heat setting 8 - 8.5

en Flex Zone
14
|Flex Zone
Fl e x Zone
You can use each flex zone as a single hotplate or as
two independent hotplates, as required.
It consists of four inductors that work independently of
each other. If using the flexible cooking zone, only the
area that is covered by cookware is activated.
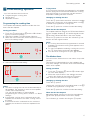
Advice on using cookware
To ensure that the cookware is detected and heat is
distributed evenly, correctly centre the cookware:
As a single hotplate
The flexible cooking zone is activated as a single
hotplate.
Activating
The cooking zones are automatically connected or
separated depending on where the pot or pan is
placed.
Connecting them manually:
1. Select the flexible cooking zone by touching the
Ä symbol.
2. Set the power level you require in the settings area.
The Flex Zone is activated.
Changing the heat setting
Select the hotplate and change the heat setting in the
relative settings area.
Adding a new item of cookware
Set down the new item of cookware in a position
suitable for its size. The appliance detects when the
cookware has been set down correctly, and then splits
the cooking zones based on this. Select the required
cooking zone and set the power level in the control
panel.
Note: If the cookware is moved to the hotplate being
used or lifted up, the hotplate begins an automatic
search and the heat setting selected previously is
retained.
Deactivating
The cooking zones are automatically connected or
separated depending on where the pot or pan is
placed. To separate the cooking zones manually, touch
the
ý symbol.
The Flex Zone is deactivated. The two cooking zones
will now operate independently of one another.
As two independent hotplates
Use the flexible cooking zone as two independent
hotplates.
Separating the cooking zones
The cooking zones are automatically connected or
separated depending on where the pot or pan is
placed.
To separate the cooking zones manually:
1. Touch the ý symbol.
2. Select the cooking zone you want to use by touching
the
" symbol.
3. Set the power level you require in the settings area.
The cooking zone is activated.
Notes
■ If the hob switches itself off and then on again, the
flexible cooking zone is used as a single hotplate
again.
■ To change the configuration settings for the flexible
cooking zone, refer to section ~ "Basic settings".
Connecting the two cooking zones
The cooking zones are automatically connected or
separated depending on where the pot or pan is
placed. To connect the cooking zones manually, touch
the ý symbol.
The Flex Zone is activated.
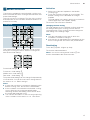
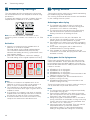
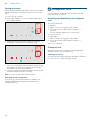
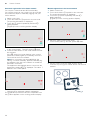
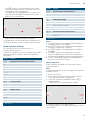
As a single hotplate
Diameter smaller than or equal to 13 cm
Place the cookware on one of the four posi-
tions that can be seen in the illustration.
Diameter greater than 13 cm
Place the cookware on one of the three
positions that can be seen in the illustration.
If the cookware takes up more than one
hotplate, place it starting on the upper or
lower edge of the flexible cooking zone.
As two independent hotplates
The front and rear hotplates each have two induc-
tors and can be used independently of each other.
Select the required heat setting for each of the
hotplates. Use only one item of cookware on each
hotplate.
Recommendations
If the hob has more than one flexible
cooking zone, place the cookware on
top so that it covers only one of the flex-
ible cooking zones.
Otherwise, the hotplates will not be
activated as intended and the cooking
result will not be satisfactory.

en Flex Zone
14
|Flex Zone
Fl e x Zone
You can use each flex zone as a single hotplate or as
two independent hotplates, as required.
It consists of four inductors that work independently of
each other. If using the flexible cooking zone, only the
area that is covered by cookware is activated.
Advice on using cookware
To ensure that the cookware is detected and heat is
distributed evenly, correctly centre the cookware:
As a single hotplate
The flexible cooking zone is activated as a single
hotplate.
Activating
The cooking zones are automatically connected or
separated depending on where the pot or pan is
placed.
Connecting them manually:
1. Select the flexible cooking zone by touching the
Ä symbol.
2. Set the power level you require in the settings area.
The Flex Zone is activated.
Changing the heat setting
Select the hotplate and change the heat setting in the
relative settings area.
Adding a new item of cookware
Set down the new item of cookware in a position
suitable for its size. The appliance detects when the
cookware has been set down correctly, and then splits
the cooking zones based on this. Select the required
cooking zone and set the power level in the control
panel.
Note: If the cookware is moved to the hotplate being
used or lifted up, the hotplate begins an automatic
search and the heat setting selected previously is
retained.
Deactivating
The cooking zones are automatically connected or
separated depending on where the pot or pan is
placed. To separate the cooking zones manually, touch
the
ý symbol.
The Flex Zone is deactivated. The two cooking zones
will now operate independently of one another.
As two independent hotplates
Use the flexible cooking zone as two independent
hotplates.
Separating the cooking zones
The cooking zones are automatically connected or
separated depending on where the pot or pan is
placed.
To separate the cooking zones manually:
1. Touch the ý symbol.
2. Select the cooking zone you want to use by touching
the
" symbol.
3. Set the power level you require in the settings area.
The cooking zone is activated.
Notes
■ If the hob switches itself off and then on again, the
flexible cooking zone is used as a single hotplate
again.
■ To change the configuration settings for the flexible
cooking zone, refer to section ~ "Basic settings".
Connecting the two cooking zones
The cooking zones are automatically connected or
separated depending on where the pot or pan is
placed. To connect the cooking zones manually, touch
the ý symbol.
The Flex Zone is activated.
As a single hotplate
Diameter smaller than or equal to 13 cm
Place the cookware on one of the four posi-
tions that can be seen in the illustration.
Diameter greater than 13 cm
Place the cookware on one of the three
positions that can be seen in the illustration.
If the cookware takes up more than one
hotplate, place it starting on the upper or
lower edge of the flexible cooking zone.
As two independent hotplates
The front and rear hotplates each have two induc-
tors and can be used independently of each other.
Select the required heat setting for each of the
hotplates. Use only one item of cookware on each
hotplate.
Recommendations
If the hob has more than one flexible
cooking zone, place the cookware on
top so that it covers only one of the flex-
ible cooking zones.
Otherwise, the hotplates will not be
activated as intended and the cooking
result will not be satisfactory.
Move function en
15
uMove function
Move f unct i on
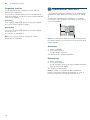
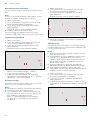
This function activates the entire flexible cooking zone,
which is divided into three cooking areas and which has
preset heat settings.
Only use one item of cookware. The size of the cooking
area depends on the cookware used and whether it is
positioned correctly.
This means that an item of cookware can be moved
during the cooking process to another cooking area
with another heat setting:
Preset heat settings:
Front area = heat setting
Š
Middle area = heat setting †
Rear area = heat setting ‚.†
The preset heat settings can be changed independently
of one another. You can find out how to change these in
the section on ~ "Basic settings".
Notes
■ If more than one item of cookware is detected on the
flexible cooking zone, the function is deactivated.
■ If the cookware is moved within the flexible cooking
zone or lifted up, the hob automatically starts
searching and the heat setting of the area in which
the vessel was detected is set.
■ You can find information on the size and positioning
of the cookware in the section on ~ "Flex Zone"
Activation
1. Select one of the two hotplates in the flexible
cooking zone.
2. Touch the ÿ symbol; it lights up more brightly. The
flexible cooking zone is activated as a single
hotplate.
The heat setting in the area in which the cookware is
located lights up in the hotplate display.
The function has now been activated.
Changing the heat setting
The heat settings for the individual cooking areas can
be changed during the cooking process. Set the
cookware down on the cooking area and change the
heat setting in the settings range.
Notes
■ Only the heat setting in the area in which the
cookware is located is changed.
■ If the function is deactivated, the heat settings for the
three cooking areas are reset to the preset values.
Deactivating
Touch the ÿ symbol. It lights up dimly.
The function was deactivated.
Note: If one of the cooking areas is set to
‹, the
function deactivates after a few seconds.
Cooking areas

en FlexPlus Zone
16
}FlexPlus Zone
Fl exPl us Zone
The hob has two FlexPlus cooking zones which are
located between the two flexible cooking zones and
which switch on in conjunction with the right- or left-
hand flexible cooking zone. This means that larger
cooking vessels can be used and better cooking results
can be achieved.
Each FlexPlus cooking zone always switches on in
conjunction with the right- or left-hand flexible cooking
zone. It is not possible to switch them on independently
of one another.
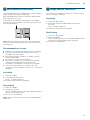
Notes regarding cookware
The cookware should be positioned centrally for good
thermal detection and distribution.
The cookware should cover the side hotplate and the
FlexPlus cooking zone.
Depending on the size of the cookware, the flexible
cooking zone can be activated as two independent
hotplates or as one hotplate:
Activation
1. Set down the cookware on the hotplate and make
sure that it also covers the FlexPlus cooking zone.
2. Select the hotplate and the required heat setting. The
hotplate and FlexPlus cooking zone indicators light
up.
The flexible cooking zone is activated.
Deactivating
Remove the cookware from the hotplate. The displays
go out.
This deactivates the FlexPlus cooking zone.
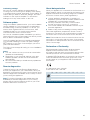
Setting the pot down
Long cooking pot:
Flexible cooking zone as two inde-
pendent cooking zones or as a single
cooking zone.
Large round cooking pot:
Flexible cooking zone as a single
cooking zone.
The pot must not cover both FlexPlus
cooking zones at the same time.

en FlexPlus Zone
16
}FlexPlus Zone
Fl exPl us Zone
The hob has two FlexPlus cooking zones which are
located between the two flexible cooking zones and
which switch on in conjunction with the right- or left-
hand flexible cooking zone. This means that larger
cooking vessels can be used and better cooking results
can be achieved.
Each FlexPlus cooking zone always switches on in
conjunction with the right- or left-hand flexible cooking
zone. It is not possible to switch them on independently
of one another.
Notes regarding cookware
The cookware should be positioned centrally for good
thermal detection and distribution.
The cookware should cover the side hotplate and the
FlexPlus cooking zone.
Depending on the size of the cookware, the flexible
cooking zone can be activated as two independent
hotplates or as one hotplate:
Activation
1. Set down the cookware on the hotplate and make
sure that it also covers the FlexPlus cooking zone.
2. Select the hotplate and the required heat setting. The
hotplate and FlexPlus cooking zone indicators light
up.
The flexible cooking zone is activated.
Deactivating
Remove the cookware from the hotplate. The displays
go out.
This deactivates the FlexPlus cooking zone.
Setting the pot down
Long cooking pot:
Flexible cooking zone as two inde-
pendent cooking zones or as a single
cooking zone.
Large round cooking pot:
Flexible cooking zone as a single
cooking zone.
The pot must not cover both FlexPlus
cooking zones at the same time.
Time-setting options en
17
OTime-setting options
Ti me- set t i ng opt i ons
Your hob has three timer functions:
■ Programming the cooking time
■ Kitchen timer
■ Stopwatch function
Programming the cooking time
The hotplate automatically switches off after the time
that is set has elapsed.
Setting procedure:
1. Touch the 0 symbol twice. ‹‹ and the x indicator
light up in the timer display.
2. Select the hotplate. The x indicator lights up.
3. Within the next 10 seconds, set the required cooking
time in the settings range.
4. Touch the 0 symbol to confirm the selected setting.
5. Select the required heat setting.
The cooking time begins to elapse.
Notes
■ The same cooking time can be set automatically for
all hotplates. The set time for each of the hotplates
counts down independently.
You can find information on automatically
programming the cooking time in section ~ "Basic
settings"
■ If the flexible cooking zone is selected as the only
hotplate, the set time for the entire cooking zone is
the same.
■ If the Move function is selected for the combined
hotplate, the set time for the three hotplates is the
same.
Frying sensor
If a cooking time has been programmed for a hotplate
and the frying sensor has been activated, the cooking
time will not begin to count down until the selected
temperature setting has been reached.
Changing or deleting the time
Touch the
0 symbol twice and then select the hotplate.
Change the cooking time in the settings area or set ‹‹
to delete the programmed cooking time.
Touch the 0 symbol to confirm the selected setting.
When the time has elapsed
The hotplate switches itself off, the x indicator flashes
and the hotplate displays ‹. An audible signal sounds.
‹‹ and the x indicator flash in the timer display.
When the 0 symbol is touched, the indicators go out
and the acoustic signal ceases.
Notes
■ If a cooking time has been programmed for several
hotplates, the shortest cooking time appears in the
timer display.
■ To query a hotplate's remaining cooking time, touch
the
0 symbol twice and select the hotplate.
■ You can set a cooking time of up to ŠŠ minutes.
The kitchen timer
You can use the kitchen timer to set a time of up to 99
minutes.
This functions independently from the hotplates and
from other settings. This function does not automatically
switch off a hotplate.
Setting procedure
1. Touch the 0 symbol. ‹‹ and the V indicator light
up in the timer display.
2. Select the required time in the settings area and
confirm this setting by touching the
0 symbol.
After a few seconds, the time begins to elapse.
Changing or deleting the time
Touch the
0 symbol.
Change the cooking time in the settings area or set ‹‹
to delete the programmed cooking time.
Touch the 0 symbol to confirm the selected setting.
When the time has elapsed
An audible signal sounds once the time has elapsed.
‹‹ and the V symbol flash in the timer display.
The indicators go out after touching the 0 symbol.

en PowerBoost function
18
Stopwatch function
The stopwatch function displays the time that has
elapsed since activation.
This functions independently from the hotplates and
from other settings. This function does not automatically
switch off a hotplate.
Activating
Touch the
þ symbol.‹‹ light up in the timer display.
The cooking time begins to elapse.
Deactivating
Touch the þ symbol.‹‹ appear in the timer display
and then go out.
The function is deactivated.
Note: This function must be selected in order to
deactivate the stopwatch.
vPowerBoost function
Power Boost f unc t i on
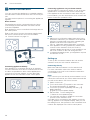
The PowerBoost function enables you to heat up large
quantities of water faster than when using heat setting
Š.
This function can always be activated for a hotplate,
provided the other hotplate in the same group is not in
use (see illustration).
Note: The PowerBoost function can also be activated in
the flexible area if the cooking zone is being used as a
single hotplate.
Activating
1. Select a hotplate.
2. Touch the & symbol.
The › indicator lights up.
The function has now been activated.
Deactivating
1. Select a hotplate.
2. Touch the & symbol.
The › indicator goes out and the hotplate switches
back to the Š heat setting.
The function is deactivated.
Note: In certain circumstances, the PowerBoost
function can switch itself off automatically in order to
protect the electronic elements inside the hob.

en PowerBoost function
18
Stopwatch function
The stopwatch function displays the time that has
elapsed since activation.
This functions independently from the hotplates and
from other settings. This function does not automatically
switch off a hotplate.
Activating
Touch the
þ symbol.‹‹ light up in the timer display.
The cooking time begins to elapse.
Deactivating
Touch the þ symbol.‹‹ appear in the timer display
and then go out.
The function is deactivated.
Note: This function must be selected in order to
deactivate the stopwatch.
vPowerBoost function
Power Boost f unc t i on
The PowerBoost function enables you to heat up large
quantities of water faster than when using heat setting
Š.
This function can always be activated for a hotplate,
provided the other hotplate in the same group is not in
use (see illustration).
Note: The PowerBoost function can also be activated in
the flexible area if the cooking zone is being used as a
single hotplate.
Activating
1. Select a hotplate.
2. Touch the & symbol.
The › indicator lights up.
The function has now been activated.
Deactivating
1. Select a hotplate.
2. Touch the & symbol.
The › indicator goes out and the hotplate switches
back to the Š heat setting.
The function is deactivated.
Note: In certain circumstances, the PowerBoost
function can switch itself off automatically in order to
protect the electronic elements inside the hob.
ShortBoost function en
19
xShortBoost function
Shor t Boost f unc t i on
The ShortBoost function enables you to heat cookware
faster than when using heat setting
Š.
After deactivating the function, select the appropriate
heat setting for your food.
This function can always be activated for a hotplate,
provided the other hotplate in the same group is not in
use (see illustration).
Note: With the flexible cooking zone, the ShortBoost
function can be activated even if it is used as the only
cooking zone.
Recommendations for use
■ Always use cookware that has not been pre-heated.
■ Use pots and pans with a flat base. Do not use
cookware with a thin base.
■ Never leave empty cookware, oil, butter or lard to
heat up unattended.
■ Do not place a lid on the cookware.
■ Place the cookware on the centre of the hotplate.
Ensure that the diameter of the base of the
cookware corresponds to the size of the hotplate.
■ You can find information on the type, size and
positioning of the cookware in section ~ "Induction
cooking"
Activating
1. Select a hotplate.
2. Touch the & symbol twice.
The ݯ indicator lights up.
The function has now been activated.
Deactivating
1. Select a hotplate.
2. Touch the & symbol.
The ݯ indicator goes out and the hotplate switches
back to the Š heat setting.
The function is deactivated.
Note: After 30 seconds, this function will automatically
switch off.
zKeep warm function
Keep wa r m f unc t i on
This function is suitable for melting chocolate or butter
and for keeping food warm.
Activating
1. Touch the è symbol.
2. Select the required hotplate within the next 10
seconds.
The
– indicator lights up.
The function has now been activated.
Deactivating
1. Touch the è symbol.
2. Select a hotplate.
The
– indicator goes out. The hotplate switches itself
off and the residual heat indicator lights up.
The function is deactivated.

en Transferring settings
20
sTransferring settings
Tr ansf er r i ng set t i ngs
The heat setting and the programmed cooking time
can be transferred from one hotplate to another using
this function.
To transfer the settings, move the cookware from the
hotplate which is switched on to another hotplate.
Note: You can find additional information on the
positioning of the cookware in the section on ~ "Flex
Zone"
Activation
1. Move the cookware from the hotplate which is
switched on to another hotplate.
The heat setting of the original hotplate flashes.
The cookware is detected and the previously
selected heat setting and the
£ symbol flash in the
new hotplate display.
2. Select the new hotplate to confirm the settings.
The heat setting of the original hotplate is set to
‹.
The settings have been transferred to the new hotplate.
Notes
■ Move the cookware to a hotplate which is not
switched on, which you have not yet preset or on
which no other cookware has been placed.
■ The PowerBoost or ShortBoost function can then
only be moved from left to right or right to left if no
hotplate is active.
■ If a new item of cookware is set down on another
hotplate before the settings have been confirmed,
this function is ready for both cooking vessels.
■ If several vessels are moved, the function is only
ready for the vessel which was last moved.
cFrying Sensor
Fr y i n g Sensor
This function can be used to fry food while maintaining
the suitable frying pan temperature.
The cooking zones that have this function are identified
by the roasting function symbol.
Advantages when frying
■ The hotplate only heats up if this is required to
maintain the temperature. This saves energy and
prevents the oil or fat from overheating.
■ The frying function reports when the empty frying
pan has reached the optimum temperature for
adding oil and then for adding the food.
Notes
■ Do not place a lid on the pan. Otherwise, the
function does not activate correctly. You can use a
splash guard to prevent splashes of grease.
■ Use suitable oil or fat for frying. If butter, margarine,
extra virgin olive oil or lard is used, set heat setting
1 or 2.
■ Never leave a frying pan, with or without food,
unattended when it is being heated.
■ If the hotplate is a higher temperature than the
cookware or vice versa, the frying sensor will not be
activated correctly.
Frying pans for the frying sensor
Frying pans specifically suited for use with the frying
sensor are available. These optional accessories can
be purchased from specialist retailers or through our
technical after-sales service. Always quote the relevant
reference number.
■ HZ390210 15 cm frying pan.
■ HZ390220 19 cm frying pan.
■ HZ390230 21 cm frying pan.
■ HZ390250 28 cm frying pan. Recommended for the
FlexPlus cooking zone only.
■ HZ390512 teppan yaki. Recommended for the
flexible cooking zone only.
■ HZ390522 griddle plate. Recommended for the
flexible cooking zone only.
These frying pans have a non-stick coating so that you
can fry food with only a small amount of oil.
Notes
■ The frying sensor has been configured specifically
for this type of frying pan.
■ Ensure that the diameter of the base of the frying
pan corresponds to the size of the hotplate. Put the
frying pan in the centre of the hotplate.
■ Using a frying pan of a different size or one that is
poorly positioned on the flexible cooking zones may
result in the frying sensor not being activated. See
the section on ~ "Flex Zone".
■ Other frying pans may overheat. They may reach a
temperature above or below the selected
temperature setting. Try the lowest temperature
setting to begin with and change it if necessary.
Page is loading ...
Page is loading ...
Page is loading ...
Page is loading ...
Page is loading ...
Page is loading ...
Page is loading ...
Page is loading ...
Page is loading ...
Page is loading ...
Page is loading ...
Page is loading ...
Page is loading ...
Page is loading ...
Page is loading ...
Page is loading ...
Page is loading ...
Page is loading ...
Page is loading ...
Page is loading ...
Page is loading ...
Page is loading ...
Page is loading ...
Page is loading ...
Page is loading ...
Page is loading ...
Page is loading ...
Page is loading ...
-
 1
1
-
 2
2
-
 3
3
-
 4
4
-
 5
5
-
 6
6
-
 7
7
-
 8
8
-
 9
9
-
 10
10
-
 11
11
-
 12
12
-
 13
13
-
 14
14
-
 15
15
-
 16
16
-
 17
17
-
 18
18
-
 19
19
-
 20
20
-
 21
21
-
 22
22
-
 23
23
-
 24
24
-
 25
25
-
 26
26
-
 27
27
-
 28
28
-
 29
29
-
 30
30
-
 31
31
-
 32
32
-
 33
33
-
 34
34
-
 35
35
-
 36
36
-
 37
37
-
 38
38
-
 39
39
-
 40
40
-
 41
41
-
 42
42
-
 43
43
-
 44
44
-
 45
45
-
 46
46
-
 47
47
-
 48
48


Ask a question and I''ll find the answer in the document
Finding information in a document is now easier with AI
in other languages
- italiano: Siemens EX807LYV5E/18 Manuale utente
Related papers
-
Siemens iQ700 User manual
-
-
Siemens EX878LYV5E Operating instructions
-
Siemens EX607LYV5E User manual
-
Siemens EX875LYE3E/13 User manual
-
-
-
-
-
Siemens EX775LYE4E/01 User manual