If equipped with the touchscreen, you can also
press Zoom and Level 1, 2 or 3 to zoom in or
out. When activating manual zoom mode, the
system always starts from OFF.
Note: Visibility aids do not replace the need to
watch where the vehicle is moving. Refer to your
Owner’s Manual for safety information, more
detail and limitations.
REVERSE SENSING SYSTEM*
This system can warn you if there is an object
behind the vehicle. A warning tone will sound
which increases in frequency as the object gets
closer and will sound continuously when the
object is less than 10 inches away. The system is
not effective when the vehicle is traveling above
3 mph (5 km/h) and may not detect angular
or moving objects.
Note: Visibility aids do not replace the need to
watch where the vehicle is moving. Refer to your
Owner’s Manual for safety information, more
detail and limitations.
HILL START ASSIST
Hill start assist helps keep your vehicle stationary
long enough to move your foot from the brake
pedal to the accelerator pedal when your vehicle
is on a slope. The brakes release automatically
once the engine has developed sufficient drive to
prevent the vehicle from rolling down the slope.
To use:
1. Press and hold the brake pedal to bring your
vehicle to a complete standstill.
2. If the sensors detect that the vehicle is on a
slope, the hill start assist feature will be
activated automatically.
3. When you remove your foot from the brake
pedal, the vehicle will remain on the slope
without rolling away for approximately
two or three seconds. This hold time will
automatically be extended if you are in the
process of driving off.
4. Drive off in a normal manner. The brakes will
be released automatically.
HILL DESCENT CONTROL
Hill descent control helps you set and maintain
vehicle speed while descending steep grades
in various surface conditions. This feature can
maintain vehicle speeds on downhill grades
between 3 mph (5 km/h) and 20 mph (32 km/h).
Above 20 mph (32 km/h), the system remains
armed, but descent speed cannot be set or
maintained. To enable hill descent control and
set the descent speed, do the following:
1. Press and release the hill descent button
located on the instrument panel. A light in the
control will illuminate and a tone will sound
when this feature is activated.
2. To increase descent speed, press the
accelerator pedal until the desired speed is
reached. To decrease descent speed, press
the brake pedal until the desired speed
is reached.
For more detailed information, please refer to your
Owner’s Manual.
OVERDRIVE CONTROL WITH
TOW/HAUL FEATURE
This feature helps improve transmission operation
when towing a trailer or a heavy load. To activate
tow/haul, press the button (on the side of the
gearshift lever on a floor-shift transmission, or
on the end of the column-shift transmission lever).
The TOW HAUL indicator light will illuminate
in the instrument cluster. To deactivate, press
the button again. Drive with the vehicle in D
(Overdrive) with tow/haul off for the best fuel
economy. Refer to the Transmission chapter of
your Owner’s Manual for more information.
PROGRESSIVE RANGE
SELECTION PRS
With the gearshift lever in D (Drive), press the
(–) button on your transmission gearshift lever or
column shifter to activate PRS. The available and
selected gears will be indicated in the instrument
cluster. All available gears will be displayed with
the current gear indicated. Press the (–) button
again to lock out gears beginning with the highest
gear. For example, press the (–) button twice to
lock out the 6th and 5th gears. Only the available
gears will be displayed and the transmission will
automatically shift between the available gears.
Press the (+) button to unlock gears to allow
the transmission to shift to higher gears. The
transmission will shift automatically within the
gear range you select.
POWERSCOPE
®
POWERFOLDING,
POWERADJUSTABLE
TELESCOPING MIRRORS*
Using the door-mounted switch, you can position
both mirrors at the same time. To telescope the
mirrors out, press and hold the left side of the
switch. While the mirrors extend, it is normal to
hear the telescoping motors running as you hold
the switch. To telescope mirrors in, press and hold
the right side of the switch.
FUNCTION
ADVANCETRAC
®
WITH ROLL STABILITY
CONTROL™ RSC
®
STABILITY
ENHANCEMENT SYSTEM*
The AdvanceTrac
®
stability system helps you to
keep control of your vehicle when on a slippery
surface. The electronic stability control portion of
the system helps avoid skids and lateral slides and
roll stability control helps avoid a vehicle rollover.
The traction control system helps avoid drive
wheel spin and loss of traction. The system can
be manually turned off
. Refer to your Stability
Control chapter in your Owner’s Manual for
more details.
TRAILER SWAY CONTROL*
The feature applies your vehicle brakes at
individual wheels and, if necessary, reduces
engine power. If the trailer begins to sway, the
stability control light flashes
. The first thing
to do is slow your vehicle down, then pull safely
to the side of the road and check for proper
tongue load and trailer load distribution. For more
information, please refer to your Owner’s Manual.
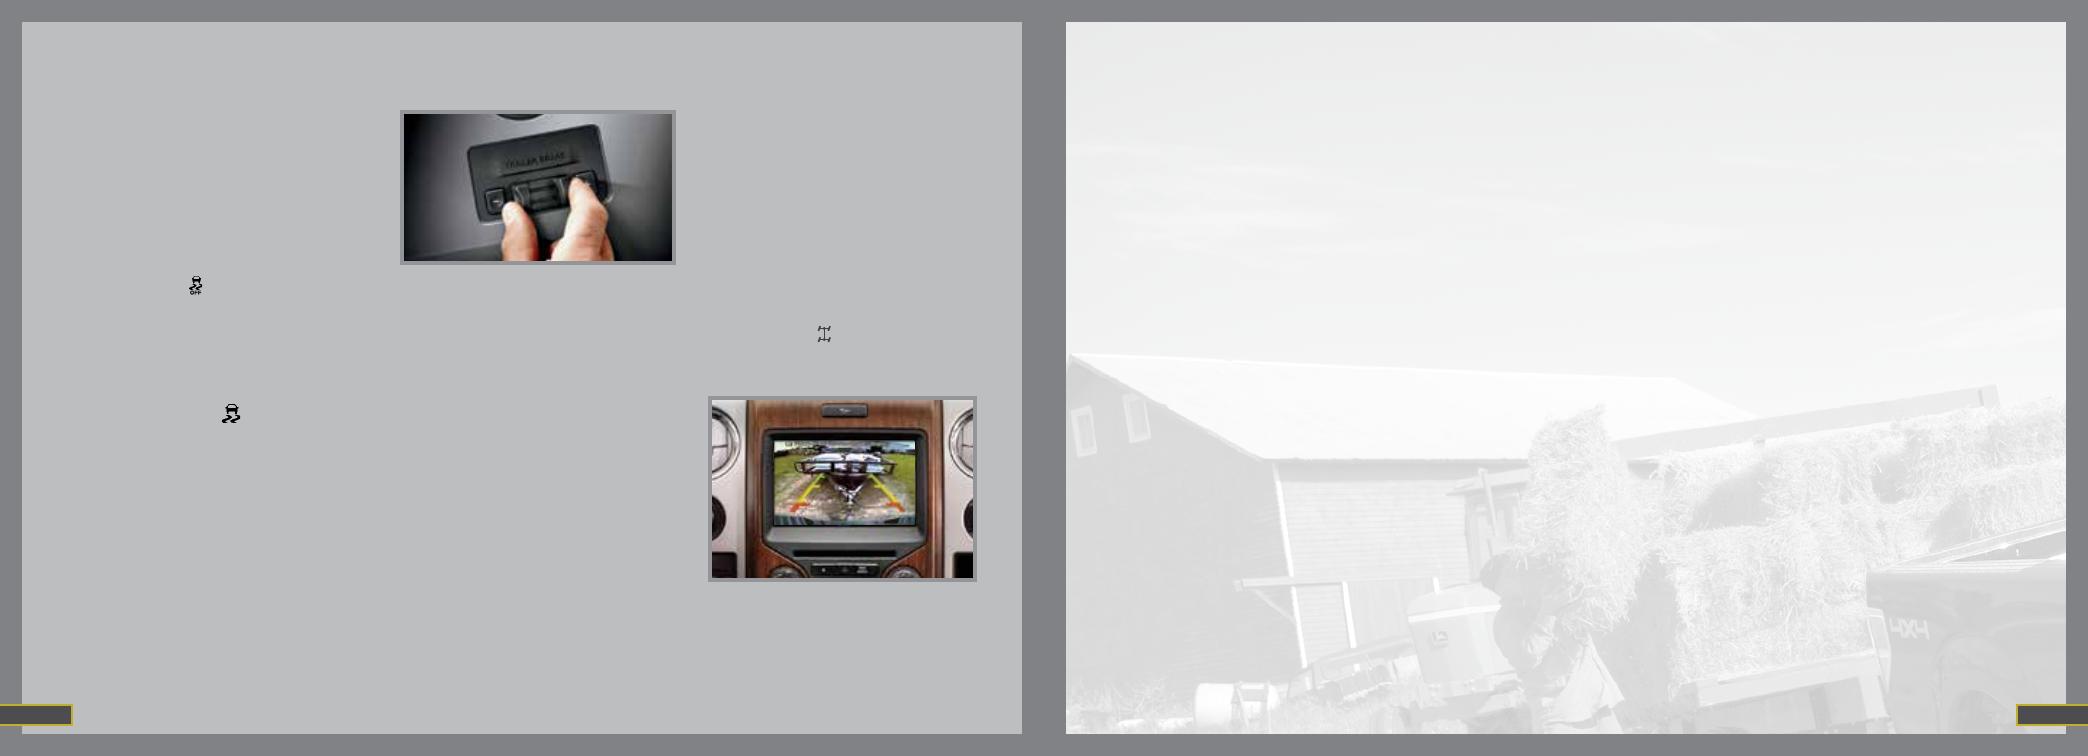
TRAILER BRAKE CONTROLLER*
The fully integrated trailer brake controller (TBC)
assists in smooth and effective trailer braking
by powering the trailer’s electric or electric-over
hydraulic brakes with a proportional output based
on the towing vehicle’s brake pressure.
The Gain setting is used to set the TBC for
specific towing conditions and should be changed
as towing conditions change. Changes to towing
conditions include trailer load, vehicle load, road
conditions and weather.
Use the Gain + and - adjustment buttons to
increase or decrease the braking feature’s
power output to the trailer in 0.5 increments.
Adjust the Gain by:
1. Pressing the Gain + or Gain - buttons to
increase or decrease the setting to the desired
starting point. A Gain setting of 6.0 is a good
starting point for heavier loads.
2. Testing the adjusted Gain setting again after
you’ve made adjustments. When testing:
a. In a traffic-free environment, tow the trailer
on a dry, level surface at a speed of 20-25
mph (30-40 km/h) and squeeze the manual
control lever completely.
b. If the trailer wheels lock up (the tires will
squeal), reduce the Gain setting. If the
trailer wheels turn freely, increase the
Gain setting.
c. The proper Gain setting will be at the point
just below trailer wheel lock-up
Note: If towing a heavier trailer, trailer wheel
lock-up may not be attainable even with the
maximum GAIN setting of 10.
ELECTRONIC LOCKING
DIFFERENTIAL ELD*
With the ELD engaged, the rear axle temporarily
locks, allowing both rear wheels to turn at the
same speed. This function helps to provide
additional traction as needed.
Note: ELD should not be used on dry surfaces.
To activate:
In 4x4 vehicles, pull the 4WD control knob
toward you.
In 4x2 vehicles, turn the ELD control knob from
OFF to ON.
The indicator light
will continuously display in
the cluster when the ELD is active.
REAR VIEW CAMERA SYSTEM*
Located under the Ford oval badge on the
tailgate, this camera provides a video image
of the area behind the vehicle. The display will
automatically appear in the touchscreen* or in the
auto dimming rearview mirror whenever the vehicle
is in R (Reverse) and uses colors (green, yellow
and red) to alert you of your proximity to objects.
*if equipped*if equipped
16 17


