Electrolux WT30H208DU (502315) User manual

Category
Dishwashers
Type
User manual
Electrolux
EFS - Dishwashing Systems Platform
Electrolux Professional
DOC. NO. 5956.446.06 ©Copyright 2005 by Electrolux Professional P.1/116
SERVICE MANUAL
CONTENTS:
This document contains the instruction to change parameter settings of electronic
board by means of user interface.
EDITION:
05.2008
TANK
BOILER
3.__
TANK
BOILER
3.__
TANK
BOILER
3.__
Electrolux
EFS – Dishwashing Systems Platform
Electrolux Professional
Electronic Dishwasher
SERVICE MANUAL
DOC. NO. 5956.446.06 ©Copyright 2005 by Electrolux Professional P.2/116
INDEX
1. KEYBOARDS 3
1.1 HOODTYPE Style 3
1.2 UNDERCOUNTER Style 4
2. MANUAL ACTIVATION OF DETERGENT AND RINSE AID DISPENSERS 5
2.1 Detergent Dispenser Activation 5
2.2 Rinse Aid Dispenser Activation 5
3. RINSE PUMP MANUAL ACTIVATION 5
4. DETERGENT AND RINSE AID DOSAGE 6
GEn General Parameters 6
5. COUNTERS 8
Cnt Counters 8
6. TEMPERATURE SETTING 9
FAC Factory Parameters 8
7. CYCLE SETTING 11
CYCLE DIAGRAM
CY1 Cycle 1 Parameters 13
CY2 Cycle 2 Parameters 13
CY3 Cycle 3 Parameters 13
drn Drain/Cleaning Cycle Parameters 13
8. OTHER PARAMETERS 14
dPA Dishwashing Parameters 14
ron Read Only Parameters 14
HCP Communication and HACCP Parameters 14
CFG Configuration Parameters 15
dbG Parameters for automatic hood type dishwashers 16
9. SPECIAL FEATURES 17
9.1 RESIN REGENERATION CYCLE 17
9.2 MEDICAL LINE DISHWASHER WITH DOOR/HOOD LOCK DEVICE 17
9.3 DETERGENT AND RINSE AID LEVEL SENSORS ACTIVATION 17
9.4 dISHWASHER WITH INCORPORATED CONTINUOUS WATER SOFTENER 18
10. MAIN BOARD CONFIGURATION 19
10.1 CODEÆProg. TABLE 19
10.2 PROGRAMMING SHEETS 24
11. DEFAULT VALUES 94
12. USER INTERFACE AND MAIN BOARD CONNECTORS 97
12.1 MAIN MALFUNCTIONS NOT DUE TO THE MAIN BOARD 97
12.2 CONNECTORS LAYOUT 97
13. ALARM MESSAGES AND TROUBLESHOOTING 105
14. LIST OF PARAMETERS FOR SUBSEQUENT VERSIONS 105
Electrolux
EFS – Dishwashing Systems Platform
Electrolux Professional
Electronic Dishwasher
SERVICE MANUAL
DOC. NO. 5956.446.06 ©Copyright 2005 by Electrolux Professional P.3/116
1. KEYBOARDS
1.1. HOOD TYPE Style
SETTING MODES:
To enter into one setting mode (Fig.1.4, Fig.1.5) the appliance should be in stand-by: switch on the
appliance, no cycles selected. Is useful keep door open to avoid start cycle in case of not
simultaneously pressure of the two keys.
Fig. 1.5
Enter into Factory Parameters
(Hold down buttons for at least
five seconds).
FAC
Fig. 1.8
Confirm Value and go
to next Parameter
(In setting mode only)
888
Fig. 1.7
Decrease Parameter Value
(In setting mode only)
888
Fig. 1.6
Next Parameter Family OR
Increase Parameter Value
(In setting mode only)
888
Fig. 1.2
Rinse Aid Dispenser
Manual Activation.
rAi
Fig. 1.3
Rinse Pump
Manual Activation
(used to EMPTY BOILER)
---
Fig. 1.4
Enter into General Parameters
(Hold down buttons for at least
five seconds).
GEn
Fig. 1.1
Detergent dispenser
Manual Activation.
dEt
dEt
rAi
---
GEn
FAC
888
888
888
Electrolux
EFS – Dishwashing Systems Platform
Electrolux Professional
Electronic Dishwasher
SERVICE MANUAL
DOC. NO. 5956.446.06 ©Copyright 2005 by Electrolux Professional P.4/116
1.2. UNDERCOUNTER Style
SETTING MODES:
To enter into one setting mode (Fig.1.4, Fig.1.5) the appliance should be in stand-by: switch on the
appliance, no cycles selected. Is useful keep door open to avoid start cycle in case of not
simultaneously pressure of the two keys.
TAN
K
BOILER
dEt
Fig.1.1
Detergent dispenser
Manual Activation
TAN
K
BOILER
rAi
Fig.1.2
Rinse Aid Dispenser
Manual Activation
TAN
K
BOILER
---
Fig.1.3
Rinse Pump
Manual Activation
(used to EMPTY BOILER)
TAN
K
BOILER
GEn
Fig. 1.4
Enter into General Parameters
(Hold down buttons for at least five
seconds).
TAN
K
BOILER
FAC
Fig. 1.5
Enter into Factory Parameters
(Hold down buttons for at least five
seconds).
TAN
K
BOILER
888
Fig.1.6
Next Parameter Family
OR
Increase Parameter Value
(in setting mode only)
TAN
K
BOILER
888
Fig.1.7
Decrease Parameter Value
(In setting mode only)
TAN
K
BOILER
888
Fig.1.8
Confirm Value and go to next Parameter
(in setting mode only)
Electrolux
EFS – Dishwashing Systems Platform
Electrolux Professional
Electronic Dishwasher
SERVICE MANUAL
DOC. NO. 5956.446.06 ©Copyright 2005 by Electrolux Professional P.5/116
2. MANUAL ACTIVATION OF DETERGENT AND RINSE AID
DISPENSERS
When replacing detergents may be necessary activate the dispensers to fill hoses.
2.1. Detergent Dispenser Activation
Switch on the dishwasher.
Press and hold down CYCLE_2 and CYCLE INFINITE keys, after two 'beep' the detergent dispenser
starts work for 20 sec.
2.2. Rinse Aid Dispenser Activation
Switch on the dishwasher.
Press and hold down CYCLE_1 and CYCLE INFINITE keys, after two 'beep' the rinse aid dispenser
starts work for 40 sec.
3. RINSE PUMP MANUAL ACTIVATION
Use this function to empty the boiler (if the dishwasher is not to be used for a long time, for maintenance operation: ex. before replacing
main board).
Switch on the dishwasher.
Close the door and press and hold down DRAIN and CYCLE INFINITE keys. A buzzer signal indicates the
rinse pump activation and the display shows three blinking lines. Three beeps indicate the cycle end.
dEt
rAi
---
Electrolux
EFS – Dishwashing Systems Platform
Electrolux Professional
Electronic Dishwasher
SERVICE MANUAL
DOC. NO. 5956.446.06 ©Copyright 2005 by Electrolux Professional P.6/116
4. DETERGENT AND RINSE AID DOSAGE
In this paragraph is explained how to set the working time for the detergent and rinse aid dispensers.
For each dispenser there are two parameters: the initial time and the time during cycle execution.
GEn General Parameters
Sym. Parameter Description
Unit Min Max
Factory
Default
dIn
Initial Detergent Dosage (during filling tank) [s] 0 240 90
rIn
Initial Rinse Aid Dosage (starts when tank filled) [s] 0 180 10
dEt
Detergent Dosage During Cycle Execution (during wash phase) [s] 0 182(*) 8
rAi
Rinse Aid Dosage During Cycle Execution (when refilling boiler) [s] 0 62 (*) 4
How change the duration:
Switch OFF and switch ON the dishwasher;
Enter into the USER SETTING mode by pressing and hold down ON/OFF and CYCLE_1 keys for at least five seconds
the display
shows
GEn (Fig.3.1);
Press CYCLE_INFINITE. The display shows alternatively the symbol
dIn and the duration in seconds (Fig.3.2 and 3.3);
NOTE: If User Interface v.3.00 tank led is on if value correspond to factory default (Default 1, HOOD TYPE).
Use CYCLE_1 key to decrease the duration and CYCLE_2 key to increase (Fig.3.3);
After settled the duration press CYCLE_INFINITE key to store value
. The display shows the next parameter (Fig.3.4) and the
corresponding value (Fig.3.5);
In the same way is possible to change the other duration; when finished switch OFF and switch ON.
Fig. 3.8
Cycle rinse aid dosage
rAi
© ª
Fig. 3.9
Change time activation
7
© ª
DEFAULT
Fig. 3.7
Change time activation
(Tank LED indicates default)
8
Fig. 3.6
Cycle detergent dosage
dEt
Fig. 3.2
Initial detergent dosage
dIn
© ª
DEFAULT
Fig. 3.3
Change duration.
(Tank LED indicates default).
90
Fig. 3.4
Initial rinse aid dosage
rIn
© ª
Fig. 3.5
Change duration
24
Fig. 3.1
Enter into User Mode
(press for 5 sec).
GEn
Electrolux
EFS – Dishwashing Systems Platform
Electrolux Professional
Electronic Dishwasher
SERVICE MANUAL
DOC. NO. 5956.446.06 ©Copyright 2005 by Electrolux Professional P.7/116
(*) Note for external dispensers:
If
DEt=181 the detergent dispenser works when WASHING PUMP is being activated; at the same time voltage
is supplied between connectors L1
7
–L1
9
(main terminal box);
If
dEt=182 the detergent dispenser works when LOADING EV is being activated to re-fill boiler level; at the
same time voltage is supplied between connectors L1
7
–L1
9
(main terminal box);
If
rAi= 61 the rinse aid dispenser works when LOADING EV is being activated to re-fill boiler level; at the same
time voltage is supplied between connectors L1
8
–L1
9
(main terminal box);
If
rAi= 62 the rinse aid dispenser works when WASHING PUMP is being activated; at the same time voltage is
supplied between connectors L1
8
–L1
9
(main terminal box);
- For electrical connections refer to electric diagram -
Example
Suppose there is connected an external detergent dispenser with a probe into the tank. A typical setting could be:
DIn= 0 the dispenser is not activated during filling tank;
DEt=181 the dispenser is supplied during washing phase and the probe automatically dose the right detergent
amount.
Electrolux
EFS – Dishwashing Systems Platform
Electrolux Professional
Electronic Dishwasher
SERVICE MANUAL
DOC. NO. 5956.446.06 ©Copyright 2005 by Electrolux Professional P.8/116
5. COUNTERS
This Parameter Family collects cycle counters and water consumption counters.
For water consumption counters a flow meter must be installed. See
PPL (calibration parameter) into dPA section (§ Other Parameters).
Cnt Counters
Sym. Parameter Description
Unit Min Max
Factory
Default
CYC
Cycles performed counter.
CYC symbol and two numbers blink consecutively. The cycle number is
obtained by joining the two numbers. Ex.
CYC 10 042 means 10042
cycles executed.
-
cYc
Cycle counter (resettable).
This counter is similar to
CYC but is resettable by user (see rSt parameter
below).
-
nnc
Water Consumption.
(only for dishwashers with incorporated continuous water softener).
Counts m
3
of water consumption.
[m
3
]
L
Water Consumption.
(only for dishwashers with incorporated continuous water softener).
Counts
litres of water consumption.
The total consumption is given by adding
nnc [m
3
] and L [l] values.
[l]
Lit
Water Consumption: resettable counter. [present up to software version 3.12]
Counts the litres of water and is resettable by user (see
rSt parameter below).
[l]
rSt
Reset resettable counters: cYc and Lit
To reset put 1 this parameter, switch off and then on again:
cYc and Lit
will show zero. Note that
cYc is used to count cycles for CAll message
(see next parameter,
nCY).
-
nCY
Store thousand of cycles after that CAll message appears on display.
Ex. If this parameter is settled to 20,
CAll message appears when cYc
reach 20.000 cycles.
-
drn
Drain/Cleaning cycles performed.
Similar to
CYC but counts Cleaning Cycles.
-
rCY
Numbers of cycles that can be made after a regeneration cycle (only for
dishwashers with non-continuous water softener) [See paragraph 9.1 resin
regeneration cycle.].
- 20
NRE
Regeneration cycle counter (only for water softener dishwasher)
[See paragraph 9.4 Dishwashers with incorporated continuous water
softener]. NrE only counts efficient regeneration cycles, i.e. those carried
out with salt in the special container (only for dishwashers with incorporated
continuous water softener)
-
rES
Counter of regeneration cycles done without salt in the special container. (only
for dishwashers with incorporated continuous water softener) [See paragraph 9.4
Dishwashers with incorporated continuous water softener].
-
Fig.4.2
Next Family
GEn
Fig. 4.3
Counters Fam.:
Cnt
Fig. 4.4
CYCLES
CYC
Fig.4.1
USER setting mode
(press for 5s)
GEn
Fig. 4.5
Thousand.
010
Fig. 4.6
Units.
042
Fig. 4.7
Next counter.
cYc
Electrolux
EFS – Dishwashing Systems Platform
Electrolux Professional
Electronic Dishwasher
SERVICE MANUAL
DOC. NO. 5956.446.06 ©Copyright 2005 by Electrolux Professional P.9/116
6. TEMPERATURE SETTING
In this paragraph is explained how to change temperature thresholds and all parameters related to boiler and tank.
FAC Factory Parameters
Sym. Parameter Description
Unit Min Max
Factory
Default
bt°C
Boiler Temperature: THRESHOLD.
When boiler temperature reaches this value, heaters switch off.
[° C]
45 95
78
btH
Boiler Temperature HISTERESIS, (represent dead band).
Heater switch on if boiler temperature is below:
bt°C - btH
[° C]
2 10
2
bHi
Boiler Temperature: HIGH LIMIT.
When boiler temperature reaches this value
C 2 alarm appears.
Put 0 to disable
C 2 alarm.
[° C]
0 98
96
bLo
Boiler Temperature: LOW LIMIT.
During boiler warm-up, temperature must increase at least
bLo °C otherwise
E 3 warning appears.
Put 0 to disable
E 3 warning.
[° C]
0 10
1
bFL
Boiler Filling Timeout.
If filling time is longer than
bFL, A 1 alarm appears.
Put 0 to disable
A 1 alarm.
[min] 0 42
5
bAJ
Boiler Temperature Adjust. [°C] 0 7
4
bP
Boiler Priority (enable boiler wait function)
0=disabled
1=enabled
- 0 1
1
bSt
Booster Function
Overheat gap over Boiler Temperature Threshold
[°C] 0 15
2
btd
Boiler temperature negative differential: when the dishwasher is in standby,
boiler threshold becomes:
bt°C - btd
(Used to save energy during machine inactivity by keeping boiler water at a
lower temperature).
[°C] 0 20
0
tt°C
Tub Temperature: THRESHOLD
When tank temperature reaches this value, heater switch off.
[° C]
40 85
63
ttH
Tub Temperature: HISTERESIS, (represent dead band).
Heater switch on if tank temperature is below:
tt°C - ttH
[° C]
2 30
5
tHi
Tank Temperature: HIGH LIMIT.
When tank temperature reaches this value
C 3 alarm appears.
Put 0 to disable
C 3 alarm.
[° C]
0 95
75
tLo
Tank Temperature: LOW LIMIT.
During tank warm-up, temperature must increase at least
bLo °C otherwise
E 2 warning appears.
Put 0 to disable
E 2 warning.
[° C]
0 10
1
tFL
Tank Filling Timeout.
If filling time is longer than
tFL, A 1 alarm appears.
Put 0 to disable
A 1 alarm.
[min] 0 42
20
Electrolux
EFS – Dishwashing Systems Platform
Electrolux Professional
Electronic Dishwasher
SERVICE MANUAL
DOC. NO. 5956.446.06 ©Copyright 2005 by Electrolux Professional P.10/116
To modify thresholds do the following:
Switch OFF and switch ON the dishwasher;
Enter into the FACTORY SETTING mode by pressing and hold down ON/OFF and CYCLE_2 keys for at least five seconds (Fig.5.1);
Press CYCLE INFINITE. The display shows alternatively the symbol
bt°C (Fig.5.2) and the corresponding value 76 (Fig.5.3);
Use CYCLE_1 key to decrease the value and CYCLE_2 key to increase (Fig.4.3);
Press CYCLE INFITE key to confirm
. The display shows the next parameter (Fig.4.4) and the corresponding value (Fig.4.5);
In the same way is possible to change the other parameters; when finished switch OFF and switch ON.
At the end the display will show again ‘FAC’ and by pressing CYCLE_2 key (Fig.4.9) is possible to change cycle duration (see next
paragraph).
Fig. 5.9
Factory setting mode
FAC
Fig. 5.10
Next Family
FAC
Fig. 5.11
Cycle 1 Family: ENTER
CY1
©ª
Fig. 5.7
Change value & Store
96
bLo
Fig. 5.6
Tank temp. High limit.
bHi
© ª
Fig. 5.5
Change value & Store
2
Fig. 5.1
Factory setting mode
FAC
Fig. 5.2
Boiler temp. threshold
bt°C
©ª
Fig. 5.3
Change value & Store
76
Fig. 5.4
Boiler Temp Hysteresis
btH
Electrolux
EFS – Dishwashing Systems Platform
Electrolux Professional
Electronic Dishwasher
SERVICE MANUAL
DOC. NO. 5956.446.06 ©Copyright 2005 by Electrolux Professional P.11/116
7. CYCLE SETTING
In this paragraph is explained how to change cycle phases duration (see Tab.1 next page).
Switch on the dishwasher;
Enter into the FACTORY SETTING mode: press and hold down ON/OFF and CYCLE_2 keys for at least 5 seconds (Fig.5.1);
Press CYCLE_2 key to select CYCLE_1 parameters.
Press CYCLE_INFINITE. The display shows alternatively the symbol (Fig.5.2) and the corresponding value (Fig.5.3);
Use CYCLE_1 key to increase the value and CYCLE_2 key to decrease (Fig.5.3);
Press CYCLE_INFINITE key to confirm. The display shows the next parameter (Fig.5.4) and the corresponding value (Fig.5.5);
In the same way is possible to change the other parameters;
After settled all parameters referring Cycle 1, by pressing CYCLE_2 key is possible to change the Cycle 2 parameters (Fig.5.8, 5.9) and so
on.
©ª
Fig. 6.7
Change value & Store.
35
Fig. 6.6
Wash duration [sec].
Sh1
© ª
Fig. 6.5
Change value & Store.
0
Fig. 6.1
Factory setting mode.
FAC
Fig. 6.2
Select next class.
FAC
Fig. 6.3
Cycle 1 Family: ENTER
CY1
Fig. 6.4
Wash duration [min].
Ln1
© ª
Fig. 6.13
Wash duration [min].
Ln3
Fig. 6.12
Cycle 3 Parameters:
ENTER
Cy3
Fig. 6.11
Cycle 2 Parameters:
next Family
CY2
Fig. 6.8
Cycle 1 Parameters.
CY1
Fig. 6.9
Cycle 2 Parameters: ENTER
CY2
Fig. 6.10
Wash duration [min].
Ln2
Electrolux
EFS – Dishwashing Systems Platform
Electrolux Professional
Electronic Dishwasher
SERVICE MANUAL
DOC. NO. 5956.446.06 ©Copyright 2005 by Electrolux Professional P.12/116
CYCLE DIAGRAM
CYCLE TYME
WASH
PRE RINSE
RINSE
COLD RINSE
DRAIN
RINSE AID
DETERGENT
IPA
Ln Sh
PA
Pr
ri
cr
FINAL
PAUSE
FP
dr
RAi
DEt
RINSE PAUSE
rPA
Electrolux
EFS – Dishwashing Systems Platform
Electrolux Professional
Electronic Dishwasher
SERVICE MANUAL
DOC. NO. 5956.446.06 ©Copyright 2005 by Electrolux Professional P.13/116
CY1 Cycle 1 Parameters
Sym. Parameter Description
Unit Min Max
Factory
Default
Ln1
Wash Phase Long [min] 0 20
0
Sh1
Wash Phase Short [s] 1 60
35
PA1
Pause [s] 0 20
4
Pr1
Pre-rinse Duration [s] 0 30
0
ri1
Rinse Phase Duration [s] 10 45
16
cr1
Cold Rinse Phase Duration [s] 0 50
0
dr1
Drain [s] 0 40
16
FP1
Final Pause at End of Cycle [s] 0 60
0
CY2 Cycle 2 Parameters
Sym. Parameter Description
Unit Min Max
Factory
Default
Ln2
Wash Phase Long [min] 0 20
0
Sh2
Wash Phase Short [s] 1 60
45
PA2
Pause [s] 0 20
4
Pr2
Pre-rinse Duration [s] 0 30
0
ri2
Rinse Phase Duration [s] 10 45
16
cr2
Cold Rinse Phase Duration [s] 0 50
0
dr2
Drain [s] 0 40
16
FP2
Final Pause at End of Cycle [s] 0 60
0
CY3 Cycle 3 Parameters
Sym. Parameter Description
Unit Min Max
Factory
Default
Ln3
Wash Phase Long [min] 0 20
1
Sh3
Wash Phase Short [s] 1 60
40
PA3
Pause [s] 0 20
4
Pr3
Pre-rinse Duration [s] 0 30
0
ri3
Rinse Phase Duration [s] 10 45
16
cr3
Cold Rinse Phase Duration [s] 0 50
0
dr3
Drain [s] 0 40
16
FP3
Final Pause at End of Cycle [s] 0 60
0
bt3
Boiler Temperature Threshold: only for Cycle 3.
This parameter allows having a different rinsing temperature for the
third cycle. Only values above 45°C are allowed.
[°C] 0 95
0
drn Drain/Cleaning Cycle Parameters
Sym. Parameter Description
Unit Min Max
Factory
Default
Idr
Initial Drain Phase Duration [s] 0 240
40
Fdr
Final Drain Phase Duration [s] 0 240
60
drt
Drain without cleaning cycle - 0 1
0
Electrolux
EFS – Dishwashing Systems Platform
Electrolux Professional
Electronic Dishwasher
SERVICE MANUAL
DOC. NO. 5956.446.06 ©Copyright 2005 by Electrolux Professional P.14/116
8. OTHER PARAMETERS
dPA
Dishwashing Parameters
Sym. Parameter Description
Unit Min Max
Factory
Default
IPA
Initial Pause before start washing (for ALL cycles) [s] 0 10
0
dLY
Delay for the 2
nd
wash pump (PW only) [s] 0 10
3
Pdr
Active a drain phase at the end of washing phase. [s] 0 40
0
RPA
Duration of pause after rinse cycle (valid for dishwashers with door/hood
lock device) [See par. 9.2 Medical line dishwasher with door/hood lock
device].
[s] 0 60
0
C F
Celsius/Fahrenheit selection
0 = Celsius
1 = Fahrenheit
- 0 1
0
rit
Rinse Temperature Display.
Enable rinse temperature probe (if installed).
0 = during rinse phase the display shows boiler temperature;
1 = during rinse phase the display shows rinse temperature;
- 0 1
0
PPL
Pulse Per Litre.
This parameter must be settled in according to flow meter installed
[present up to software version 3.12].
[p/l] 0 255
0
CdE
Number of wash cycles performable without detergent (only for
dishwashers with external detergent level sensor – par. 9.2.1 Detergent
and rinse aid level sensors activation) [LES=1]
- 0 5
5
1LE
Pressure sensor threshold 1 [present up to software version 2.11]. - 0 255
140
1HS
Pressure sensor histeresis 1 [present up to software version 2.11]. - 0 255
50
2LE
Pressure sensor threshold 2 [present up to software version 2.11]. - 0 255
140
2Hs
Pressure sensor histeresis 2 [present up to software version 2.11]. - 0 255
50
Note:
1LE
,
1HS
,
2LE
,
2HS
parameters emulates a two levels pressure switch, keep in mind that value doesn’t correspond to a
physical quantity.
ron Read Only Parameters
Sym. Parameter Description
Unit Min Max
Factory
Default
rEL
Main Board Firmware Release - - - -
rLs
Water softener board software version. (only for dishwashers with
incorporated continuous water softener).
- - - -
ACC
Active column: indicates through which of the two continuous water
softener columns boiler filling is being carried out: 0 = column A and 1 =
column B (only for dishwashers with incorporated continuous water
softener).
- - - -
CAll
When CAll message appears, the parameter value becomes 3.
After maintenance, to clear
CAll message, insert 0.
- - - -
C 8
When C 8 alarm appears, the machine is frozen and this parameter is 3.
After maintenance (see alarm codes document), insert 0 to enable the
machine.
- - - -
F21
This alarm appears in case of malfunctioning in the continuous water
softener. To facilitate fault-finding, see par. E "Alarm codes that stop the
machine for models with incorporated continuous water softener".
- - - -
HCP Communication and HACCP Parameters
Sym. Parameter Description
Unit Min Max
Factory
Default
SEr
Serial Device
0 = 8N1
1 = PC connection (DAAS 8E1)
7 = HACCP network (ECAP 8E1+LK485)
(LK485 board is necessary)
9 = Dishwashers with incorporated continuous
water softener
11 = Machines with incorporated continuous water
- 0 63
1
Electrolux
EFS – Dishwashing Systems Platform
Electrolux Professional
Electronic Dishwasher
SERVICE MANUAL
DOC. NO. 5956.446.06 ©Copyright 2005 by Electrolux Professional P.15/116
softener that communicate with LK485 board
16 = HACCP printer (8N1)
32 = MODEM GSM (DAAS 8N1)
33 = MODEM GSM (DAAS 8E1)
48 = Hyper Terminal (8N1)
Adr
Address.
This parameter specifies the address of the appliance into the
‘HACCP_network’.
Works only if ‘HACCP network’ is selected (see above parameter).
- 0 255
1
Prn
Print parameter table. - 0 1
1
bt
HACCP ‘Basic’ (printer)
Boiler temperature: high limit.
[°C] 45 95
90
bH
HACCP ‘Basic’ (printer)
Boiler temperature: gap below high limit.
[°C] 0 20
10
tt
HACCP ‘Basic’ (printer)
Tank temperature: high limit.
[°C] 35 75
68
tH
HACCP ‘Basic’ (printer)
Tank temperature: gap below high limit.
[°C] 0 20
10
CFG Configuration Parameters
Sym. Parameter Description
Unit Min Max
Factory
Default
tYP
Dishwasher Model:
0 = HOOD TYPE & UNDERCOUNTER
1 = POT WASHER
2 = AUTOMATIC POT WASHER
3 = MEDICAL LINE DISHWASHER WITH LOCK DOOR/HOOD
DEVICE
- 0 3
0
boi
Boiler type:
0 = ATMOSPHERIC BOILER
1 = PRESSURE BOILER
2 = EXTERNAL BOILER
- 0 2
0
doo
Door type:
0 = AUTOMATIC HOOD
1 = MANUAL HOOD
2 = FRONT LOADING
3 = POT WASHER
0 3
1
dFL
Default model (see Default tables):
1 = HOOD TYPE
2 = POT WASHER
3 = UNDERCOUNTER
- 0 3
-
trc
Solid State Relay (TRIAC).
0 = not enabled;
1 = SOFT START enabled;
3 = SLOW SOFT START enabled
(works only on boards with Solid State Relay).
- 0 3
0
b_t
Boiler/Tank heating swap:
0 = boiler heaters and tank heater can work simultaneously;
1 = swap enabled: tank heating starts only boiler temperature is
reached;
(Note: disabling this function changes the global electrical power of
appliance; before enabling this function check available power, supply cable
section, fuses in according to User Manual).
- 0 1
1
btF
Tank Filling Mode
Enable filling tank by means of rinsing cycles.
Ex:
btF = 75 means that boiler water is heated at 75°C, then follows a
rinse phase and so on until tank is full.
If
btF = 0 the tank is filled by solenoid valve in the traditional way (On
machines with incorporated continuous water softener, even if btF is set to
0, filling occurs through subsequent rinses).
[°C] 0 85
75
LES
Detergent Level Switches
0 = level switches not enabled;
1 = enable detergent level switches;
- 0 1
0
UI
USER INTERFACE MODEL
8 = ACTIVE function disabled
(up to version 3.11 [up to serial nr.
42100099] set to 0)
9 = hood type, under counter (up to version 3.11 [up to serial nr.
42100099] set to 1)
13 = LS5 with atmospheric boiler(up to version 3.11 [up to serial nr.
42100099] set to 5)
15 = LS5 with pressure boiler (user interface without display); (up to
version 3.11 [up to serial nr. 42100099] set to 7)
- 0 15
9
Electrolux
EFS – Dishwashing Systems Platform
Electrolux Professional
Electronic Dishwasher
SERVICE MANUAL
DOC. NO. 5956.446.06 ©Copyright 2005 by Electrolux Professional P.16/116
24 = LS5 with atmospheric boiler (From Ser. Nr.: 821).
See parameter
rEL(family ron) to check the software version
installed in the board.
rE
Enable “regeneration cycle” key (only for dishwashers with non-continuous
water softener) [See paragraph 9.1 resin regeneration cycle].
- 0 1
0
ALr
ALARMS ENABLE
0 = alarms disabled (to disable also warnings see
bLo and tLo);
1 = alarms enabled;
If this function is disabled, faults can be detected so display do not shows
any alarm code.
- 0 1
1
AAG
Air gap with float level sensor normally closed (the level sensor is closed
when the boiler is empty). E.g. the boiler level sensor for machines with
incorporated continuous water softener.
- 0 1
0
FrG
Forced start of a resin regeneration cycle (only for dishwashers with
incorporated continuous water softener). [See paragraph 9.4 Dishwashers
with incorporated continuous water softener].
- 0 2
0
SrU
Max. rinse water hardness (only for dishwashers with incorporated
continuous water softener). After modifying, disconnect and reconnect the
machine's main power supply by means of the main switch. [See paragraph
9.4 Dishwashers with incorporated continuous water softener].
°fH 4 14
10
BPo
Boiler heating control.
Defines the max. permissible temperature difference during boiler heating in
a time interval of 2 minutes and 30 seconds.
°C 25 80
50
dbG
Parameters for automatic hood type dishwashers
Sym. Parameter Description
Unit Min Max
Factory
Default
t 1
DELAY_K1
Time (during hood lifting) within which S3” must return to the rest position.
0.1 s 0.0 s. 20.0 s
15
t 2
HOOD_TOUT
TIMEOUT – max. time allowed for complete hood opening/closing.
0.1 s 0.0 s. 20.0 s
200
t 3
DELAY_K1_S3
During hood lowering, firstly S3” must cut in and then after a time
t3 .the bottom limit switch S3.
0.1 s 0.0 s. 20.0 s
15
t 4
DELAY_K
Time within which K and K’ must be both closed or both open.
0.1 s 0.0 s. 20.0 s
10
t 5
DELAY_S3
Time during hood lifting within which the bottom limit switch must return
to the rest position..
0.1 s 0.0 s. 20.0 s
20
t 6
DELAY_S5
Time during hood lowering within which the top limit switch must return to
the rest position.
0.1 s 0.0 s. 20.0 s
20
AL_
Displays the last alarm code relative to automatic hood type dishwashers. - - -
-
Ith
Parameter only valid for hood type models.
Hood lifting motor absorption threshold.
(50 units correspond to a current of approx. 1 ampere).
- 0 250
100
Ith
Parametro valido solo per cappottine.
Soglia limite di assorbimento del motore di sollevamento della cappotta
(50 Unità corrispondono ad una corrente di circa un ampere).
- 0 250
100
Electrolux
EFS – Dishwashing Systems Platform
Electrolux Professional
Electronic Dishwasher
SERVICE MANUAL
DOC. NO. 5956.446.06 ©Copyright 2005 by Electrolux Professional P.17/116
9. SPECIAL FEATURES
9.1 RESIN REGENERATION CYCLE
The regeneration cycle is activated by pressing the button shown in the figure, for at least 5 seconds.
For this key to be enabled parameter
rE (in family CFG) must be set to 1.
At this point you can enter the number of wash cycles that can be performed after each regeneration: parameter rCY in the
counters family
Cnt. If rCY is set to zero the counter is disabled, otherwise after the preset number of cycles the
message
rEG is displayed to confirm that regeneration is possible (this is an information-only message with no effect on
operation of the appliance, so you can continue to use the dishwasher). The message is cleared when the regeneration cycle is
terminated.
The number of regeneration cycles performed can be checked by consulting the parameter
nrE in the Cnt family of
counters.
When there are just 15 cycles remaining before the next regeneration cycle, at the end of the wash cycle the display shows the
message
End followed by 15, at the end of the next wash cycle the display shows End and 14, and so forth, i.e. the
display informs the user of the number of wash cycles still available before resin regeneration is required.
Before starting the regeneration cycle remove the siphon spillway.
CAUTION: if the regeneration cycle is accidentally started, it can be switched off by pressing the button shown in the figure, for
at least 5 seconds.
The hardness of the water exiting the softener can vary between 3°fH - 10 °fH / 1.7 °dH - 5.6 °dH / 2.1 °cH - 7 °cH.
9.2 MEDICAL LINE DISHWASHER WITH DOOR/HOOD LOCK DEVICE
The medical line dishwasher with door/hood lock device has a device that prevents door/hood opening for the entire duration of
the work cycle.
For the door/hood lock to be active, the parameter
tYP (in the CFG family) must be set to 3.
The dishwasher door/hood is locked at the start of a wash cycle and is released at the end of the final pause after rinse. The
wash compartment can be accessed by stopping the work cycle in progress, as the locking device is thus disabled.
A pause at the end of rinse can be set by means of the parameter
rPA (in thedPA family). This parameter is common to all
3 wash cycles. The rinse water temperature is displayed during this pause. Another final pause in the cycle can be set by setting
the parameters
FP1, FP2, FP3. During the final pause the display shows the time remaining for completion of the cycle.
The door/hood lock device will be deactivated at the end of the final pause (
FP1, FP2, FP3).
For correct performance of the wash cycle the pause at the end of rinse and the final pause must assume the default values
(see Prog 032 – 034 - 035).
9.3 DETERGENT AND RINSE AID LEVEL SENSORS ACTIVATION
By setting the parameter
LES (in the CFG family) to 1, management of the level sensors located inside the external
detergent and rinse aid tanks is enabled. During the rinse phase, when the rinse aid inside the tank has finished, the message
rAi 0 appears on the display.
When the detergent inside the tank is finished, the message
dEt 0 is displayed and after a number of wash cycles equal
to
CdE (in the dPA family) the dishwasher inhibits the activation of other wash cycles. Therefore the detergent level in the
tank must be restored.
TANK
BOILER
Electrolux
EFS – Dishwashing Systems Platform
Electrolux Professional
Electronic Dishwasher
SERVICE MANUAL
DOC. NO. 5956.446.06 ©Copyright 2005 by Electrolux Professional P.18/116
9.4 DISHWASHER WITH INCORPORATED CONTINUOUS WATER SOFTENER
Dishwashers with incorporated continuous water softener have a continuous softener in the water circuit. By means of special
resins, this device removes the calcareous substances from the feed water, supplying decalcified water for washing.
To activate the continuous water softener, set the parameter
SER (in the HCP family) to the value 9 or the value 11 if the
water softener board is connected to the LK485 board.
For the continuous softener to work properly the resins must be regenerated periodically with a frequency depending on the
hardness of the inlet water, the number of wash cycles carried out and the max. hardness set with the parameter
SrU (in the
CFG family).
Unlike conventional water softeners, this continuous softener does not require machine stops for regenerating the resins.
To regenerate the resins it is necessary to put coarse salt in the special container located in the dishwasher.
In particular, the salt container must be filled when the dishwasher is used for the first time and whenever the messages
SAL 0 or SAL END are displayed at the start or end of a wash cycle. The salt container holds up to 1.5 kg of salt.
CAUTION: use only coarse salt with a NaCl purity grade of 99.8 %. The use of salt with a lower purity grade may cause
the sale container filter to clog and the water softener to malfunction.
IMPORTANT: The messages
SAL 0 or SAL End may appear for several wash cycles even after topping-up the
salt, as the salt must circulate in the entire system. Correct operation of the dishwasher is not, however, affected.
The number of regeneration cycles performed can be checked by consulting the parameter
nrE in the Cnt family of
counters.
nrE only counts regeneration cycles carried out with the salt container adequately filled; there is another counter, rES (in the
Cnt family) that indicates the number of regeneration cycles done without salt.
If the parameter
SrU is set to the value10, according to the factory setting, the water softener outlet water hardness can
vary between 3°fH - 10 °fH/ 1.7 °dH - 5.6 °dH / 2.1 °cH - 7 ° cH.
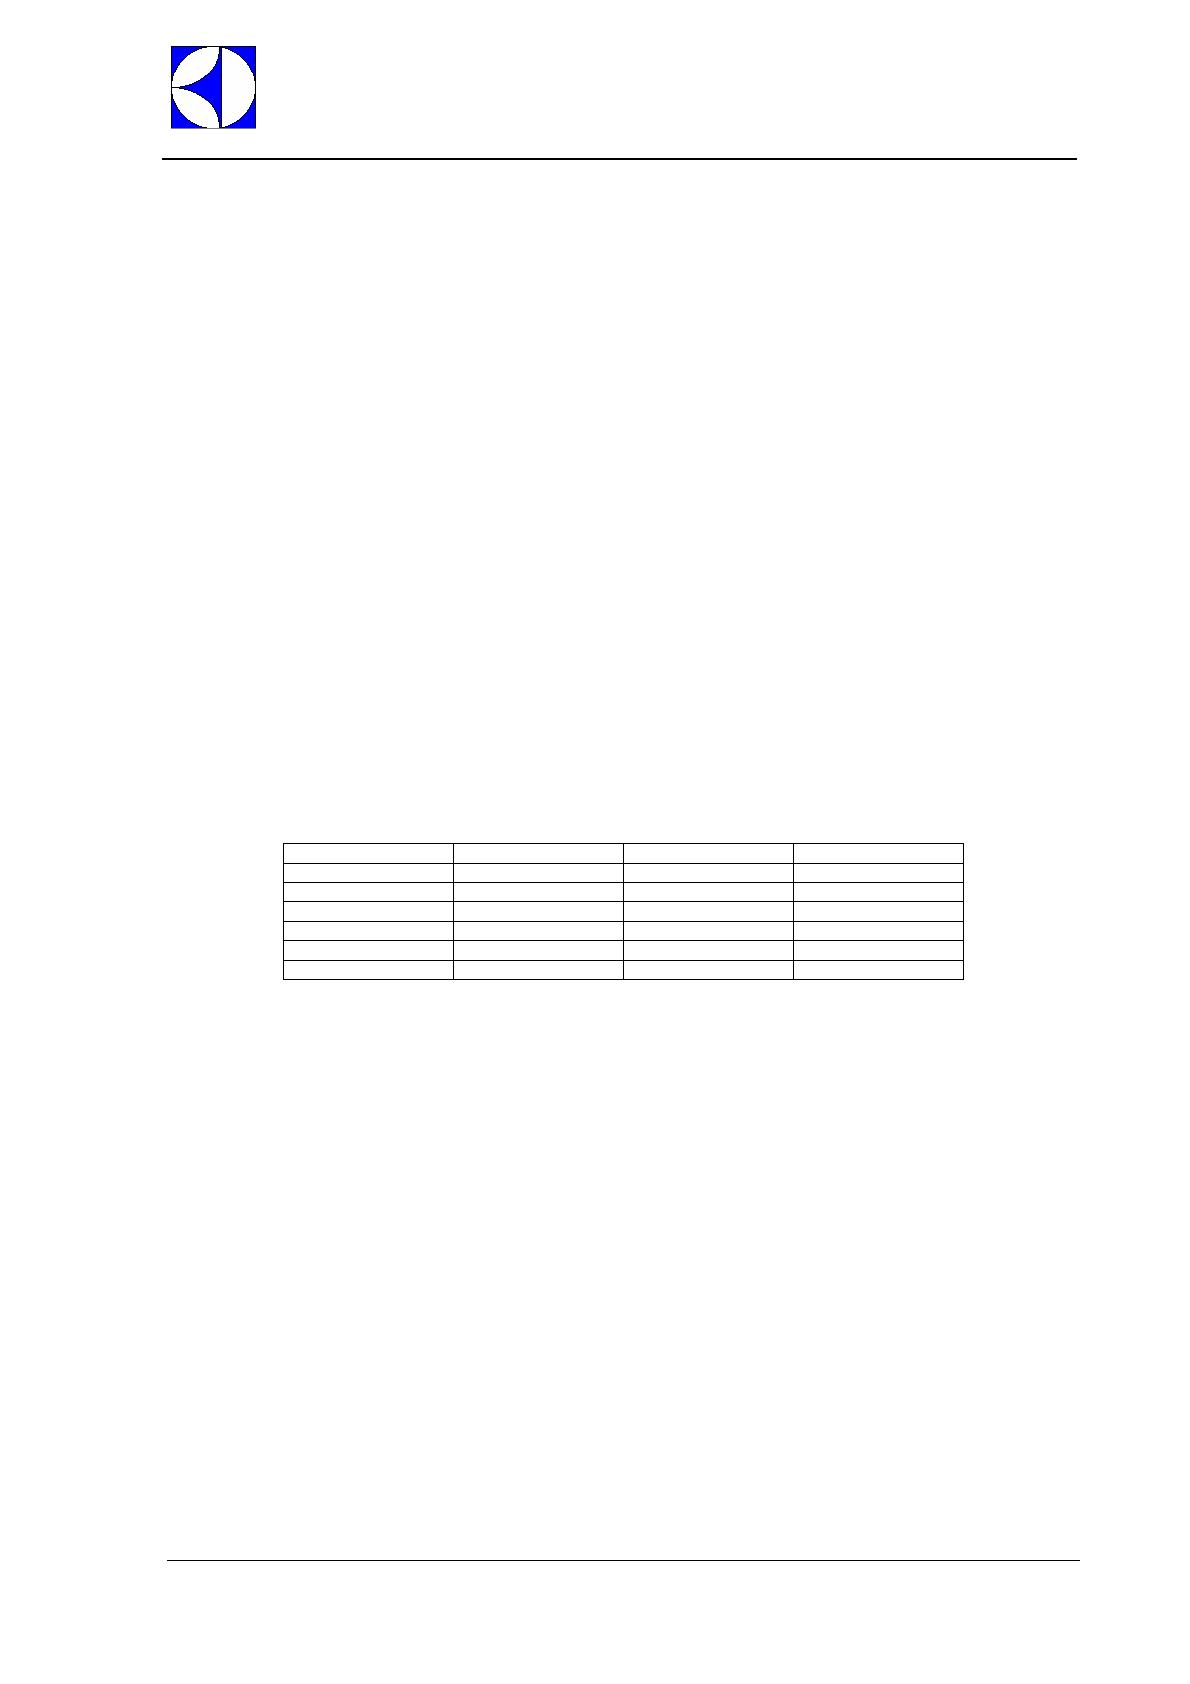
AUTONOMY OF A COLUMN OF RESINS ACCORDING TO THE CHANGE IN INLET WATER HARDNESS, WITH OUTLET
WATER HARDNESS OF 10 °fH / 5.6 °dH /7 °cH (
SrU =10 according to the factory setting).
°fH °dH °cH Number of cycles
15 8,4 10,5 14
20 11,2 14 10
25 14 17,5 7
30 16,8 21,1 6
35 19,6 24,6 5
40 22,4 28,1 4
Maximum outlet water hardness can be modified by setting the SrU value. The outlet water hardness can be modified from the
value of 4° fH to 14° fH.
NB: To save the new water hardness value, in addition to the normal parameter modification and saving operations it is necessary to
disconnect and reconnect the machine's main power supply by means of the main switch on the external board.
Water softener operation can be checked by forcing the regeneration of resins, without waiting for the outlet water hardness to
reach the set max. value (
SrU ).
To do this, wait for the water softener to finish previous resin washing or regeneration operations and set the parameter FrG
(CFG family) to 1 for regenerating column A or to 2 for regenerating column B.
Switch the machine off and on again so that it carries out complete regeneration of the set column. If previous resin washing or
regeneration operations were not completed, the manual request for regeneration is not carried out.
It is possible to check which column is being used for boiler filling by querying the parameter AAC (ron family): if AAC = 0
column “A” is used, if AAC =1 column “B” is used.
The number of litres used by the machine can be checked by querying the parameters nnc (m3 ) and L (litres). To calculate the
total number of litres used by the machine, add the nnc and L values.
NB: In machines with incorporated continuous water softener, tank filling cannot be carried out through overflowing (btF=0) but
only by means of successive rinse cycles (btF=75). Therefore the btF parameter must be set to 75.
Electrolux
EFS – Dishwashing Systems Platform
Electrolux Professional
Electronic Dishwasher
SERVICE MANUAL
DOC. NO. 5956.446.06 ©Copyright 2005 by Electrolux Professional P.19/116
10. MAIN BOARD CONFIGURATION
When receiving an electronic board (spare part) may be necessary to configure it in according to the machine where has to be replaced.
1. With the machine CODE enter into the following table and read the corresponding Prog. number;
2. Follow the instructions reported into the corresponding Prog.XXX sheet (next pages).
3. With the machine CODE find the Layout number in Par. 12.2 – Connectors layout.
10.1. CODEÆProg. TABLE
MODEL CODE Prog. Layout
400007
Up to Ser.: 806 021 11
WT4
From Ser.: 807 065 11
400008
Up to Ser.: 806 020 16
WT4B
From Ser.: 807 064 16
400009
Up to Ser.: 806 021 11
WT4D
From Ser.: 807 065 11
400015
Up to Ser.: 806 020 16
WT4DB
From Ser.: 807 064 16
WT46 400016 020 16
WT4G 400017 022 8
WT4DG 400018 022 8
400019
Up to Ser.: 806 024 21
WT4WS1
From Ser.: 807 066 21
400027
Up to Ser.: 806 012 17
WT4BWS
From Ser.: 807 063 17
400028
Up to Ser.: 806 024 21
WT4DWS1
From Ser.: 807 066 21
400029
Up to Ser.: 806 012 17
WT4BDWS
From Ser.: 807 063 17
400042
Up to Ser.: 806 021 11
WT4D60
From Ser.: 807 065 11
400043
Up to Ser.: 806 036 11
WT4DDG
From Ser.: 807 067 11
400100
Up to Ser.: 806 021 11
LS5/1
From Ser.: 807 065 11
400102
Up to Ser.: 806 021 11
LS5/1 DP
From Ser.: 807 065 11
MODEL CODE Prog. Layout
400103
Up to Ser.: 806 024 21
LS5/1WS
From Ser.: 807 066 21
400110
Up to Ser.: 806 024 21
LS5/1WSDP
From Ser.: 807 066 21
400112
Up to Ser.: 806 020 16
LS5/3
From Ser.: 807 064 16
400113
Up to Ser.: 806 020 16
LS5/3 DP
From Ser.: 807 064 16
400114
Up to Ser.: 806 012 17
LS5/3WS
From Ser.: 807 063 17
400115
Up to Ser.: 806 012 17
LS5/3WSDP
From Ser.: 807 063 17
400117
Up to Ser.: 806 012 17
LS5/3WSDPD
From Ser.: 807 063 17
LB5G 400118 022 8
LB5GDP 400119 022 8
400124
Up to Ser.: 806 021 11
LS5/1DP60
From Ser.: 807 065 11
400125
Up to Ser.: 806 036 11
LS5/1DPAUS
From Ser.: 807 067 11
400126
Up to Ser.: 806 036 11
LS5/1DPCS
From Ser.: 807 067 11
LS6EP 502003 013 16
LS6EP/DD 502004 013 16
LS6EA/DD 502005 011 8
LS6EA/DD/DP 502006 011 8
WT38TDE 502007 032 10
WT38/M50 502008 015 9
LS6EADPWS 502014 044 8
LS6EADPWSG 502015 044 8
WT38WS 502016 044 8
Electrolux
EFS – Dishwashing Systems Platform
Electrolux Professional
Electronic Dishwasher
SERVICE MANUAL
DOC. NO. 5956.446.06 ©Copyright 2005 by Electrolux Professional P.20/116
MODEL CODE Prog. Layout
WT38WSG 502017 044 8
WT38MEDWS 502018 045 8
WT38PM50 502019 039 19
WT37LEV/9 502020 051 18
LS6EADPDWS 502022 044 8
WT38DWS 502023 044 8
LS6SANA 502024 053 10
WT38M50/4 502029 015 9
LS6EA/UK 502030 011 8
LS6EA/UKDP 502031 011 8
LS6EA/60 502041 011 8
WT 38DD 502110 011 8
WT 37 502111
011
8
WT 38 502112
011
8
WT 37/4.5 502117
011
8
WT 38/4.5 502118
011
8
WT 37/UK 502122
046
8
WT38C 502125 033 18
WT38C60 502126 033 18
WT38CUK 502127 033 18
WT38/4.5NW 502129 011 8
WT 38/UK 502217
011
8
WT37J60 502218
046
8
WT37J50 502219
046
8
LS6AH240U 502312 027 9
WT30H208U 502313 031 9
WT30H240U 502314 031 9
WT30H208DU 502315 027 9
WT30H240DU 502316 027 9
WT30H208RU 502317 031 9
WT30H240RU 502318 031 9
LS6H208DU 502319 027 9
LS6AH208U 502320 027 9
WT 38/60 502321 011 8
WT 38/M60 502322 015 9
WT 38MED 502323 014 8
LS6H240DU 502325 027 9
LS6H208RU 502326 027 9
LS6H240RU 502327 027 9
WT30M208U 502328 034 10
WT30M240U 502329 034 10
WT30M208DU 502339 034 10
WT30M240DU 502341 034 10
WT30M208RU 502342 034 10
WT30M240RU 502343 034 10
WT30C208DU 502344 038 9
WT30C240DU 502345 038 9
WT38PM60 502346 039 19
WT38M60/4 502347 015 9
WT30H208WS 502348 056 9
MODEL CODE Prog. Layout
WT30H240WS 502349 056 9
WT30H208DN 502352 068
WT30H240DN 502353 068
WT38WL 502514 055 8
LS6EA 502520 011 8
LS6EA/DP 502521 011 8
LS6EAH 502523 011 8
LS6MCD 502524 033 18
LU7PDP 503020 040 24
LU7ADP 503021 041 22
LU7ADPWS 503022 061 22
WTU40PDP 503023 040 24
WTU40ADP 503024 047 22
WTU40ADPWS 503025 062 22
WTU40ADPD 503026 047 22
LS 10 504100 002 1
LS14EA 504101 001 4
LS 10 UK DP 504102 002 1
ET12E 504104 003 1
LS 10/60Hz 504105 002 1
LS 10 CW 504107 002 1
LS 10 INS 504108 002 1
HT 1200 ins DEK 504109 001 1
LS14EA/INS 504110 001 4
LS 10 N 504111 002 1
LS 10 DP 504114 002 1
LS 10 HD 504115 008 1
LS14EA/AU 504116 004 15
LS14EA/60 504117 001 4
LS 10 UK1 504118 002 1
LS 10 UK3 504119 002 1
LS 12 INS 504120 001 1
LS 12 504121 001 1
LS 12 DP 504122 001 1
LS 12 60Hz 504125 001 1
LS 12 CW 504128 001 1
HT 1200 DEK 504129 001 1
LS14EA/ASIA 504131 009 4
LS14EA/G 504133 001 4
WT 60 DP 504134 001 1
WT 60 504135 001 1
WT 60 CW 504136 001 1
WT 60 UK DP CW INS 504137 001 1
WT 60 INS 504138 001 1
WT 60 CW INS 504139 001 1
WT 60 AU CW 504140 004 14
WT 60 AU N 504141 004 14
LS10EA 504142 002 4
WT 60/60HZ 504145 001 1
WT 60/60HZ CW 504146 001 1
  • Page 1 1
  • Page 2 2
  • Page 3 3
  • Page 4 4
  • Page 5 5
  • Page 6 6
  • Page 7 7
  • Page 8 8
  • Page 9 9
  • Page 10 10
  • Page 11 11
  • Page 12 12
  • Page 13 13
  • Page 14 14
  • Page 15 15
  • Page 16 16
  • Page 17 17
  • Page 18 18
  • Page 19 19
  • Page 20 20
  • Page 21 21
  • Page 22 22
  • Page 23 23
  • Page 24 24
  • Page 25 25
  • Page 26 26
  • Page 27 27
  • Page 28 28
  • Page 29 29
  • Page 30 30
  • Page 31 31
  • Page 32 32
  • Page 33 33
  • Page 34 34
  • Page 35 35
  • Page 36 36
  • Page 37 37
  • Page 38 38
  • Page 39 39
  • Page 40 40
  • Page 41 41
  • Page 42 42
  • Page 43 43
  • Page 44 44
  • Page 45 45
  • Page 46 46
  • Page 47 47
  • Page 48 48
  • Page 49 49
  • Page 50 50
  • Page 51 51
  • Page 52 52
  • Page 53 53
  • Page 54 54
  • Page 55 55
  • Page 56 56
  • Page 57 57
  • Page 58 58
  • Page 59 59
  • Page 60 60
  • Page 61 61
  • Page 62 62
  • Page 63 63
  • Page 64 64
  • Page 65 65
  • Page 66 66
  • Page 67 67
  • Page 68 68
  • Page 69 69
  • Page 70 70
  • Page 71 71
  • Page 72 72
  • Page 73 73
  • Page 74 74
  • Page 75 75
  • Page 76 76
  • Page 77 77
  • Page 78 78
  • Page 79 79
  • Page 80 80
  • Page 81 81
  • Page 82 82
  • Page 83 83
  • Page 84 84
  • Page 85 85
  • Page 86 86
  • Page 87 87
  • Page 88 88
  • Page 89 89
  • Page 90 90
  • Page 91 91
  • Page 92 92
  • Page 93 93
  • Page 94 94
  • Page 95 95
  • Page 96 96
  • Page 97 97
  • Page 98 98
  • Page 99 99
  • Page 100 100
  • Page 101 101
  • Page 102 102
  • Page 103 103
  • Page 104 104
  • Page 105 105
  • Page 106 106
  • Page 107 107
  • Page 108 108
  • Page 109 109
  • Page 110 110
  • Page 111 111
  • Page 112 112
  • Page 113 113
  • Page 114 114
  • Page 115 115
  • Page 116 116

Electrolux WT30H208DU (502315) User manual

Category
Dishwashers
Type
User manual

Ask a question and I''ll find the answer in the document

Finding information in a document is now easier with AI