BOMANN GSP 849 Owner's manual

Category
Dishwashers
Type
Owner's manual

This manual is also suitable for

H
HH
H
OUSEHOLD
OUSEHOLD OUSEHOLD
OUSEHOLD
D
DD
D
ISHWASHER
ISHWASHERISHWASHER
ISHWASHER
GSP
GSPGSP
GSP
86
8686
864
44
4
Instruction Manual
Instruction ManualInstruction Manual
Instruction Manual
2
Contents
ContentsContents
Contents
Introduction ……………………..………………….………………………………………………….….... Page 3
General Notes …...……………………………………….……………………………………………..…. Page 3
Special safety Information for this Unit ……………………………...…………………………….......... Page 4
Unpacking the Appliance ….……………………………..…..………………………………………… Page 5
Appliance Equipment ……………………..….………………………………………………………….... Page 5
Installation …...…………………………………………………………………………………………..…. Page 5
Prior Using for the first Time ……………………………………………………………………………… Page 7
Loading the Dishwasher ………………………………………………………………………………….. Page 9
Startup / Operation ……………………..………………………………………..………………….......... Page 11
Cleaning and Maintenance …...……………………….…..………………………………………………
Page 14
Troubleshooting ……………………..………………......……………………………………………….... Page 15
Technical Data …...………………………………………...………..…………………...……………..…. Page 16
Disposal …...………………………………..………………..……………………………..……………… Page 16
EU Product Data Sheet .....………………………..………..……………………………..…………… Page 17
3
Introduction
IntroductionIntroduction
Introduction
Thank you for choosing our product. We hope you
will enjoy using the appliance.
Symbols in these Instructions for Use
Symbols in these Instructions for UseSymbols in these Instructions for Use
Symbols in these Instructions for Use
Important information for your safety is specially
marked. It is essential to comply with these instruc-
tions to avoid accidents and prevent damage:
WARNING:
WARNING:WARNING:
WARNING:
This warns you of dangers to your health and indi-
cates possible injury risks.
CAUTION:
CAUTION:CAUTION:
CAUTION:
This refers to possible hazards to the machine or
other objects.
NOTE
NOTENOTE
NOTE:
::
: This highlights tips and information.
General Notes
General NotesGeneral Notes
General Notes
Read the operating instructions carefully before put-
ting the appliance into operation and keep the in-
structions including the warranty and the receipt. If
you give this device to other people, also pass on the
operating instructions.
NOTE
NOTENOTE
NOTE:
::
:
Illustrations can deviate from the original appliance.
The appliance is designed exclusively for private
use and for the envisaged purpose. This appli-
ance is not fit for commercial use.
The appliance is only to be used as described in
the user manual. Do not use the appliance for any
other purpose. Any other use is not intended and
can result in damages or personal injuries.
Do not use it outdoors. Keep it away from sources
of heat, direct sunlight and humidity.
Do not operate the appliance without
withoutwithout
without supervision.
When not in use, for cleaning, user maintenance
works or with disruption, switch off the appliance
and disconnect the plug (pull the plug itself, not
the lead) or turn off the fuse.
The appliance and if possible the mains lead have
to be checked regularly for signs of damage. If
damage is found the appliance must not be used.
For safety reasons, alterations or modifications of
the appliance are prohibited.
In order to ensure your children’s safety, please
keep all packaging (plastic bags, boxes, polysty-
rene etc.) out of their reach.
WAR
WARWAR
WARNING
NINGNING
NING:
::
:
Do not allow small children to play with the foil.
There is a danger of suffocation!
danger of suffocation!danger of suffocation!
danger of suffocation!
4
Special safety In
Special safety InSpecial safety In
Special safety Information for this Unit
formation for this Unitformation for this Unit
formation for this Unit
The maximum number of place settings to be washed is 13.
This unit is intended to be used in household and similar applications
such as
- staff kitchen areas in shops, offices and other working environ-
ments;
- by clients in hotels, motels and other residential type environments;
- in farm houses.
The appliance is to be connected to the water mains using new hose
sets and that old hose-sets should not be reused.
The maximum permissible inlet water pressure is 1 Mpa.
The minimum permissible inlet water pressure is 0.04 Mpa.
In the appliance bottom are located ventilation openings (depending on
model). These may not be clogged e.g. by carpet.
Pay attention to a proper loading of the appliance. Follow the instruc-
tions in the chapter “Loading the Dishwasher”.
Knives and other utensils with sharp points must be loaded with their
points down in the cutlery basket (depending on model) or placed in a
horizontal position in the dishwasher basket.
The door should not be left open, since this could increase the risk of
tripping.
This appliance can be used by children
childrenchildren
children aged from 8 years and above
and persons with reduced physical, sensory or mental capabilities or
lack of experience and knowledge if they have been given supervision
or instruction concerning use of the appliance
use of the applianceuse of the appliance
use of the appliance in a safe way and under-
stand the hazards involved.
5
Children
ChildrenChildren
Children who are younger than 8 years must be kept away from the
device.
Children
ChildrenChildren
Children shall not play with the appliance.
Cleaning and user maintenance
user maintenanceuser maintenance
user maintenance shall not be made by children,
children,children,
children, unless
they are older than 8 years and are supervised.
Do not try to repair the appliance on your own. Always contact an au-
thorized technician. If the supply cord is damaged, it must be replaced
by the manufacturer, its service agent or similarly qualified persons in
order to avoid a hazard.
Unpacking the Appliance
Unpacking the ApplianceUnpacking the Appliance
Unpacking the Appliance
Remove the appliance from its packaging.
Remove all packaging material, such as foils, filler
and cardboard packaging.
To prevent hazards, check the appliance for any
transport damage.
In case of damage, do not put the appliance into
operation. Contact your distributor.
NOTE
NOTENOTE
NOTE:
::
:
Production residue or dust may have collected on the
appliance. We recommend cleaning the appliance
according to chapter “Cleaning and Maintenance”.
Appliance Equipment
Appliance EquipmentAppliance Equipment
Appliance Equipment
A
AA
Appliance Overview
ppliance Overviewppliance Overview
ppliance Overview
1
11
1
Lower spray arm
2
22
2
Filter system
3
33
3
Dispenser
4
44
4
Salt container
5
55
5
Inner pipe
Delivery scope
Delivery scopeDelivery scope
Delivery scope
1x cutlery basket, 1x cutlery rack, 1x cup shelf,
1x salt funnel tube, 1x inlet hose safety system
Installation
InstallationInstallation
Installation
WARNING:
WARNING:WARNING:
WARNING:
The unit must not be connected to the mains during
installing. Otherwise there is danger to life
danger to lifedanger to life
danger to life or electric
electric electric
electric
shock hazard
shock hazardshock hazard
shock hazard!
CAUTION:
CAUTION:CAUTION:
CAUTION:
For a correct operation the appliance must be con-
nected properly. The specifications for water supply
and drain as well as the electrical connection must
fulfill the required criteria.
Installation location
Installation locationInstallation location
Installation location
The site should be located near the water inlet
and outlet, as well as near a properly grounded
power socket.
Place the appliance so that all controls are easily
to reach and the appliance door can open without
being impeded.
6
Take care of a solid and horizontal position of the
appliance. If the appliance is not horizontally lev-
eled, adjust the feet accordingly (see “Adjust the
feet”).
Power cord and water hoses may not kinked or
squashed.
Avoid the installation:
Avoid the installation:Avoid the installation:
Avoid the installation:
- near heaters, next to a stove, direct sunlight
or any other heat sources;
- at locations with high humidity (e.g. out-
doors), as metal parts would be susceptible
to corrosion under such circumstances;
- in rooms where the temperature could drop
below freezing. Do not expose the appliance
any weather.
- near volatile or flammable materials (e.g.
gas, fuel, alcohol, paint, etc.).
Removing the
Removing the Removing the
Removing the appliance cover
appliance coverappliance cover
appliance cover
The appliance cover can be removed and thus
reducing the device height to 81.5 cm; to place the
dishwasher under a suitable kitchen worktop.
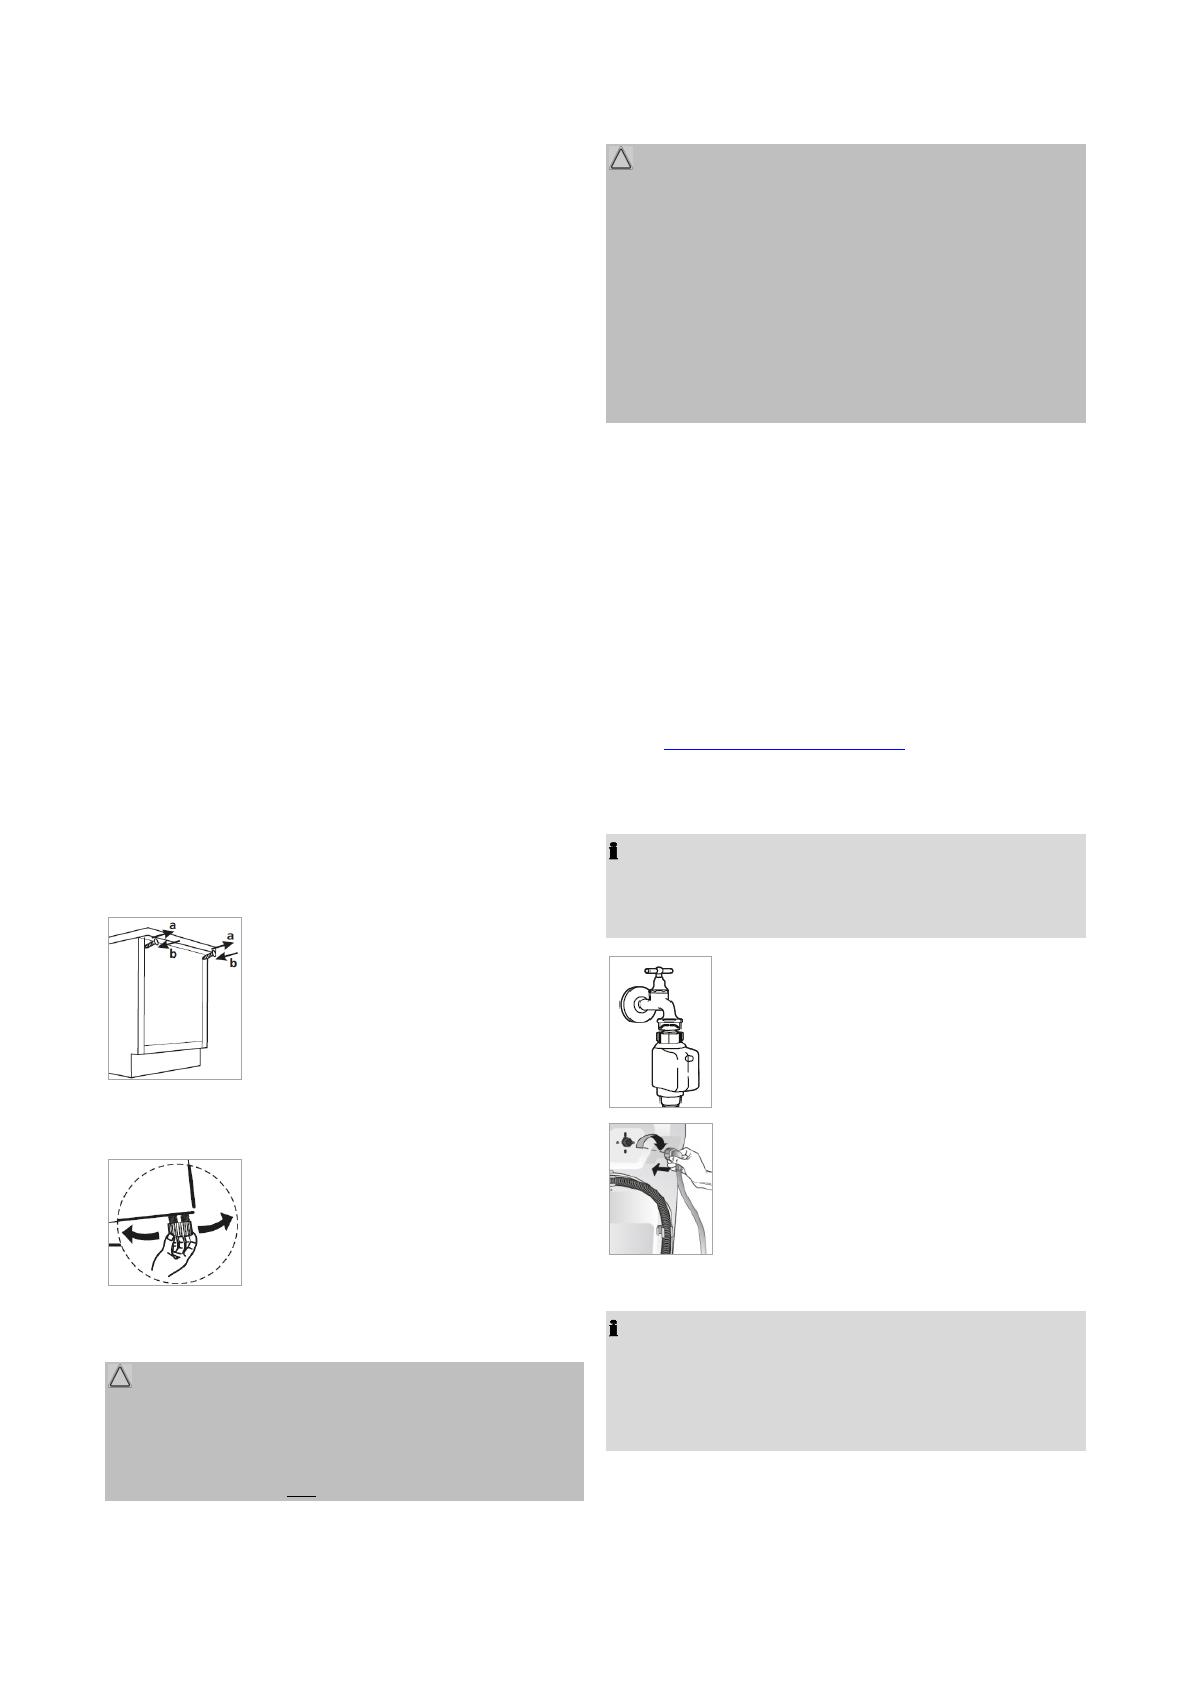
a)
a)a)
a) Loosen the screws on the unit
back and remove the cover.
b)
b)b)
b) After removing the cover,
retighten the screws.
Adjusting the feet
Adjusting the feetAdjusting the feet
Adjusting the feet
Check with a spirit level whether the
appliance is leveled horizontally. If
the unit is not in balance, the feet
must be adjusted.
Water connection
Water connectionWater connection
Water connection
CAUTION:
CAUTION:CAUTION:
CAUTION:
The Installation of the water supply must conform
to the local laws and regulations.
The appliance is not
notnot
not suitable for hot water supply.
CAUTION:
CAUTION:CAUTION:
CAUTION:
Use the new supplied hose set to connect the
appliance to the water supply. Do not reuse old or
used connection sets.
If the water pipe is new or long time not used,
ensure before connecting to the water system,
that the water is clear and free from contamina-
tion.
Notes on inlet hose safety system (delivery scope
Notes on inlet hose safety system (delivery scope Notes on inlet hose safety system (delivery scope
Notes on inlet hose safety system (delivery scope
depending on model)
depending on model)depending on model)
depending on model)
The safety system consists of a double-walled inlet
hose. It guarantees to cut off the water supply when
leakage of the inner hose. Switching off the water
supply leads over an electronic contact.
If necessary, you can order an inlet hose safety sys-
tem from your dealer or in our online accessories
shop, www.bomann
www.bomannwww.bomann
www.bomann-
--
-germarny.de
germarny.degermarny.de
germarny.de. To order, use the
reference number found under “Technical Data”.
Connect the water inlet hose (cold water connection)
Connect the water inlet hose (cold water connection)Connect the water inlet hose (cold water connection)
Connect the water inlet hose (cold water connection)
NOTE
NOTENOTE
NOTE:
::
:
The water pressure must be between 0.04-1.0 MPa.
With higher pressure: use a pressure regulator.
Connect the water inlet hose to a
water thread with ¾“. Screw the
hose firmly in the direction of the
screw thread; pay attention for a
tight fit.
Connect the other end of the inlet
hose to the inlet valve on the appli-
ance back; pay attention for a tight
fit too.
Connect the water drain hose
Connect the water drain hoseConnect the water drain hose
Connect the water drain hose
NOTE
NOTENOTE
NOTE:
::
:
The drain hose has a length of approx. 1.5 m and
can extend with a suitable hose and connecting
piece to a length of max. 4 m.
7
CAUTION:
CAUTION:CAUTION:
CAUTION:
In order to prevent backflow of contaminated water,
the free end of the hose must not come under the
water level of the drain.
Connect the drain hose to a
drain pipe (B) with a mini-
mum diameter of 40 mm;
alternatively the drain hose
can be fixed directly to the
sink (A).
Always make sure that the hose is not bent or
squeezed.
It is allowed to install the hose maximal up to a
height of 1000 mm above the rinsing floor.
Secure the drain hose securely to avoid a change
in position and with it a water leakage.
Electrical connection
Electrical connectionElectrical connection
Electrical connection
WARNING:
WARNING:WARNING:
WARNING:
The installation to the mains supply must conform
to the local standards and regulations.
Improper connection may cause to an electric
electric electric
electric
shock
shockshock
shock!
Do not use multiple sockets or extension cords.
It is not allowed to modify the plug provided with
the appliance! If the plug does not fit properly to
the outlet, let install a proper outlet by an author-
ized specialist.
The accessibility of the power plug must always
be ensured in order to disconnect the device from
the power supply in case of an emergency.
Make sure that the voltage supply matches the
specifications on the rating label (door frame) be-
fore connecting.
Connect the mains cable to a properly installed
and earthed wall outlet.
If the plug after installation is not accessible, a
corresponding disconnect device must be availa-
ble to meet the relevant safety regulations.
Prior Using for the first Time
Prior Using for the first TimePrior Using for the first Time
Prior Using for the first Time
Before using your di
Before using your diBefore using your di
Before using your dishwasher for the first time:
shwasher for the first time:shwasher for the first time:
shwasher for the first time:
A. Filling salt into the salt container (water softener)
B. Fill the rinse aid dispenser
C. Fill in detergent
CAUTION:
CAUTION:CAUTION:
CAUTION:
Use only salt, rinse aid and detergent for dish-
washers. Other products may damage the appli-
ance.
Always consider the dosage and storage recom-
mendations on the sales packaging.
WARNING:
WARNING:WARNING:
WARNING:
Keep salt, rinse aid and detergent out of reach for
children.
A. Filling salt into the salt container (water softener)
A. Filling salt into the salt container (water softener)A. Filling salt into the salt container (water softener)
A. Filling salt into the salt container (water softener)
Water softener
Water softenerWater softener
Water softener
The water hardness varies regionally. If hard water is
used in the dishwasher, deposits form on the dishes
and kitchen utensils. The appliance is equipped with
a water softener, that removes lime and minerals
from the water by using water softening in the salt
container. Your local water authority can advise you
on the hardness of the water in your area.
Adjusting the salt consumption
Adjusting the salt consumptionAdjusting the salt consumption
Adjusting the salt consumption
The salt consumption can be adjusted according to
your water hardness and therefore optimally regulat-
ed.
Turn on the appliance.
Press the Start/Pause button for more than
5 seconds, the setting mode is now activated for
approx. 60 seconds.
By repeatedly pressing the Start/Pause button the
water hardness can be selected: H1->H2->H3
->H4->H5->H6. The display indicates the selec-
tion (see below table).
8
The setting is automatically saved after a few
seconds; alternatively end the setup with the
Power button.
Water hardness
Water hardnessWater hardness
Water hardness
Setting / Di
Setting / DiSetting / Di
Setting / Dis-
s-s-
s-
play indicator
play indicatorplay indicator
play indicator
Salt cons.
Salt cons.Salt cons.
Salt cons.
/
/ /
/
cycle
cyclecycle
cycle
°dH
°dH°dH
°dH
Mmol/l
Mmol/lMmol/l
Mmol/l
0-5 0-0.94 H1 0 g
6-11 1.0-2.0 H2 9 g
12-17 2.1-3.0 H3 12 g
18-22 3.1-4.0 H4 20 g
23-34 4.1-6.0 H5 30 g
35-55 6.1-9.8 H6 60 g
NOTE
NOTENOTE
NOTE:
::
:
°dH: German degree of hardness
Factory setting: H3
Fill in the salt
Fill in the saltFill in the salt
Fill in the salt
CAUTION:
CAUTION:CAUTION:
CAUTION:
Only refill the salt container when the salt warning
lamp is lighting.
During filling the salt container, salt and water can
escape. Start a program immediately after you
have filled the container to prevent corrosion.
Remove the lower basket and unscrew the lid of
the salt container.
Add about 1.5 kg of salt by using the supplied
funnel tube.
Full fill the salt container with water (just before
the first use).
Screw the lid firmly on again after filling the con-
tainer.
Depending on salt resolution, the warning lamp
usually disappears immediately after filling.
B
BB
B.
. .
.
Fill the rinse aid dispenser
Fill the rinse aid dispenserFill the rinse aid dispenser
Fill the rinse aid dispenser
Function of rinse aid
Function of rinse aidFunction of rinse aid
Function of rinse aid
The rinse aid is automatically added during the final
rinse, ensuring thorough rinsing and a spot and
streak free drying.
When to refill the rinse aid dispenser
When to refill the rinse aid dispenserWhen to refill the rinse aid dispenser
When to refill the rinse aid dispenser
As long as the corresponding
message does not light up in the
display, you can estimate the
amount of remaining rinse aid to the optical level
indicator (D
DD
D) next to the dispenser.
When the rinse aid dispenser is full, the indicator is
completely dark. If the rinse aid diminishes, the size
of the black dot changes as shown below. In order to
avoid spotting, the rinse aid level must not drop be-
low ¼.
full ¾ full
½ full
¼ full empty
Fill in the rinse aid
Fill in the rinse aidFill in the rinse aid
Fill in the rinse aid
To open the dispenser screw the lid counter-
clockwise to the open position and remove the lid.
Add the rinse aid into the dispenser, being careful
not to overfill. The dispenser contains approx.
110 ml.
Before closing the appliance door, put on the lid in
the open position back and turn it clockwise to the
closed position.
NOTE
NOTENOTE
NOTE:
::
:
Remove spilled rinse aid with an absorbent cloth to
avoid excessive foaming during the next rinse.
Adjusting the rinse aid dosage
Adjusting the rinse aid dosageAdjusting the rinse aid dosage
Adjusting the rinse aid dosage
When forming spots and the dishes dries poorly,
increase the added amount of rinse aid. You can set
the amount of addition between level 1 (min.) and
level 6 (max.).
Take off the lid of the rinse aid dispenser
and adjust the dial to the desired level.
The factory setting is “4”.
NOTE
NOTENOTE
NOTE:
::
:
Increase the dosage if there are drops of water or
lime spots on the dishes after rinsing. Reduce the
9
dosage if there are sticky whitish stains on dishes or
a bluish film on glassware or knife blades.
C
CC
C.
. .
. Fill in detergent
Fill in detergentFill in detergent
Fill in detergent
Function of detergent
Function of detergentFunction of detergent
Function of detergent
Detergents with its chemical ingredients are neces-
sary to remove dirt, crush dirt and transport it out of
the dishwasher. The most commercially, high-quality
cleaning agents are suitable for this purpose.
Detergent
DetergentDetergent
Detergent
Normally new pulverized detergent is without phos-
phate. Thus the water softener function of phosphate
is not given. In this case we recommend to fill salt in
the salt container even when the hardness of water is
only 6°dH. If detergents without phosphate are used
in the case of hard water often white spots appear on
dishes and glasses. In this case add more detergent
to reach better results. Detergents without chlorine
do only bleach a little. Strong and colored spot will
not be removed completely. In this case choose a
program with a higher temperature.
Detergent tablets (
Detergent tablets (Detergent tablets (
Detergent tablets (T
TT
Tabs)
abs)abs)
abs)
Dishwasher tablets from different manufacturers
dissolve at different rates. It is possible that they will
not fully dissolve in programs with short running time
and low water temperature and thus does not reach
their full productive efficiency. To ensure the com-
plete removal of detergent residues, we recommend
choosing rinse programs with long running times and
high water temperature. Always follow the
manufacturer's instructions!
Fill in the detergent
Fill in the detergentFill in the detergent
Fill in the detergent
NOTE
NOTENOTE
NOTE:
::
:
Always add the detergent just before starting the
rinse cycle, otherwise it could get damp and will
not dissolve properly.
You’ll find information about the amount of deter-
gent for the respective programs in the „Program
table“. Note that depending on the degree of soil-
ing and water hardness differences are possible.
At the end of the rinse cycle the detergent dis-
penser must be empty.
The dispenser must be refilled before the start of
each rinse cycle according to the instructions in the
"Program table".
Press the release button to open
the dispenser.
A
A A
A
Chamber of detergent in powder
form for the main rinse
B
B B
B
Chamber of detergent for the
pre-rinse / Chamber for deter-
gent in tablet form
The main rinse chamber must be filled at least up to
the marking MIN (about 20 g). Add with heavily
soiled dishes an additional dose of detergent (about
5 g) in the chamber for the pre-rinse. Close the dis-
penser. Make sure that the lid locks into place.
Loading the Dishwasher
Loading the DishwasherLoading the Dishwasher
Loading the Dishwasher
CAUTION:
CAUTION:CAUTION:
CAUTION:
Only rinse such dishes and cutlery in the dishwasher,
which is expressly marked as "dishwasher resistant".
NOTE
NOTENOTE
NOTE:
::
:
Remove gross scraps of food and soak burnt
leftovers. Pre-rinse under running water is not
necessary.
Do not overload! This is important for adequate
cleaning results and reasonable energy consump-
tion.
Very small items should not be rinsed in the ap-
pliance, as they could easily fall out of the bas-
kets.
10
For rinsing in the
For rinsing in theFor rinsing in the
For rinsing in the
dishwasher the following c
dishwasher the following cdishwasher the following c
dishwasher the following cutlery
utlery utlery
utlery
and
and and
and dishes..
dishes..dishes..
dishes..
..
....
..are not suitable
are not suitableare not suitable
are not suitable:
::
:
- Cutlery with hand pieces of wood, porcelain
mother of pearl
- Plastic items that are not heat resistant
- Older cutlery with glued parts that are not temper-
ature resistant
- Bonded cutlery items or dishes
- Pewter or cooper items
- Crystal glass
- Steel items subject to rusting
- Wooden platters
- Items made from synthetic fibres
..
....
..are limited suitable
are limited suitableare limited suitable
are limited suitable:
::
:
- some types of glasses can become dull after a
large number of washes
- silver and aluminum parts have a tendency to
discolor during washing
- Glazed patterns may fade if machine washed
frequently
Recommendations for loading
Recommendations for loadingRecommendations for loading
Recommendations for loading
Arrange sensitive, light tableware items such as
glasses, coffee and tea cups in the upper basket.
Place large items that are most difficult to clean in
the lower basket.
Make sure that the tableware is placed securely
and cannot tip over.
Place all items so, that the spray arms can rotate
freely during rinsing.
Arrange all items with openings facing down.
Curved items, or ones with recesses, should be
loaded aslant so that water can drain off.
Make sure that glasses do not touch each other.
Set the dishes and cutlery not into each other or
covering each other.
Arrange cutlery in the cutlery basket.
Store long as well as sharp cutlery horizontally in
the dishwasher basket.
Methods for loading normal dishware
Methods for loading normal dishwareMethods for loading normal dishware
Methods for loading normal dishware
Loading the upper basket
Loading the upper basketLoading the upper basket
Loading the upper basket
On the upper basket
only small and medium
items should be load-
ed. Load e.g. glasses,
cups, saucers and
small bowls.
1
11
1
Cups 7
77
7
Dessert plates
2
22
2
Saucers 8
88
8
Dinner plates
3
33
3
Glasses 9
99
9
Soup plates
4
44
4
Bowl 10
1010
10
Platter
5
55
5
Bowl 11
1111
11
Cutlery basket
6
66
6
Bowl
Loading the lower basket
Loading the lower basketLoading the lower basket
Loading the lower basket
Because of the particular-
ly intense cleaning action
of the lower spray arm the
lower basket is suitable
for heavily soiled dishes.
Load e.g. pots and plates.
Cup and plate holders
Cup and plate holdersCup and plate holders
Cup and plate holders
In order to create a better arrangement for bulky
dishes, the cup holders and the plate holders can be
folded. Lift the racks slightly and fold them down.
Cup
Cup Cup
Cup shelf in the upper basket
shelf in the upper basketshelf in the upper basket
shelf in the upper basket
If necessary, fold down or remove the cup shelf.
11
Adjusting the upper basket
Adjusting the upper basketAdjusting the upper basket
Adjusting the upper basket
The height of the upper basket can be adjusted by
placing the wheels on rails of different heights. This
will create more space for large items in the upper as
well as in the lower basket.
Pull out the basket guides.
Remove the basket out of the guides.
Depending on the desired setting, insert the upper
or lower pair of wheels into the guide; both sides
should always be located at the same height.
Cutlery basket /
Cutlery basket / Cutlery basket /
Cutlery basket / rack
rackrack
rack
WARNI
WARNIWARNI
WARNING: Risk of injury!
NG: Risk of injury!NG: Risk of injury!
NG: Risk of injury!
Cutlery must not protrude above the cutlery basket
base.
Knives and other utensils with sharp points must
be placed with the tip down in the cutlery basket or
in a horizontal position in the dishwasher basket
and/or on the cutlery rack.
NOTE
NOTENOTE
NOTE:
::
:
If necessary, remove the basket and/or the rack in
order to create more space for large dishware.
Cutlery basket
Cutlery basketCutlery basket
Cutlery basket
The basket is equipped with grid inserts in which the
cutlery is arranged uniformly and with the handles
downwards.
Cutlery
Cutlery Cutlery
Cutlery rack
rackrack
rack
Use the shelf in the upper basket for long cutlery
types, such as serving cutlery, salad servers and
kitchen knives.
Startup / Operation
Startup / OperationStartup / Operation
Startup / Operation
Pr
PrPr
Pro
oo
ogram table
gram tablegram table
gram table
Select a suitable program depending on dishes and degree of soiling.
Pr
PrPr
Pro
oo
ogram
gramgram
gram
Program selection
Program selectionProgram selection
Program selection
informat
informatinformat
informati
ii
ion
onon
on
Program
ProgramProgram
Program
sequence
sequencesequence
sequence
Detergent
DetergentDetergent
Detergent
pre/main
pre/mainpre/main
pre/main
(g)
(g)(g)
(g)
Time
TimeTime
Time
(Min.)
(Min.)(Min.)
(Min.)
Ene
EneEne
Ener
rr
rgy
gygy
gy
(kWh)
(kWh)(kWh)
(kWh)
Water
WaterWater
Water
(l
(l(l
(l)
))
)
Multi-TAB
1)
normal soiled dishes, daily
use
Pre-rinse (50°C)
Rinse
Rinse (65°C)
Drying
35
Tab
215 1.05 11
Program for the use of multi-cleaning tablets containing salt, rinse aid and detergent.
Intensive
1)
heavily soiled dishes and
dried leftovers
Pre-rinse (50°C)
Main rinse (60°C)
Rinse 1+2
Rinse (70°C)
Drying
5/30
(or Tab)
170 1.6 18.5
12
Pr
PrPr
Pro
oo
ogram
gramgram
gram
Program selection
Program selection Program selection
Program selection
informat
informatinformat
informati
ii
ion
onon
on
Program sequence
Program sequenceProgram sequence
Program sequence
Detergent
DetergentDetergent
Detergent
pre/main
pre/main pre/main
pre/main (g)
(g)(g)
(g)
Time
TimeTime
Time
(Min.)
(Min.)(Min.)
(Min.)
Ene
EneEne
Ener
rr
rgy
gygy
gy
(kWh)
(kWh)(kWh)
(kWh)
Water
WaterWater
Water
(l)
(l)(l)
(l)
ECO
ECOECO
ECO
(*EN 50242)
1)
standard program for nor-
mally soiled dishes,
Pre-rinse
Main rinse (45°C)
Rinse (65°C)
Drying
5/30
(or Tab)
190 0.92 11
90 Min.
1)
for lightly soiled dishes
Main rinse (65°C)
Rinse
Rinse (65°C)
Drying
35
(or Tab)
90 1.35 12.5
Glass
1)
low adhesive, fresh leftovers,
such as glasses
Pre-rinse
Main rinse (40°C)
Rinse
Rinse (60°C)
Drying
5/30
(or Tab)
130 0.9 14.5
Pre-rinse
for dishes, which should be
rinsed later in the day
Pre-rinse - 15 0.02 4
1)
1)1)
1)
½ Loading: Use this function with a loading of half or less dishes; energy and water consumption are reduced. Add a little
less detergent than for a complete load.
NOTE
NOTENOTE
NOTE:
::
:
*EN 50242: this program is the test program and of combined energy and water consumption most efficient.
The information for comparability:
Capacity: 13 settings; Position of the upper basket: lower position; rinse aid setting: 6
Control panel
Control panelControl panel
Control panel
1
11
1 Power: button to turn on/off the power supply.
2
22
2 Child safety lock
: to activate / deactivate, press
the button combination for a few seconds. All buttons,
except the Power button, are locked for operation
.
3
33
3 : button to activate/deactivate the ½ loading function.
Consider that the function is program dependent!
4
44
4 Delay: button to select the start delay by 1-24
hours. Press the Start/Pause button and the
appliance starts automatically after the selected
time delay has expired.
5
55
5 Program: Button to select the rinse program.
6
66
6 Start/Pause: button to start/pause the selected
or running program.
7
77
7 Control lamp: lights up when the water supply
is closed.
Control lamp: lights up when rinse aid must be
added.
Control lamp: lights up, when dishwasher salt
needs refilling.
8
88
8 Display: the salt consumption (water hardness)
and the start delay are selected via the display.
The start delay (when activated), the program
remaining time and any error codes are displayed.
9
99
9 The control lamps indicate the program selection.
13
Starting a program
Starting a programStarting a program
Starting a program
The water supply must be opened up to the max-
imum pressure.
Load the dishwasher baskets.
Fill in the detergent.
Turn on the appliance.
Set the required program options.
Start the operation.
Changing the program
Changing the programChanging the program
Changing the program
CAUTION:
CAUTION:CAUTION:
CAUTION:
A program change should be done only a short time
after starting the program. Otherwise, maybe deter-
gent has been released and already drained rinse
water.
First press the Start/Pause button to stop the
current rinse program.
Press the Program selection button for about
3 seconds.
Select a new program and start the new
operation.
Forgot to
Forgot to Forgot to
Forgot to add a dish?
add a dish?add a dish?
add a dish?
WARNING:
WARNING:WARNING:
WARNING:
Open the door very carefully during operation, there
is a risk of water squirting out.
Dishware can be added any time before the deter-
gent dispenser opens.
Press the Start/Pause button to stop the opera-
tion. Once the spray arms have stopped, you can
fully open the appliance door.
Add forgotten dishware.
Press the Start/Pause button, the operation will
continue after approx. 10 seconds.
At the e
At the eAt the e
At the end of program
nd of programnd of program
nd of program
CAUTION:
CAUTION:CAUTION:
CAUTION:
Allow the appliance to cool down a bit after the pro-
gram has ended, before you open it. This avoids that
steam escapes that causing long-term damages to
your furniture.
At the end of the rinse cycle will sound a series of
signals; then the unit goes into standby mode.
Turn off
Turn offTurn off
Turn off
Turn off the appliance.
Close the water supply, if necessary!
Remove the dishes after cooling (see "Unloading
the dishwasher").
Leave the appliance door slightly open until the
next rinse cycle to avoid odors.
If the appliance is not in use for an extended peri-
od, disconnect it from the power supply!
Unloading the dishwasher
Unloading the dishwasherUnloading the dishwasher
Unloading the dishwasher
CAUTION:
CAUTION:CAUTION:
CAUTION:
Let the dishware cool down for about 15 minutes
before unloading. Hot dishes are sensitive to knocks.
NOTE
NOTENOTE
NOTE:
::
:
At the end of program there could be still water drops
inside the appliance.
Open the appliance door and pull out the basket.
To avoid water dripping from the upper basket
onto the dishes in the lower basket, it is advisable
to unload the appliance from the bottom up.
Energy saving tips
Energy saving tipsEnergy saving tips
Energy saving tips
Always try to operate the dishwasher when it is
fully loaded.
Do not rinse the dishes in advance under running
water.
Use for each type of load the most appropriate
rinse program.
Do not perform a pre-rinse (depending on model),
if not absolutely necessary.
14
Cleaning
CleaningCleaning
Cleaning
and Maintenance
and Maintenanceand Maintenance
and Maintenance
WARNING:
WARNING:WARNING:
WARNING:
Always turn off the appliance and disconnect it
from the power supply before cleaning and user
maintenance.
Allow the appliance to cool down sufficient before
cleaning.
Do not use steam cleaners for cleaning the appli-
ance; moisture could enter electrical components.
Risk of electri
Risk of electriRisk of electri
Risk of electric shock!
c shock!c shock!
c shock! Hot steam could damage
the plastic parts. The appliance must be dry be-
fore restarting operation.
CAUTION
CAUTIONCAUTION
CAUTION:
::
:
Do not use a wire brush or other sharp, abrasive
items.
Do not use any acidic or abrasive detergents.
NOTE
NOTENOTE
NOTE:
::
:
Dirty filters and clogged spray arms degrade the
rinsing. Regularly check the filter and spray arms and
clean them if necessary.
Filter
FilterFilter
Filter
system
systemsystem
system
The three-part filter system prevents
larger amounts of food or other ob-
jects from getting inside the pump.
1
1 1
1
Main
Main Main
Main filter
filterfilter
filter: food and soil particles trapped in this
filter are pulverized by a special jet on the lower
spray arm and washed down to drain.
2
2 2
2 Coarse filter
Coarse filterCoarse filter
Coarse filter: filters out larger items such as pieces
of bone or glass shards that could block the drain-
age.
3
3 3
3 Micro
Micro Micro
Micro filter
filterfilter
filter: filters dirt and food residues in the
sump area and prevents it from being redeposited on
the dishware during rinse cycle.
Cleaning the filter system
Cleaning the filter systemCleaning the filter system
Cleaning the filter system
CAUTION:
CAUTION:CAUTION:
CAUTION:
The dishwasher must never be used without the
filter.
Improper replacement of the filter can reduce
performance and damage the appliance.
Do not knock out the filter for cleaning to avoid
possible deformations of the filters.
NOTE
NOTENOTE
NOTE:
::
:
Check after each rinsing the filter for residues.
Turn the coarse filter counterclockwise and re-
move the whole filter system upwards.
Remove the coarse as well as the micro filter from
the main filter.
Remove leftover food and clean the filter under
running water. Use a soft brush for the coarse and
micro filter, if necessary.
Put the filter system properly in reverse order
together and reinstall in its provided position. Fix
the entire system, by tightening the filter unit
clockwise.
Cleaning the spray arms
Cleaning the spray armsCleaning the spray arms
Cleaning the spray arms
Lime and impurities from the rinsing water can block
nozzles and bearings of the spray arms. Check the
outlet nozzles of the spray arms regularly for block-
ages.
Unscrew the securing nut of the upper spray and
pull off the arm downwards.
Pull off the lower spray arm upwards.
Clean the arms under running water; if necessary
use a soft brush for the nozzles.
15
Insert the spray arms again until they clicks into
place and tighten the nut of the upper spray arm.
Maintenance of the dishwasher
Maintenance of the dishwasherMaintenance of the dishwasher
Maintenance of the dishwasher
CAUTION
CAUTIONCAUTION
CAUTION:
::
:
Never use spray cleaners to clean the door panel,
this may damage the door lock and electrical compo-
nents.
Clean the appliance outer surfaces and the door
sealing thoroughly with a soft, damp cloth. Use
only mild cleaning agent.
Use to remove stains inside the appliance a
dampened cloth with a little white vinegar or a
special detergent for dishwashers. If necessary,
fill detergent in and start the appliance without
dishware in the program with the highest rinse
temperature.
Dry the outer surfaces thoroughly before taking in
operation again.
A
AA
Antifreeze
ntifreezentifreeze
ntifreeze
protection
protectionprotection
protection
If the unit is out of operation and exposed to temper-
atures below zero, observe the following precautions:
Disconnect the mains plug.
Close the water supply and remove the inlet hose
from the water valve.
Drain the water from the inlet hose and the water
valve.
Reconnect the inlet hose to the water valve.
Turn off the lid of the salt container and take off
the filter system. Remove the remaining water in
the sump with an absorbent sponge.
Troubleshooting
TroubleshootingTroubleshooting
Troubleshooting
Before you contact an authorized specialist
Before you contact an authorized specialistBefore you contact an authorized specialist
Before you contact an authorized specialist
Problem
ProblemProblem
Problem
Possible cause / Action
Possible cause / ActionPossible cause / Action
Possible cause / Action
Appliance is
not working
/ starting
∙ Check the power supply. ∙ Is the appliance
turned on and the door securely closed?
∙ Is a program selected? ∙ Is the water supply
properly connected and the water supply
opened?
Water is not
drained off
∙ Check the drain hose.
∙ Are the filters or the kitchen sink clogged?
Noises ∙ A clicking sound on opening of the deter-
gent container is normal. ∙ Make sure that all
dishes are secured in the dishwasher.
∙ Place the parts so that the spray arms can
rotate freely.
Foaming ∙ Use only special dishwasher detergent to
avoid foaming. If this occurs, open the door
and let suds evaporate. Add approx. 4 liter
cold water to the tub. Start a short rinse cycle
to drain out the water. ∙ Always wipe up
spilled rinse aid immediately.
Flat table-
ware are
not clean
∙ Select a stronger program.
∙ Make sure that the action of the detergent
dispenser and spray arm is not blocked by
large dishes.
Spots and
filming
∙ Extremely hard water ∙ low inlet temperature
∙ overloading the baskets, improper loading
∙ old or damp detergent ∙ empty rinse dis-
penser ∙ incorrect dosage of detergent
Cloudiness
glassware
Use less detergent if you have soft water and
select a shortest cycle to rinse and clean
glassware.
Black or
grey marks
Aluminum utensils have rubbed against dish-
ware. Use a mild abrasive cleaner to elimi-
nate those marks.
Stains on
inner sur-
face
Only use detergents without colorants.
Yellow or
brown film
on inside
surface
∙ Tea or coffee stains: Using a solution of ½
cup of bleach and 3 cups of warm water to
remove the stains by hand. ∙ Iron deposits in
water can cause an overall film. Call a water
softener company for a special filter.
16
Problem
ProblemProblem
Problem
Possible cause / Action
Possible cause / ActionPossible cause / Action
Possible cause / Action
White film
on inside
surface
Hard water minerals: clean the interior by
using a damp sponge with dishwasher deter-
gent. Wear rubber gloves.
Dispenser
doesn’t
close
properly
Clogged detergent residue is blocking the
catch. Clean the catch.
Detergent
left in dis-
penser
Improper loaded dish is blocking the dis-
penser.
Unsatisfac-
tory drying
result
∙ Improper loading ∙ too less rinse aid
∙ dishes are removed too soon ∙ wrong pro-
gram has been selected ∙ use of cutlery with
a low-quality coating
Error codes
Error codesError codes
Error codes
For some malfunctions, the device displays the
following error codes to warn you:
Code
CodeCode
Code
Meani
MeaniMeani
Meaning / possible cause
ng / possible causeng / possible cause
ng / possible cause
E1
E1E1
E1
Water inlet fault! Faucet not open, inlet blocked or
water pressure too low.
E4
E4E4
E4
Overflow / water leakage!
CAUTION:
CAUTION:CAUTION:
CAUTION:
If overflow occurs, turn off the main water supply
before calling an authorized technician.
If there is water in the lower housing part due to
an overfilling or a small leak, remove this water
before restarting the appliance.
NOTE:
NOTE:NOTE:
NOTE:
If a problem still persists after following the steps
above, please contact your distributor or an author-
ized technician.
Technical
TechnicalTechnical
Technical
Data
DataData
Data
Electrical connection / Water supply………....………..
Electrical connection / Water supply………....………..Electrical connection / Water supply………....………..
Electrical connection / Water supply………....………..
Connection voltage: …..……………..220-240 V~ / 50 Hz
Connection power: …………….………….1760 – 2100 W
Water pressure: ………………………..……0.04 – 1 Mpa
Dimension H x W x D / Weight..……...………………..
Dimension H x W x D / Weight..……...………………..Dimension H x W x D / Weight..……...………………..
Dimension H x W x D / Weight..……...………………..
Unit size: ………………..…….....…84.5 x 59.8 x 61.0 cm
Net weight: ………………….……..………......ca. 41.5 kg
Available accessory
Available accessoryAvailable accessory
Available accessory……………………………………..
……………………………………..……………………………………..
……………………………………..
Inlet hose safety system: ………….Art.-No. 8900 400
The right to make technical and design modifications
in the course of continuous product development
remains reserved.
This appliance has been tested according to all rele-
vant current CE guidelines, such as electromagnetic
compatibility and low voltage directives, and has
been constructed in accordance with the latest safety
regulations.
Disposal
DisposalDisposal
Disposal
Meaning of the “Dustbin” Symbol
Meaning of the “Dustbin” SymbolMeaning of the “Dustbin” Symbol
Meaning of the “Dustbin” Symbol
Protect our environment; do not dispose of electrical
equipment in the domestic waste.
Please return any electrical equipment that you will
no longer use to the collection points provided for
their disposal.
This helps avoid the potential effects of incorrect
disposal on the environment and human health.
This will contribute to the recycling and other forms of
reutilization of electrical and electronic equipment.
Information concerning where these can be disposed
of can be obtained from your local authority.
WARNING:
WARNING:WARNING:
WARNING:
Remove or disable any existing snap and bolt locks,
if you take the unit out of operation or dispose it.
17
EU Product Data Sheet
EU Product Data SheetEU Product Data Sheet
EU Product Data Sheet
Product information for household dishwasher a
Product information for household dishwasher aProduct information for household dishwasher a
Product information for household dishwasher according to regulation (EU) No. 1059/2010
ccording to regulation (EU) No. 1059/2010ccording to regulation (EU) No. 1059/2010
ccording to regulation (EU) No. 1059/2010
Brand
BrandBrand
Brand
BOMANN
BOMANNBOMANN
BOMANN
Model
ModelModel
Model
GSP
GSPGSP
GSP
86
8686
864
44
4
Standard place settings
Standard place settingsStandard place settings
Standard place settings
1
11
13
33
3
Energy efficiency class
1)
A++
Annual energy consumption
2)
kWh
262
Energy consumption of the standard cleaning cycle kWh
0.92
Power consumption of the off mode W
0.45
Power consumption of the left-on mode W
0.49
Weighted annual water consumption
3)
l
3080
Drying efficiency class
4)
A
Standard program, information relates to the label and the data sheet
5)
ECO 45°C
Program duration of the standard cleaning cycle Min
190
Duration of the left-on mode Min
-
Noise emission dB(A) re1pW
49
Built-in appliance
-
1) A+++ (highest efficiency) to D (lowest efficiency).
2) Based on 280 standard cleaning cycles using cold water fill and the consumption of the low power models. Actual energy consumption will depend on
how the appliance is used.
3) Based on 280 standard cleaning cycles. Actual water consumption will depend on how the appliance is used.
4) A (highest efficiency) to G (lowest efficiency).
5) This program is suitable for cleaning normally soiled tableware and that it is the most efficient program in terms of its combined energy and water con-
sumption for that type of tableware.
Note: The above values have been measured in accordance with standards under specified operating conditions. Results may vary greatly according to
quantity and pollution of the dishes, water hardness, amount of detergent, etc.
18
19
20
C. Bomann GmbH
C. Bomann GmbHC. Bomann GmbH
C. Bomann GmbH
www.bomann
www.bomannwww.bomann
www.bomann-
--
-germany.de
germany.degermany.de
germany.de
Made in P.R.C.
Stand 04/18
  • Page 1 1
  • Page 2 2
  • Page 3 3
  • Page 4 4
  • Page 5 5
  • Page 6 6
  • Page 7 7
  • Page 8 8
  • Page 9 9
  • Page 10 10
  • Page 11 11
  • Page 12 12
  • Page 13 13
  • Page 14 14
  • Page 15 15
  • Page 16 16
  • Page 17 17
  • Page 18 18
  • Page 19 19
  • Page 20 20

BOMANN GSP 849 Owner's manual

Category
Dishwashers
Type
Owner's manual
This manual is also suitable for

Ask a question and I''ll find the answer in the document

Finding information in a document is now easier with AI