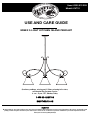
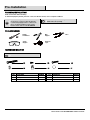
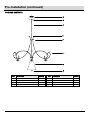
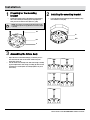
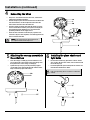
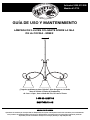
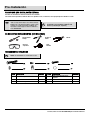
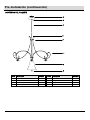
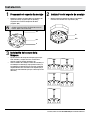
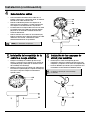
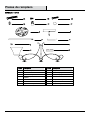
Hampton Bay 14710 is a 3-light kitchen island pendant that can be installed using three 60W type A bulbs or 13W SBCFL bulbs. The fixture comes with a mounting bracket, canopy assembly, 12 in tube, 6 in tube, decorative screw, fixture body, glass shade, and socket ring. It also includes hardware such as support screws, green ground screw, outlet box screw, hex nut, wire connector, and cap nut. The fixture can be adjusted to 5 different height options and features a glossy/live wire, rough/neutral wire, and bare copper grounding wire for easy installation.
Hampton Bay 14710 is a 3-light kitchen island pendant that can be installed using three 60W type A bulbs or 13W SBCFL bulbs. The fixture comes with a mounting bracket, canopy assembly, 12 in tube, 6 in tube, decorative screw, fixture body, glass shade, and socket ring. It also includes hardware such as support screws, green ground screw, outlet box screw, hex nut, wire connector, and cap nut. The fixture can be adjusted to 5 different height options and features a glossy/live wire, rough/neutral wire, and bare copper grounding wire for easy installation.


-
 1
1
-
 2
2
-
 3
3
-
 4
4
-
 5
5
-
 6
6
-
 7
7
-
 8
8
-
 9
9
-
 10
10
-
 11
11
-
 12
12
-
 13
13
-
 14
14
-
 15
15
-
 16
16
-
 17
17
-
 18
18


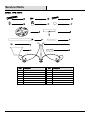
Hampton Bay 14710 is a 3-light kitchen island pendant that can be installed using three 60W type A bulbs or 13W SBCFL bulbs. The fixture comes with a mounting bracket, canopy assembly, 12 in tube, 6 in tube, decorative screw, fixture body, glass shade, and socket ring. It also includes hardware such as support screws, green ground screw, outlet box screw, hex nut, wire connector, and cap nut. The fixture can be adjusted to 5 different height options and features a glossy/live wire, rough/neutral wire, and bare copper grounding wire for easy installation.
Ask a question and I''ll find the answer in the document
Finding information in a document is now easier with AI
in other languages
Related papers
-
 Hampton Bay NB 03307 Installation guide
-
Hampton Bay 18759-4 Operating instructions
-
 Hampton Bay KB 5004 Operating instructions
-
 Hampton Bay 1000051637 Installation guide
-
 Hampton Bay 19406-HBU Operating instructions
-
 Hampton Bay 14709 Installation guide
-
 Hampton Bay 16659 Installation guide
-
Hampton Bay CP2563 Installation guide
-
 Hampton Bay 16657 Installation guide
-
 Hampton Bay CFL-F319001A BN Operating instructions


Other documents
-
Triarch 31483 User manual
-
Maxim Lighting 9044CIGO Operating instructions
-
Design House 517938 Installation guide
-
 SCHULLER 507818 User manual
-
 HomeSelects 6112 Installation guide
-
 ACROMA 6806SNCL User manual
-
-
Eglo 202911A Operating instructions
-
Designers Fountain 6713-SP Operating instructions
-


