K
HC-1272FB 020510
Before You Begin
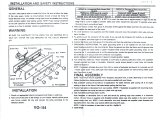
Carefully remove the fixture from the carton and check that all parts are
included, as shown in figure 1. Be careful not to misplace any of the screws or
parts which are needed to install this fixture.
Alternative Mounting Method (Fig. 2)
This fixture can be mounted to a wall without an outlet box, making the
wiring connection between the faceplate and backplate.
1. Remove knock-out from the backplate (if applicable), or remove plastic
bushing.
2. Install Romex / Bx connector on the backplate.
3. Feed house supply wires through Romex / Bx connector, and secure.
4. Make wiring connection as described in the steps that follow, and tuck
the wires between the faceplate and backplate
Installation
1. Mark where wood screws should mount on wall and drill hole for
anchors (K). Insert anchors (K).
2. Secure backplate (A) to mounting surface by driving wood screws (J)
into anchors (K).
3. A. Use a listed wire connector to connect the fixture hot wire (black
wire, or round and smooth tracer) to the supply hot wire.
B. Use a listed wire connector to connect the fixture common wire
(white wire, or square and rigid) to the supply common wire.
C. Gently try to remove the wires from the connector. If you can
remove the wires, carefully re-do the wiring connection.
4. Grounding Instructions: Connect the supply ground wire, fixture
ground wire, and mounting bar ground wire (pre attached) using the
supplied wiring connector. Gently try to remove the wires from the
connector. If you can remove the wires, carefully re-do the wiring
connection.
Final Assembly
Make sure no bare wires can be seen outside wire connectors.
1. Tuck wires into outlet box. Position faceplate (E) over studs (C) and
secure in place with cap nuts (F).
2. Attach glass (I) to socket cup (G), with glass retaining screws (H).
3. Install self ballasted lamps (L) by twisting into socket (M) (Fig 3).
Assemblage
Sortez l’appareil de la boîte avec précaution et vérifiez si toutes les
pièces indiquées aux Figure 1 sont incluses. Faites attention de ne
pas perdre des vis ou des pièces qui sont nécessaires à l’installation
de l’appareil d’éclairage.
Méthode de Montage Alternative (Fig. 2)
Cet appareil peut être monté à un mur sans boîte de prise de courant, en
reliant les branchements entre la plaque frontale et la plaque de fond.
1. Retirer le décochage de la plaque de fond (le cas échéant), ou retirer
l’embout plastique.
2. Monter le Romex / connecteur Bx sur la plaque de fond.
3. Passer le câble d’alimentation du courant domestique dans le Romex /
connecteur Bx, et bien attacher.
4. Effectuer les branchements comme décrits dans les étapes suivantes, et
insérer les câbles entre la plaque frontale et la plaque de fond.
Installation
1. Marquer l’emplacement des vis à bois dans le mur et percer les trous
pour les chevilles (Y). Insérer les chevilles (Y).
2. Fixer la plaque de fond (A) à la surface de montage en vissant les vis à
bois (X) dans les chevilles (Y).
3. A. Utiliser un connecteur à torsader listé pour relier le câble
sous tension du luminaire (câble noir, ou rond et mou) au câble
d’alimentation sous tension.
B. Utiliser un connecteur à torsader listé pour relier le câble
hors tension du luminaire (câble blanc, ou carré et rigide) au câble
d’alimentation hors tension.
C. Essayer délicatement de retirer les câbles des connecteurs. Si vous
parvenez à retirer les câbles, recommencer la connexion des câbles avec
précaution.
4. Consignes de Mise à Terre : relier le fil d’alimentation de terre, le fil de
terre du luminaire, et le fil de terre de la barre de montage (pré attaché)
à l’aide du connecteur fourni. Essayer délicatement de retirer les câbles
des connecteurs. Si vous parvenez à retirer les câbles, recommencer la
connexion des câbles avec précaution.
Assemblage Final
S’assurer qu’aucun câble dénudé ne dépasse des connecteurs.
1. Insérer les câbles dans la boîte de prise de courant. Placer la plaque (E)
frontale sur les tiges (C) filetées et fixer à l’aide d’écrous borgnes (F).
2. Fixer le verre (K) au base de douille (G), des vis de fixation pour verre (J).
3. Monter la lampe à ballast intégré (L) en tournant délicatement dans la
douille (M). (Fig 3).
A. Back Plate
Plaque de Fixation
B. Green Grounding
Screw
Vis Verte Fil de Terre
C. Mounting Studs
Clous de Montage
D. Outer Holes*
Trous Extérieurs*
E. Face Plate
Douille
F. Cap Nuts
Ecrous Borgnes
G. Socket Cup
Base de Douille
H. Glass Retaining
Screws
Vis de Retenue du Verre
I. Glass
Verre
J. Wood Screws*
Vis à Bois *
K. Drywall Anchor
Chevilles Placoplâtre
Outlet Box*
Boîte De Prise De
Courant*
Outlet Box Screws*
Vis Boîte de Prise de
Courant*
Wire Connector*
Connecteur Câble*
* not included
non fourni
Helpful Tools / Outils Utiles
Important Safety Instructions
• Be sure the electricity to the system you are working on is turned off;
either the fuse removed or the circuit breaker set at off.
• Use of other manufacturers components will void warranty, listing
and create a potential safety hazard.
• If you are unclear as to how to proceed, contact a qualified
electrician.
• You don’t need special tools to install this fixture.
• Be sure to follow the steps in the order given.
• Read instructions carefully
• Proper wiring is essential for the safe operation of this fixture.
• Save these instructions.
Consignes de Sécurité Importante
• S’assurer que le courant du réseau électrique sur lequel vous
travaillez est coupé ; retirer le fusible ou couper le disjoncteur.
• L’utilisation de pièces d’autres fabricants entraînera l’annulation
de la garantie, de l’enregistrement et vous exposera à un risque
potentiel.
• Si la marche à suivre vous semble confuse, veuillez contacter un
électricien qualifié.
• Vous n’avez pas besoin d’outils spécifiques pour monter cette lampe.
• Assurez-vous de bien respecter l’ordre des étapes à suivre.
• Veuillez lire les instructions attentivement.
• Un câblage correct est nécessaire au fonctionnement de cette lampe
en toute sécurité.
• Veuillez conserver ces instructions.
L. Self Ballasted Lamp
Lampe A Ballast Intégré
M. Socket
Douille
Fixtures With A One Piece Lamp /
Ballast Combination
Luminaire Combinaison Lampe / Ballast
L
M
Mark means lamp contains mercury.
Follow disposal laws.
See www.lamprecycle.org
Le marquage indique que la lampe contient du mercure.
Respecter les lois concernant l’élimination des déchets.
Veuillez consulter le site www.lamprecycle.org
A
G
H
I
J
C
D
E
B
F
Figure 1
Le Schéma 1
Figure 3
Le Schéma 3
F
Figure 2
Le Schéma 2
C
*