AOpen KP180 User guide

Type
User guide

AOpen KP180 is an innovative device that transforms your video conferencing experience. With its cutting-edge technology, it automatically detects and frames participants, ensuring everyone is in focus and visible during your meetings. The device's multiple layout options, including Compose mode, Focus mode, Grid mode, Picture-in-Picture mode, and Presenter mode, allow you to customize your video feed to suit your preferences.

AOpen KP180 is an innovative device that transforms your video conferencing experience. With its cutting-edge technology, it automatically detects and frames participants, ensuring everyone is in focus and visible during your meetings. The device's multiple layout options, including Compose mode, Focus mode, Grid mode, Picture-in-Picture mode, and Presenter mode, allow you to customize your video feed to suit your preferences.

INSTALLATION GUIDE
1
180 STUDIO
Simple Operation Instructions
(1) Installation
(1) Please visit the AOPEN download page and select 180 Studio to download
the compressed file. The link is http://global.aopen.com/download.aspx or
https://www.aopen.com/US_en/products_info/KP180
(2) Select the downloaded compressed file, decompress it, and then run the
installation program. The file can be typically found in your Downloads
directory.
(3) After running the 180 Studio installation program, a shortcut icon is created
on your desktop. An example of the icon is shown below. Double click the
icon to run the application.
2
(2) Operation Guide
(1) Control area
- The space on the left side of the 180 Studio app is the control area,
where you can frame participants or objects.
- After 180 Studio is opened, the Auto-detect function in the control
panel will be turned “Onby default. This will automatically frame any
person in the camera view.
-
To deactivate Auto-detect, use your mouse and click on the button selector.
d. Display layout area
e. Effect options area
f. Frame area control panel
a. Control area
b. Navigator panel- broadcast preview
c. Control panel
3
- To create a selection boxpress and hold the left mouse button and drag a
square or rectangle shape.
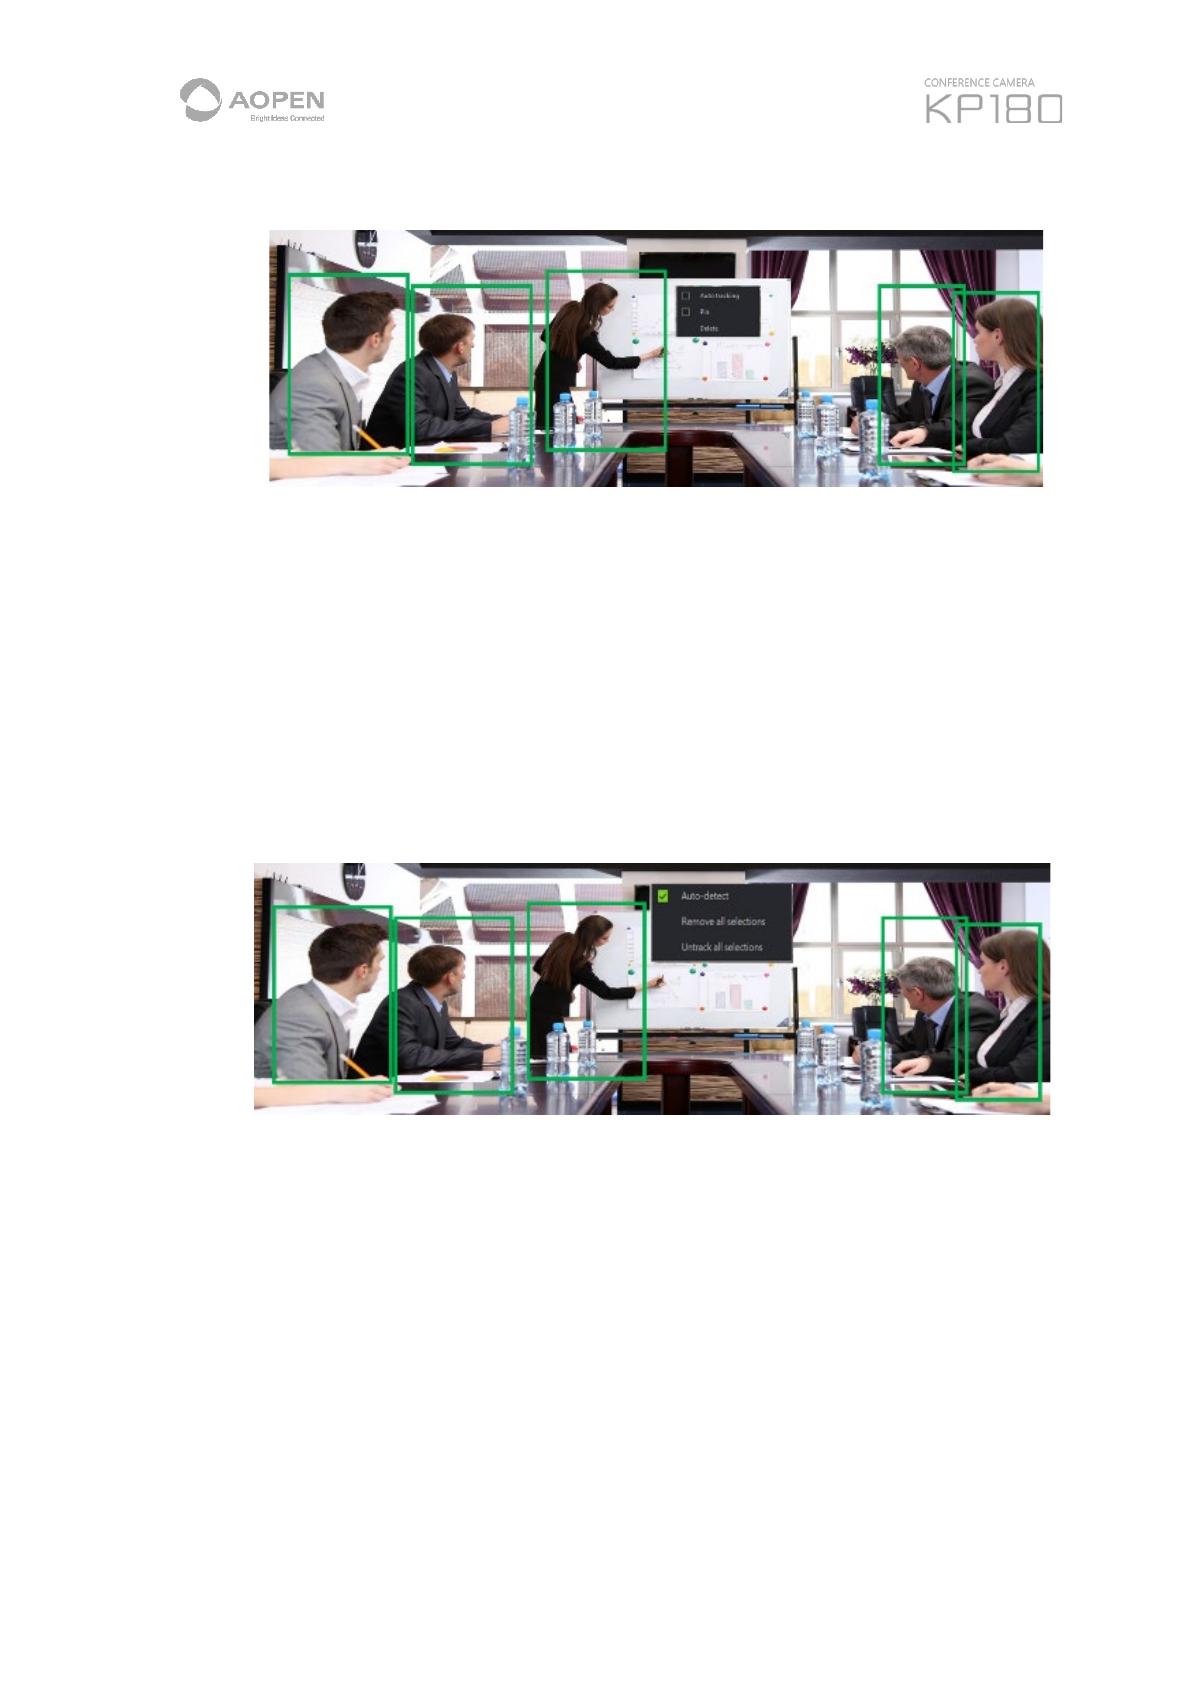
- Right-click inside of any green selection box and you have the following
options:
Auto tracking: This will automatically track the movement of
participants. The frame selection area changes from green to purple.
Pin: To pin a frame. A pin icon will be shown on the frame.
Delete: Removes the selection box
- Right-click inside the control area but not within the selection box to
select the following:
Auto-detect: It will automatically detect participants but will not track
the movement of all participants.
* Please note, Auto Detect and Auto Tracking might be affected by lighting or an
object in your environment.
Remove all selections: This will remove all of the selection boxes.
Untrack all selections: All tracked selection boxes (purple frame) will
no longer be tracked and will turn green in color.
4
- Edit Base Position: Set the image base from 12 degree down,
center and 12 degree up.
(2) Navigator Panel Broadcast Preview
- In the upper right corner of the 180 Studio screen, a preview window
shown. This displays what your meeting software will broadcast.
- Press the icon in the upper right corner to separate the
Navigator preview window from the right side of the screen.
- Click you can now move the preview windows back to the right
side of screen.
5
(3) Control option area (Control)
Auto-detect: When enabled, this will automatically select participants and
focus on them.
Image mirror: This will mirror your displayed image.
6
(4) Display Layout - Conference mode selection area
Compose mode: Displays the panoramic view on top with 4 framed
participants below.
Focus mode (default is on): Display the minimum range covered by
each frame selection combination
Grid mode: Displays 4 selection areas. To frame an area, click the left
mouse button and draw a frame around each participant or item you
wish to display in the grid.
Picture in Picture: Displays 2 framed selection areas. This layout is
great for product demonstrations since it allows you to frame a product
in the large frame and a demonstrator in the small frame.
7
To pin a frame: Press the right mouse button and click Pin. A pin icon
will be shown on the frame.
Presenter mode: Only the main presenter and panoramic screen are
Displayed.
The frame selection area of the main speaker can be fixed through
the Pin function with the right mouse button;
The panoramic frame selection area can be adjusted by selecting
the arrows in the lower right and left corners of the dashed line
white box and dragging the box to the desired position.
8
(5) Effect options area
Click the expand icon in the Effect area to expand the available preset options.
Use the mouse to select the following light sources:
Normal: Balanced light source.
Strong Light: Select this option if the room is very bright.
Soft Light: Select this option if the room is softly lit.
Low Light: Select this option if the room is darker.
9
Custom: If the preset options are not providing the needed adjustments, selecting the
Custom option and then selecting Advanced settingwill allow you to manually control
the camera. The following adjustment items can be made:
EV (Exposure Value) adjustment This will darken or brighten the overall
camera image.
Flicker adjustment: Auto, 50Hz, 60Hz can be selected. For the U.S. and
Canada, should be set to Auto or 60Hz.
Lighting adjustment Adjusts the camera image brightness.
3DNR adjustment 3D Noise Reduction - Reduces the amount of noise
(snow) in the camera image.
Gamma adjustment Adjusts the camera image contrast.
10
3. Unable to run 180 Studio?
If you have resource usage conflict that conference software or 180 Studio cannot
work properly, please follow the steps as below.
(1) Please exit the 180 studio and communication application, if they are
working.
(2) Want to use video come from 180 Studio
2.1 Exit the 180 Studio, if it is working.
2.2 Launch communication application and set camera selection to
"Studio Camera"
2.3 then, launch the 180 Studio.
(3) Want to use "KP180 Camera". (Use KP180 directly without 180
Studio.
3.1 Exit the 180 Studio, if it is working.
3.2 Launch communication application and set camera selection to
"KP180 Camera";
  • Page 1 1
  • Page 2 2
  • Page 3 3
  • Page 4 4
  • Page 5 5
  • Page 6 6
  • Page 7 7
  • Page 8 8
  • Page 9 9
  • Page 10 10
  • Page 11 11

AOpen KP180 User guide

Type
User guide

AOpen KP180 is an innovative device that transforms your video conferencing experience. With its cutting-edge technology, it automatically detects and frames participants, ensuring everyone is in focus and visible during your meetings. The device's multiple layout options, including Compose mode, Focus mode, Grid mode, Picture-in-Picture mode, and Presenter mode, allow you to customize your video feed to suit your preferences.

Ask a question and I''ll find the answer in the document

Finding information in a document is now easier with AI