Electrolux EDC5330 User manual
- Category
- Tumble dryers
- Type
- User manual

TUMBLE DRYER
TORKTUMLARE
KUIVAUSRIMPU
SUfiILWNAÅ MAfiINA
INSTRUCTION BOOKLET
BRUKSANVISNING
KÄYTTÖOHJE
RUKOVODSTVO
PO ÈKSPLUATACII
EDC 5330
125 992 611
S
FIN
RUS
GB
125992610 copertina 4-02-2004 12:30 Pagina 1

2
Contents
Important safety information ......................3
Disposal ..............................................................3
Tips for environmental protection ............4
Technical specifications................................4
Description of the appliance ......................4
Adjusting the level of conductivity............5
Installation ..........................................................6
• Unpacking ............................................................6
• Positioning ............................................................6
• Electrical connection ............................................6
• Stacking kit ..........................................................6
• Door reversal ........................................................6
Use ........................................................................7
• The control panel ..............................................7-9
• Programme chart ................................................10
• Operating sequence............................................11
• Useful hints ........................................................12
Maintenance and Cleaning ........................13
• External cleaning ................................................13
• Cleaning the door ..............................................13
• Cleaning the filters ..............................................13
• Cleaning the condenser unit ..............................13
• Emptying the water reservoir..............................14
• Cleaning the air intake grille................................14
• Cleaning the drum ..............................................14
Something not working? ............................15
Dear customer,
Please read these operating instructions carefully and pay particular attention to the safety notes indicated in
the first pages.
We recommend that you keep this instruction booklet for future reference and pass it on to any future owners.
Transport damages
After unpacking the machine please check it is not damaged. If in doubt, do not start it but contact your local
Service Centre.
The symbols you will see on some paragraphs of this booklet have the following meaning:
The warning triangle emphasize information that is particularly important for your safety or correct
functioning of the appliance.
The information marked with this symbol provides additional instructions and practical tips on the use of
the appliance.
Tips and information about economical and ecological use of the machine are marked with this symbol.
Our contribution to the protection of the
environment: we use recycled paper.
125992611.qxp 2004-07-06 10:15 Page 2

ENGLISH
3
Important safety information
Installation
• Any electrical work required to install this
appliance should be carried out by a qualified
electrician or competent person.
• Care must be taken to ensure that the appliance
does not stand on the electrical supply cable.
• If the machine is situated on a carpeted floor,
please adjust the feet in order to allow air to
circulate freely.
Use
• This appliance is designed for domestic use only.
If the machine is used for any other purposes or is
not used correctly, the manufacturer accepts no
responsibility for any damage that might occur.
• Always unplug the appliance after use.
• Clothes which are dripping wet should not be
placed in the dryer.
• Danger of explosion: Never tumble dry items that
have been in contact with inflammable solvents
(petrol, methylated spirits, dry cleaning fluid and
the like). As these substances are volatile, they
could cause an explosion. Tumble dry only items
washed with water.
• Please make sure that no gas lighters have
accidentally been left in pockets of garments to be
loaded into appliance.
• Do not dry canvas shoes or sports shoes, as they
could get stuck between the door and the drum,
thus blocking this latter.
• Leave the door slightly ajar when the appliance is
not being used. This will allow the seal to be
preserved.
• Clean fluff filters after using the tumble dryer. To
prevent fire risks, do not use the appliance if the
fluff filters are damaged or without filters.
• Do not allow fluff to accumulate around the dryer.
General safety
• It is dangerous to alter the specifications or
attempt to modify this product in any way.
• Under no circumstances should you attempt to
repair the machine yourself. Repairs carried out by
inexperienced persons may cause injury or serious
malfunctioning. Contact your local Service Centre.
Always insist on genuine spare parts.
Child safety
• Children are often not aware of how dangerous
electrical appliances can be. When the machine is
working, children should be carefully supervised
and not be allowed to play with the appliance.
• The packaging components (e.g. plastic film,
polystyrene) can be dangerous to children -
danger of suffocation! Keep them out of children’s
reach.
• Make sure that children or pets do not climb into
the drum.
• When the appliance is to be scrapped, cut off the
electrical supply cable and destroy the plug with
the remaining cable. Disable the door catch in
order to prevent children from becoming trapped
inside while playing.
These warnings have been provided in the interest of safety. You MUST read them carefully before installing or
using the appliance.
• Packaging materials
The materials marked with the symbol are
recyclable.
This means that they can be recycled by disposing
of them properly in appropriate collection
containers.
• Machine
Use authorised disposal sites for your old appliance.
Help to keep your country tidy!
Disposal
125992611.qxp 2004-07-06 10:15 Page 3

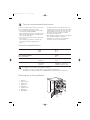
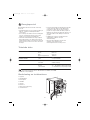
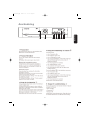
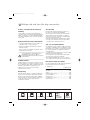
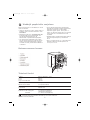
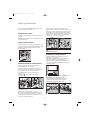
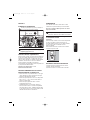
Description of the appliance
01 Table top
02 Water reservoir
03 Control panel
04 Fluff filters
05 Rating Plate
06 Condenser Unit
07 Drum light
08 Adjustable feet
0
4
To save energy and to help protect the environment,
we recommend that you follow these hints:
• Try to load the maximum capacity of the machine
as small loads are uneconomical.
• Always load well spun laundry. The higher the spin
speed, the lower the electricity consumption and
the shorter the drying times.
• Do not over-dry laundry, this avoids creasing and
saves energy.
Select the drying programme according to the
type of laundry and the required degree of
dryness.
• To utilize the maximum load, laundry which is to
be dried ready to put away (store dry) can be dried
together with items to be ironed. To do this, select
the programme for iron-dry, remove the iron-dry
items at the end of the programme and then
finish-dry the rest of the load.
• Clean the filters regularly to avoid excessive drying
times and high electricity consumption.
• Ventilate the room well. The room temperature
should not exceed +35°C during drying.
Tips for environmental protection
Technical specifications
DIMENSIONS: Height 85 cm
Width 60 cm
Depth 58 cm
ELECTRICAL CONNECTION: 220/230 V/50 Hz
MAX. POWER ABSORBED: 2200 W
MIN. FUSE RATING: 10 A
MAX. DRYING CAPACITY: Cotton, linen 6 kg
Synthetics 2.5 kg
CONSUMPTION: Cotton, linen 4.37 kWh (6.5 kg store dry)
Cotton, linen 3.60 kWh (6.5 kg iron dry)
Synthetics 1.40 kWh (2.5 kg store dry)
This appliance complies with the following E.E.C. Directives:
- 73/23 EEC of 19.2.73 (Low Voltage Directive) and subsequent modifications;
- 89/336 EEC of 3.5.89 (Electromagnetic Compatibility Directive) and subsequent modifications.
125992611.qxp 2004-07-06 10:15 Page 4

5
ENGLISH
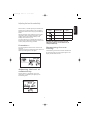
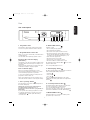
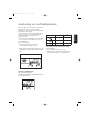
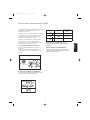
Adjusting the level of conductivity
Water contains, a variable quantity of limestone and
mineral salts of which quantities vary according to
geographical locations thus varying its conductivity
values.
Relevant variations of the conductivity of the water
compared to those prefixed by the factory could
slightly influence the residual humidity of the
laundry at the end of the cycle.
Your dryer allows you to regulate the sensitivity of
the drying sensor based on conductivity values of the
water by using the following procedure.
Procedure:
Turn the programme selector dial to switch on the
appliance
In selection mode press simultaneously the buttons 3
and 6 until «
C0» appears on the digits.
Adjusting the level of
conductivity:
Press the button 5 sequentially: the level of
conductivity is indicated by the lighting of the
horizontal hyphens.
START/PAUSE
Normally, the appliance is factory-set to the
highest level; however, certain models may be
configured differently.
Memorizing the new
setting:
Simultaneously press down the buttons 3 and 6 until
the previous drying cycle time appears again on the
display and the buzzer sounds.
Display Conductivity degree
Approximative value
(µS/cm)
CC 00
Low < 300
CC 00
Medium 300 - 600
CC 00
High > 600
125992611.qxp 2004-07-06 10:15 Page 5

6
Installation
Warning!
Unpacking
Slide out the polythene bag with the
polystyrene stuffing before using the
appliance.
Should the appliance be moved, it must be
transported vertically.
Positioning
It is recommended that, for your convenience, the
machine is positioned close to your washing
machine.
The tumble dryer must be installed in a clean place,
where dirt does not build up.
Air must be able to circulate freely all round the
appliance. Do not obstruct the front ventilation grille
or the air intake grille at the back of the machine.
To keep vibration and noise to a minimum when the
dryer is in use, it should be placed on a firm, level
surface.
Once in its permanent operating position, check
that the dryer is absolutely level with the aid of a
spirit level. If it is not, raise or lower the feet until
it is.
The feet must never be removed.
Do not restrict the floor clearance through deep-
pile carpets, strips of wood or similar. This might
cause heat build-up which would interfere with
the operation of the appliance.
Important
The hot air emitted by the tumble dryer can reach
temperatures of up to 60°C. The appliance must
therefore not be installed on floors which are not
resistant to high temperatures.
P1106
When operating the tumble dryer, the room
temperature must not be lower than +5°C and
higher than +35°C, as it may affect the performance
of the appliance.
Electrical connection
This machine is designed to operate on a 220-230 V,
single-phase, 50 Hz supply.
Check that your domestic electrical installation can
take the maximum load required (2.2 kW), also
taking into account any other appliances in use.
Connect the machine to an earthed socket, in
accordance with current wiring regulations.
The manufacturer declines any
responsibility for damage or injury
through failure to comply with the
above safety precaution.
Should the appliance power supply
cable need to be replaced, this must
be carried out by our Service
Centre.
Important!
The power supply cable must be accessible after
installing the machine.
Stacking kit
A special stacking kit is available through your
dealer, to enable the mounting of the dryer on top of
a front loading washing machine with cover’s depth
between 48 and 60 cm.
Read carefully the instructions supplied with the kit.
Door reversal
To make it easier to load or unload the laundry the
door can be reversed.
This operation must be carried out by qualified
personnel.
Please contact the nearest Service Centre.
P1148
125992611.qxp 2004-07-06 10:15 Page 6

7
ENGLISH
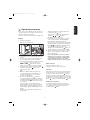
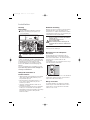
Use
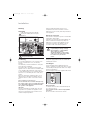
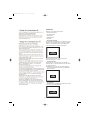
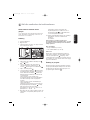
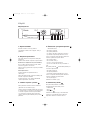
The control panel
12 345678910
90 min
60 min
30 min
START/PAUSE
EDC 5330
PROGRAM
FUNCTION
TIMELINE 6 kg
1 Programme chart
A programme chart is in the interior part of water
reservoir or together with the instruction booklet.
2 Programme/Time selector dial
Allows you to select electronically controlled or time
controlled drying.
Turn the dial to the required programme or time.
Electronically controlled drying
(automatic)
The appliance runs these programmes with the help
of probes which detect the degree of dampness of
the laundry.
Simply select the programme according to the type
of laundry and degree of drying required.
Time controlled drying
Can be used to finish off drying if necessary.
Select the 90 or 60 minute programme for cottons
or the 30 minute programme for synthetics.
To cancel a programme which is running, turn the
programme selector dial to “0”.
At the end of drying, turn the selector dial to “0” to
switch the machine off before removing the laundry.
3 “Door opening” button
Press this button to open the door. The light above
the button will light up.
Opening the door by means of this button is
possible only if the tumble dryer is on
(programme selector dial set to a programme or
drying time).
If you open the door during a programme, in order
to restart the programme you must re-press the
“START/PAUSE” button again after having
closed the door.
4 “Buzzer OFF” button
A buzzer sounds
• when selecting the programme
• when depressing the buttons
• when an incorrect option selection is made
• when the programme selector dial is turned to
another position during the programme or when
you depress an option button during the cycle
• at the end of the programme
• when the water reservoir is full
• if the machine is not working correctly
• when the small door at the bottom is open
By depressing button “Buzzer OFF” the acoustic
signal is switched off.
The corresponding light comes on.
5 “Quick drying” button
By depressing this button the drying time is reduced
in the following COTTON programmes:
• extra dry
• ready to wear
• store dry
The corresponding light illuminates. This option
cannot be selected together with “low temperature”
function .
6 “Low temperature” button
Pressing this button allows drying to be performed
at a lower temperature, for delicate items.
The corresponding pilot light comes on.
This option can also be used for time controlled drying.
This function cannot be used with “Quick drying” .
7 “DELAY START” button
This button allows you to delay the starting of the
programme by 12 hours max.
125992611.qxp 2004-07-06 10:15 Page 7

8
This option must be selected after having selected
the programme and before pressing “START/PAUSE”
to start the programme.
Every time the button is pressed, the time is
increased by 30 minutes, until the display shows a
delay of “2 hours”. After this, the delay is displayed
hour by hour.
The minutes or hours of delay that have been
selected are displayed for 3 seconds, then the
display shows the duration of the previously
selected programme.
The countdown begins after you have pressed the
“START/PAUSE” button.
To cancel the delay time press first the
“START/PAUSE” button and then the “DELAY
START” button until the display indicates
0’
. Then
press the “START/PAUSE” button again.
When the delay is cancelled, after 3 seconds the
display shows the duration of the programme.
During the delayed start, it is not possible to change
the programme or the delay time that have been
selected. To do this, you must first switch off the
machine by setting the programme selector dial to
“0”. Select the new programme, the options and the
delayed start, then press the “START/PAUSE”
button.
To cancel or change options that have been
selected, simply set the appliance to PAUSE. Once
you perform the desired operation, press once again
the “START/PAUSE” button.
If you wish to add more laundry while the machine is
performing the countdown, simply open the door.
When you close the door, press the “START/PAUSE”
button again to cause the countdown to be
resumed.
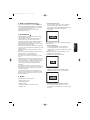
8 DISPLAY
The display shows the following information:
• duration of selected programme
• delayed start
• end of programme
• incorrect option selection
• alarm code
• Duration of selected programme
After you have selected the programme, its
duration (in hours and minutes) appears on the
display. It is calculated automatically on the basis
of the maximum load accepted for each type of
fabric and of the required degree of drying.
When the programme starts, the remaining time is
displayed every 5 minutes.
• Delayed start
If you have selected a delay time by means of the
relevant button, the display shows it for 3
seconds; then it shows the duration of the
previously selected programme.
The countdown is displayed every 30 minutes until it
displays “90 minutes” and then hour by hour.
• End of programme
A flashing zero indicates the end of the
programme and it is displayed after the “anti-
creasing” phase.
• Incorrect option selection
If you select an option that is not compatible with
the programme you have selected, the display
shows Err (error).
0
3
1.20
125992611.qxp 2004-07-06 10:15 Page 8

9
ENGLISH
This code will reappear during the execution of the
programme if you press one of the option buttons or
turn the programme selector.
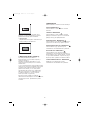
• Alarm code
In case of a functional anomaly, the display shows
an alarm code (e.g. E21). See page 14 for more
detailed information.
9 “START/PAUSE” button
Press this button to start the dryer after having
selected the programme and the options.
The relevant light will stop flashing. If you have
chosen a delayed start, the machine will begin the
countdown.
If the door of the appliance or the small door at
the bottom is opened while the programme is
running, this button must be pressed again after
closing the door in order to restart the programme
from the point at which it was interrupted.
This button must be depressed also after a power
failure and after having re-inserted the water
reservoir, if it has been emptied in the middle of a
programme after lighting up of light
.
In both cases the light of the Start/Pause button
flashes to remind you that the start button needs to
be pressed again.
E21
10 Indicator lights
These lights indicate the following functions:
“Drying” light
This light indicates that the appliance is in the drying
phase.
“Cooling” light
This light indicates that the appliance is in the
cooling phase. At the end of drying, there is a
10 minute cooling phase to cool the laundry.
“End of programme” light
This light is on at the end of the cooling phase,
during the anti-creasing phase and at the end of the
programme.
“Filter cleaning” light
This light illuminates at the end of the programme to
remind you that the filters must be cleaned.
“Water reservoir full” light
This light comes on at the end of the programme to
remind you that the water reservoir must be emptied
out. If this light illuminates during a programme this
means that the water reservoir is full. The buzzer
sounds, the programme stops, the light of the
Start/Pause button flashes.
“Condenser cleaning” light
It comes on every 80 cycles to remind you that the
condenser must be cleaned.
125992611.qxp 2004-07-06 10:15 Page 9

10
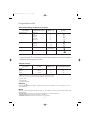
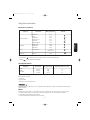
Programme chart
Automatic drying (electronic programmes)
(*) According to IEC 61121 Standards.
Type of laundry
Degree of drying
required
Max-load
(1)
Programme
Cotton & linen
extra dry
ready to wear
store dry
slightly damp
iron dry
machine iron dry
6 kg
6 kg
6 kg
6 kg
6 kg
6 kg
(*)
(*)
Time controlled drying
(1) Never overfill the drum (do not load large quilts, for example).
Drying times vary according to:
• The type of laundry
• The size of the load
• The degree of drying required
• The degree of spinning prior to drying.
Fresh & Cool
This position on programme selector dial can be used to freshen the laundry (e.g. to remove a persistent
odour of moth-balls). Programme duration 10 mins.
Load
It is often difficult to estimate the weight of items to be dried. We therefore recommend that you adopt the
following guidelines:
• cotton, linen: drum full but not too tightly packed;
• synthetics: drum no more than half full;
• delicate fabrics: drum no more than one third full.
Type of laundry Drying time Max-load
(1)
Programme
selector dial position
Cotton
Cotton
Synthetics
90 min
60 min
30 min
6 kg
6 kg
2.5 kg
90 min
60 min
30 min
Synthetics
extra dry
store dry
iron dry
2.5 kg
2.5 kg
2.5 kg
(*)
Jumpers
Baby cycle
1 kg
(10 jumpers)
Synthetics
Easy Iron
2.5 kg
• Baby cycle is a special programme for jumpers to be dried “ready to wear”.
• Easy iron is a special programme for synthetics.
125992611.qxp 2004-07-06 10:15 Page 10

ENGLISH
11
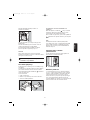
Operating sequence
Before using your tumble dryer for the first time, we
recommend to place a few damp cloths inside the
appliance and dry for 30 minutes.
There may be dust inside a brand new tumble dryer.
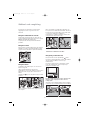
Drying
1. Connect the appliance.
2. Open the door (see picture).
3. Load the items one at a time, shaking them out
loosely.
4. Close the door. Please check the laundry does
not get caught between the door and filter.
5. Select the drying programme or time. The lights
, and come on. The light of the
“START/PAUSE” button flashes and the
display shows the duration of the programme.
6. If required, press the low temperature button
and/or the “Buzzer OFF” button or the
“Quick drying” button
.
7. Select the “DELAY START” if required. The
selected delay appears on the display for 3
seconds, then the duration of the selected
programme is displayed.
8. Press the “START/PAUSE” button the
corresponding light stops flashing and drying
starts. Only the light remains lit. If you have
selected the delayed start, the machine begins
its countdown.
If the programme selector dial is turned to
another position, when the machine is running,
the buzzer will sound, the programme phase
indicator lights will flash and Err appears on the
display.
The drum turns alternately in both directions
during drying.
P1108
P1149
All drying programmes end with a 10 minute
cooling phase light is on).
You may remove the laundry after this phase.
The lights , and illuminate.
The display shows a static zero.
9. If the laundry is not removed at the end of the
cycle, the dryer performs an anti-creasing
phase (duration: 30 minutes maximum).
If you do not remove the laundry, the dryer will stop
automatically at the end of the anti-creasing phase.
Lights , and remain lit and the buzzer
sounds every 10 seconds for 2 minutes.
The light of the “START/PAUSE” button goes
off and a flashing zero appears on the display.
10. Turn the programme selector dial to “0”; all the
lights go out. The appliance is switched off.
Remove the laundry.
If you open and then close the door before
turning the selector dial to “0” all the lights
corresponding to the phases making up the
performed programme come on and the
display shows the duration of the programme.
After each use
• Clean the filters (see page 13).
• Empty the water reservoir (see page 14).
Important!
If the drying programme has to be stopped before it
reaches the end, we recommend that you turn the
programme selector dial to position and wait
until the end of this cooling phase before removing
the laundry. This will avoid a build-up of heat inside
the appliance.To do this first turn the dial to “0” and
then to and depress “START/PAUSE” button
.
Modifying the programme
To change a programme which is running, first
cancel it by turning the programme selector dial to
“0”. Select the new programme and press the
“START/PAUSE” button.
125992611.qxp 2004-07-06 10:15 Page 11

12
Useful hints
• Try to load to the maximum capacity of the
machine as small loads are uneconomical.
For information, here is a list of the average
weights of some common laundry items.
Sheet 700 - 1000 g
Tablecloth 400 - 500 g
Kitchen towel 70 - 120 g
Table napkin 50 - 100 g
Towelling hand towel 150 - 250 g
Bathrobe 1000 - 1500 g
Man’s shirt 200 - 300 g
Pillowcase 100 - 200 g
Man’s pyjamas 400 - 500 g
Ladies’ nightdress 200 - 250 g
• Never tumble dry the following:
Particularly delicate items such as net curtains,
woollen, silk, fabrics with metal trim, nylon tights,
bulky materials such as anoraks, blankets,
eiderdowns, sleeping bags, feather quilts and any
items containing rubber foam or materials similar
to rubber foam.
• Always follow the instructions on garment labels:
may be tumble dried
normal drying (high temperature)
delicate drying (low temperature)
do not tumble dry
• Close pillowcases and covers with fasteners to
prevent small laundry items getting tangled inside
them. Close press studs, zips and hooks and tie
belts and apron strings.
• Sort laundry according to type and degree of
drying required.
• Do not over-dry laundry, this avoids creasing and
saves energy.
• Avoid drying dark clothes with light coloured fluffy
items such as towels as they could attract the
fluff.
• The laundry must be thoroughly spun before
tumble drying.
• Easy-care items, too, e.g. shirts, should be
briefly pre-spun before drying (depending on
crease resistance approx. 30 seconds or using the
special brief spin programme of your washing
machine).
• Knitted textiles (knitted underwear) may shrink a
little during drying. Please do not overdry items of
this type. It is advisable to allow for shrinkage
when choosing the size of new purchases.
• You can also put starched items into your dryer.
However, to achieve the desired starched effect,
choose the programme “iron dry”. To remove any
starch residues, wipe out the internal drum after
drying with a moist cloth and then rub it dry.
• To avoid a static charge when drying is
completed, use either a fabric softener when you
are washing the laundry or a fabric conditioner
specifically for tumble dryers.
• Remove the laundry when the dryer has finished
drying.
• If individual items are still damp after drying, set a
brief post-drying time, but at least 30 minutes.
This will be necessary particularly for multilayered
items (e.g. collars, pockets, etc.).
125992611.qxp 2004-07-06 10:15 Page 12

ENGLISH
13
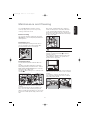
Maintenance and Cleaning
You must disconnect the appliance from the
electricity supply, before you can carry out any
cleaning or maintenance work.
External cleaning
Use only soap and water and then dry thoroughly.
Important: do not use methylated spirit, diluents or
similar products.
Cleaning the door
Clean periodically the interior part of the door to
remove any fluff from the seals around the filter.
Accurate cleaning ensures correct drying.
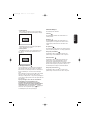
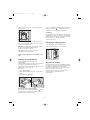
Cleaning the filters
Your dryer will only function well if the filters are
clean.
The filters collect all the fluff which accumulates
during drying and they must therefore be cleaned
at the end of each programme, before removing
the laundry, with a damp cloth.
The light (Filter cleaning) is on to remind you this
operation.
The filter in the inner door must be removed for
cleaning.
Do not be alarmed by the amount of fluff. It is not
due to excessive wear caused by the dryer. All
fabric loses fluff when drying but it goes un-noticed
in the air. In a tumble dryer it simply collects in the
filter.
A
U
T
O
R
E
V
E
R
S
E
kg 5
kg 2,5
8
0
0
/
9
0
0
7
0
'
-
9
0
'
3
5
'
-
5
0
'
1
0
0
0
/
1
2
0
0
6
5
'
-
8
5
'
3
0
'
-
4
5
'
8
0
0
/
9
0
0
8
0
'
-
1
0
0
'
5
5
'
-
7
0
'
1
0
0
0
/
1
2
0
0
7
5
'
-
9
5
'
5
0
'
-
6
5
'
6
5
0
5
0
'
-
6
0
'
3
0
'
-
3
5
'
kg
2,5
kg 1
P1151
P1110
A
U
T
O
R
E
V
E
R
S
E
kg
5
kg 2
,5
8
0
0
/
9
0
0
7
0
'
-
9
0
'
3
5
'
-
5
0
'
1
0
0
0
/
1
2
0
0
6
5
'
-
8
5
'
3
0
'
-
4
5
'
8
0
0
/
9
0
0
8
0
'
-
1
0
0
'
5
5
'
-
7
0
'
1
0
0
0
/
1
2
0
0
7
5
'
-
9
5
'
5
0
'
-
6
5
'
6
5
0
5
0
'
-
6
0
'
3
0
'
-
3
5
'
kg
2,5
k
g 1
P1150
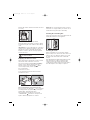
After a while, a withish patina due to detergent
residue on laundry forms on the filters. When this
occurs, clean the filters with warm water using a
brush. Remove the filter in the door opening as per
picture (it can be positioned with the tooth facing to
the left or to the right).
Do not use the appliance without filters.
Cleaning the condenser unit
Clean the condenser when light (Condenser
cleaning) comes on.
The condenser is situated at the lower part of the
cabinet behind a small door. To open the door,
push the catch as per picture.
During the drying cycle or at the end, it is normal for
water to be present on the surface of the condenser
insertion.
To pull out the condenser, first turn the two red
stops downwards and then remove the condenser
unit holding it at the handle.
P1155
P1154
P1153
A
U
T
O
R
E
V
E
R
S
E
kg 5
kg
2,5
8
0
0
/
9
0
0
7
0
'
-
9
0
'
3
5
'
-
5
0
'
1
0
0
0
/
1
2
0
0
6
5
'
-
8
5
'
3
0
'
-
4
5
'
8
0
0
/
9
0
0
8
0
'
-
1
0
0
'
5
5
'
-
7
0
'
1
0
0
0
/
1
2
0
0
7
5
'
-
9
5
'
5
0
'
-
6
5
'
6
5
0
5
0
'
-
6
0
'
3
0
'
-
3
5
'
kg
2
,5
kg
1
P1152
125992611.qxp 2004-07-06 10:15 Page 13

14
Clean it with a brush and rinse it under the shower if
necessary.
Also clean the outside, removing all fluff.
Clean the rubber seal round the condenser cabinet
and in the inner part of the small door with a damp
cloth.
Important! Do not use pointed objects or utensils to
clean the spaces between the plates, as this could
damage the condenser and make it permeable.
Re-fit the condenser, turn the red stops upwards
and close the door.
Do not use this appliance if the condenser
has not been fitted.
Emptying the water reservoir
Water extracted from the laundry condenses inside
the machine and is collected in a reservoir.
The reservoir must be emptied after each drying
cycle to ensure efficient operation when the
machine is next used. The pilot light (Water
reservoir full) reminds you this operation.
Proceed as follows:
•Pull out the reservoir
•Turn it upside down and let water flow down
•Re-fit the reservoir
The reservoir must be re-inserted correctly.
If this is not done the pilot light comes on during
next drying and the programme stops, leaving the
laundry damp. The buzzer will sound.
After emptying and inserting the reservoir the
“START/PAUSE” button has to be depressed
again to allow the programme to continue.
P1157
P1156
P0639
Handy tip: The condensed water may be used in a
steam iron or to top up a battery, etc. In this case it
must be filtered (e.g. through a coffee filter).
Cleaning the air intake grille
Using a vacuum cleaner remove the fluff from the air
intake grille at the back of the appliance.
Cleaning the drum
When your laundry does not reach the desired
degree of dryness, in other words, when it turns out
either too dry or too damp, we advise you to clean
the inside of the drum with a cloth soaked with
vinegar.
This will eliminate the slight patina that has formed
in the drum (due to residues of detergent and
softeners used in the washing, and to the lime
contained in the water), which prevents the probes
from detecting the correct degree of dryness.
P1162
125992611.qxp 2004-07-06 10:16 Page 14

ENGLISH
15
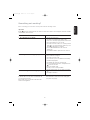
Something not working?
If, after the above checks, there is still a fault, call
your local Service Centre.
Please make sure you give the model and serial
number of the appliance.
Before contacting your local Service Centre, please make the following checks.
Important!
If light (End of programme) flashes, the buzzer sounds and an alarm code is displayed, switch the machine
off and call the Service Centre.
Problem Possible cause
• The dryer does not work:
• The door(s) is(are) open.
• The plug is not fitted into the wall socket.
• There is no electricity supply from the wall socket.
• The selector dial is not set correctly.
• The water reservoir is full or not correctly inserted
(light is on
)
. The programme starts in any case
but it stops after approx. 4 minutes.
• The “START/PAUSE” button has not been
depressed.
• The “DELAY START” option has been selected.
• The dryer does not dry properly:
• The filters are clogged.
• The condenser is clogged.
• The water reservoir is full.
• The selected cycle is not suitable for the laundry.
• Insufficient drying time.
• The laundry has not been spun properly.
• The low temperature function “Temperature low.”
has been selected.
• Excessive laundry load.
• The dryer is not correctly installed.
This information can be found on the rating plate
(see picture on page 4).
• The drum light does not light up:
• The Programme/Time selector dial is on position
“0”.
• The lamp is defective.
125992611.qxp 2004-07-06 10:16 Page 15

16
Innehållsförteckning
Bästa kund,,
vi ber dig att läsa igenom den här bruksanvisningen noggrant.
Framför allt är det viktigt att du läser säkerhetsinformationen på de första sidorna i bruksanvisningen. Förvara
alltid bruksanvisningen lättillgänglig, så att du snabbt kan hitta den och slå upp information i den vid ett senare
tillfälle. Om du säljer maskinen ska bruksanvisningen lämnas över till nästa ägare..
Transportskador
Kontrollera att torktumlaren inte är skadad. Eventuella transportskador skall omedelbart anmälas till den som
ansvarat för transporten. Skador, felaktigheter och ev. saknade delar skall omedelbart anmälas till säljaren.
Så här använder du bruksanvisningen
Några stycken i bruksanvisningen är försedda med en symbol. Dessa symboler betyder följande:
Här finns viktig information om olämplig användning av torktumlaren som skulle kunna förorsaka
person- och egendomsskada.
Här finns information, som är särskilt viktig för att erhålla bästa möjliga torkresultat.
Här finns viktiga miljö- och energispartips.
Vårt bidrag till miljöskyddet är att vi
använder returpapper.
Viktig säkerhetsinformation . . . . . . . . . . . 17
Bortforsling/avfallshantering
. . . . . . . . . . 17
Energisparråd
. . . . . . . . . . . . . . . . . . . . . . . . . 18
FÖR ANVÄNDAREN
Beskrivning av torktumlaren
. . . . . . . . . . 18
Tekniska data
. . . . . . . . . . . . . . . . . . . . . . . . . 18
Justering av restfuktingheten
. . . . . . . . . 19
FÖR INSTALLATÖREN
Installation
. . . . . . . . . . . . . . . . . . . . . . . . . . . .20
•
Uppackning . . . . . . . . . . . . . . . . . . . . . . . . . . . .20
•
Placering av tumlaren . . . . . . . . . . . . . . . . . . . .20
•
Viktigt ved installation av kondenstumlare . . . .20
•
Elektrisk anslutning . . . . . . . . . . . . . . . . . . . . . .20
•
Monteringssats för tvättpelare (extra tillbehör) . . .20
•
Hänga om luckan . . . . . . . . . . . . . . . . . . . . . . .20
Bruk . . . . . . . . . . . . . . . . . . . . . . . . . . . . . . . . . . . 21
•
Beskrivning av panelens funktioner . . . . . . .21-23
•
Programöversikt . . . . . . . . . . . . . . . . . . . . . . . .24
•
Så här använder du torktumlaren.. . . . . . . . . . .25
Viktiga råd och tips för dig som torkar . . . 26
•
Allt kan inte torkas i tumlaren. . . . . . . . . . . . . . 26
•
Stärkta textilier . . . . . . . . . . . . . . . . . . . . . . . . . 26
•
Krympning. . . . . . . . . . . . . . . . . . . . . . . . . . . . . 26
•
Vad är ludd? . . . . . . . . . . . . . . . . . . . . . . . . . . . 26
•
Tid- och energiförbrukning . . . . . . . . . . . . . . . . 26
•
Tvättmärkning . . . . . . . . . . . . . . . . . . . . . . . . . . 26
Skötsel och rengöring. . . . . . . . . . . . . . . . . 27
•
Rengöra torktumlarens utsida . . . . . . . . . . . . .27
•
Rengöra luckan . . . . . . . . . . . . . . . . . . . . . . . . .27
•
Rengöra filtren . . . . . . . . . . . . . . . . . . . . . . . . .27
•
Rengöring av kondensorn . . . . . . . . . . . . . . . . .27
•
Tömning av vattenbehållaren . . . . . . . . . . . . . .28
•
Korrekt placering av vattenbehållare . . . . . . . .28
•
Rengöring av luftintagsgallret . . . . . . . . . . . . . .28
•
Rengöring av trumma . . . . . . . . . . . . . . . . . . . .28
Om torktumlaren inte fungerar . . . . . . . .29
•
Reklamation . . . . . . . . . . . . . . . . . . . . . . . . . . .29
•
Konsumentkontakt . . . . . . . . . . . . . . . . . . . . . .29
•
Service och reservdelar . . . . . . . . . . . . . . . . . .29
•
Garanti (gäller för Finland) . . . . . . . . . . . . . . . . .29
125992611.qxp 2004-07-06 10:16 Page 16

17
SVENSKA
Viktig säkerhetsinformation
Installation
• Alla installationsarbeten och ingrepp i produkten,
liksom förändring av den elektriska
anslutningssladden, skall utföras av behörig fackman.
Arbeten utförda av personer med otillräckliga
kunskaper, kan försämra produktens funktion och
förorsaka skada på person och egendom.
• Se till att maskinen inte står på anslutningssladden.
• Om maskinen har placerats på ett mattbelagt golv,
måste du justera dess fötter så att luften får
möjlighet att cirkulera fritt.
Användning
• Maskinen får endast användas i hushållet och
endast för angivet ändamål.
• När du har använt maskinen ska du alltid dra ut
stickkontakten ur vägguttaget.
• Tvätt som inte har centrifugerats får aldrig torkas i
torktumlaren.
• Plagg och textilier som behandlats med
brandfarliga rengörings- och lösningsmedel
(tvättbensin, alkohol, fläckborttagningsmedel etc)
får aldrig torkas i torktumlaren. Brandrisk
föreligger! Endast textilier som tvättats i vatten får
torkas i torktumlaren.
• Kontrollera alltid att det inte glömts kvar någon
gaständare/cigarrettändare i klädesplaggen. Det
gäller även tändare som inte fungerar.
• Låt luckan på torktumlaren stå öppen mellan
torkprogrammen. Det gör att gummilisten som
tätar runt luckan håller längre och tätar bättre.
• Använd aldrig torktumlaren utan luddfilter eller
med trasiga luddfilter. Brandrisk föreligger!
• Torka aldrig gymnastikskor (tennisskor,
joggingskor etc) i torktumlaren. Skorna kan
komma emellan trumman och luckan och därmed
blockera trumman.
Allmänna säkerhetsföreskrifter
• Det är farligt att på något sätt förändra
torktumlaren eller dess egenskaper.
• Försök aldrig att själv reparera maskinen.
Reparationer som inte har utförts av fackman kan
leda till svåra olyckor eller driftstörningar.
• Service och reparationer skall utföras av
leverantören legitimerat serviceföretag. Kontrollera
att delarna byts ut mot original reservdelar – för
säker drift.
Barnsäkerhet
• Barn förstår oftast inte hur farligt det kan vara att
leka med elektriska maskiner. Därför ska du hålla
uppsikt över maskinen under drift. Låt inte barnen
leka med torktumlaren.
• Förpackningsmaterial (t ex plastfolie och frigolit)
kan vara farligt för barn. Risk för kvävning! Se till
att barnen inte kommer åt att leka med
förpackningsmaterialet.
• Kontrollera att barn eller små djur inte tar sig in i
torktumlarens trumma.
• När torktumlaren är uttjänt och ska forslas bort,
ska du dra ut stickkontakten och skära av
nätkabeln. Stickkontakten och resterna av
nätkabeln ska också kastas. Lucklåset ska
förstöras. På så sätt kan lekande barn inte bli
instängda i torktumlarna och därmed försättas i
livsfara.
Bortforsling/
avfallshantering
• Hantering av förpackningsavfall
De material i förpackningen som kan återanvändas
är märkta med symbolen och skall i princip
återanvändas.
>PE< står för polyeten
>PS< står för polystyrol
>PP< står för polypropylen
Pappemballaget bör läggas i en pappersin-
samlingscontainer, om en sådan finns i ert
område.
• Deponering av uttjänt maskin
Kontakta din kommun för information om var du
kan lämna din maskin.
Följande varningsuppgifter är till för den allmänna säkerheten. Läs noga igenom dem före installation och
användning av apparaten.
125992611.qxp 2004-07-06 10:16 Page 17

18
Energisparråd
Din torktumlare arbetar ekonomiskt om du följer
dessa råd.
• Fyll alltid maskinen helt. Se programöversikten på
sidan 31. Torkning med halvfylld maskin är
oekonomiskt.
• Före torkningen ska tvätten vara väl centrifugerad.
Ju högre centrifugeringsvarvtal, desto kortare
torktid och desto lägre strömförbrukning.
• Undvik att torktumla kläderna för länge. Välj det
rätta torkprogrammet och därmed den önskade
torkningsgraden. Kläder som torkats för länge kan
krympa mer än normalt och dessutom vara svåra
att stryka.
• För att utnyttja maskinens fulla kapacitet kan tvätt
som ska vara helt skåptorr torkas tillsammans
med tvätt som bara ska vara stryktorr. Välj ett
program för stryktorr tvätt. När detta program är
färdigt tas den stryktorra tvätten helt enkelt ut och
den övriga tvätten torkas färdigt med ett annat
program.
• Luddfiltren bör rengöras regelbundet för att
undvika längre torktider och högre
strömförbrukning.
• Utrymmet där torktumlaren står ska vara
ventilerat. Under torkningen bör
rumstemperaturen inte överstiga +35°C.
Beskrivning av torktumlaren
1 Topplock
2 Vattenbehållare
3 Kontrollpanel
4 Luddfilter
5 Typskylt
6 Kondensor
7 Lampa för innerbelysning
8 Justerbara fötter
Tekniska data
MÅTT: höjd 850 mm justerbar + 8 mm
bredd 600 mm
djup 580 mm
djup med öppen lucka 1008 mm
REKOMMENDERAD bomull 6,0 kg torra kläder
MAXIMAL MÄNGD: syntet 2,5 kg torra kläder
ELANSLUTNING: nätspänning 220-230 V, 50 Hz
totaleffekt 2200 W, 10 Amp
STRÖMFÖRBRUKNING: bomull 4.37 kilowattimme (6 kg skåptorr tvätt)
bomull 3,6 kilowattimme (6 kg stryktorr tvätt)
syntetmaterial 1,4 kilowattimme (2,5 kg skåptorr tvätt)
Denna apparat uppfyller kraven i EG-direktivet 89/336/EEG, 73/32/EEG.
Vi reserverar oss för ändringar.
125992611.qxp 2004-07-06 10:16 Page 18

19
SVENSKA
Justering av restfuktigheten
Vatten innehåller olika mängd kalk och mineralsalter.
Mängden varierar beroende på geografiska
förhållanden och det påverkar vattnets konduktivitet
(elektriska ledningsförmåga).
Lokala variationerna i vattnets konduktivitet jämfört
med de fasta värden som är fabriksinställda kan
påverka restfuktigheten i tvättgodset efter
programmets slut.
Du kan själv anpassa känsligheten på torktumlarens
sensor som känner av konduktiviteten genom att
göra enligt följande.
Gå in i inställningsläget:
• Vrid programvredet till ett torkprogram.
• Tryck samtidigt in knapparna 3 och 6.
• Håll knapparna intryckta tills programfaslamporna
börjar blinka och lampan för torkfase
«C0»
ser med fast
sken.
Justera konduktiviteten:
Tryck på 5 flera gånger tills:
programindikeringslampan för önskad konduktivitet
lyser, se tabellen nedan
Normalt är högsta värdet fabriksinställt, men
vissa modeller kan ha ett annat värde inställt.
Spara inställningen:
• Tryck samtidigt in knapparna 3 och 6.
• Håll knapparna intryckta tills indikeringslamporna
ovanför slutar att blinka och en ljudsignal hörs.
LED lampa Konduktivitet
Cirka
värdenµS/cm
CC 00
Låg < 300
CC 00
Medium 300 - 600
CC 00
Hög > 600
START/PAUSE
125992611.qxp 2004-07-06 10:16 Page 19

20
Installation
Varning!
Uppackning
Innan du använder torktumlaren måste du
avlägsna (se bilden) polyetenpåsen med
polystyrenfyllning.
Torktumlaren skall transporteras vertikalt.
Torktumlaren kan installeras på ett plant golv eller
ovanpå en tvättmaskin. Tumlaren skall i båda fallen
stå i våg, använd vattenpass för kontroll. Eventuella
justeringar kan göras med maskinens fötter.
Se till att tumlaren har god ventilation undertill,
blockera inte lufttillförseln med klädesplagg eller
liknande.
Sörj för god luftväxling genom luftgallret i sockeln.
Tjock matta är på grund av detta olämpligt som
underlag för torktumlaren.
Viktigt vid installation av
kondenstumlare
• Utblåsningsluften från torktumlaren kan bli upptill
+60°C. Placera därför aldrig tumlaren på ett
temperaturkänsligt golv.
• Rumstemperaturen måste ligga mellan +5° och
35°C, eftersom temperaturen kan påverka
maskinens prestanda.
• Utrymmet omkring torktumlaren skall vara så
dammfritt som möjligt.
• De justerbara fötterna får inte tas bort. Avståndet
mellan golv och torktumlare är nödvändigt för
luftcirkulationen. Blockerad ventilation ger förhöjd
temperatur inne i tumlaren, vilket påverkar
tumlarens funktion.
P1106
Elektrisk anslutning
Maskinen levereras med sladd och stickkontakt för
anslutning till 230 V 1 fas 10 A. Vid placering i
våtutrymmen t ex. badrum skall maskinen anslutas
enligt gällande bestämmelser. Fast elanslutning får
endast utföras av behörig elinstallatör.
Skador orsakade av felaktig elinstallation
omfattas inte av
konsumentbestämmelserna,
Konsumentköp EHL.
Om anslutningssladden måste bytas ut
skall detta arbete utföras av auktoriserad
service.
Efter att maskinen har ställts upp skall det gå att
kunna komma åt elledningen.
Monteringssats för tvättpelare
Extra tillbehör
Det är möjligt att montera torktumlaren på en
frontmatad tvättmaskin, men då måste tumlaren
skruvas fast i tvättmaskinen. För detta erfordras en
monteringssats som du beställer hos din
återförsäljare.
Läs instruktionerna som medföljer leveransen noga
innan du installerar torktumlaren.
OBS! Ställs kombinationen på en sockel, fundament
eller liknande skall den förankras så det inte finns
någon risk för att den kan falla ner.
Hänga om luckan
För enklare iläggning och uttagning av tvätt kan
luckan hängas om åt andra hållet. Detta får dock
endast göras av en behörig fackman. Kontakta
närmaste servicecenter.
P1148
125992611.qxp 2004-07-06 10:16 Page 20
Page is loading ...
Page is loading ...
Page is loading ...
Page is loading ...
Page is loading ...
Page is loading ...
Page is loading ...
Page is loading ...
Page is loading ...
Page is loading ...
Page is loading ...
Page is loading ...
Page is loading ...
Page is loading ...
Page is loading ...
Page is loading ...
Page is loading ...
Page is loading ...
Page is loading ...
Page is loading ...
Page is loading ...
Page is loading ...
Page is loading ...
-
 1
1
-
 2
2
-
 3
3
-
 4
4
-
 5
5
-
 6
6
-
 7
7
-
 8
8
-
 9
9
-
 10
10
-
 11
11
-
 12
12
-
 13
13
-
 14
14
-
 15
15
-
 16
16
-
 17
17
-
 18
18
-
 19
19
-
 20
20
-
 21
21
-
 22
22
-
 23
23
-
 24
24
-
 25
25
-
 26
26
-
 27
27
-
 28
28
-
 29
29
-
 30
30
-
 31
31
-
 32
32
-
 33
33
-
 34
34
-
 35
35
-
 36
36
-
 37
37
-
 38
38
-
 39
39
-
 40
40
-
 41
41
-
 42
42
-
 43
43


Electrolux EDC5330 User manual
- Category
- Tumble dryers
- Type
- User manual
Ask a question and I''ll find the answer in the document
Finding information in a document is now easier with AI
in other languages
- eesti: Electrolux EDC5330 Kasutusjuhend
- svenska: Electrolux EDC5330 Användarmanual
Related papers
-
Electrolux EDC510E User manual
-
-
-
Electrolux TCE7124 User manual
-
-
-
-
-
-
Electrolux EDC77570W User manual