Homewerks Worldwide 3210-160-CH-B-Z Installation guide
- Category
- Sanitary ware
- Type
- Installation guide

1
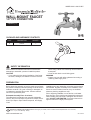
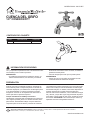
Questions, problems, missing parts? Before returning to your retailer, call our customer service department at 1-877-319-3757,
7 a.m. - 5 p.m., CST, Monday - Friday.
WALL-MOUNT FAUCET
1/2" FPT CONNECTION
Español p. 5
04-13-2012
www.homewerksww.com
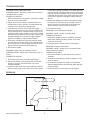
PACKAGE AND HARDWARE CONTENTS
PREPARATION
PART DESCRIPTION QUANTITY
A Faucet 1
SAFETY INFORMATION
Please read and understand this entire manual before
attempting to assemble, operate or install the product.
CAUTION
• If you solder the joints during installation of the faucet,
the seats, cartridges, and washers must be removed
before using a ame or the warranty will be voided on
these parts.
• Cover the sink drain to avoid losing parts.
WARNING
• Protect your eyes with safety glasses when cutting or
soldering water supply lines.
Before beginning assembly of product, make sure all parts
are present. Compare parts with package contents list and
hardware contents. If any part is missing or damaged, do
not attempt to assemble the product. Contact customer
service for replacement parts.
Estimated Assembly Time: 30 minutes
Tools Required for Assembly (not included): Adjustable
Wrench, Groove Joint Pliers, Pipe Wrench, Phillips Screw-
driver, Pipe Tape or Pipe Thread Compound, and Supply
Lines
Installations may vary depending on how the previous faucet
was installed. Supplies necessary for the installation of the
faucet are not all included; however, they are available
wherever plumbing supplies are sold.
Prior to beginning installation, turn off the hot or cold water
lines, then turn on the old faucet to release built-up pressure.
When installing the new faucet, hand tighten the connector
nuts. DO NOT OVERTIGHTEN. Connections that are too
tight will reduce the integrity of the system.
MODEL #3210-160-CH-B-Z
A

2
PRODUCT SPECIFICATIONS
SPECIFICATIONS SPECIFICATIONS
Max. ow rate: 2.2 GPM (8.3 LPM) at 60 PSI Brass waterways
ASME A112.18.1/CSA B125
Manufactured to include no more than 0.25% weighted
average lead content on wetted surfaces
NSF 61-9
Compression cartridge Total weight of item: 0.474 lbs.
www.homewerksww.com
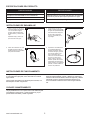
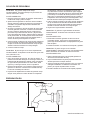
ASSEMBLY INSTRUCTIONS
1. Turn off water at the supply
valve under the sink or at the
main water supply, disconnect
the supply line, and remove old
faucet.
Clean and dry surface area
where new faucet will be
mounted.
1
3. Thread faucet onto stub-out
or water supply line. Do not
overtighten.
Turn water supply or shut-off
valve back on and check for
leaks.
3
2. Cover thread connection of
stub-out with PTFE pipe tape
(wrapped clockwise) or pipe joint
compound.
2
4. Important: After installation is
completed, remover aerator.
Turn on water supply and allow
hot or cold water to run for at
least one minute. While water
is running, check for leaks.
Replace aerator. Tighten nuts
slightly to stop minor leaks. If
problems persist, refer to
troubleshooting chart.
4
OPERATION INSTRUCTIONS
This faucet is a single temperature faucet. Depending on
what you hooked the faucet to, it will either be all COLD or
all HOT water.
Turn faucet handle to the left to turn on, to the right to turn
water off.
To get a blended temperature, you must have two spigot
faucets installed, one hot and one cold. Place plug in the
sink basin, turn on the hot and cold water to ll the basin.
Adjust the water temperature in the basin by adding more
or less hot or cold water.
CARE AND MAINTENANCE
Clean periodically with a soft cloth. Avoid abrasive cleaners,
steel wool, and harsh chemicals as these will dull the nish
and void your warranty.

3
www.homewerksww.com
TROUBLESHOOTING
PROBLEM: Leaks underneath handle.
POSSIBLE CAUSE: Bonnet has come loose or O-ring on
cartridge is dirty or twisted.
CORRECTIVE ACTION:
1. Move the handle to the off position. Unscrew the handle
screw and remove the handle.
2. Tighten the bonnet by turning it clockwise. Move the
cartridge stem to the on position. The leak should stop
draining out from around the cartridge stem.
3. If the leak does not stop, shut off the water supply.
Remove the bonnet by turning it counter-clockwise. Lift
out the cartridge valve. Inspect the larger O-ring on the
cartridge bonnet and the smaller O-ring on the cartridge
stem. Remove any debris from the O-rings. If either O-ring
is twisted, straighten it out. If either O-ring is damaged,
replace the cartridge by calling Customer Service.
4. Position the cartridge back into the faucet body. Make
sure the ridges on the two sides of the cartridge bonnet
t into the grooves on the two sides of the faucet body.
Tightly screw the bonnet onto the faucet body.
5. Re-install the handle.
PROBLEM: Water does not completely shut off.
POSSIBLE CAUSE: Rubber valve seat is dirty, stuck, or
broken.
CORRECTIVE ACTION:
1. Shut off the water supply to the faucet that leaks.
2. Remove the handle on the problem side. Loosen the
bonnet by turning it counterclockwise. Lift out the
cartridge assembly.
3. Inspect the rubber valve seat in the faucet body. If there is
debris or brass scrap on the surface of the seat, remove
it. If the rubber seat is stuck tightly in the water inlet hole,
push it gently with a ngertip so that it moves up and down
smoothly. The spring (smaller end up) must be replaced
underneath the valve seat. If the rubber valve seat is worn
out or broken, replace the cartridge by calling Customer
Service.
4. Replace the cartridge in the faucet body. Make sure that
the ridges on the two sides of the cartridge bonnet t
into the grooves on the two sides of the faucet body.
Tightly screw the bonnet onto the faucet body.
5. Re-install the handle.
PROBLEM: Faucet leaks around aerator.
POSSIBLE CAUSE: Aerator incorrectly tted.
CORRECTIVE ACTION:
1. Unscrew the aerator by turning it clockwise. Inspect the
black rubber packing inside the aerator. The rubber
packing should be at.
2. Screw the aerator onto the spout end and tighten.
PROBLEM: Improper water pattern.
POSSIBLE CAUSE: Aerator dirty or small parts inside
aerator improperly installed.
CORRECTIVE ACTION:
1. Remove the aerator from the spout end by turning it
clockwise.
2. Gently ush the small parts inside the aerator to clear
away any debris.
3. Re-install the small parts as shown in the exploded
diagram. Metal screens must be at and plastic supporter
must be straight.
4. Screw the aerator onto the spout end and tighten.
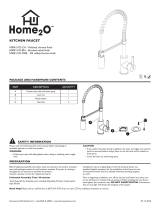
ROUGH-IN
3.12"
1.77"
0.5" FPT
3.16"

4
www.homewerksww.com
¿Preguntas, problemas, piezas faltantes? Antes de regresar a la tienda, llame a nuestro departamento de servicio al cliente al
1-877-319-3757, 7 a.m.-5 p.m., hora del centro, de lunes - viernes.
CUENCA DEL GRIFO
1/2" CONEXIÓN FPT
A
CONTENIDO DEL PAQUETE
PREPARACIÓN
INFORMACIÓN DE SEGURIDAD
Lea y comprenda completamente este manual antes de inten-
tar ensamblar, usar o instalar el producto.
PRECAUCIÓN
• Si suelda las juntas durante la instalación del grifo, se
deben retirar los asientos, los cartuchos y las arande
las antes de usar la llama. De lo contrario, se anulará la
garantía de dichas piezas.
• Cubra el desagüe para evitar que se pierdan piezas.
ADVERTENCIA
• Proteja sus ojos con las gafas de seguridad al cortar
o soldando líneas de suministro del agua
Antes de comenzar a ensamblar el producto, asegúrese de
tener todas las piezas. Compare las piezas con la lista del
contenido del paquete y los aditamentos. Si falta alguna pieza
o hay piezas dañadas, no intente ensamblar el producto.
Póngase en contacto con el Departamento de Servicio al
Cliente para obtener piezas de repuesto.
Tiempo calculado de ensamblaje: 30 minutos
Herramientas necesarias para el ensamblaje (no se incluyen):
Llave inglesa ajustable, pinzas con dientes ranurados, llave
para tuberías, destornillador Phillips, cinta para tuberías o
compuesto para roscas de tubería y tuberías de suministro.
Las instalaciones pueden variar según cómo se instaló el grifo
anterior. No se incluyen todos los materiales necesarios para
la instalación del grifo; no obstante, estos están disponibles en
cualquier lugar donde se vendan artículos de plomería.
Antes de comenzar la instalación, corte el suministro de agua
fría y caliente, y luego abra el grifo viejo para liberar la presión
acumulada. Cuando instale el grifo nuevo, Apriete las tuercas
de conexión. NO APRIETE. Las conexiones que estén muy
apretadas reducirán la integridad del sistema.s
MODELO #3210-160-CH-B-Z
PIEZA DESCRIPCIÓN CANTIDAD
A Grifo 1
A

5
www.homewerksww.com
ESPECIFICACIONES DEL PRODUCTO
ESPECIFICACIONES ESPECIFICACIONES
Caudal de ujo máximo: 8,328 LPM (2,2 GPM) a 60 PSI Cursos de agua de latón
Cumple con la norma ASME A112.18.1/CSA B125 Fabricado para que no incluya más de 0,25% de contenido
promedio en peso de plomo para supercies con agua
NSF 61-9
Compresión del cartucho Peso total del artículo: 0,215 kg
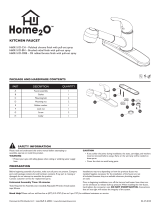
INSTRUCCIONES DE ENSAMBLAJE
INSTRUCCIONES DE FUNCIONAMIENTO
CUIDADO Y MANTENIMIENTO
Este grifo es un grifo de una sola temperatura. Dependiendo de
lo que engancha el grifo para, o bien será todo Frío o toda el
agua caliente.
Cierre el grifo de la palanca a la izquierda para encender, a la
derecha para convertir el agua fuera.
Para obtener una temperatura de mezclado, debe tener dos
llaves de espiga instalada, una fría y caliente uno. Coloque el
enchufe en la cuenca del lavabo, la llave del agua fría y caliente
para llenar la cuenca. Ajuste la temperatura del agua en la
cuenca mediante la adición de más o menos agua caliente o
fría.
Limpie periódicamente con un paño suave. Evite utilizar limpiad-
ores abrasivos, lana de acero y químicos agresivos, ya que
pueden dañar el acabado y anular su garantía.
1. Cierre el agua en la válvula de
suministro debajo del fregadero
o en el suministro de agua
principal, desconecte la línea
de alimentación y retire la llave
vieja.
Supercie limpia y seca en la
que se monta nuevo grifo.
1
3. Tema del grifo en trozo de
salida o la línea de suministro
de agua. No apriete demasiado.
Abra el suministro de agua o
de cierre de la válvula de
nuevo y compruebe que no
haya fugas.
3
2. Cubra rosca del talón-con cinta
de teón PTFE (envuelto en
sentido horario) o el compuesto
para juntas de tuberías.
2
4. Importante: La instalación se
ha completado Después,
aireador removedor. Abra el
suministro de agua y permitir
que el agua caliente o fría
para una duración de al
menos un minuto. Mientras el
agua corre, revise si hay
fugas. Vuelva a colocar el
aireador. Apretar las tuercas
ligeramente para detener las
fugas menores. Si el problema
persiste, consulte la tabla de
solución de problemas.
4

6
www.homewerksww.com
SOLUCIÓN DE PROBLEMAS
PROBLEMA: Hay goteras debajo de la manija.
CAUSA POSIBLE: El bonete está ojo o la junta tórica del
cartucho está sucia o torcida.
ACCIÓN CORRECTIVA:
1. Mueva la manija a la posición de apagado. Desatornille el
tornillo de la manija y retire la manija.
2. Apriete el bonete girándolo en dirección de las manecillas
del reloj. Coloque el vástago del cartucho en la posición de
encendido. La fuga debe dejar de drenar alrededor del
vástago del cartucho.
3. Si la fuga no se detiene, cierre el suministro de agua. Retire
el bonete girándolo en dirección contraria a las manecillas
del reloj. Levante la válvula del cartucho. Inspeccione la
junta tórica mayor del bonete del cartucho y la junta tórica
menor del vástago del cartucho. Elimine todos los desechos
de las juntas tóricas. Si una de las juntas tóricas está torcida,
estírela. Si una de las juntas tóricas está dañada, llame a
Servicio al Cliente para reemplazar el cartucho.
4. Vuelva a colocar el cartucho en el cuerpo del grifo. Asegúrese
de que los bordes de ambos lados del bonete del cartucho
encajen en las ranuras de ambos lados del cuerpo del grifo.
Atornille con rmeza el bonete en el cuerpo del grifo.
5. Vuelva a instalar la manija.
PROBLEMA: El paso de agua no se cierra completamente.
CAUSA POSIBLE: El alojamiento de la válvula de goma está
sucio, atascado o roto.
ACCIÓN CORRECTIVA:
1. Cierre el suministro de agua fría. Si la fuga se detiene, el
problema está del lado del agua fría. Si la fuga continúa, el
problema está del lado del agua caliente. Cierre el suministro
de agua caliente para determinar si ambos lados, el del
agua fría y el del agua caliente, tienen un problema.
2. Retire la manija del lado con el problema. Aoje el bonete
girándolo en dirección contraria a las manecillas del reloj.
Levante el ensamblaje del cartucho.
3. Inspeccione el alojamiento de la válvula de goma del cuerpo
del grifo. Si hay desechos o restos de latón en la supercie
del alojamiento, retírelos. Si el alojamiento de goma está
muy atascado en el oricio de entrada de agua, empújelo
cuidadosamente con el dedo para que se mueva hacia arriba
y hacia abajo con suavidad. El resorte (extremo menor) se
debe volver a colocar debajo del alojamiento de la válvula. Si
el alojamiento de la válvula de goma está desgastado o roto,
llame al Servicio al Cliente para reemplazar el cartucho.
4. Vuelva a colocar el cartucho en el cuerpo del grifo. Asegúrese
de que los bordes de ambos lados del bonete del cartucho
encajen en las ranuras de ambos lados del cuerpo del grifo.
Atornille con rmeza el bonete en el cuerpo del grifo.
5. El grifo tiene fugas alrededor del aireador.
PROBLEMA: El grifo tiene fugas alrededor del aireador.
CAUSA POSIBLE: El aireador está colocado de manera
incorrecta.
ACCIÓN CORRECTIVA:
1. Desatornille el aireador girándolo en dirección de las
manecillas del reloj. Inspeccione la empaquetadura de
goma negra dentro del aireador. La empaquetadura de goma
debe ser plana.
2. Atornille el aireador en el extremo de la boquilla y apriételo.
PROBLEMA: El patrón de agua no es adecuado.
CAUSA POSIBLE: El aireador está sucio o las piezaspequeñas
dentro del aireador se instalaron de manera incorrecta.
ACCIÓN CORRECTIVA:
1. Retire el aireador del extremo de la boquilla girándolo en
dirección de las manecillas del reloj.
2. Limpie cuidadosamente las piezas pequeñas dentro del
aireador para retirar cualquier desecho.
3. Vuelva a instalar las piezas pequeñas como se muestra en
el diagrama detallado. Las mallas de metal deben ser
planas y el soporte de plástico debe ser recto.
4. Atornille el aireador en el extremo de la boquilla y apriételo.
PREPARACIÓN EN
3.12"
1.77"
0.5" FPT
3.16"
-
 1
1
-
 2
2
-
 3
3
-
 4
4
-
 5
5
-
 6
6


Homewerks Worldwide 3210-160-CH-B-Z Installation guide
- Category
- Sanitary ware
- Type
- Installation guide
Ask a question and I''ll find the answer in the document
Finding information in a document is now easier with AI
in other languages
Related papers
-
Homewerks Worldwide 3220-40-CH-B Installation guide
-
HOMEWERKS 3310-255-RB-B Installation guide
-
-
-
-
-
-
-
-
Other documents
-
NEOPERL 37.0292.98 Installation guide
-
-
-
Project Source 252-K825-PS-SSD Installation guide
-
-
-
 Home2O H90K-51D-ORB Installation guide
-
 Home2O H11L-421-MB Installation guide
-
 Home2O H60K-51D-CH Installation guide
-


