Zanussi ZRB323WO1 User manual

Category
Freezers
Type
User manual

This manual is also suitable for

2
GB
Before installing and using the appliance read this user’s instruction book carefully. It contains safety precautions,
hints, information and ideas. If the refrigerator is used in compliance with the instructions written, it will operate
properly and provide you with greatest satisfaction.
The symbols below help you to find things more easily:
Important safety information _ _ _ _ _ _ _ _ _ _ _ _ 3
General safety precautions _ _ _ _ _ _ _ _ _ _ _ _ _ 3
Precautions for child safety _ _ _ _ _ _ _ _ _ _ _ _ 3
Safety precautions for installation _ _ _ _ _ _ _ _ _ 3
Safety precautions for isobutane _ _ _ _ _ _ _ _ _ _ 4
Instructions for the User _ _ _ _ _ _ _ _ _ _ _ _ _ _ 4
General information _ _ _ _ _ _ _ _ _ _ _ _ _ _ _ _ 4
Description of the appliance, main parts _ _ _ _ _ _ 4
Handling the appliance _ _ _ _ _ _ _ _ _ _ _ _ _ _ 5
Putting it into use _ _ _ _ _ _ _ _ _ _ _ _ _ _ _ _ _ 5
Controlling the temperature, setting _ _ _ _ _ _ _ _ 5
How to use the refrigerator _____________ 5
Storing in the refrigerator _ _ _ _ _ _ _ _ _ _ _ _ _ 5
Storage time and temperature of foods _ _ _ _ _ _ _ 5
How to use the freezer _ _ _ _ _ _ _ _ _ _ _ _ _ _ _ 5
Freezing _ _ _ _ _ _ _ _ _ _ _ _ _ _ _ _ _ _ _ _ _ 5
Storing in the freezer ________________ 6
Some useful information and advice _ _ _ _ _ _ _ _ 6
Hints and ideas _ _ _ _ _ _ _ _ _ _ _ _ _ _ _ _ _ _ 6
How to save energy _ _ _ _ _ _ _ _ _ _ _ _ _ _ _ _ 7
The appliance and environment _ _ _ _ _ _ _ _ _ _ 7
Maintenance _ _ _ _ _ _ _ _ _ _ _ _ _ _ _ _ _ _ _ 7
Defrosting _____________________ 7
Regular cleaning _ _ _ _ _ _ _ _ _ _ _ _ _ _ _ _ _ 8
When the refrigerator is not in use _ _ _ _ _ _ _ _ _ 8
Trouble shooting _ _ _ _ _ _ _ _ _ _ _ _ _ _ _ _ _ 8
How to change the bulb _ _ _ _ _ _ _ _ _ _ _ _ _ _ 8
If something does not work _ _ _ _ _ _ _ _ _ _ _ _ 9
Instructions for the Installer _ _ _ _ _ _ _ _ _ _ _ _10
Technical data ___________________10
Installing the appliance _ _ _ _ _ _ _ _ _ _ _ _ _ _10
Transportation, unpacking _ _ _ _ _ _ _ _ _ _ _ _ _10
Cleaning _ _ _ _ _ _ _ _ _ _ _ _ _ _ _ _ _ _ _ _ _10
Placement_ _ _ _ _ _ _ _ _ _ _ _ _ _ _ _ _ _ _ _ _10
Change of door opening direction _ _ _ _ _ _ _ _ _11
Electrical connection ________________12
Storage time chart (1) _ _ _ _ _ _ _ _ _ _ _ _ _ _ _13
Storage time chart (2) _ _ _ _ _ _ _ _ _ _ _ _ _ _ _14
Warranty and service _ _ _ _ _ _ _ _ _ _ _ _ _ _ _14
Guarantee conditions _ _ _ _ _ _ _ _ _ _ _ _ _ _ _14
Service and spare parts _ _ _ _ _ _ _ _ _ _ _ _ _ _14
Safety precautions
Warnings and information at this symbol serve safety for you and your appliance.
Hints, useful information
Symbol for ideas
At this symbol ideas can be found according to food and its storing.
The symbol on the product or on its packaging indicates that this product may not be treated as household waste.
Instead it shall be handed over to the applicable collection point for the recycling of electrical and electronic
equipment. By ensuring this product is disposed of correctly, you will help prevent potential negative consequences
for the environment and human health, which could otherwise be caused by inappropriate waste handling of this
product. For more detailed information about recycling of this product, please contact your local city office, your
household waste disposal service or the shop where you purchased the product.
Contents
From the Electrolux Group. The world’s No.1 choice.
The Electrolux Group is the world’s largest producer of powered appliances for kitchen, cleaning and outdoor
use. More than 55 million Electrolux Group products (such as refrigerators, cookers, washing machines, vacuum
cleaners, chain saws and lawn mowers) are sold each year to a value of approx. USD 14 billion in more than 150
countries around the world.
3
GB
General safety precautions
Keep these instructions and they should remain at the
appliance when moving away or changing owner.
This appliance is designed for storing food, domestic
use according to these instructions only.
Specialized companies that are qualified to do so by
the manufacturer must carry out service and repairs
including repairing and changing the power cord.
Accessory parts supplied by them should be used only
for repairing. Otherwise the appliance can be damaged
or can cause other damage or injury.
The appliance is out of circuit only in that case if the
plug is removed from the socket. Before cleaning and
maintenance always unplug it (do not get it by the
cable). If the socket is difficult to reach, switch off the
appliance by cutting off the current.
Power cord must not be lengthened.
Make sure that the power plug is not squashed or
damaged by the back of the fridge/freezer. A damaged
power plug may overheat and cause a fire.
Do not place heavy articles or the fridge/freezer itself on
the power cord.
- There is a risk of a short circuit and fire.
Do not remove the power cord by pulling on its lead,
particularly when the fridge/freezer is being pulled out
of its niche.
- Damage to the cord may cause a short-circuit, fire
and/or electric shock.
- If the power cord is damaged, it must be replaced by a
certified service agent or qualified service personnel.
If the power plug socket is loose, do not insert the
power plug.
- There is a risk of electric shock or fire.
Without the lamp cover of interior lighting you must not
operate the appliance.
When cleaning, defrosting, taking out frozen food or ice
tray do not use sharp, pointed or hard devices, as they
can cause damage to the appliance.
Be careful not to allow liquids to the temperature control
and lighting box.
Ice and ice-cream can cause hurt if they are eaten
immediately after removal from the frozen food
compartment.
After dissolving frozen food must not be refrozen, it
must be used up as soon as possible. Store pre-
packed frozen food in accordance with the frozen food
manufacturers instructions.
You must not make defrosting faster with any electric
heating appliance or chemicals. Do not put hot pot to
the plastic parts.
Do not store flammable gas and liquid in the appliance,
because they may explode.
Do not store carbonated drinks, bottled drinks and
bottled fruits in the frozen food compartment.
Check and clean the outlet of melting water coming
during defrosting regularly - a label inside the appliance
warns you for this. If it is clogged the melting water
gathered can cause earlier failure.
Precautions for child safety
Do not allow children to play with the packaging of the
appliance. Plastic foil can cause suffocation.
Adults must handle the appliance. Do not allow
children to play with it or its controlling parts. If you are
discarding the appliance, pull the plug out of the socket,
cut the connection cable (as close to the appliance
as you can) and remove the door to prevent playing
children to suffer electric shock or to close themselves
into it.
Safety precautions for installation
Put the appliance to the wall to avoid touching or
catching warm parts (compressor, condenser) to prevent
possible burn.
When moving the appliance take care of the plug not to
be in the socket.
When placing the appliance take care not to stand it on
the power cord.
Adequate air circulation should be around the
appliance, lacking this leads to overheating. To achieve
sufficient ventilation follow the instructions relevant to
installation.
See chapter Placement.
Important safety information
4
GB
Description of the appliance, main parts
1. Work plate
2. Lighting box
3. Glass shelves
4. Defrost water collector
5. Glass shelf
6. Vegetable box
7. Frozen food drawer
8. Frozen food basket
9. Defrost water collecting funnel
10. Adjustable feet
11. Egg tray
12. Door shelves
13. Bottle shelf
14. Door gaskets
Safety precautions for isobutane
Warning
The refrigerant of the appliance is isobutane
(R600a) that is inflammable and explosive to a
greater extent.
Keep ventilation openings, in the appliance
enclosure or in the built-in structure, clear of
obstruction.
Do not use mechanical devices or other means to
accelerate the defrosting process, other than those
recommended by the manufacturer.
Do not damage the refrigerant circuit.
Do not use electrical appliances inside the food
storage compartments of the appliance, unless they
are of the type recommended by the manufacturer.
For the safety of life and property
keep the precautions of these user’s
instructions as the manufacturer is not
responsible for damages caused by
omission.
General information
The official designation of the appliance is refrigerator-
freezer combination with one motor compressor and
freezer placed in the upper part”. The appliance has,
besides the general services, a freezer with its own
door and is completely separated from the other unit.
According to this the appliance is suitable for storing
frozen and deep-frozen food, freezing products in
quantity given in the users instructions at home.
Description of the appliance, main parts
The appliance can meet the requirements of standards
between different temperature limits according to the
climate class.
The letter symbol for climate class can be found on the
data label.
Instructions for the User
5
GB
Handling the appliance
Putting it into use
Place the accessories into the appliance then plug to the
mains socket. The thermostat knob is installed in the work
plate on the refrigerator. You can switch the appliance on and
set the temperature with it by turning the knob clockwise.
The next paragraph will give instructions for setting.
Controlling the temperature, setting
The thermostat interrupts the operation of the appliance
automatically for more or less time depending on the
setting then restarts it assuring the required temperature.
The closer it is set to maximum position the more intensive
the refrigerating will be. When the thermostat knob is set
to a medium position (between minimum and maximum),
in the freezer a temperature colder than -18 00, in the
refrigerator around +5 °C can be reached. Setting it to a
medium position is adequate for everyday use.
The temperature coming about in the refrigerator is effected
by not only the position of the thermostat but the ambient
temperature, frequency of door openings and the quantity
of food put into it newly, etc.
In the maximum position - in case of
increased demand e.g. during heat waves -
the compressor may operate continually. This
does not cause damages to the appliance.
How to use the refrigerator
For adequate cooling developing interior air
circulation is necessary. For this reason you are asked
not to cover the air circulation gaps behind the shelves
(e.g. with tray etc.).
Do not put hot food into the refrigerator.
Allow it to reach room temperature naturally. In
this way the unnecessary frost building up can
be avoided.
Foods can take over odors from each other.
So it is essential to put foods in closed dishes or wrap
them in cellophane, aluminum foil, and greaseproof
paper or cling film before placing them into the
refrigerator. This way foods will keep their moisture e.g.
vegetables will not dry out after some days.
Storing in the refrigerator
When placing the different kinds of food take into
consideration the sketch below in figure:
Butter, cheese 1.
Eggs 2.
Tubes, cans, sour cream, small bottles 3.
Drinks in big bottles, soda-water and mousse siphon4.
Frizzed food storage 5.
Fast freeze 6.
Fruits, vegetables, salads 7.
Milk, dairy products, ready-cooked foods, 8.
confectionery, foods in dishes covered, opened,
cans, bottles laid, fresh meat, sausages, etc.
Storage time and temperature of foods
The storage time chart at the end of the instruction book
gives information about storage time.
The storage time can not be determined exactly in
advance, as it depends on the freshness and handling
of the cooled food. That is why the storage time made
known is only informative.
If you do not want to use up deep-frozen foods bought
immediately they can be stored for about 1 day (until
dissolving) in the refrigerator.
How to use the freezer
Freezing
In the compartment various fresh food can be frozen at
home. Mind the following to get thorough result. Freeze
fresh and faultless food only. Before starting freezing set the
thermostatic control knob to maximum position and put the
wire drawer in the frozen food compartment to the highest
position. Then put in the quantity to be frozen, directly into
the wire shelf. Freezing is completed in approx. 24 hours.
After 24 hours set the thermostatic control knob back to
Medium position, which is usually adequate for everyday
use. It is practical to store the frozen food in the lower basket.
6
GB
Avoid opening the door of frozen food compartment
during freezing if possible.
It is not expedient to set the thermostat k nob
to higher (e.g. max) position. Freezing time could be
reduced this way, but the temperature of the fresh food
compartment would go beyond 0 °C permanently, which
would cause freezing to foods and drinks stored there.
Never freeze food in bigger quantity than
given in the “Technical data” at the same time,
otherwise freezing will not be thorough and
after dissolving various deterioration may take
place (losing taste and aroma, lysing, etc.).
Storing in the freezer
After finishing freezing it is practical to put the
frozen food from the wire drawer in the frozen food
compartment into the basket under that making room
for a next possible freezing. Food already stored is not
damaged by another freezing.
Do not forget to keep to the storage time given on
the packaging of frozen products if you buy them frozen.
It is safe to store quick-frozen, frozen foods only
if they have not dissolved even for a short time until
placing them into freezer.
If the deep-frozen food has already dissolved, refreezing
is not recommended, it has to be used as soon as
possible.
Some useful information and advice
The variable shelves are worth paying attention •
to, which increases the usability of the fresh food
compartment considerably. Rearranging the shelves
is also possible when the door is open at an angle
of 90.
After opening and closing the door of freezer vacuum •
will rise inside the appliance because of the low
temperature. So wait 2-3 minutes after closing the
door if you want to open it again while inner pressure
equalizes.
Take care of operating the freezer at a position of •
thermostatic control so that the inside temperature
can never be warmer than -18 °C
It is practical to make sure of faultless operation of •
the appliance daily so as to notice possible failure in
time and prevent deterioration of frozen foods.
Normal operating sounds: •
A thermostat controls the compressor and you will
hear a faint click when thermostat cuts in and out.
You may hear faint gurgling or bubbling sound
when the refrigerant is pumped thorough the coils
at the rear, to the cooling plate/evaporator.
When the compressor is on, the refrigerant is
being pumped round and you will hear a whirring
sound or pulsating noise from the compressor.
The fridge evaporator (this part cool down the
fridge section) is foamed into the cabinet. The
temperature of this part changing during its
work, and parallel with this its dimensions are
slightly changing, too. These changes might
cause a cracking noise, which is natural, harmless
phenomenon.
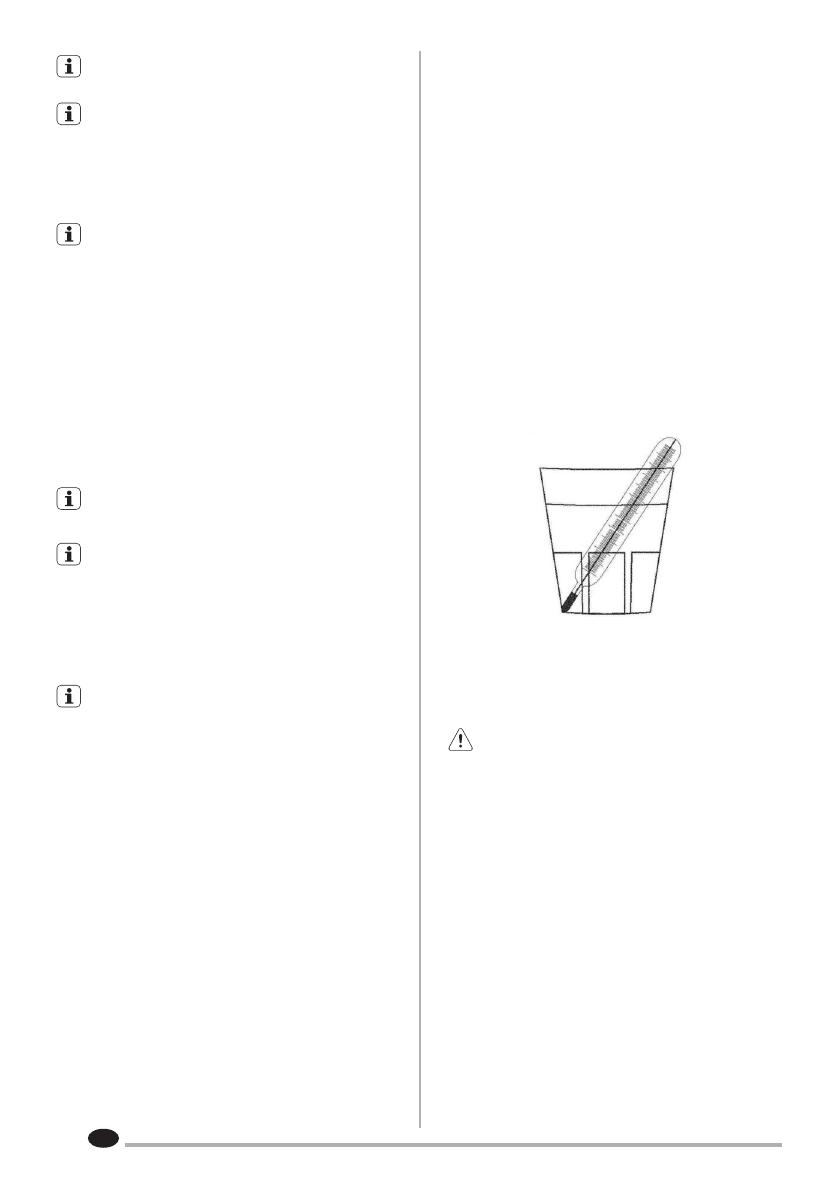
Should you want to check the temperature of food •
stored in the refrigerator, set the thermostat knob into
a medium position, place a glass of water centrally
in the cabinet, and put a proper thermometer with an
accuracy of +/- 1 °C into it. If after 6 hours you
measure a value between +3 °C and +8 °C the
refrigerator works properly. The measuring shall be
performed under steady- stated conditions (without
changing the load).
If the freezer temperature is measured using a •
thermometer, put it between the products since
this will reflect the real temperature in the frozen
products.
Hints and ideas
In this chapter practical hints and ideas are given about
how to use the appliance to reach maximum energy
saving and there is environmental information about the
appliance as well. using a thermometer, put it between
the products since this will reflect the real temperature
in the frozen products.
7
GB
How to save energy
Avoid pulling the appliance in a sunny place and •
near anything that gives off heat.
Be sure that the condenser and the compressor are •
well ventilated. Do not cover the sections where
ventilation is.
Wrap products in tightly closing dishes or cling film •
to avoid building up unnecessary frost.
Do not leave the door open longer than necessary •
and avoid unnecessary openings.
Put warm foods into the appliance when they are at •
room temperature.
Keep the condenser clean. •
The appliance and environment
This appliance does not contain gasses which could
damage the ozone layer, in either its refrigerant circuit
or insulation materials. The appliance shall not be
discarded together with the urban refuse and rubbish.
Avoid damaging the cooling unit, especially at the rear
near the heat exchanger. Information on your local
disposal sites may be obtained from your municipal
authorities.
The materials used on this appliance marked with the
symbol are recyclable.
Maintenance
Defrosting
Bleeding part of the moisture of cooling chambers in
form of frost and ice goes with the operation of the
appliance.
Thick frost and ice has an insulating effect, so it reduces
cooling efficiency as the temperature increases in the
cooling chambers and they need more energy.
At this type of appliance defrosting the cooling plate
of the refrigerator is automatic without any external
intervention. The thermostatic control interrupts the
operation of compressor at regular intervals for more
or less time during this cooling is interrupted the
temperature of the cooling plate goes above 0 °C due to
interior heating load of the compartment, so defrosting
occurs. When the surface temperature of the cooling
plate has reached +3 - +4 °C the thermostatic control
restarts operation of the system.
Melting water flows through defrost water outlet leaded
through the back into the evaporative tray maintained on
the top of compressor and evaporates due to its warmth.
Check and clean the outlet of melting water
coming during defrosting regularly
a label inside the appliance warns you
for this. If it is clogged the melting water
gathered can cause earlier failure as it can
go to the insulating of the appliance
Clean the melting water outlet with the supplied pipe
scraper that can be seen in the figure above.
The pipe scraper has to be stored in the outlet.
The most typical case of clogging up in the melting
water outlet when you put food wrapped in some paper
into the appliance and this paper contacts back plate of
the refrigerator and freezes to it. If you remove the food
right at this moment the paper will tear and it can cause
clogging up in the outlet by gelling into it.
So you are asked to be careful because of the
above when placing foods wrapped in paper into the
appliance. In case of increased demand e.g. during heat
waves, the refrigerator temporarily happens to operate
constantly. During this the automatic defrosting is
ineffective.
8
GB
Remaining small ice and frost stains on back plate of
the refrigerator after defrosting period is not abnormal.
The freezer can not be equipped with automatic
defrosting set since the deep-frozen and frozen foods do
not endure melting temperature.
When small frost and ice occurs scrape off and remove
frost and ice coating with the supplied plastic scraper.
The tray in figure is not a piece of accessories to the
appliance!
When ice coating is so thick that it cannot be removed
with the plastic scraper, the cooling plate has to be
defrosted. Frequency of defrosting depends on usage
(generally 2-3 times a year).
Take the frozen foods out of the appliance, and put
them into a basket lined with paper or cloth. Store them
in a possibly cool place or replace them into another
refrigerator.
Pull out the mains plug from the mains socket, so both
parts of the appliance are out of operation.
Open the doors of both parts of the appliance and clean
the refrigerator according to Regular cleaning. Maintain
and clean the freezer as following:
Sweep the melting water with a cloth or sponge off the
cooling plate. The melting water swept down gathers in
the bottom of the appliance and can be removed with a
hygroscopic cloth or a sponge.
Wipe the surfaces after defrosting.
Put the mains plug into the mains socket and put foods
taken out back to their places.
It is recommended to operate the appliance at the
highest position of the thermostatic control for some
hours so that it can reach the sufficient storing
temperature as soon as possible.
Regular cleaning
It is recommended to wash the inside of the refrigerator
in 3-4 weeks time using lukewarm water then wipe it (it
is practical to clean the inside of the freezer and defrost
it at a time).
Household cleaner or soap must not be used.
After breaking the circuit wash the appliance with
lukewarm water then wipe it. Clean the door gasket
with clean water. After cleaning apply voltage to the
appliance.
It is recommended to remove the dust and dirt collected
on the back of the refrigerator and the condenser and
to clean the evaporative tray on top of the compressor
once or twice a year.
When the refrigerator is not in use
In case the appliance will not be used for a long time,
follow these steps: Break the circuit of the appliance.
Remove foods from the refrigerator.
Defrost and clean it as written before.
Leave the door open to avoid a build up of air inside.
Trouble shooting
How to change the bulb
Should the light fail to work you can change it as below:
Break the circuit of the appliance.
Press the front hook and at the same time slide the
cover in the direction indicated by horizontal arrow
(1), than remove cover by pulling it gently down as
indicated by arrow (2). So the bulb can be replaced.
(Bulb type: 230-240 V, 15 W, F 14 thread) After
changing the bulb replace the cover, snap it in place and
apply voltage to the appliance.
9
GB
If something does not work
During operation of the appliance some smaller but
annoying trouble can often occur, which does not require
calling a technician out. In the following chart information is
given about them to avoid unnecessary charges on service.
We draw your attention that operation of appliance goes with
certain sounds (compressor- and circulating sound).
This is not trouble, but means normal operation
We draw it to your attention again that the
appliance operates discontinuously, so the stopping
of compressor does not mean being no- current. That
is why you must not touch the electrical parts of the
appliance before breaking the circuit.
Problem Possible cause Solution
It is too warm in the
refrigerator
Thermostatic control can be set wrongly.
If products are not cold enough or placed wrong.
The door does not close tightly or it is not shut
properly.
Set the thermostat knob to higher position.
Place the products to the appropriate place.
Check if the door closes well and the gasket is
unhurt and clean.
It is too warm in the
freezer
Thermostatic control can be set wrongly.
The door does not close tightly or it is not shut
properly.
Products in big quantity to be frozen were put in.
Products to be frozen are placed too closely to
each other.
Set the thermostat knob to higher position.
Check if the door closes well and the gasket is
unhurt and clean.
Wait some hours and then check the
temperature again.
Place the products in a way so that cold air could
circulate among them.
Water flows at the back
plate of the refrigerator
Water flows into the
chamber
Water flows onto the
floor
It is normal. During automatic defrosting
frost melts on the back plate.
The outlet of the chamber can be clogged up.
Products placed in can prevent water from
flowing into the collector.
The melting water outlet flows not into the
evaporative tray above the compressor.
Clean the outlet.
Replace the products so that they can not touch
the back plate directly.
Put the melting water outlet to the evaporative
tray.
There are too much
frost and ice.
Products are not wrapped properly.
Doors are not shut properly or do not close tight.
The thermostatic control can be set wrongly.
Wrap the products better
Check if the doors close well and the gaskets are
unhurt and clean.
Set the thermostat knob to a position that gives
higher temperature.
The compressor
operates continually.
The thermostatic control is set wrongly.
Doors are not shut properly or do not close tight.
Products in big quantity to be frozen were put in.
Set the thermostat knob to a position that gives
higher temperature.
Check if the doors close well and the gaskets are
unhurt and clean.
Wait some hours and then check the temperature
again.
Put food at max. room temperature.
The a ppliance does
not work at all.
Neither cooling, nor
lighting works.
Indicator lamps do not
give light.
Too warm food was put in.
The appliance is in too warm place.
Plug is not connected to the mains socket
proper.
The fuse burnt out.
The thermostatic control is not on.
Try to reduce the temperature in the room where
the appliance stands.
Connect the mains plug properly.
Change the fuse.
Start the appliance according to instructions in
chapter “Putting it into use”.
Call an electrician.
The a ppliance is noisy.
There is no voltage in the mains socket.
(Try to connect another appliance into it.)
The appliance is not supported properly.
Check if the appliance stands stable (all the four
feet should be on the floor).
In as much the advice does not lead to result, call the nearest brand- mark service.
10
GB
Installing the appliance
Transportation, unpacking
It is recommended to deliver the appliance in original
packaging, in vertical position considering the
protective warning on packaging.
After each transportation the appliance must not be
switched on for approx. 2 hours.
Unpack the appliance and check if there are damages
on it. Report possible damages immediately to the place
you bought it. In that case retain packaging.
Cleaning
Remove every adhesive tape and everything else, which
ensure the accessories not to move in the appliance.
Wash the inside of the appliance using lukewarm water
and mild detergent. Use soft cloth. After cleaning, wipe
out the inside of the appliance.
Placement
The ambient temperature has an effect on the energy
consumption and proper operation of the appliance.
When placing, take into consideration that it is practical
to operate the appliance between ambient temperature
limits according to the climate class that is given in the
chart below and can be found in the data label.
Class of climate Ambient temperature
SN +10…+32 °C
N +16…+32 °C
ST +18…+38 °C
If the ambient temperature goes below the lower data the
temperature of the cooling compartment can go beyond
the prescribed temperature.
If the ambient temperature goes beyond the upper data
this means longer operating time of the compressor,
breakdown in the automatic defrosting increasing
temperature in the cooling compartment or increasing
energy consumption. When placing the appliance
ensure that it stands level. This can be achieved by two
adjustable feet (1) at the bottom in front.
MODEL
Gross capacity (l)
ZRB327WO1
272
Net capacity (l)
Freezer: 64
Refrigerator: 190
Width (mm) 540
Height (mm) 1800
Depth (mm) 600
Energy consumption (kWh/24h)
(kWh/year)
0,836
305
Energy class, according to EU standards A
Freezing capacity (kg/24h) 4,5
Rising time (h) 15
Rated power (W) 79
Weight (kg) 61
Number of compressors 1
Instructions for the Installer
Technical data
11
GB
The plastic bag of accessories also contains two
spacers to be fitted into special holes in the back of the
appliance. Fit the spacers into the holes, taking care to
ensure that the spacer is positioned as shown in Figure.
Then turn them through 45° until they lock into place.
Do not stand the appliance on a sunny place or close to
a radiator or cooker.
If it is unavoidable because of furnishing and the
appliance has to be stood near a cooker take these
minimum distances into consideration: In case of gas
or electric cooker 3 cm must be left, when it is less
put a 0,5 - 1 cm non-flam insulation between the two
appliances.
In case of oil or coal-fired stove the distance must be 30
cms since they give off more heat.
The refrigerator is designed to operate when it is totally
pushed to the wall.
When placing the refrigerator keep minimal
distances recommended in figure.
A: placing it under a wall-cupboard
B: placing it freely
Change of door opening direction
Should the setting-up place
or handling demand it, door
opening direction can be refilled
from right-handed to left-handed.
Appliances on the market
are right-handed. Following
operations are to be done
on the basis of figures and
explanations:
Disconnect the appliance from
the electricity supply.
Tilt back the appliance
carefully. It is recommended
to ask another person for help,
who can keep the appliance at
this position safely.
Remove cover from the upper
door mask and remove upper
door shaft (Picture 1).
Take off the upper door by
pulling it slightly upwards.
Dismount the double door
holder by removing two
screws in front (Picture 2).
Take off the lower door by
pulling it slightly upwards
and remove plastic door
limiter from the bottom of the
both doors by removing the
screw. Install left door limiter,
enclosed in the bag of spare
parts, on both doors
(Picture 3).
Take off thermostate button from front of the work
plate. (Picture 4). Unstick the label from front of
the work plate. Remove the refrigerator work plate
(Picture 5).
Unscrew the upper door hinge of the refrigerator, and
then screw it back on the other side (Picture 6).
Remove the screws of the lower door hinge on
the left side and screw it back on the other side of
refrigerator (Picture 7).
Fit the lower door to the lower door hinge.
12
GB
Change the position of the
lower door mask cover
(Picture 8). Remove
opening mask from the work
plate and fix it to the other
side (Picture 9).
Install work plate back to the
refrigerator (Picture 10).
Stick label, enclosed in the
bag of spare parts, on front
of the work plate. Put the
thermostate button to front of
the work plate.(Picture 11).
Fix the double door holder
onto the left side using the
screws (2 pieces). Be careful
that the door edge is parallel
with the edge of the mantle
(Picture 12).
Fit the upper door to the
double door hinge. Fix the
upper door shaft onto the
left side using the screws
you removed previously. Be
careful that the door edge
of the refrigerator is parallel
with the edge of the top cap
(Picture 13).
Put over the handle on the opposite side and
cover up the vacant holes with the plastic nails
from the bag of spare parts. (Picture 14).
Put the appliance to its place, set it’s level with
leveling front legs, and connect it to the electricity
supply.
In case you don’t want to perform the procedures
above, call the nearest brand-mark service.
Technicians will accomplish the refilling expertly
for charge.
Electrical connection
This refrigerator is designed to operate on
230 VAC (~) 50 Hz supply.
The plug must be put into a socket with
protective contact. If there is no such, it is
recommended to get an electrician to fit an
earthed socket in compliance with standards
near the refrigerator.
This appliance complies with the following
E.E.C. Directives:
- 73/23 EEC of 19.02.73 (Low Voltage Directive) and
subsequent modifications,
- 89/336 EEC of 03.05.89 (Electromagnetic
Compatibility Directive) and subsequent
modifications.
13
GB
Storage time chart (1)
Time and method of storage of fresh foods in the refrigerator
Foods
Storage time in days
Method of packaging
1 2 3 4 5 6 7
Raw meat X X x x x Cling film, airtight
Cooked meat X X X x x x Dish covered
Roasted meat X X X x x Dish covered
Raw minced meat X Dish covered
Roasted minced meat X X x x Dish covered
Cold cuts, Vienna sausage X X x x
Cling film, cellophane,
grease-proof paper
Fresh fish X x x Cling film, airtight
Cooked fish X X x x Dish covered
Fried fish X X x x x Dish covered
Tinned fish, open X x x Dish covered
Fresh chicken X X X x x x Cling film, airtight
Fried chicken X X X x x x Dish covered
Fresh hen X X x x x Cling film, airtight
Boiled hen X X x x X Dish covered
Fresh duck, goose X X X x x x Cling film, airtight
Roasted duck, goose X X X X x x x Dish covered
Buffer unopened X X X X X X X Original packaging
Buffer opened X X x x x x x Original packaging
Milk in a plastic bag X X X x x Original packaging
Cream X X x x Plastic box
Sour cream X X X X x x x Plastic box
Cheese (hard) X X X X X X X Aluminum foil
Cheese (soft) X X X X x x x Cling film
Curds X X X X x x x Cling film
Egg X X X X X X X
Spinach, sorrel X X x x Cling film
Green peas, green beans X X X X x x x Cling film
Mushroom X X x x x Cling film
Carrot, roots X X X X X X X Cling film
Bell-pepper X X x x x Cling film
Tomato X X X X X X X Cling film
Cabbage X X X X X x x Cling film
Quickly rotting fruits (strawberry,
raspberry, etc)
X X X x x Cling film
Other fruits X X X X x x x Cling film
Tinned fruits opened X X X x x Dish covered
Cakes filled with cream X X x x Dish covered
Notation:
X usual storage time
x possible storage time ( concerns to really fresh product only)
14
GB
Storage time chart (2)
Storage time of deep-frozen and frozen products
Foods
In the fresh food
compartment +2 + 7°C
In the---- frozen food
compartment -18°C
Vegetables:
green beans ,green peas, mixed vegetables, marrow, com, etc.
1 day 12 months
Ready-cooked foods:
vegetable dish, trimmings, with meat, etc.
1 day 12 months
Ready-cooked foods:
sirioin steaks, stew from knuckle of ham, meat from pig pudding, etc.
1 day 6 months
Food from potatoes, pasta:
mashed potato ,gnocchi, dumpling, pasta filled with jam, chips
1 day 12 months
Soups:
meat-broth, soup from green beans, soup from green peas, etc.
1 day 6 months
Fruits:
sour cherry, gooseberry, fruit cream, mashed maroon
1 day 12 months
Meat:
chicken, duck, goose fillets, tuna fish
1 day
1 day
5 months
6 months
Popsicle, ice-cream 1 day 3 weeks
Warranty and service
Guarantee conditions
Service and spare parts
If calling the service is unavoidable, announce the
trouble at a brand-mark service nearest to your place.
When announcing, the appliance has to be identified
according to its data label.
The data label of the appliance is stuck to the wall of
the interior beside the vegetable box in the fresh food
compartment in the bottom on the left side.
The manufacturer reserves the right to make any
changes in the products.
All necessary data are there which are needed to the
service announcement (type, model, serial number,
etc.). Note here the data from the data label of your
appliance.
Model
Product No.
Serial No.
Date of purchase:
  • Page 1 1
  • Page 2 2
  • Page 3 3
  • Page 4 4
  • Page 5 5
  • Page 6 6
  • Page 7 7
  • Page 8 8
  • Page 9 9
  • Page 10 10
  • Page 11 11
  • Page 12 12
  • Page 13 13
  • Page 14 14
  • Page 15 15
  • Page 16 16
  • Page 17 17
  • Page 18 18
  • Page 19 19
  • Page 20 20
  • Page 21 21
  • Page 22 22
  • Page 23 23
  • Page 24 24
  • Page 25 25
  • Page 26 26
  • Page 27 27
  • Page 28 28
  • Page 29 29
  • Page 30 30
  • Page 31 31
  • Page 32 32
  • Page 33 33
  • Page 34 34
  • Page 35 35
  • Page 36 36
  • Page 37 37
  • Page 38 38
  • Page 39 39
  • Page 40 40
  • Page 41 41
  • Page 42 42
  • Page 43 43
  • Page 44 44
  • Page 45 45
  • Page 46 46
  • Page 47 47
  • Page 48 48
  • Page 49 49
  • Page 50 50
  • Page 51 51
  • Page 52 52
  • Page 53 53
  • Page 54 54
  • Page 55 55
  • Page 56 56
  • Page 57 57
  • Page 58 58
  • Page 59 59
  • Page 60 60
  • Page 61 61
  • Page 62 62
  • Page 63 63
  • Page 64 64
  • Page 65 65
  • Page 66 66
  • Page 67 67
  • Page 68 68

Zanussi ZRB323WO1 User manual

Category
Freezers
Type
User manual
This manual is also suitable for

Ask a question and I''ll find the answer in the document

Finding information in a document is now easier with AI