Power Fist 6320642 Owner's manual
- Category
- Power tools
- Type
- Owner's manual

User Manual
6320642V 3.03
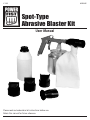
Spot-Type
Abrasive Blaster Kit
Please read and understand all instructions before use.
Retain this manual for future reference.

2
For technical questions call: 1-800-665-8685
6320642V 3.03
Spot-Type
Abrasive Blaster Kit
SPECIFICATIONS
Construction Body Aluminum
Cup Aluminum
Recycle Nozzles Pliable Rubber
Collection Bag Fabric with Elastic and Velcro Closure
Air Inlet 1/4 in. NPT
Air Consumption @ 90 PSI 6 CFM
Working Pressure 80 to 120 PSI
INTRODUCTION
The Spot-Type Abrasive Blaster gun is suitable for blasting small surface areas found in autobody work or furniture
frames. The suction force used to recover grit is determinded by the grit size and air pressure. The latter can be
regulated with the addition of a pressure regulator on the compressor.
SAFETY
IMPORTANT SAFETY PRECAUTIONS
WARNING! Read and understand all instructions before using this tool. The operator must follow basic
precautions to reduce the risk of personal injury and/or damage to the equipment.
Keep this manual for the safety warnings, precautions, operating, inspection and maintenance instructions.
WORK AREA
1. Operate in a safe work environment. Keep your work area clean and well lit.
2. Do not use in the presence of flammable gases or liquids.
3. Keep anyone not wearing the appropriate safety equipment away from the work area.
4. Minimize distractions in the work environment. Distractions can cause you to lose control of the tool.
5. Store tool properly in a safe and dry location to prevent rust or damage.
6. Always lock up tools and keep them out of the reach of children.
PERSONAL SAFETY
WARNING! Wear personal protective equipment approved by the Canadian Standards Association (CSA) or
American National Standards Institute (ANSI).
1. Head Protection
a. Always wear impact safety goggles that provide front and side protection for the eyes.
b. Wear the appropriate rated dust mask or respirator when working around metal, wood and chemical
dusts or mists.
c. Wear earplugs if the tool or work environment is noisy.

Spot-Type Abrasive Blaster Kit
3
For technical questions call: 1-800-665-8685
6320642 V 3.03
d. Wear a full-face shield if your work creates metal filings or wood chips.
e. Wear a hard hat to protect your head from falling objects.
2. Gloves
a. The gloves should provide protection based on the work materials.
b. Wear suitable gloves to reduce the effects of vibration.
3. Protective Clothing
a. Wear protective clothing designed for the work environment. Examples are electrical non-conductive
clothes or clothes treated to resist corrosive liquids or materials.
4. Foot Protection
a. Steel toe footwear or steel toe caps to prevent injury from falling objects.
b. Non-skid footwear is recommended to maintain footing and balance.
5. Control the tool, personal movement and the work environment to avoid personal injury or damage to the
tool. Stay alert, watch what you are doing and use your common sense.
a. Keep articles of clothing, jewelry, hair, etc., away from moving parts to avoid entanglement with a tool.
b. Do not operate any machine/tool when tired or under the influence of drugs, alcohol or medications.
c. Do not overreach when operating a tool. Proper footing and balance enables better control of a tool in
unexpected situations.
d. Use clamps or other practical ways to support or secure the work piece to a stable platform. Holding the
work piece by hand or against your body is not stable and may lead to loss of control and injury.
VIBRATION PRECAUTIONS
1. This tool vibrates during use. Repeated or long-term exposure to vibration may cause temporary or
permanent physical injury, particularly to the hands, arms and shoulders.
2. Anyone using vibrating tools regularly or for an extended period should first be examined by a doctor and
then have regular medical check ups to ensure medical problems are not being caused by or worsened
from tool use.
3. If you feel any medical symptoms related to vibrations (such as tingling, numbness, and white or
blue fingers), seek medical attention as soon as possible.
4. DO NOT use this tool if one of the following applies:
• Pregnant
• Impaired blood circulation to the hands
• Past hand injuries
• Nervous system disorders
• Diabetes
• Raynaud’s Disease
5. Do not smoke while operating the tool. Nicotine reduces the blood flow to the hands and fingers, increasing
the risk of vibration-related injury.
6. Wear suitable gloves to reduce the effects of vibration.
7. Use the tool with the least amount of vibration, when there is a choice between different processes.
8. Do not use for extended periods. Take frequent breaks to when using this tool.
9. Let the tool do the work. Grip the tool as lightly as possible (while still keeping safe control of it).
10. To reduce vibrations, maintain the tool as explained in this manual. If abnormal vibrations occur, stop using
this tool immediately.

Spot-Type Abrasive Blaster Kit
4
For technical questions call: 1-800-665-8685
6320642V 3.03
SPECIFIC SAFETY PRECAUTIONS
ABRASIVE BLASTING MEDIA
The blasting process emits abrasive media under pressure that breaks apart upon impact. The resulting dust is a
combination of the media and the material being removed by the abrasive. Both the media and the material being
removed may have toxic components such as lead in paint.
1. Check the abrasive media’s Material Safety Data Sheet (MSDS) for information on the health risks and
preventative measures that can be taken to minimize those risks.
2. Determine the toxicity of the material being removed and take appropriate measures.
3. Work outside or in a ventilated area whenever possible.
• Always check the local regulations for any laws regarding sandblasting outdoors.
4. Wear NIOSH approved respirators that protect both the lower face and eyes during blasting operations
whenever possible.
WARNING! Sand or silica particle dust can result in the lung disease known as silicosis, when inhaled over a
short period of time. Silicosis causes shortness of breath, cough, fever and bluish skin (cyanosis).
Seek immediate medical attention if these symptoms appear.
TOOL USE AND CARE
WARNING! Do not use the tool if the trigger or ON/OFF switch does not function properly. Any tool that cannot be
controlled with the ON/OFF switch is dangerous and must be repaired.
1. Use the correct tool for the job. Do not force the tool to do the work of a larger industrial tool. Maximize tool
performance and safety by using the tool for its intended task.
2. Do not modify this tool or use for a purpose for which it was not designed.
3. This tool/device was designed for a specific function.
Do Not:
• Modify or alter the tool; all parts and accessories are designed with built-in safety features that may be
compromised if altered.
• Use the tool in a way for which it was not designed.
4. Avoid unintentional starts. Be sure the trigger is in the neutral position and the hopper is in the OFF position
when not in use and before connecting it to any air source.
5. Do not carry the tool with fingers near or on the trigger.
6. Maintain the sandblasting gun with care (see Maintenance).
PARTS IDENTIFICATION
WARNING! Do not operate the tool if any part is missing. Replace the missing part before operating. Failure to
do so could result in a malfunction and personal injury.
Remove the parts and accessories from the packaging and inspect for damage. make sure that all items in the parts
list are included.
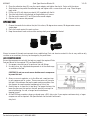
Contents:
• 1 x Abrasive blasting gun
• 1 x Aluminum cup
• 4 x Recycling nozzles
• 1 x Hose clamp
• 1 x Collection bag, fabric
• 1 x 2 lb container of abrasive grit
ASSEMBLY
When this manual refers to a part number it refers to the included Parts List.
1. Hold the gun body (#4) upside down.
2. Slip the hose clamp over the collection tube on the nozzle adapter (#8).

Spot-Type Abrasive Blaster Kit
5
For technical questions call: 1-800-665-8685
6320642 V 3.03
3. Place the collection bag (#1) over the nozzle adapter and tighten the elastiv. Fasten with the velcro.
4. Slide the hose clamp over the collection bag and tighten with a screw driver until snug. Place the gun
body aside.
5. Fill the cup (#3) with abrasive material (#2) supplied with the kit.
6. Twist the cup onto the lid attached to the gun body until secure.
7. Slip the recycle nozzle (#17 to #20) onto the nozzle adapter.
8. Connect to air source and proceed.
OPERATION
1. Choose the nozzle that matches the job: flat surface, 90 degree inner corner, 90 degree outer corner,
single edge.
2. Press the nozzle against the work surface.
3. Keep the nozzle on work surface while moving slowly over spot to be blasted.
Always be aware of the work environment when sandblasting. Dust and abrasive material in the air may settle on oily
surfaces or on machinery that may be damaged by the particulates.
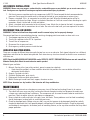
AIR COMPRESSOR
Ensure the compressor used with the tool can supply the required Cubic
Feet per Minute at the required PSI (see Specifications).
1. Use proper size and type of air pressure line and fittings.
2. Use only clean, dry, regulated compressed air at the rated range
as marked on the tool.
CAUTION! Do not use an air source besides an air compressor
to power this tool.
3. Always use an air regulator, an in-line filter and a moisture trap
in your compressed air system. These accessories will increase
the tool’s life and keeps the tool in good working condition. See
the diagram for recommended components of an air line.
4. Avoid using an air hose that is too long. The longer the hose, the
lower the pressure that reaches the tool, possibly causing it to
cease functioning. As well, a longer hose can become a
tripping hazard.
5. Air tool CFM consumption ratings are based upon a 25% duty cycle. If you require continuous duty, a larger
compressor will be required. See Specifications for the tool’s continuous
duty limit.

Spot-Type Abrasive Blaster Kit
6
For technical questions call: 1-800-665-8685
6320642V 3.03
AIR SOURCE INSTALLATION
WARNING! Never use pure oxygen, carbon dioxide, combustible gases or any bottled gas as an air source for a
tool. Such gases are capable of causing an explosion and serious injury to persons.
1. Set the air pressure regulator on the air compressor to 90 PSI. Do not exceed the tool recommended air
pressure. Excess pressure could result in damage to the tool, to your work piece or serious injury.
2. Prepare a standard 1/4 in. air connector for use with your tool. Wrap the threaded portion of the air
connector with thread seal tape. Wrap in a clockwise direction so it will not unravel when attaching to a quick
connector. Attach it to the tool air inlet and tighten.
3. Attach a standard quick connector to the air source’s hose. Attach the air hose to the tool’s air connector.
4. Check the air line and its connections for air leaks. Do not use the tool until you have repaired all air leaks.
DISCONNECTING AIR SOURCE
WARNING! Failure to follow these steps could result in severe injury, tool or property damage.
Disconnect tool from air source before cleaning, servicing, changing parts/accessories or when not in use.
1. Turn hopper regulator to the OFF position.
2. Turn the air regulator to the OFF or L position.
3. Turn off the air compressor.
4. Disconnect the air pressure hose.
5. Discharge any residual pressure inside the tool.
ABRASIVE BLASTING MEDIA
There are a number of different abrasive media the tool can use as an abrasive. Each type of abrasive has a different
application and effect on the object being blasted. Each abrasive may also have hazards or health issues associated
with their use.
NOTE: Read the ABRASIVE BLASTING MEDIA under SPECIFIC SAFETY PRECAUTIONS before use and consult the
Material Safety Data Sheet for each abrasive media product.
Material types available:
1. Mineral: Sand or silica (see safety section), garnet, magnesium sulphate.
• Sand should be avoided, as there are other abrasives that perform the same or better without the
detrimental health effects.
2. Organic: Crushed nut shells.
3. Synthetic: Baking soda, grain starch.
4. Engineered: Aluminum oxide, glass beads.
5. Metal: Shot or grit made from steel, copper, aluminum or zinc.
NOTE: Store abrasive in a dry location. Wet abrasive will clog sandblasters.
MAINTENANCE
Before making any adjustments or changing any accessory, turn off the tool and unplug it from its air source.
1. The nozzle will wear away over time, causing the internal diameter to widen and disperse the media over
a larger area, reducing the tool’s efficiency. The compressor will also need to work harder to maintain the
pressure. Check at regular intervals and replace as appropriate.
2. Always check for cracks and leaks in the gun, hose, and tanks. These problems must be fixed immediately
due to the dangers involved with air under high pressures.
3. Check for damaged parts. Before using any tool, any part that appears to be damaged should be carefully
checked to determine that it will operate properly and perform its intended functions. Check for alignment
and binding of moving parts, for broken parts or mounting fixtures, or for any other condition that may affect
proper operation.

Spot-Type Abrasive Blaster Kit
7
For technical questions call: 1-800-665-8685
6320642 V 3.03
4. Use only identical replacement parts or accessories intended for use with this tool when servicing. Replace
damaged parts immediately.
5. Keep the tool clean. Wipe the tool with a clean cloth and periodically blow out all areas with compressed air.
If compressed air is not available, use a brush to remove dust from all areas. Do not use harsh chemicals or
solvents to clean the tool. These chemicals could seriously damage the housing.
6. Regularly inspect all mountings and screws to ensure tightness. Should any screws become loose,
tighten immediately.
7. If repairs are required, bring your tool to Princess Auto Ltd.
LUBRICATION
NOTICE! Never use a penetrating oil to lubricate an air tool. Penetrating oil may act as a solvent that will break
down the grease and cause the tool to seize up.
Only use air tool oil to lubricate the tool. Other lubricants may not be suitable and could damage the tool or cause a
malfunction during use.
1. All air tools are packed in grease to prevent corrosion of internal parts during shipping and storage. To
clean this out, add a generous amount of air tool oil in the air inlet, and then run the tool under no load until
exhaust is clear.
2. The abrasive gun is different from most air tools in that it does not require typical lubrication. Air tool oil
introduced in the gun could mix with the abrasive, clog the gun and damage the tool. Do not use this tool on
an airline, which contains an automatic in-line lubricator.
3. After cleaning the gun, add a few drops of oil to the back of the air stem to lubricate the rear bushing though
the slot that holds the trigger stop in place. Then, turn the gun upside down, pull back the trigger and aapply
some oil to the front part of the air stem to lubricate the front bushing.
NOTICE! It is very important to properly clean the gun after lubricating it, as excess oil can cause clogging or
create poor quality work during the next use.
DISPOSING OF TOOL
If your tool has become damaged beyond repair, do not throw it out. Take it to the appropriate recycling facility.
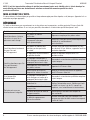
TROUBLE SHOOTING
Contact Princess Auto Ltd. for a solution if the tool does not function properly or parts are missing. If unable to do
so, have a qualified technician service the tool.
Problems Possible Causes Suggested Solutions
Tool runs at normal speed but
loses power under load.
Motor parts worn. Repair by replacing worn parts.
Tool runs slowly. Air flows
slightly from exhaust.
Motor parts jammed with
dirt particles.
Check air inlet filter for blockage. If this fails,
bring to Princess Auto.
Power Regulator is in the
closed position.
Set Power Regulator to open position.
Tools will not run. Air flows
freely from exhaust.
O-rings throttle valve dislodged
from seat inlet valve.
Have a qualified technician replace the O-ring.
Damage to, or excessive
wearing of internal parts.
Bring to Princess Auto.
Material build-up impeding
motor vanes.
Clean internal mechanism or bring to Princess
Auto Ltd.

Spot-Type Abrasive Blaster Kit
8
For technical questions call: 1-800-665-8685
6320642V 3.03
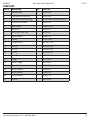
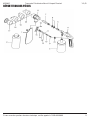
PARTS BREAKDOWN
Problems Possible Causes Suggested Solutions
Tool will not shut off.
O-rings throttle valve dislodged
from seat inlet valve.
Have a qualified technician replace the O-ring.
Loss of power
or erratic performance.
Excessive drain on the air line.
Check the air supply. Ensure tool is connected
to the correct I.D. or larger air hose with no
kinks or restrictions.
Moisture or restriction in the air
hose.
Incorrect size or type of
hose connectors.
Check that the fittings are properly fitted and
connected.
Air compressor has insufficient
flow.
Ensure tool is connected to a compressor that
matches the rated flow of the tool.

Spot-Type Abrasive Blaster Kit
9
For technical questions call: 1-800-665-8685
6320642 V 3.03
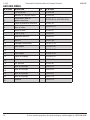
PARTS LIST
PART # DESCRIPTION QTY. PARTS NO.
1 Collection Bag 1 BTS202.MF
2 1 kg Bottle with Abrasive 1 BTS204.AS
3 Cup Cover & Aluminum Cup 1 BTS203-B1.AL & BTS203-B2.AL
4 Aluminum Gun Body 1 BTS301.AL
5 Brass Nozzle 1 ASB304-2.CU
6 Metal Nut 2 BTS302.FE
7 Sand Inject Steel Tube 1 BTS309.FE
8 Nozzle Adapter 1 ASB305.PS
9 Spring 1 BTS307.MC
10 Throttle Valve 1 DGT307-1.CU
11 O-ring 1 BTS305-4.RB
12 O-ring 1 BTS305-7.RB
13 O-ring 1 BTS305-3.RB
14 Valve Body 1 BTS305-2.CU
15 Trigger 1 BTS308.FE
16 Screw, Trigger 1 BTS304.AL
17 Recycle Nozzle 1 ASB204.PS
18 Recycle Nozzle 1 ASB206.PS
19 Recycle Nozzle 1 ASB205.PS
20 Recycle Nozzle 1 ASB207.PS
21 Washer 1 DG4303.PS
Page is loading ...
Page is loading ...
Page is loading ...
Page is loading ...
Page is loading ...
Page is loading ...
Page is loading ...
Page is loading ...
Page is loading ...
Page is loading ...
Page is loading ...
-
 1
1
-
 2
2
-
 3
3
-
 4
4
-
 5
5
-
 6
6
-
 7
7
-
 8
8
-
 9
9
-
 10
10
-
 11
11
-
 12
12
-
 13
13
-
 14
14
-
 15
15
-
 16
16
-
 17
17
-
 18
18
-
 19
19
-
 20
20


Power Fist 6320642 Owner's manual
- Category
- Power tools
- Type
- Owner's manual
Ask a question and I''ll find the answer in the document
Finding information in a document is now easier with AI
in other languages
Related papers
-
Power Fist 3406063 Owner's manual
-
-
-
-
-
-
-
-
-